Power Apps PDF Function: Create, View & Download PDFs

The new Power Apps PDF Function can generate a PDF document from any screen or control. It makes the task of creating PDFs very simple and only requires a standard license. Once the PDF is generated we can then view a PDF and download a PDF from directly inside of the app itself. In this article I will show you how to use the Power Apps PDF Function.
Introduction: The Work Orders App
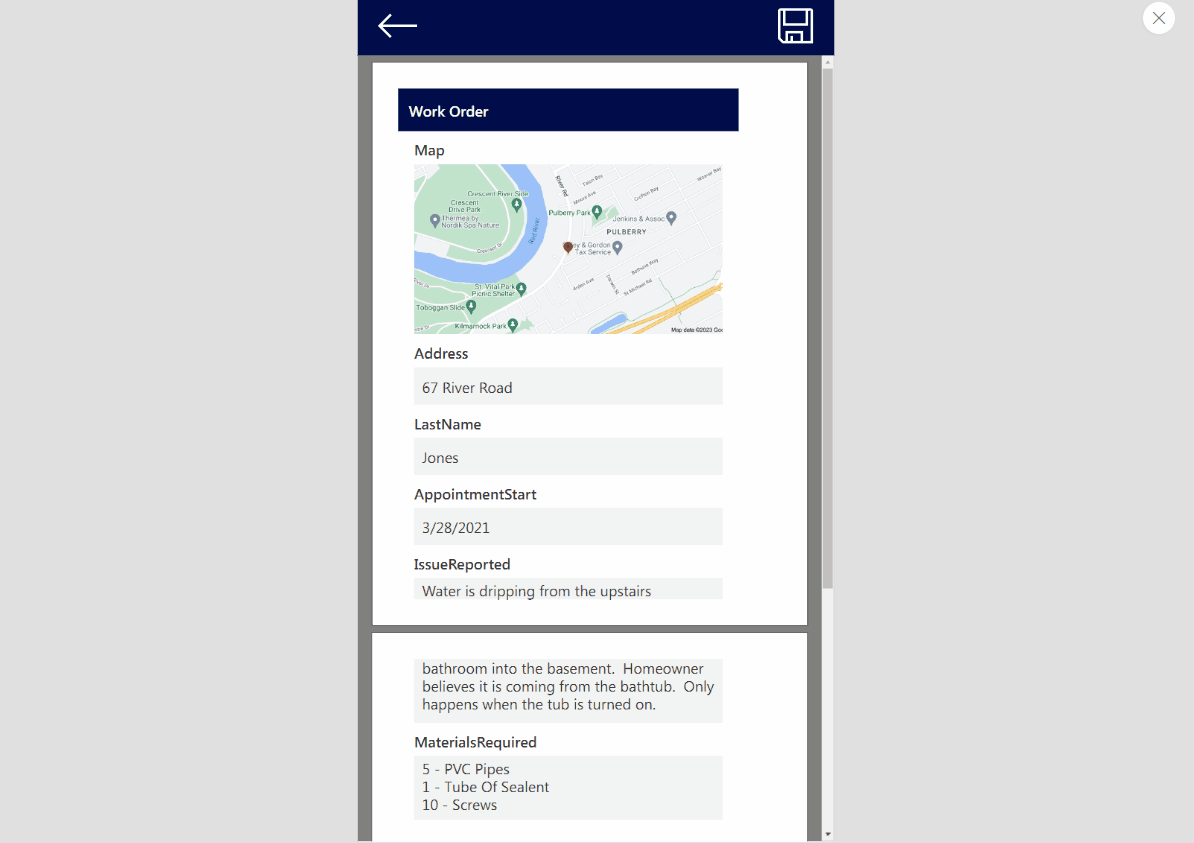
The work orders app is used by employees at a plumbing services company to track job details. An employee can view a PDF of the Work Order form on their device and download a copy of the PDF.
Setup The SharePoint List
Create a new SharePoint list named Work Orders with the following columns:
- Map (image)
- Address (single line text)
- LastName (single line text)
- AppointmentStart (date only)
- IssueReported (single line text)
- MaterialsRequired (single line text)
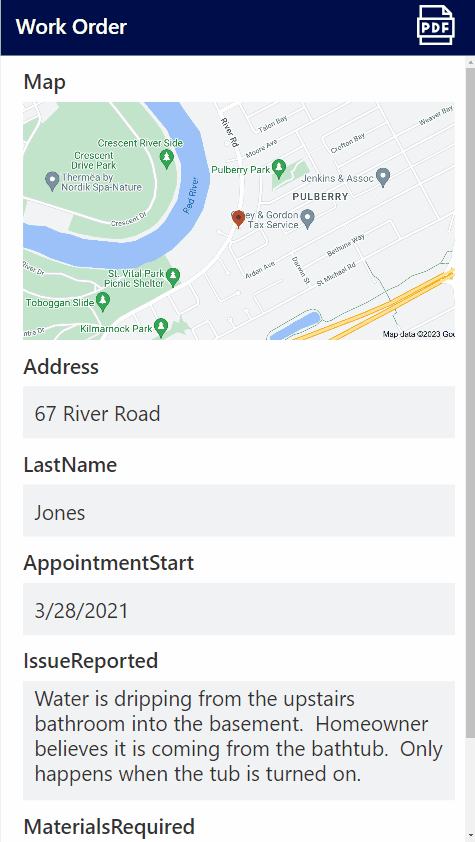
Add a new row to the SharePoint list with this data. We will display it on the Work Order PDF.
| Column | Value |
| Map |  |
| Address | 67 River Road |
| LastName | Jones |
| AppointmentDate | 3/28/2021 |
| IssueReported | Water is dripping from the upstairs bathroom into the basement. Homeowner believes it is coming from the bathtub. Only happens when the tub is turned on. |
| MaterialsRequired | 5 – PVC Pipes 1 – Tube Of Sealent 10 – Screws |
Insert A Vertical Container
A PDF cannot be generated for a Power Apps Edit Form so we must use a workaround. We can place an Edit Form inside of a container and create a PDF of container’s contents instead. Open Power Apps Studio and create a new app from blank. Insert a vertical container onto the screen.
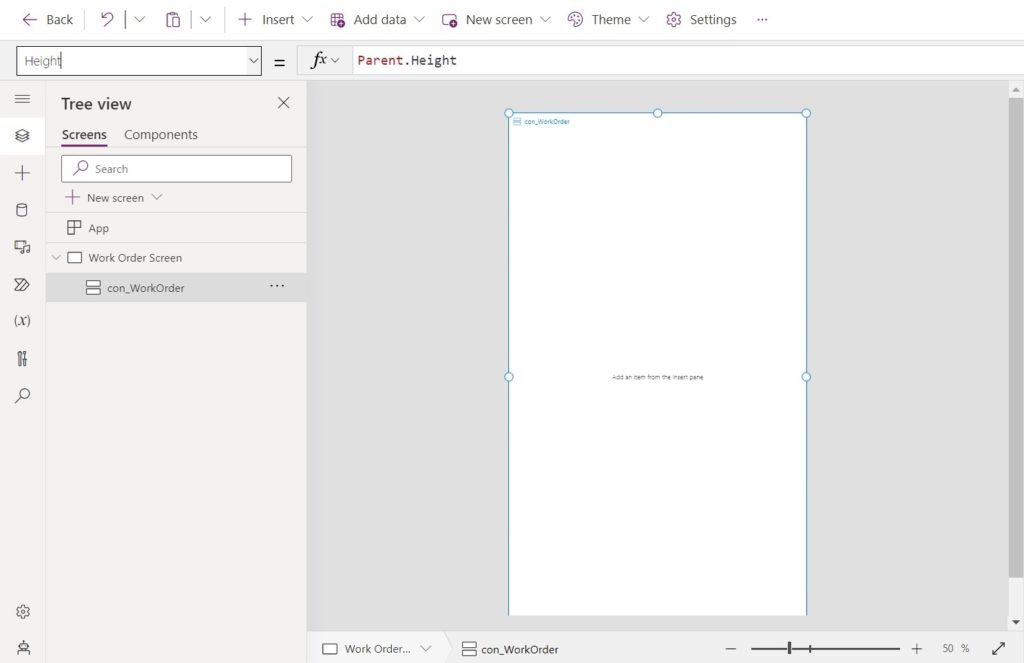
Make the vertical container fill the screen by giving the following properties these values.
Height: App.Height
Width: App.Width
X: 0
Y: 0Code language: HTTP (http)
Set the LayoutAlignItems property to this value to make them fill the width of the container.
LayoutAlignItems.StretchCode language: CSS (css)
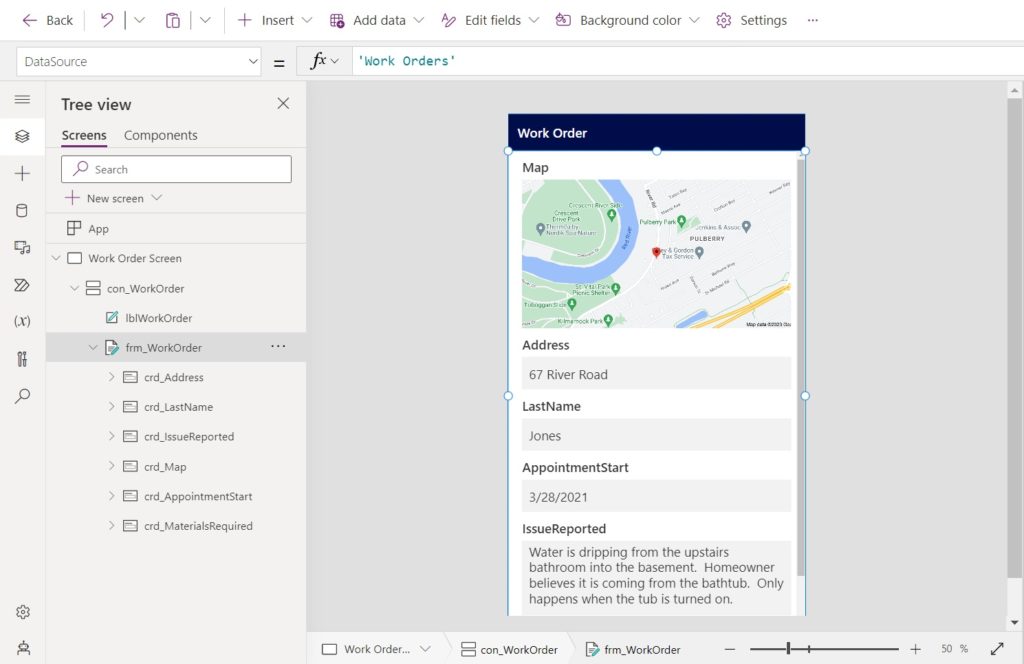
Add a label to the container to use as a title bar. Give it the text “Work Order” and apply a dark blue fill.

Add A Power Apps Form To The Vertical Container
Next we will create a Power Apps Edit Form to display Work Order information. Open the Data tab from the left navigation menu and add the Work Orders SharePoint list as a data source.

Insert a Power Apps Edit form into the vertical container. Select the Work Orders SharePoint list as the data source.
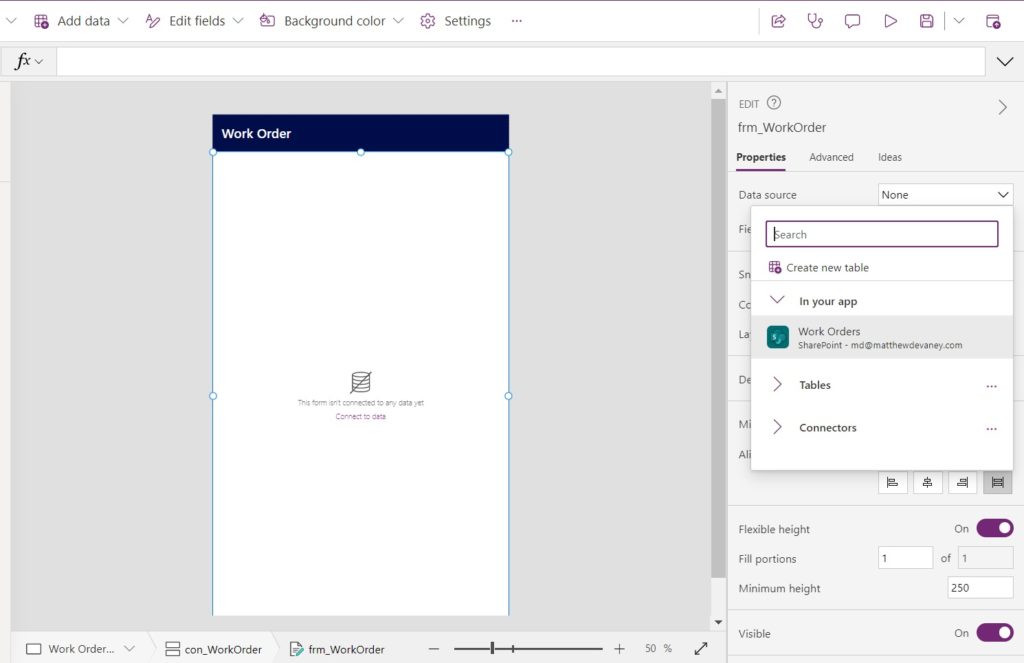
Update the Edit Form to use a vertical layout with only 1 column.
Use this code in the Item property of the form to display the first record in the SharePoint list. In this tutorial the user will not have an ability to select another record.
LookUp('Work Orders', ID=1)Code language: JavaScript (javascript)
Change the DisplayMode property of the the Edit Form to View.
DisplayMode.ViewCode language: CSS (css)
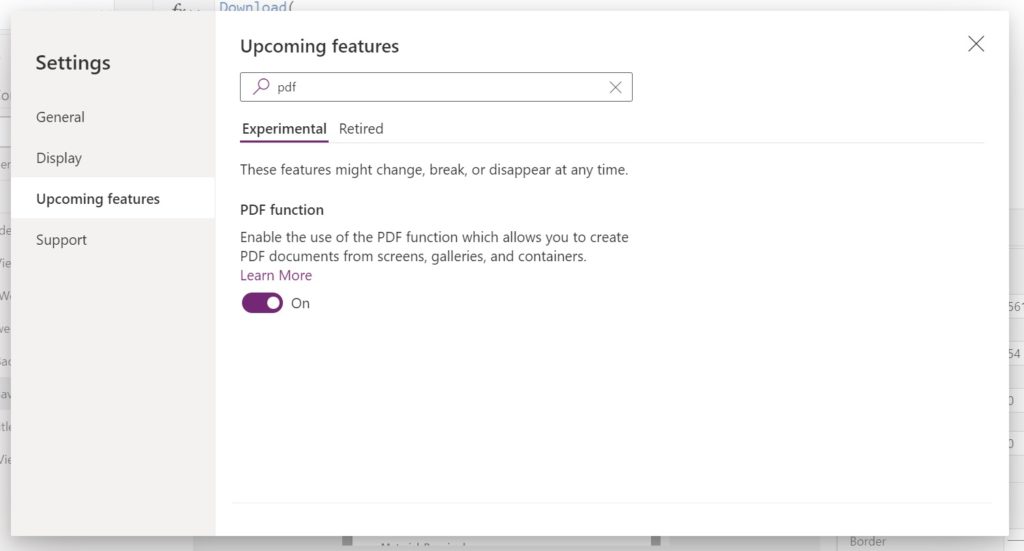
Enable The Power Apps PDF Function Experimental Feature
The Power Apps PDF Function is an experimental feature and is not enabled by default. To use it, go to the Settings menu, select upcoming features, then toggle on the PDF Function setting.
Generate A PDF Of The Power Apps Form
When the user clicks on a PDF icon it generates the PDF and navigates to a screen with PDF viewer. Add a PDF icon to the app’s titlebar.
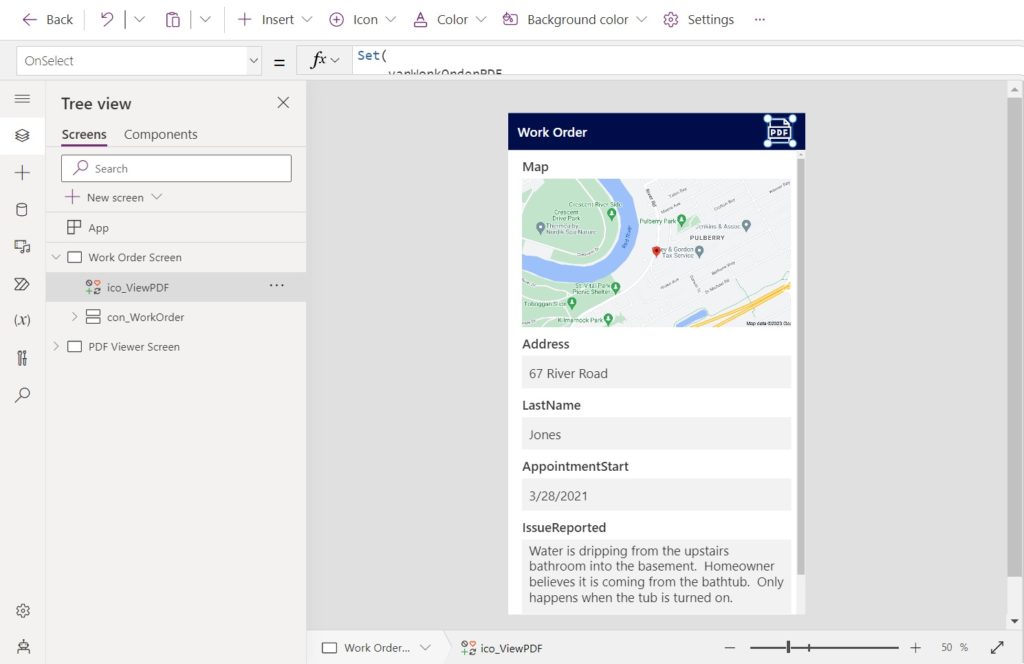
Then write this code in the icon’s OnSelect property.
The first argument to the Power Apps PDF Function tells it which screen or control to generate a PDF from. The second argument can be used to pass in optional values to control the PDF’s size, orientation, margins & DPI. Here we will use the ExpandContainers parameter to ensure the container expands to show any hidden or off-screen controls.
Set(
    varWorkOrderPDF,
    PDF(
        con_WorkOrder,
        {ExpandContainers: true}
    )
);
Navigate('PDF Viewer Screen');Code language: JavaScript (javascript)
View The PDF In Power Apps
We need to make another screen to display the PDF. Create a new screen named PDF Viewer Screen. Add a dark blue label for a titlebar and insert a left arrow icon in the top-left corner.
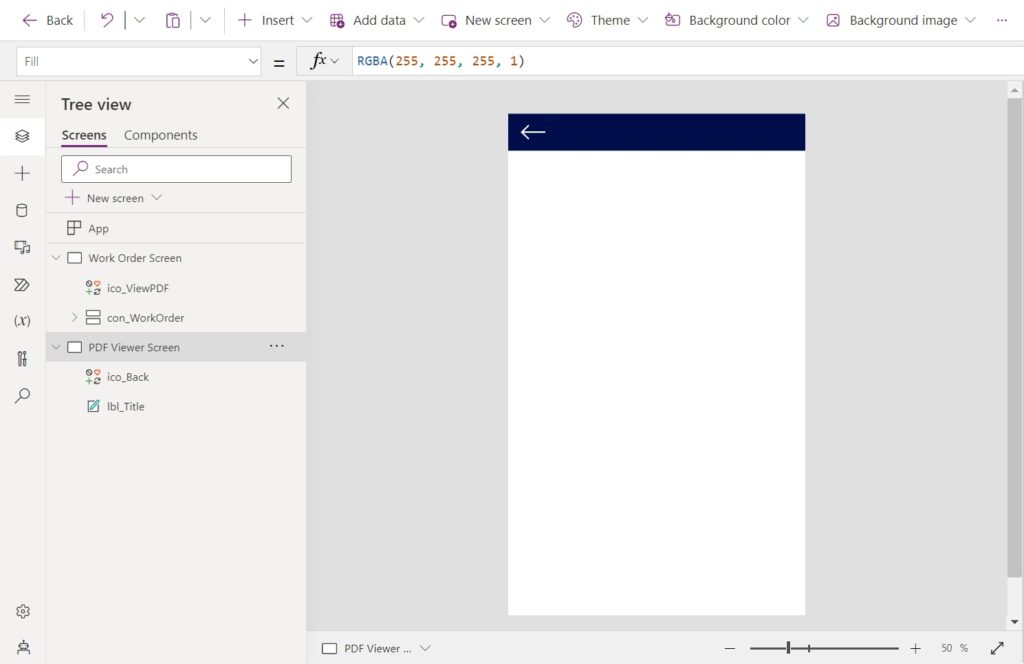
Use this code in the OnSelect property of the left arrow icon to navigate back to the previous screen.
Set(varWorkOrderPDF,Blank());
Navigate('Work Order Screen');Code language: JavaScript (javascript)
Add the PDF Viewer control the screen. Position the PDF Viewer control so it fills the remaining space on the screen.

Use this code in the document property of the PDF. The PDF document will now display in the PDF viewer.
varWorkOrderPDF
Test the feature we built to generate and view a PDF from Power Apps. It should look like this.

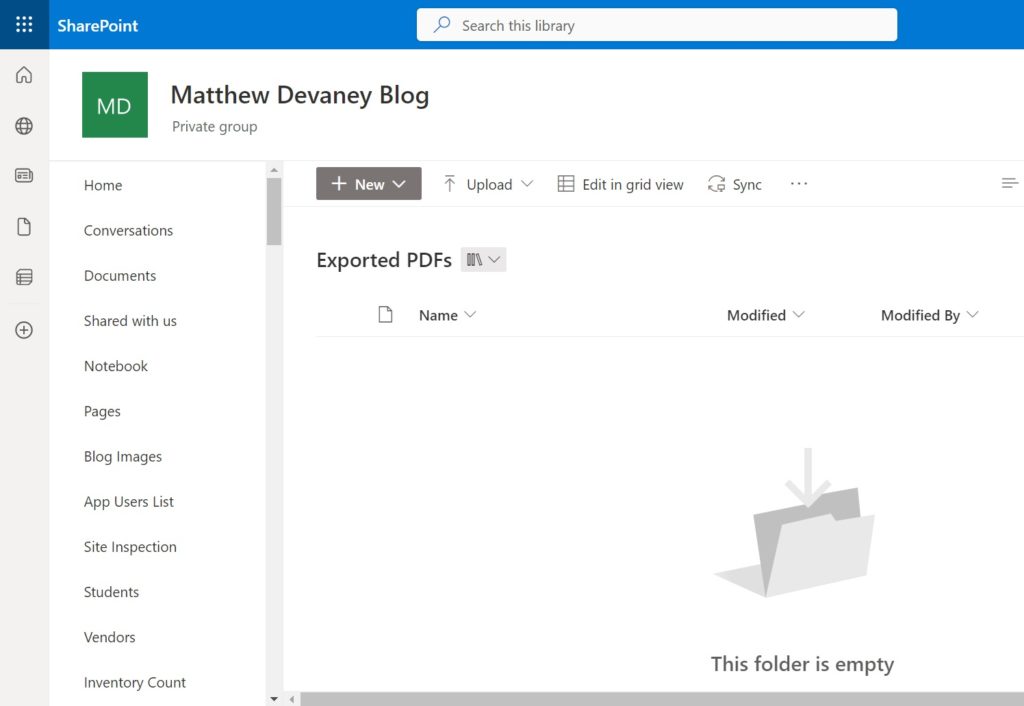
Create A SharePoint Document Library To Store PDF Files
We want to create the ability to download the PDF file directly from Power Apps. To do this, we need a place to temporarily store the PDF file. Make a new SharePoint Document library named Exported PDFs. No additional setup is required beyond creating the document library.
Build A Flow To Download PDF Files From A SharePoint Document Library
To download the PDF file we must make a flow to store the PDF file in SharePoint and then return a file download link to the app. Open Power Automate, create a new flow named Download PDF From Power Apps and setup the flow as show in the image below. Set the PDF File input parameter to required.
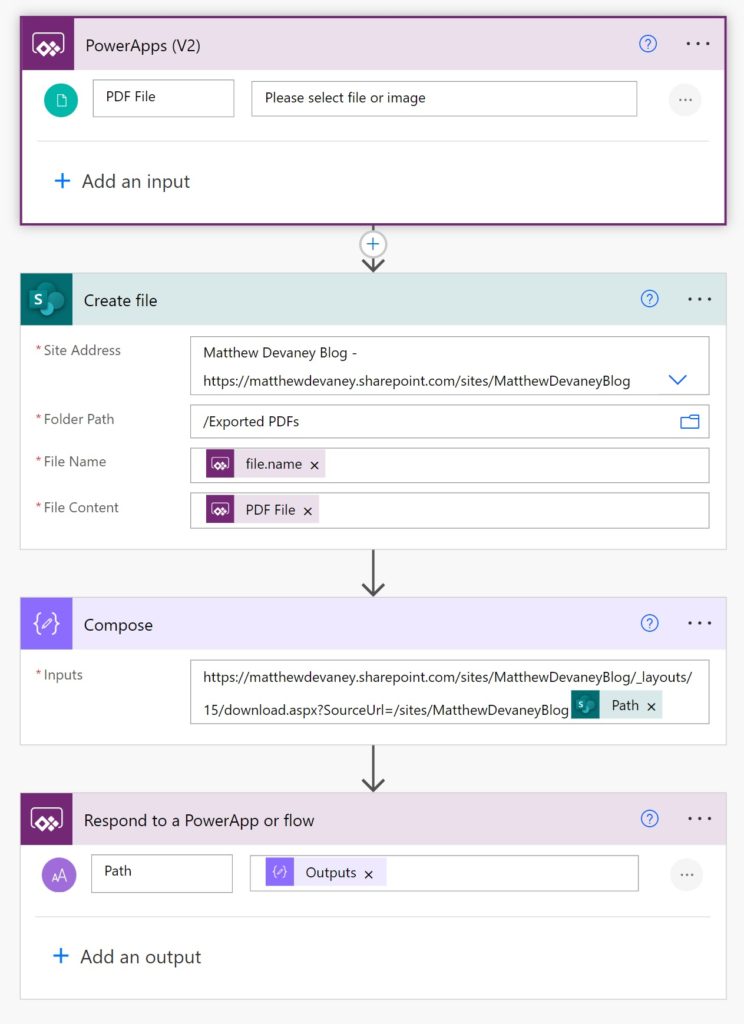
Use this code in the File Name property of the SharePoint – Create File action.
triggerBody()?['file']?['name']Code language: CSS (css)
A link to the PDF file in SharePoint opens it in the SharePoint document viewer. However, we want to perform a direct download of the PDF file instead. We can use this special URL to bypass the SharePoint document viewer and download the file. Fill in any tags <> with your own values.
https://<tenantname>.sharepoint.com/sites/<site collection title>/_layouts/15/download.aspx?SourceUrl=/sites/<site collection title>/<file path with the library name>Code language: HTML, XML (xml)
My completed URL looks like this.
https://matthewdevaney.sharepoint.com/sites/MatthewDevaneyBlog/_layouts/15/download.aspx?SourceUrl=/sites/MatthewDevaneyBlog/Exported PDFs/WorkOrder_20230423081046.pdfCode language: JavaScript (javascript)
Download The PDF Directly From Power Apps
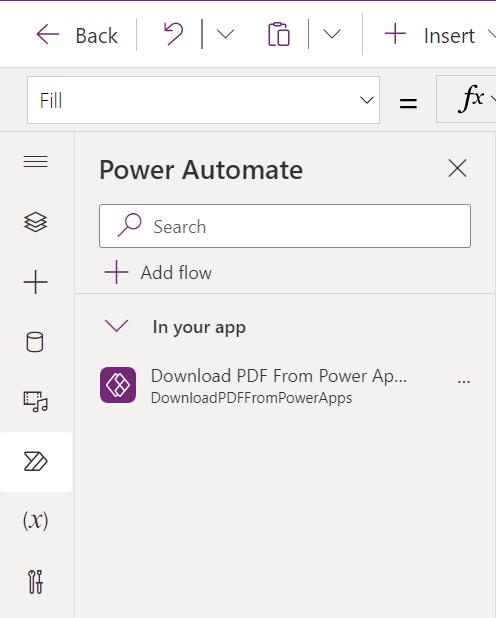
Now that the Power Automate flow is completed go back to Power Apps Studio and add the Download PDF From Power Apps flow to the app.
Insert a save button icon in the top left corner of the PDF Viewer Screen.

Then add this code to the OnSelect property of the save icon. The Download function downloads a file from the internet to the user’s device. We get the file’s web address returned in the path property of the Download PDF From Power Apps flow.
Download(
    DownloadPDFFromPowerApps.Run(
        {
            name: $"WorkOrder_{Text(
                Now(),
                "yyyymmddhhmmss"
            )}.pdf",
            contentBytes: varWorkOrderPDF
        }
    ).path
);Code language: PHP (php)
Test the completed download PDF from Power Apps feature. It should work like this:
Did You Enjoy This Article? 😺
Subscribe to get new Copilot Studio articles sent to your inbox each week for FREE
Questions?
If you have any questions or feedback about Power Apps PDF Function: Create, View & Download PDFs please leave a message in the comments section below. You can post using your email address and are not required to create an account to join the discussion.


I was going through your first PDF video last week and now you have an additional part that I was looking for.
Great stuff l, as always.
👍👍
Andre,
I’m glad I released the article this week then. I had it queued for 3 weeks from now but I thought you might like it more than the other articles.
You can create a multi-page PDF this way?!? You are blowing my mind right now! This is a game changer for me – I have been doing these annoying workarounds using Word templates, and trying to craft HTML for projects that require a “parent-child” relationship, so we don’t have to pay for the premium connector. If this really works to print multiple pages I am going to be so happy and owe you a coffee or a tea or a beer or something!!!
Nic,
Yes, it will work for multiple pages. I’ve found it’s good enough for most internal company use cases. The only limitation I’ve had so far is it can’t handle flexible height galleries very well. Normal galleries are fine 🙂
Question! So for multiple screen I have to create a PDF or can I wrap all together in just one?
What would be the formula for the PDF with multiple pages? Thank you!
thats the {ExpandContainers: true} part
Hi, Matthew Devaney!
How the power app pos application communicate with external peripherals like cash drawer/Line display?
Kindly advise me on this!
Ram,
This article has nothing to do with point of sales systems. Please read the article and ask an on-topic question. Off-topic questions will be deleted.
I understood, but if you have any inputs kindly share them!
Good morning, I’m excited about using this, but I am getting this message:
Unable to process template language expressions in action ‘Create_file’ inputs at line ‘0’ and column ‘0’: ‘The template language expression ‘triggerBody()[‘file’][‘name’]’ cannot be evaluated because property ‘file’ cannot be selected. Please see https://aka.ms/logicexpressions for usage details.’.
Any ideas of what I am doing wrong?
Eileen,
Make sure you have set the flow’s file parameter to required and then it will work.
I had the same issue, so I changed File Name to triggerBody()?[‘file’]?[‘name’] and File Content: triggerBody()?[‘file’]?[‘contentBytes’]; the flow ran successfully. Hope this helps.
Where or how do you set the flow’s file parameters to required?
As a mention Matthew, and additional, delete the trigger and added again, it works 😎
Download(
DownloadPDFFromPowerApps.Run(
{
name: $”WorkOrder_{Text(
Now(),
“yyyymmddhhmmss”
)}.pdf”,
contentBytes: varWorkOrderPDF
}
).path
);
Can u please explain me about this formula.
i try it but getting a error a value format in text???
Anish,
Screenshot please. Show the error message in the screenshot and the red underlined text.
I got an error in’.path’. When I hover on that, it says “invalid use of ‘.'”
Nat,
I believe error is appearing for one of two reasons:
1. You have not added a respond to Power Apps action in your flow named ‘path’
2. The flow has not been refreshed in Power Appps
I have an issue with Arabic Language not being recognized while using PDF function. It is blank instead of the wording added by the users.
Hi, Matthew !
Thanks for sharing. I learned a lot !
Ciro,
You’re very welcome 🙂
triggerbody()[‘file’][‘name’].
written this expression in the create file column. But flow is getting failed.
What is the solution?
Narenda,
Your question is the same as Eileen’s above. Make sure you have set the flow’s file parameter to required and then it will work.
Matthew,
Do we need to create on PowerApps (V2) a NAME or can you explain bit more please? as this is not failing also when you say make it required what do you mean by that?
triggerBody()[‘file’][‘name’]Access denied.
Base,
Are you having trouble with the error message “Access Denied”? Please show a screenshot.
I am actually building this out right now and would like to give my PDF file a name that is based on a variable I am storing in the app, instead of using “WorkOrder_” and then the current date/time. I am unsure of how to write the formula with this change.
In addition to the PDF File being passed as a parameter from the workflow, I also created a text parameter called “PlanNumber”. Here’s what I have so far:
Download(‘MyWorkflowName’.Run(varPlanNumber, {name:
Any guidance you can provide would be greatly appreciated!
Never mind – I figured it out after reviewing your post on $-strings to concatenate strings again to remind myself of how that works! Here was the formula that I used to get the file name to use the Plan Number of my record:
Download(
‘MyWorkflowName’.Run(
{
name: $”{varRecord.’Plan Number’}.pdf”,
contentBytes: varWorkOrderPDF
}
).path
)
I managed to name the file of the PDF using a variable of the record to save the name dynamically.
I enjoy doing this very much, the PDF part work like a charm but the save button part is giving me error, IDK what I’m doing wrong
Hello Matt! I appreciate this example, I was looking for something like this, but in the download still have problems, don’t know what to do 🙁
Linda,
What problem are you having with the download. Please share your error message.
Hi Matthew!
Thank you for this informative and helpful PDF guide! I’m running into an error when selecting the save icon to run the Download function:
DownloadPDFFromPowerApps.Run failed: { “error”: { “code”: “TriggerInputSchemaMismatch”, “message”: “The input body for trigger ‘manual’ of type ‘Request’ did not match its schema definition. The input body is missing required schema properties. “}}
The parts of my OnSelect property that are underlined in red I have put in bold below
Download(
DownloadPDFFromPowerApps.Run(
{
name: $”Videogame_{Text(
Now(),
“yyyymmddhhmmss”
)}.pdf”,
contentBytes: varVideogamePDF
}
).path
);
Any input on this would be greatly appreciated!
Hi, I had the same error, problem was the missing file property in my case
Download(
DownloadPDFFromPowerApps.Run(
{
file: {
name: $”Test_{Text(Now(), “yyyymmddhhmmss”)}.pdf”,
contentBytes: varPdf
}
}
).path
);
Steven/Mustafa,
The reason you must type “file” in your parameters is you did not set the Power Automate input field to “required.” If you did set it to required, the word “file” is not necessary.
can you tell me how to set the Power Automate input field to “required.” ? I had the same issue
Thank you for this article. Super helpful. All was working fine yesterday but today it stopped showing the full container of the data and only provides one page. I made sure to include {ExpandContainers:true} but it still cuts the rest of the document off. There should be at least 2-3 more pages. Any help you can provide would be much appreciated. Thank you!
Shenal,
A colleague of mine notified Microsoft on this one. It’s a bug. Hoping to see a resolution soon.
Hi Matthew, is possible share the PDF created in the device?
Miguel,
Share? What do you mean by that. I’ve shown how to download it in the tutorial. Is that what you mean?
Great tutorial I have used it to create a pdf report of an incident record and save it to the SharePoint document folder. Is it possible yet to be able do page formatting as my reports can be up to 6 pages long depending on the incident and how many details there are. What I am looking to do is a page header and footer details to show same details on each page and page 1 of 5 etc.
Derek,
The PDF function does not support headers or footers. You’ll need to use a premium connector to accomplish this like MS Word or Plumsail.
Hi, Thanks for this post. I created a canvas app that use PDF function to copy a screen that is 3 pages long, with expandcontainers option. It works perfect when is run from the https://make.powerapps.com/ environment, but fails to generate the 3 pages PDF when is run from the web link https://apps.powerapps.com/play/e/default… It only copies the first viewable page of the screen, creating a 1 page PDF. Any explanation?
Elly,
Unfortunately, it is a bug. Microsoft has been notified and they are working on a fix.
Hi Matthew,
I imagined it was a bug, since the PDF function is an experimental feature.
Thanks for sharing your expertise with the developers community.
I continued testing and could resolve the problem. In return, I will share my experience:
The way the original screen (with the problem) was designed, used the Scrollable Screen with the Fluid Grid control, and the 3 pages content was added in multiple data cards inside this control. The application logic would create the PDF from the screen, with the ExpandContainers option. It worked perfect when was run from the https://make.powerapps.com/ environment,
but failed to generate the 3 pages PDF when was run from the web link https://apps.powerapps.com/play/e/default…
It only copied the first viewable page of the screen, creating a 1 page PDF.
I read your post https://www.matthewdevaney.com/easy-power-apps-scrollable-screen-using-a-vertical-container/, so I tried to use the vertical container with text label controls, but the position of these controls was not flexible. For my use case, I needed the controls to be positioned like in a data card.
I read other references about using containers inside vertical containers.
That gave me the idea of placing the Fluid Grid with Data Cards inside the Vertical Container, then create the PDF from the Vertical Container with the ExpandContainers option.
Then voila! It works the same on both the development environment and the published version.
Ps: I take care of 10 cats!
Elly,
You take care of 10 cats? Wow, amazing. You are awesome! 🐱🐱🐱🐱🐱 🐱🐱🐱🐱🐱
Hi Matthew, great guide. However, I get an error at the point “Create file”: Unable to process template language expressions in action ‘Datei_erstellen’ inputs at line ‘0’ and column ‘0’: ‘The template language expression ‘triggerBody()[‘file’][‘contentBytes’]’ cannot be evaluated because property ‘file’ doesn’t exist, available properties are ‘.
What am I doing wrong here? Do I need to replace the ‘file’ and ‘name’ fields with fixed values (in code triggerBody()?[‘ file’]? [‘name’])?
Greetings from Germany, Ansgar
Ansgar,
Can you please confirm the Power Apps V2 trigger is being used and the PDF File field in the trigger is set to required?
Hey Matthew,
I added a screenshot
You are such a killer ;D
Hi Matthew,
Thank you for the great walkthroughs!
I am having trouble with the last part.
I’ve included a screenshot of the problem.
Mark,
You are receiving this message because the flow was never added to the app. Goto the flow menu on the left side and do this. Then the issue will become resolved.
Hi Matthew,
firstly, thank you very much for posting – this is indeed a demanded business case and very happy the community has you to unleash the core Power App life hacks 🤩👍👍
Is the PDF-function is also capable of multi-tab/ multi-screen forms (like here – Power Apps Tabbed Form With An Awesome-Looking Design (matthewdevaney.com), e.g. exporting each form tab/ page as separate PDF page?
Gennady,
At this time the PDF Function is not capable of multi-screen forms. You would have to create several PDFs with this function and then use some paid service in Power Automate to join them together.
Thank you for your reply Matthew,
I’ve noticed it only today as somehow didn’t get an email notification about the reply 😅
I got some budget in the current project and will shortly test, how PDF will behave at multi tabs form (but all on the same page).
I will also post some hacks below, which could show themselves useful in terms of dynamic formulas 😊
just to demonstrate, that it can be a bit dynamic – I used the environment variables and the output from create file activity.
The formula for the download link would be e.g.
@{parameters('var SiteUrl(msft_SiteUrl)')}/_layouts/15/download.aspx?SourceUrl=@{parameters('var SiteUrl(msft_SiteUrl)')}@{outputs('Create_file')?['body/Path']}