Foolproof Power Automate HTML Table Styling

You can use Power Automate to an send email with a formatted and styled HTML table. With the help of the Create HTML Table action any set of SharePoint list items can be quickly converted into an HTML table. But that table will look pretty plain unless you apply some CSS to it. In this article I will show you my foolproof Power Automate method for HTML table styling.
Introduction: The Daily Cash Receipts Report
Salespeople at a bus manufacturing company receives a daily cash receipts report from the accounting team. The email contains a formatted HTML table showing when payment was received, which customer paid and the amount.

Setup The SharePoint List
Create a new SharePoint list named Cash Receipts with the following columns:
- Customer Name (text)
- Received Date (date only)
- Amount (number)
Populate the SharePoint list with the following data:
| Customer Name | Received Date | Amount |
| Burton Bus Lines | 1/12/2024 | 462000 |
| Texas Tours, LLC | 1/12/2024 | 2161000 |
| Coach America | 1/12/2024 | 2851000 |
| State Of New York | 1/12/2024 | 955000 |
| Polk County | 1/12/2024 | 513000 |
| Jefferson Bus Lines | 1/12/2024 | 1456000 |
| California Coach | 1/12/2024 | 525000 |
| Las Vegas Touring Company | 1/12/2024 | 2914000 |
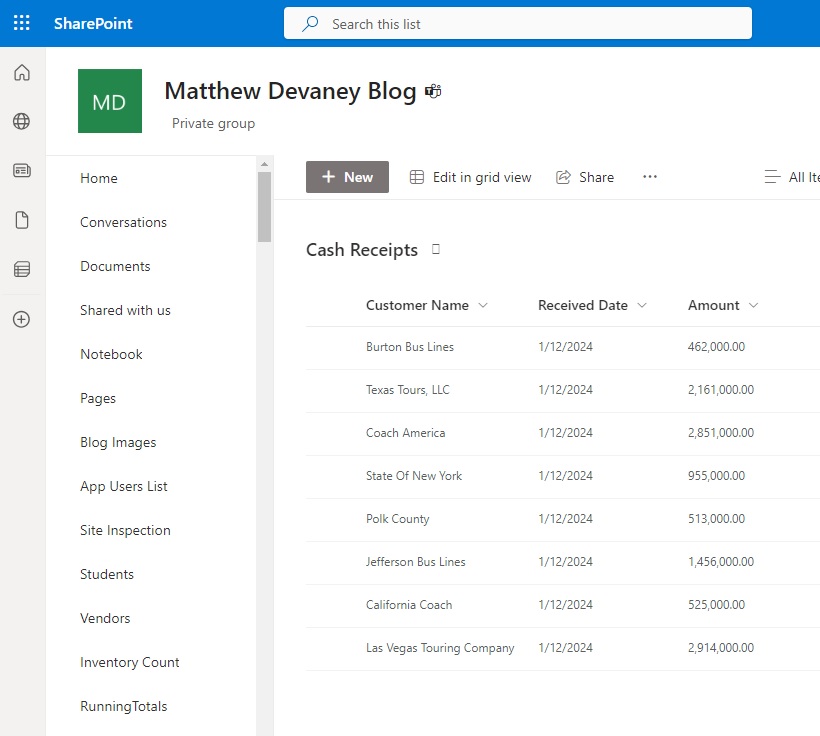
After setting up the SharePoint list it will look like this.
Create An HTML Table From SharePoint List Items
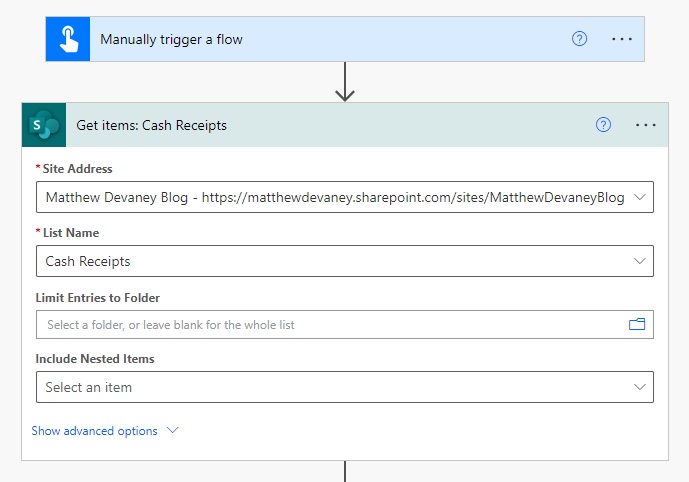
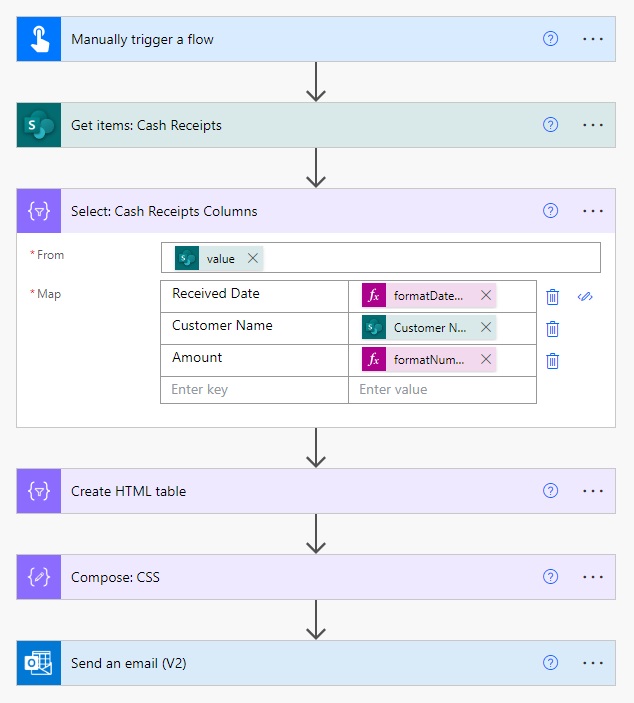
We want to get all of the items in the Cash Receipts SharePoint list and convert them into an HTML table. Open Power Automate and create a new flow with an instant trigger. Then add the SharePoint – Get Items action and select the Cash Receipts list.
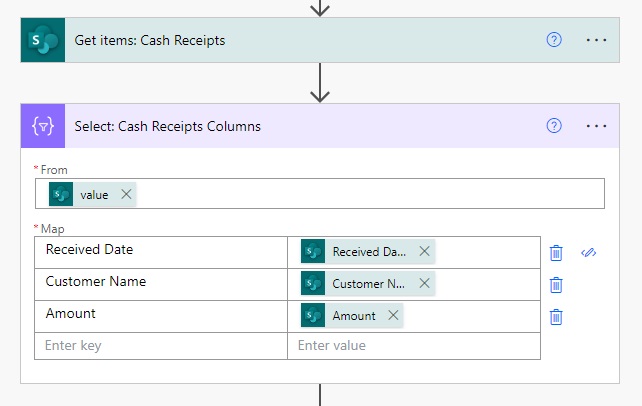
The SharePoint list includes many columns that we do not want to appear in the email. We only want to show the Received Date, Customer Name and Amount. To show only the desired columns insert the Data Operations – Select action and configure it as shown below.
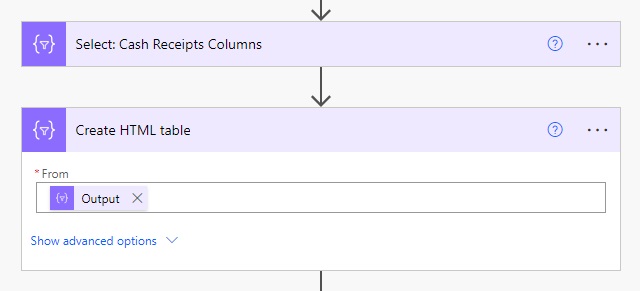
Then add a Data Operations – Create HTML table and use the output of the Select action in the from field. The flow now result in a plain HTML table with no styling applied.
Design And Apply An HTML Table Style
To create the HTML table style we will use the DivTable Table Styler online tool. Scroll down to the style editor and select the NO STYLE theme. Then setup the HTML table style exactly as shown below.

Below the Style Editor there is a WYSIWYG preview that shows a preview of what the table will look like. After the desired style has been achieved copy the copy in the CSS textbox to the clipboard.
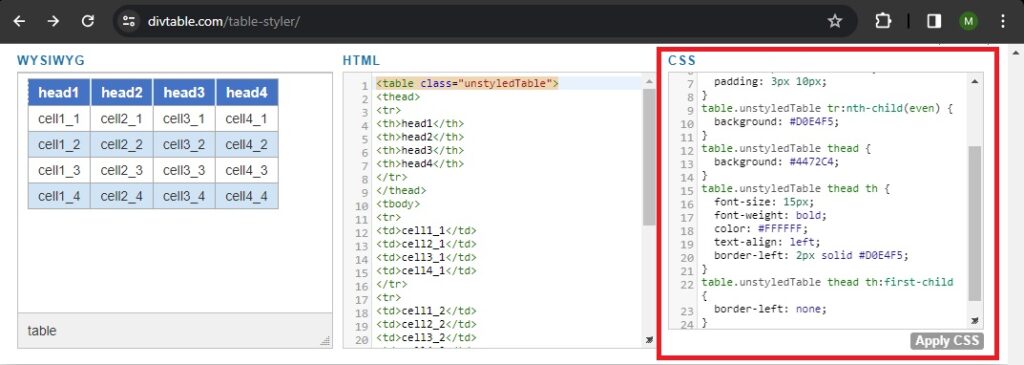
Paste the code into Windows Notepad and remove the “.unstyledTable” CSS class from it entirely. Then add style tags to the start and end of the code.
<style>
	table {
          border-collapse: collapse;
	}
        table td, table th {
          border: 1px solid #AAAAAA;
          padding: 3px 10px;
        }
       table tr:nth-child(even) {
          background: #D9E1F2;
	}
	table thead {
	  background: #4472C4;
	}
	table thead th {
	  font-size: 15px;
          font-weight: bold;
          color: #FFFFFF;
          text-align: left;
	}
	table tfoot {
 	 font-weight: bold;
	}
</style>Code language: HTML, XML (xml)
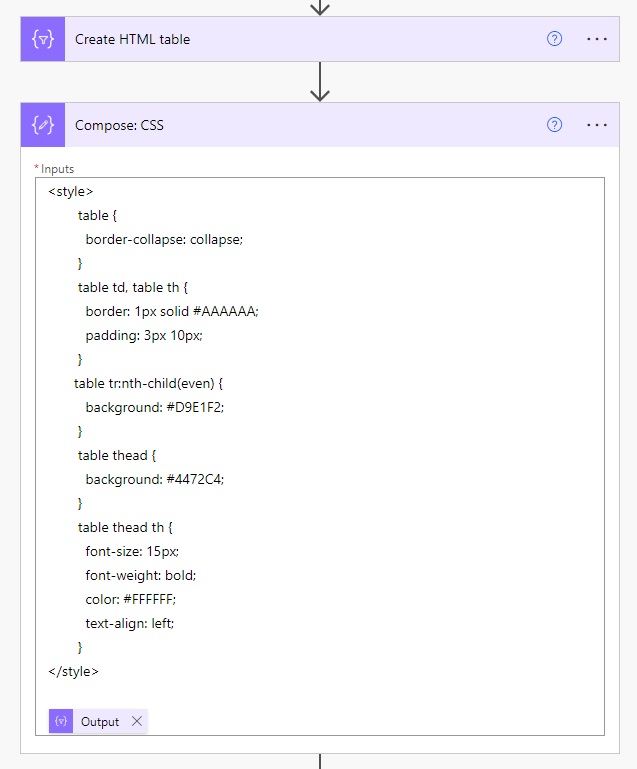
Insert a Data Operations – Compose action into the flow and copy + paste the code from Windows Notepad into it. Add the output of the Create HTML table action at the bottom. When placed in the body of an email this Compose actions output will display a styled HTML table.
Send An Email With An HTML Table Style
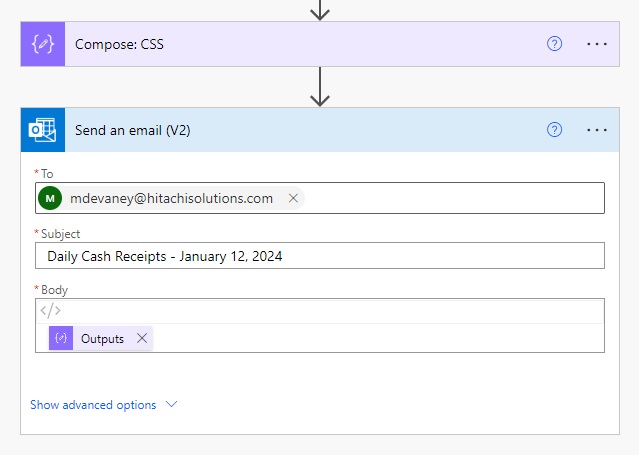
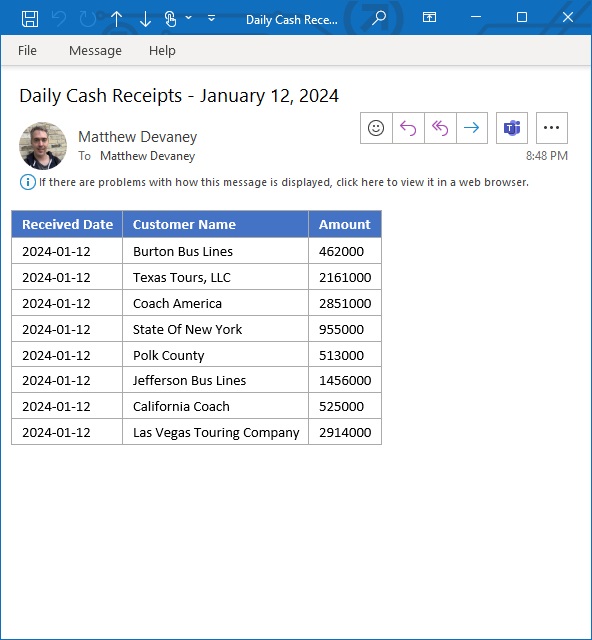
Now we have everything needed to include in the email. Add an Office 365 Outlook – Send An Email (V2) action with “Daily Cash Receipts – January 12, 2024” as the subject. Switch the body to Code View and fill it with the Compose CSS action output.
Test run the flow.
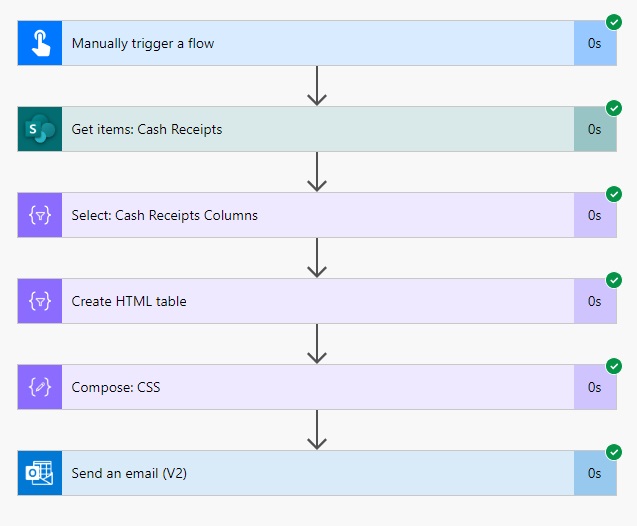
When the email is received it will look like this.
Formatting Dates And Numbers In An HTML Table
The Received Date and Amount are shown using the default date & number formats respectively. We can change that with some additional updates to the flow.
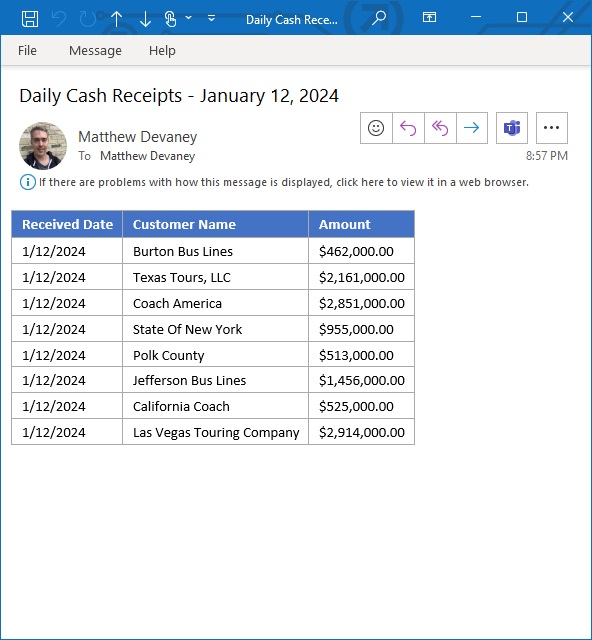
Go to the Select action of the flow and change the Received Date value to this code. The date showing as 2024-01-12 will now appear as 1/12/2024.
formatDateTime(item()?['ReceivedDate'], 'M/d/yyyy')Code language: JavaScript (javascript)
Then update the Amount code to this instead. The number showing as 462000 will now appear as $462,000.00
formatNumber(item()?['Amount'], '$#,##0.00')Code language: JavaScript (javascript)
Perform another flow test run to see the dates and numbers in their desired formats.
Did You Enjoy This Article? 😺
Subscribe to get new Copilot Studio articles sent to your inbox each week for FREE
Questions?
If you have any questions or feedback about Foolproof Power Automate HTML Table Styling please leave a message in the comments section below. You can post using your email address and are not required to create an account to join the discussion.


I used a similar flow for an incident reporting task. we used it to inform staff when they have missed a deadline.
This is out of context, out of PowerApps and Power Automate, which one do you love the most?
Udula,
I enjoy apps more because they have a visual problem solving component when deciding on the UI. And end users are aware of apps more than they are of an automation.
Cool stuff Matt
Thanks Raghu 🙂
Great article Matthew. I did this similar setup a couple of years ago, however, the issue I encountered was when you save to a PDF and the table is longer than a single page. Then pagination, footers, repeating headers seem not to be a reality for Microsoft. Not every table is very small and confined to email.
Thanks again.
Carl,
In truth, I think Microsoft does not give the ability to do the Populate A Word Document action which is superior to HTML because they want us to upgrade to a premium license. This leads to suboptimal workarounds. And yes, the HTML method has many limitations. But the worst limitation in my mind is maintainability.
Great post. Thanks for leaving it!
This is really cool, thank you!
One thing we tried was to create a sub-flow with the styling only.
Then other flows call this one and the e-mail styling is consistent across flows.
Great stuff, Matt. Question: Would it be possible to make an cell in the HTML table a clickable href link? I’ve tried to put the <a href.. etc.> code in, but of course it renders as literal text, not as a link. Any idea?
Tomas Riha has a great article on this: How to add hyperlink in the ‘Create HTML table’ Power Automate action (tomriha.com)
Wow! One can learn to simplify things/ topics from you. Cheers 🙂
Awesome tutorial, I really enjoyed build this flow, one question, how can I handle a column that has set the multiple selection enable? and send with this email format? thanks
Thank you for sharing. I love all your blogs!
Is there a way to sort the HTML table? I am pulling records for next 30-60-90 resource end dates. My current HTML table is in order by the SharePoint ID vs Resource end date. I tried to do a compose sort(select output, column name) but didn’t work.
Any guidance would be appreciated. Thank you!
You need to sort your data prior to feeding it to HTML action.
Doesn´t work.
My data came from Azure Devops. I Already sorted it there, but when the data came to Automate, it´s not in the order that I seted up
Wonderful article. I tried it and I found an issue where the HTML content doesn’t render or show up for the recipients, but it looks perfect in my sent email. See screenshots for sent vs recieved email Was wondering if you’ve run in to this issue before and have a solution?
sent email looks perfect
I tried sending two html tables myself, like your image above. But the formatting seems a bit off, not consistent. Is there a way to fix this?
As usual, awesome example and explanation!
This is a great tutorial! If my column with data has different formatting (ie, some cells values are currency, some are percentages, some need decimals, etc.), is there a way to create a more custom HTML table with the formats of the values basically reflecting what I have in my excel table?
Jonah,
I believe the best way to do it is reshaping the array used as input before formatting the table. Convert all of the number fields to text with the required formatting. I have a man article queued up to teach this and I hope to publish in the next few weeks.
How about shading every other line? I’ve attempted to do this in the Compose CSS, but it doesn’t work.
Great tuts Mat, but I wonder can we make the Amount column data to align to right?
Hi Matthew,
I have a column which is multi line text/rich text which hold the data in html. When i use ‘Create HTML Table’, it creates the table but this rich text appears as html still. How do i process this before sending email?
This is great!
One problem I face is our company email has prepopulated signatures, which use tables for formatting. Any CSS I add to the email applies to the signature too.
Any suggestions on how to get around that?
TIA
Thanks for the great tutorial. I got it working perfectly, however can’t seem to get it to work if I don’t want all items from a list. I only want the most recent submission to go out. (Using this to format responses from a MS form intake and to notify people of the most recent intake submission in a aesthetically pleasing way.
Figured I would leave a reply now that my comment got approved. I got it working by combining two of your tutorials. I made tables in outlook, exported the html and used the compose feature directly after updating lists in automate. Thanks again for housing these. Super insightful.
I think it would be much nicer if the amount column is aligned to the right, but I don’t find a way to do this for a single column.
Outlook doesn’t seem to support:
table td:nth-child(3) {
text-align: right;
}
Edit: found a solution:
When formatting the number as currency with formatNumber(item()?[‘Amount’],’C2′,’nl-NL’)
It automatically aligns it to the right
Have you found a way to do this for units that are not currency?
How can I add conditional background color to a multi selection cell?
Has anyone else tried sending multiple HTML tables using the same HTML styling? Did you notice the formatting to be different? The first table being properly formatted the rest not?
If so, is there a fix?
Hi Jay, i would suggest you to take a look at Elis Karim blog on Power Automate: HTML Table Styling Code explained ( https://elliskarim.com/2024/09/17/html-styling-code-explained/#:~:text=table%2Dlayout%3A%20fixed%3B%20%3A,than%20the%20fixed%20column%20width.) You will find the answer you are looking for. Enjoy !
I need some help, i have a condition to check if the status column is completed and send that one column from the list in a HTML table format as an email