Power Apps Modal Dialog For Canvas Apps Using Containers

A modal dialog is a menu that appears on top of the screen and requires the user to interact with it before moving to the next task. Modals work best in situations where you want to intentionally interrupt the user’s workflow such as a confirmation modal. They can also be used to create lightweight forms that do not require the user open another screen to interact with. In this article I will show you how to build a modal dialog for Power Apps canvas apps.
Introduction: The Inspection App
Inspectors at a restaurant company use the Inspections app to record the results of restaurant inspections. The inspector opens each item in the list, selects either Pass, Fail or N/A and then sees an icon appear beside the item.

Setup The SharePoint List
Create a new SharePoint list called Inspection Items with the following columns:
- Title
- PassOrFail (Choices: Pass, Fail, N/A)
Populate the SharePoint list with these inspection items:
| Title | PassOrFail |
| Kitchen and Dining Room areas are clean | |
| Dishwasher and sink are in working condition | |
| Food Items are labelled with expiration dates and allergen info | |
| Refrigeration units are operating at the correct temperatures | |
| Staff members have food safety certification | |
| Building does not have any pest related problems |
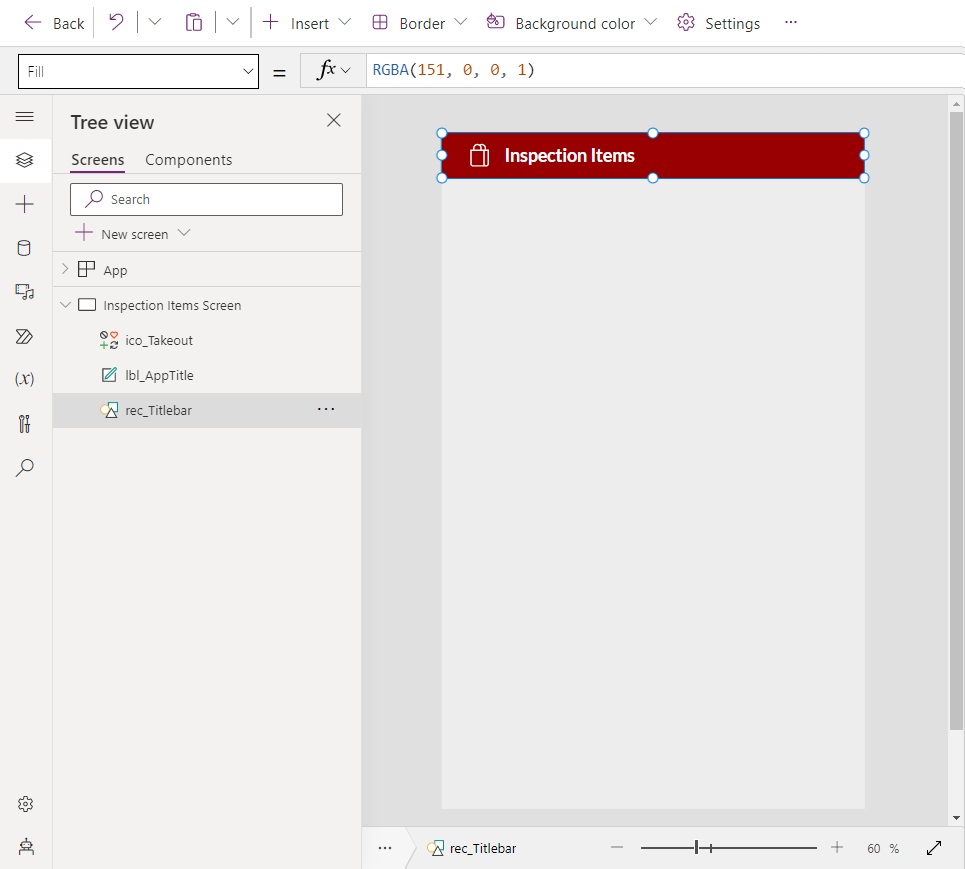
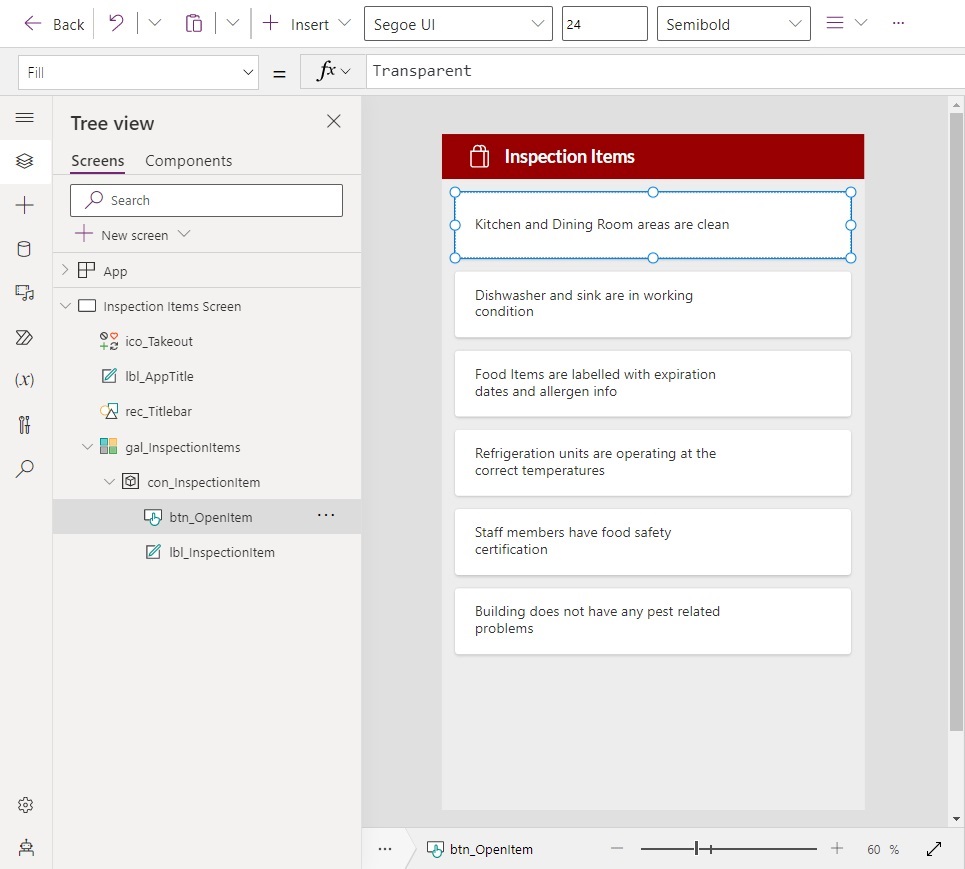
Create A New Gallery Showing Inspection Items
Open Power Apps Studio and create a new app from blank. Insert a label at the top of the app with the title Inspection Items along with a shopping bag icon. Place a rectangle shape beneath them with a dark red fill.
Position a new gallery below the title bar and stretch it to fill the remaining space.
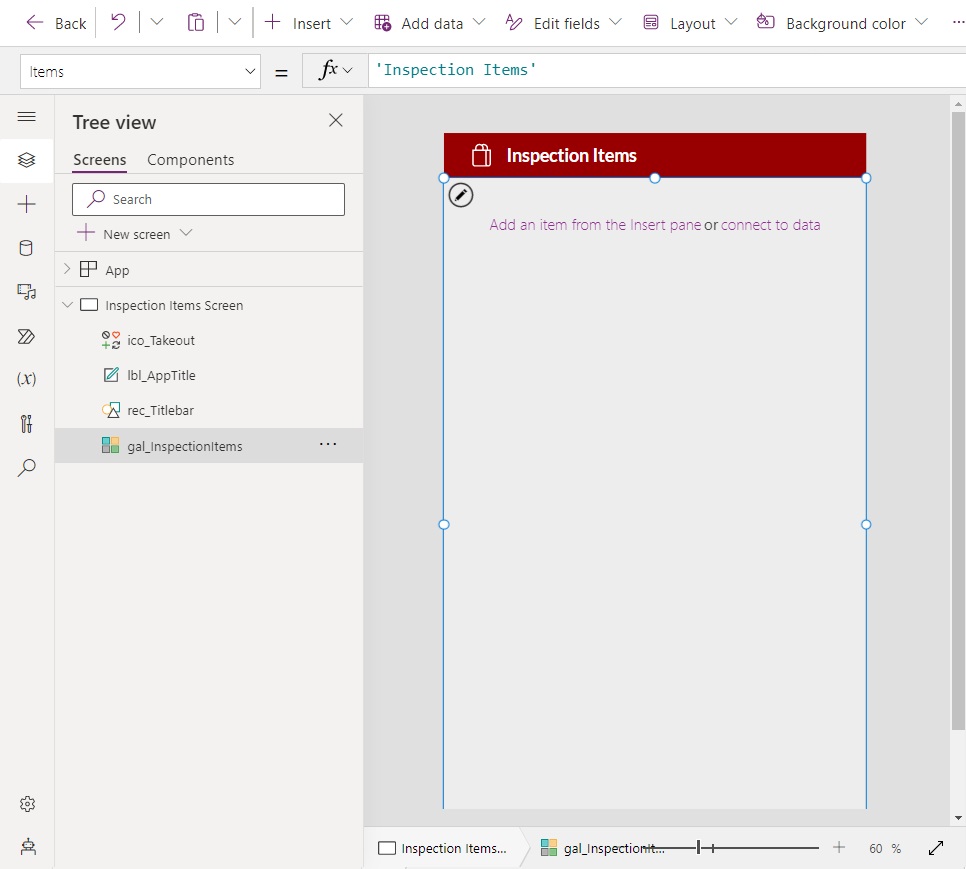
Set the Items property of the gallery to Inspection Items. Make sure to add the SharePoint list to the Data tab of the app beforehand.
'Inspection Items'Code language: JavaScript (javascript)
Increase the TemplatePadding of the gallery and change the TemplateSize to these values.
TemplatePadding: 20
TemplateSize: 100Code language: HTTP (http)
Insert a container into the gallery. Stretch the container to fill the gallery row.
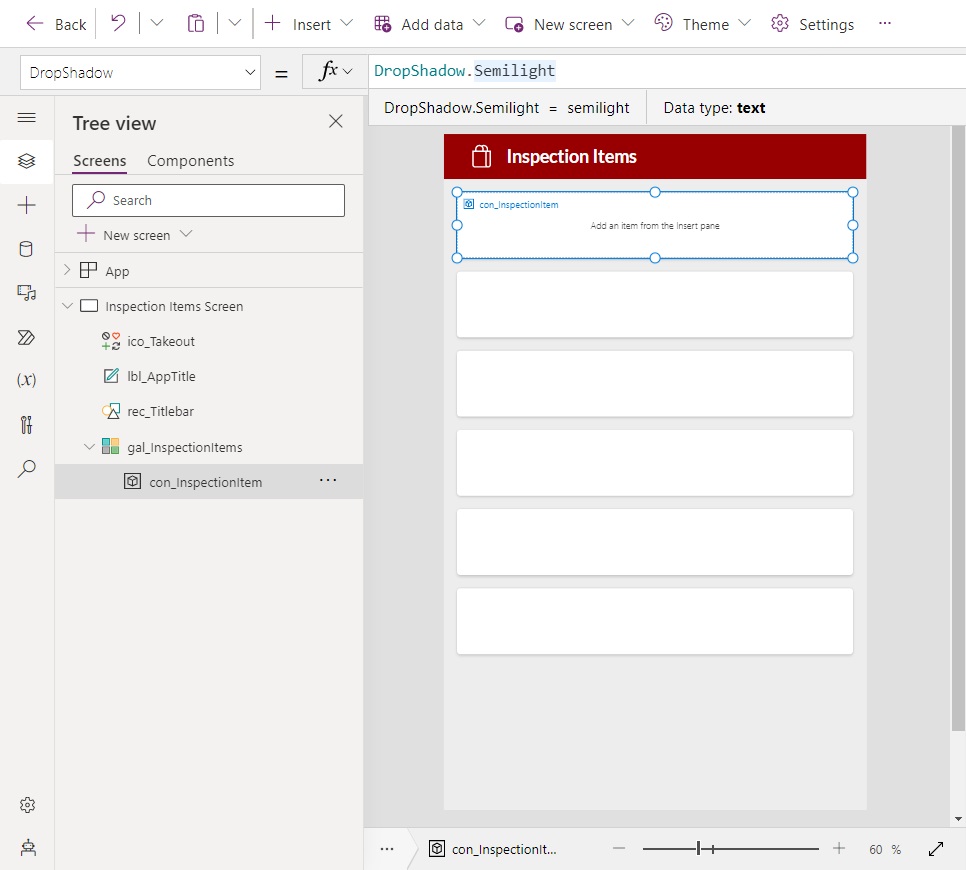
Change the style of the container to include a drop shadow and a slight border radius.
BorderRadius: 5
DropShadow: DropShadow.SemilightCode language: HTTP (http)
Show The Modal Dialog When The Gallery Item Is Selected
Continue by adding a new label to the gallery to display the inspection item

Use this code in the Text property of the label.
ThisItem.TitleCode language: CSS (css)
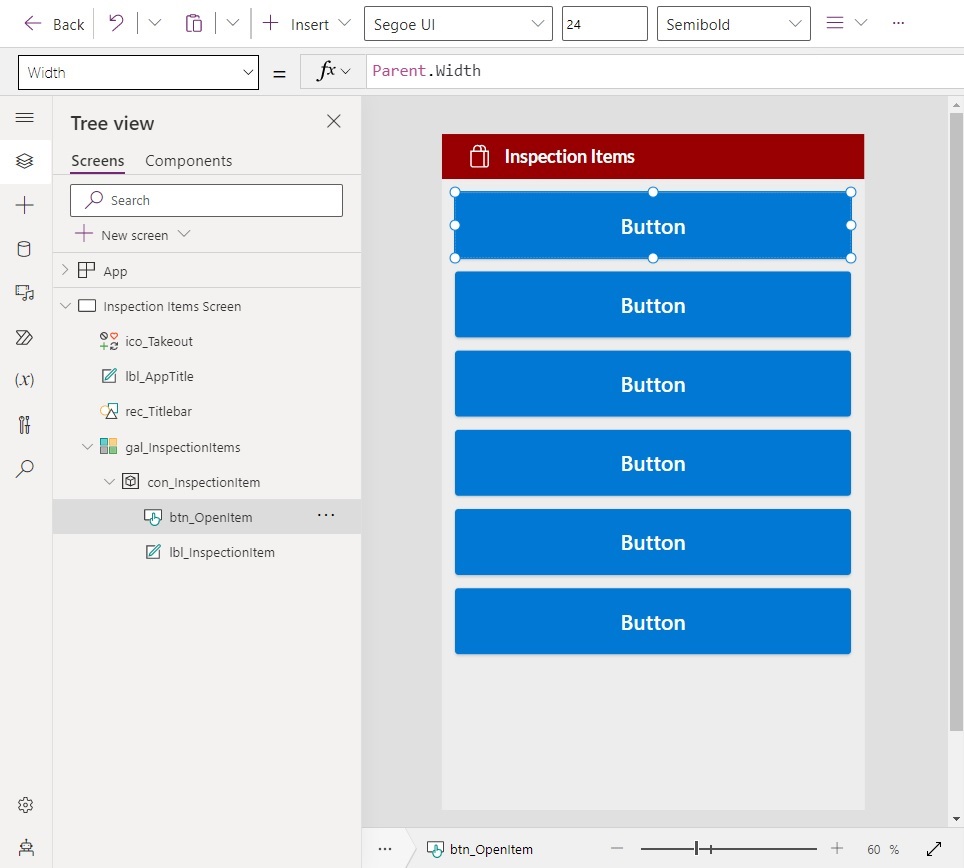
We want the modal dialog to appear when the gallery item is selected. Add a new button and position over top of the entire gallery row.
Write this code in the OnSelect property of the button. The selected item is stored inside a variable and then another variable triggers the modal dialog to appear on the screen. Once we build the modal we will use gblShowModal in its Visible property.
Set(gblSelectedItem, ThisItem);
Set(gblShowModal, true)Code language: JavaScript (javascript)
Make the button completely transparent by updating its properties to these values:
AutoDisableOnSelect: false
BorderStyle: BorderStyle.None
Color: Color.Transparent
DisabledColor: Color.Transparent
DisabledFill: Color.Transparent
Fill: Color.Transparent
HoverColor: Color.Transparent
HoverFill: Color.Transparent
PressedColor: Color.Transparent
PressedFill: Color.TransparentCode language: HTTP (http)
After its properties are update the transparent button not be visible to the user but it will still be pressable.
Design A Modal Dialog Using Containers
We will create our modal dialog using Power Apps containers. The first step is to make a screen protector that will block the user from doing any other actions. Insert a new container and stretch it to fill the entire screen.
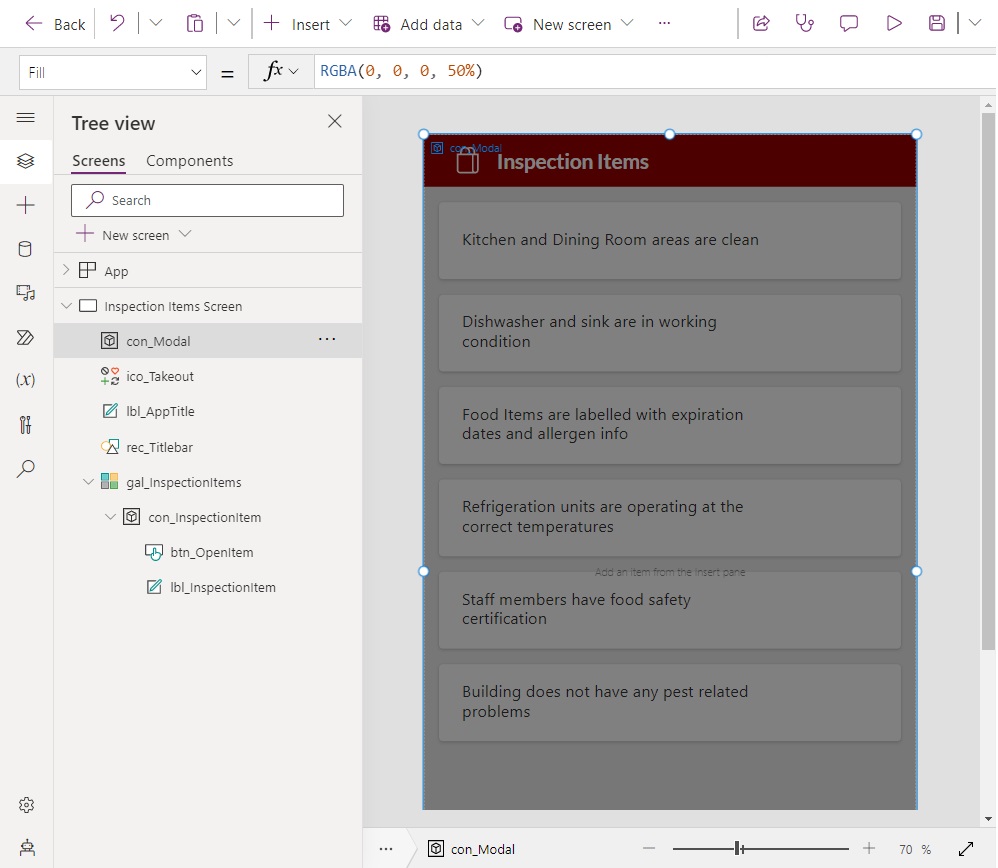
Change the Fill property of the container to indicate the screen cannot be interacted with.
RGBA(0, 0, 0, 50%)
Then place second container inside the first one to create the modal dialog background.
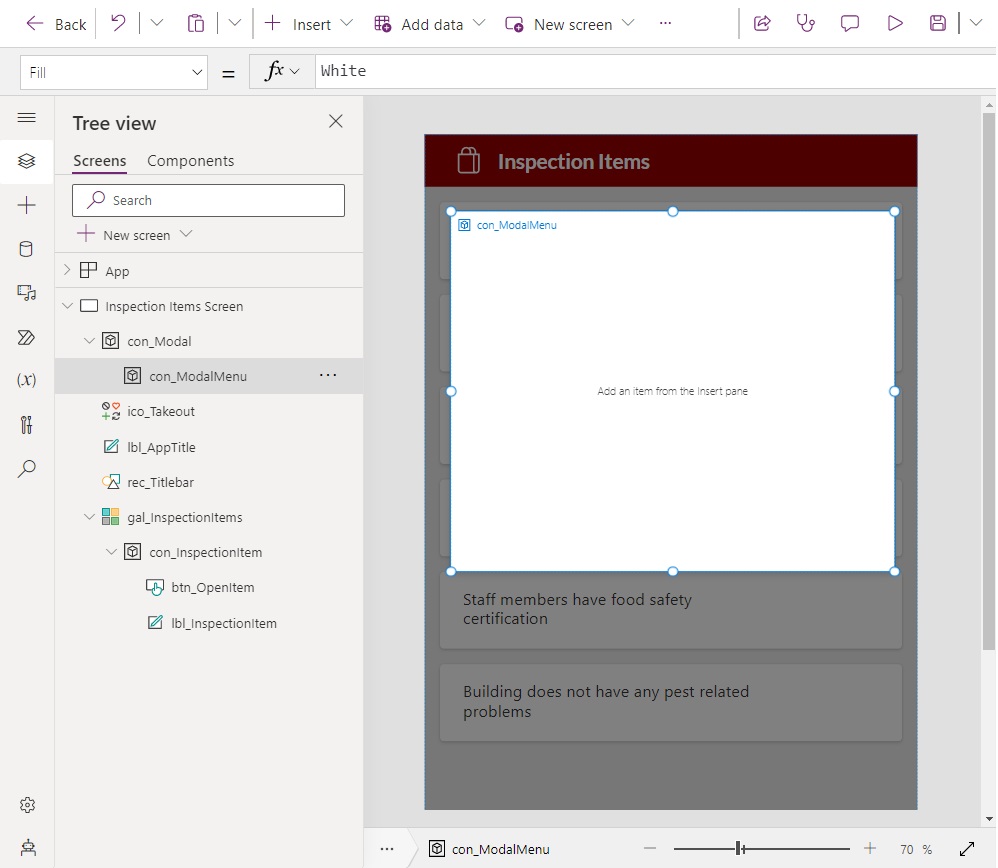
Update the Fill property of the modal dialog to the color white.
Color.WhiteCode language: CSS (css)
Display Menu Options Within The Modal Dialog
Now we will populate the modal dialog with some contents. Start by adding a new label at the top of the modal container.
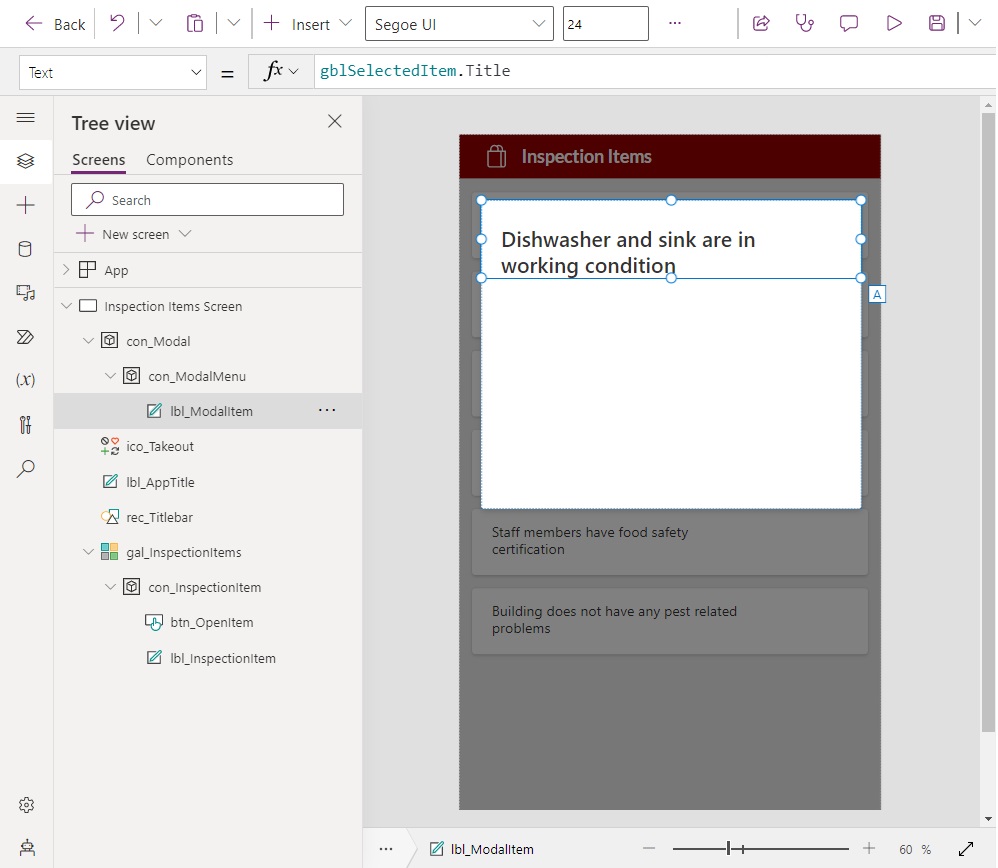
Set the Text property of the label to this code to show the selected question.
gblSelectedItem.TitleCode language: CSS (css)
Then add radio buttons below the title with the values Pass, Fail and N/A.
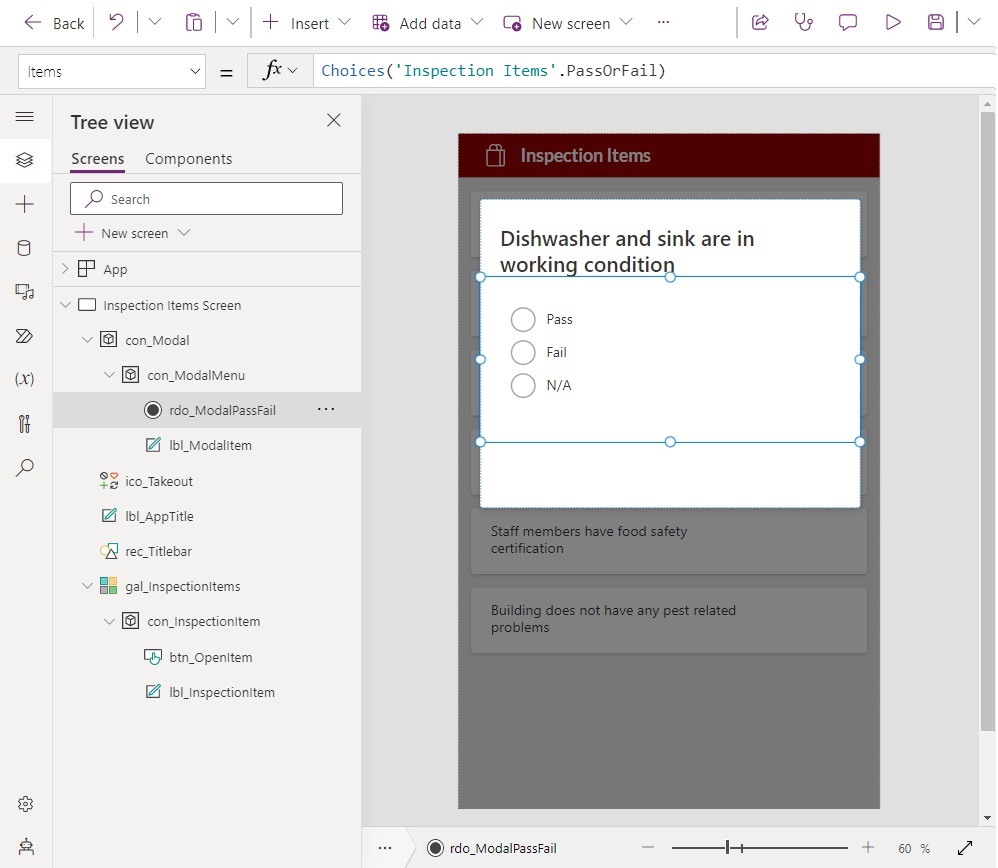
Use this code in the Items property of the radio buttons to populate it with options.
Choices('Inspection Items'.PassOrFail)Code language: JavaScript (javascript)
Write this code in the Default property of the radio buttons to show the selected value if a user returns to a question that has already been answered.
gblSelectedItem.PassOrFail.ValueCode language: CSS (css)
Create a new button at the bottom of the modal dialog with the text OK.
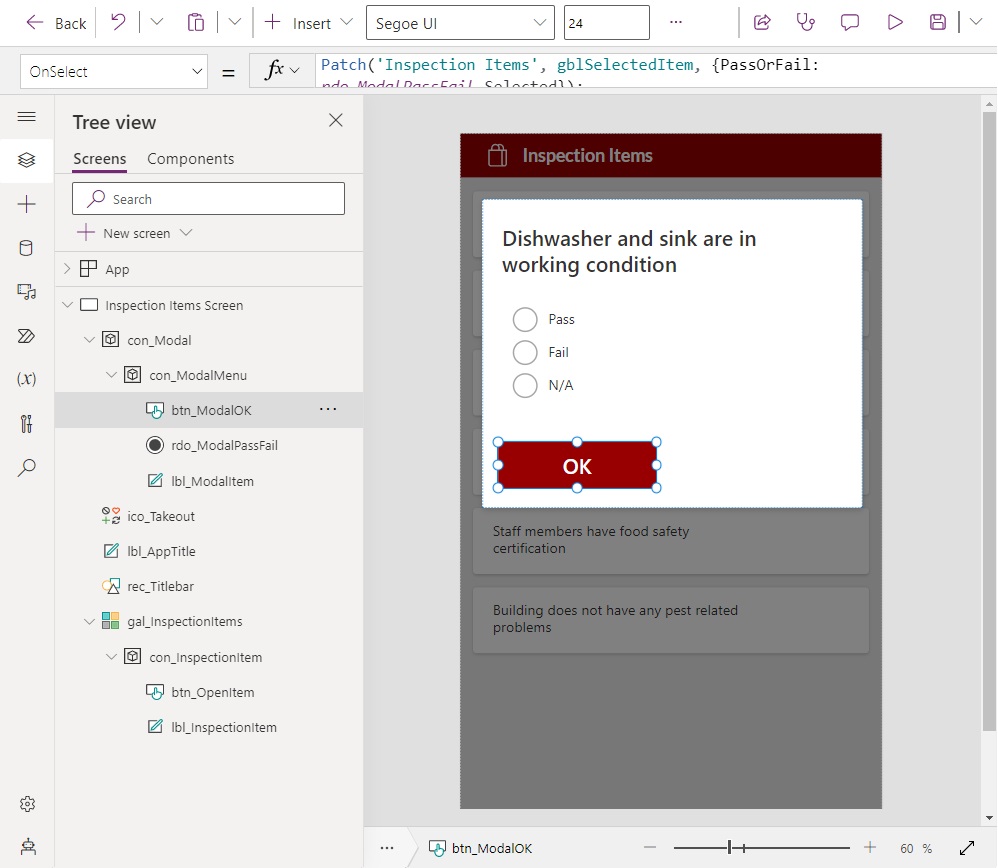
Use this code in the OnSelect property of the modal dialog to update the Inspection Items SharePoint and then close the modal and reset its controls.
Patch(
    'Inspection Items',
    gblSelectedItem,
    {PassOrFail: rdo_ModalPassFail.Selected}
);
Set(gblShowModal, false);
Set(gblSelectedItem, Blank())
Reset(rdo_ModalPassFail);Code language: JavaScript (javascript)
Now that the modal dialog is fully programmed we will control when it becomes visible. The modal should appear once a user pressed a gallery item and disappear when the OK item is clicked.
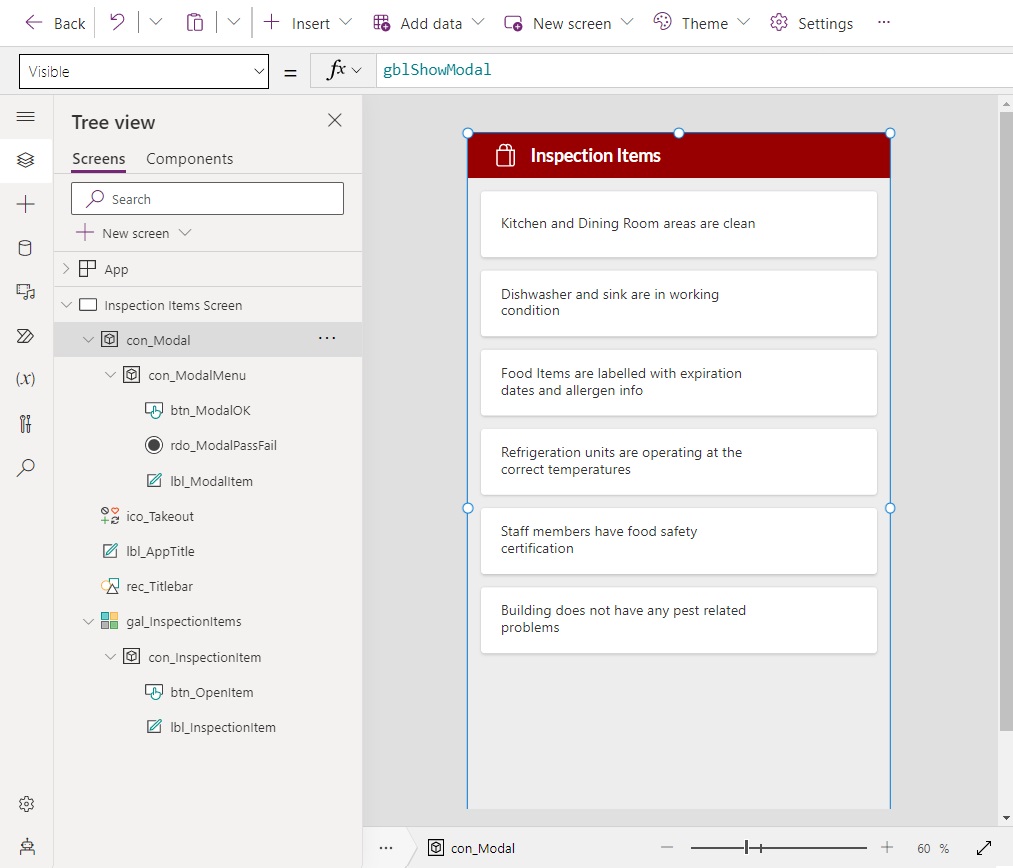
Go to the Visible property of the blocking modal dialog and update it to use the gblShowModal variable.
gblShowModal
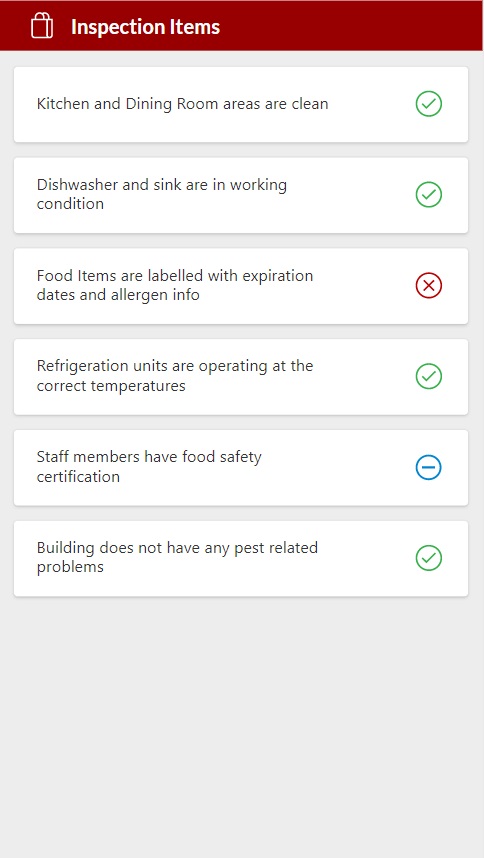
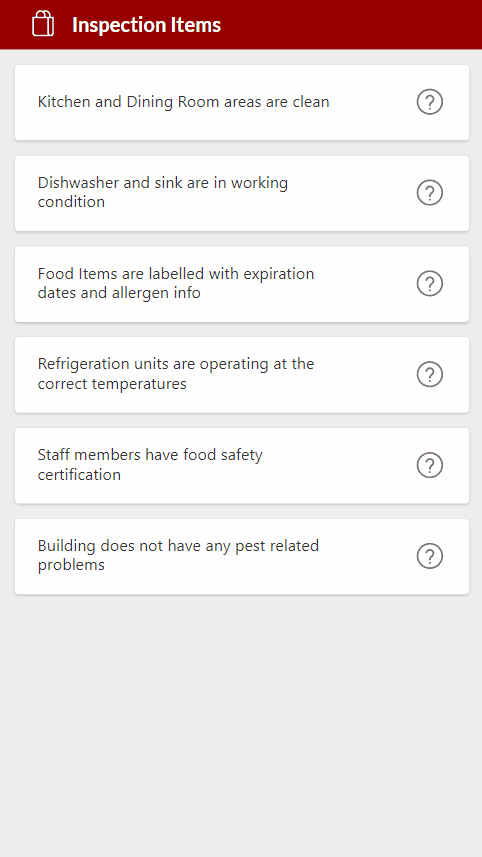
Indicate The Inspection Result With An Icon
Users need a way to see what the inspection item result was without having to open it again. We will communicate the result by showing a checkmark icon for pass, an X icon for fail, a neutral icon for N/A and a question mark icon where no response was given.
Add a new icon control to the right side of the menu. Place it underneath the transparent button.
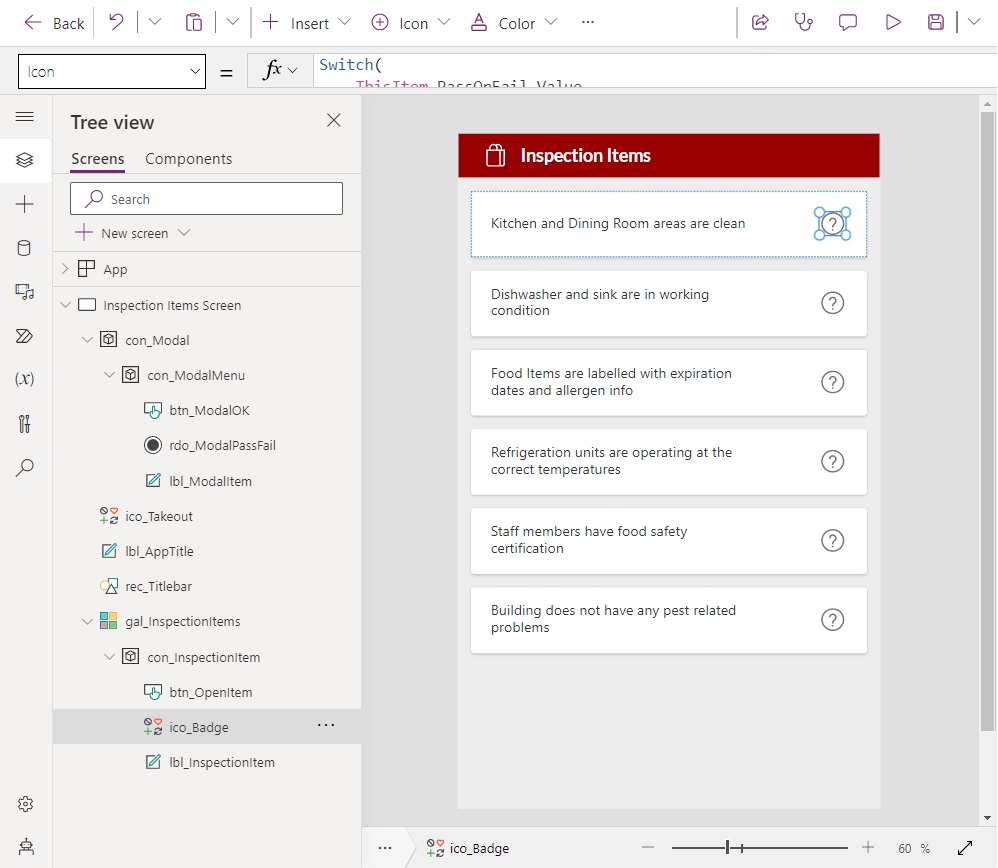
Use this code in the Icon property of the icon to conditionally show the property icon based on the inspection item results.
Switch(
    ThisItem.PassOrFail.Value,
    "Pass",
    Icon.CheckBadge,
    "Fail",
    Icon.CancelBadge,
    "N/A",
    Icon.Blocked,
    Icon.Help
)Code language: PHP (php)
And write this code in the Color property to give each result a different color.
Switch(
    ThisItem.PassOrFail.Value,
    "Pass",
    RGBA(54, 176, 75, 1),
    "Fail",
    RGBA(184, 0, 0, 1),
    "N/A",
    RGBA(0, 134, 208, 1),
    RGBA(116, 116, 116, 1)
)Code language: PHP (php)
The finished icon control will look like this once the inspection results are recorded.
Test The Modal Dialog In Power Apps
We’re done. Try out the app to make sure the modal dialog works. It should behave as shown below.
Did You Enjoy This Article? 😺
Subscribe to get new Copilot Studio articles sent to your inbox each week for FREE
Questions?
If you have any questions or feedback about Simple Power Apps Modal Dialog Using Containers please leave a message in the comments section below. You can post using your email address and are not required to create an account to join the discussion.


Wow, this blog post is exactly what I needed! I’m literally building out an app that needs exactly what you’re talking about. HAHA… Working on it as I type this out. Sunday in America. 😉 Thanks for sharing your insights and tips, they are super helpful and inspiring. I learned a lot from your post and I’m eager to apply it to my own project. I can’t wait to see what you come up with next! Thank you!
Joel,
Timing is everything in life. I’m glad I timed this right so it would work out for you 🙂
LOL! “Sunday in America”. I work the same. As I am now fully remote and will stay that way the rest of my professional career thanks to COVID, the concept of 7 to 4 or 8 to 5 is gone.
Hi Matthew.
When you say “to make a screen protector that will block the user from doing any other actions.” It is not totally right as the user still can use keyboard to interact with any controls that have a tabindex property to 0.
You can use the ‘glbShowModal’ value to change the background controls tabindex value to -1 to prevent user to focus on them using keyboard.
You can do the opposite with the tabindex property of the controls in the modal dialog.
Alexsolex,
That is very good advice anyone reading this tutorial should know. Thank you for your very valuable comment.
This is great, thank you!! Could you please explain how to add a text input field to the same modal form and include it in the patch? Any help appreciated as I’m stuck and googling is scrambling my brain.
Monica,
Of course 😊
1. Create a new text field in SharePoint called Question1
2. Add text input to the modal named txt_Question1
3. Update your PATCH to this code.
Patch(‘Inspection Items’, gblSelectedItem, {Question1: txt_Question1.Text});
Thank you! Life saver!
I think I prefer a vertical container (easier to organize the controls) for the modal popup and a separate rectangle shape for the background.
Dave,
I prefer a vertical container too. Decided to stick with ‘standard containers’ for this tutorial because my last responsive tutorial was too confusing for many users. It seems teaching one concept at a time is best.
But yes, please do use vertical containers here!
This newfound site is a blast! Thanks for not only this quality tip, but all the others I’ve read as well.
To take it a step further, how would you collect the data each time a user answers the questions? This is perfect for a project I’ve been working on where users need to give themselves a rating and then an independent reviewer goes in an gives their own rating/comments. Would I have to have another sharepoint list to have the answers submit back to? Thanks so much; your site is awesome!
Julie,
At minimum there would be 3 SharePoint lists in your design:
1. Inspections (every inspection has 1 record)
2. Inspection Items (every inspection has many items)
3. Template Inspection Items (a list of questions cloned into Inspection Items each time a new inspection is created).
Very Cool. I am struggling with an inspection app at work. We have maybe 15 different pieces of equipment, each with different inspection criteria. So far I have one landing page where the user can pick their inspection form from a dropdown and they are navigated to that form (Each inspection form has its own screen). The part I am stuck on is how can I (or a manager) view all the inspections that are spilt across 15 lists in one place? No one want to have to look at 15 lists to see what is getting inspected. Google and ChatGPT have failed me…. Any insight appreciated
Brian,
Sounds like a data-model problem to me. Why are all inspections stored in 15 different lists? The inspections model should be generic so all equipment can use it.
Try these 4 tables instead:
1. Inspections (every inspection has 1 record)
2. Inspection Items (every inspection has many items)
3. Inspection Template (header for inspections of each equipment type)
4. Template Inspection Items (a list of questions cloned into Inspection Items each time a new inspection is created, linked to one Inspection Template)
Ok, I appreciate the reply! I’m pretty new and this might be a bit beyond my current level of understanding. I can’t really visualize how this works. Where would the specific inspection results go from a particular inspection. How would I pull up inspections from the past to show auditors? I was pretty sure I was on the wrong track so thank you for confirming! I’ll have to dig in and keep trying using your suggestion! Thanks you! Your blog is awesome and a huge help to a non computer science/programmer!
Brian,
“How would I pull up inspections from the past to show auditors?”
I did not build the solution far enough to demonstrate pulling up past inspections. They would need to be another screen with a gallery showing all of the inspections. The user would select a past inspection from the gallery to open it or start a new one.
“Where would the specific inspection results go from a particular inspection?”
This would require a few more tables to accomplish
1. Inspections (every inspection has 1 record)
2. Inspection Items (every inspection has many items)
3. Inspection Template (header for inspections of each equipment type)
4. Template Inspection Items (a list of questions cloned into Inspection Items each
Hi, I have a problem with step:
gblSelectedItem.Title
since this step, showing of Titles is not working and then nothing with “gbl” code.
What I am doing wrong?
Thank you in advance.
Filip,
Did you remember to SET your variable gblSelectedItem before typing it? This is the only reason it would not appear.
Hi, I am a begginer in power apps, please. Which step is this “set variable”… or maybe I do not understand correctly.
With this solution we could build an update of tables, for example “suppliers”, “product types”, when we are updating a list or creating a new record. In the container we could create, for example, a new supplier, update the name of an existing supplier or delete a supplier if there were no associated records yet.
Hi Matthew,
Thank you for your post. Is it possible to make the modal dialog responsive to the screen size? If yes, how would you go about it?
Ada,
I would place it inside a container and then calculate the width based upon container size. Something like this:
Min(Parent.Width, 400)-20
I’d like to do more tutorials on responsive but I won’t be touching it until the new responsive functionality described in 2023 Release Wave 1 drops in September 2023.
Awesome article – thanks.
Semi-related… I want an OnSelect from my main screen to Navigate to another screen and wait for that screen to Navigate back to my main screen before executing the subsequent functions in my OnSelect. I’m guessing that Power Apps is not smart enough to wait and just continues on with the rest of my OnSelect after executing the Navigate. Is there a way to implement this kind of behavior in a canvas app?
(Use case is I have a number of action buttons in my app and I want to collect a comment from the user – stored in a variable – before performing the selected action which uses the comment variable… i want this secondary screen to be general purpose so I can use it for many different actions, so I only want it to collect this text so it can be used by the main screen.)
Hello Matthew,
As usual the top 1 result in search engine feed and as usual exactly what I needed!
Andrew,
I love to hear my site has the top result 🙂