Make A Power Apps Timesheet App – Part 2

This is the 2nd article in a series about how to build your own timesheets app in Power Apps. The first article focused on creating a timesheet lines feature with the ability to add, edit, delete and save lines. This article will continue the tutorial to include the ability to create new timesheets and submit them for approval.
If you haven’t completed Make A Power Apps Timesheet App Part 1 then I would highly encourage you to check it out first.
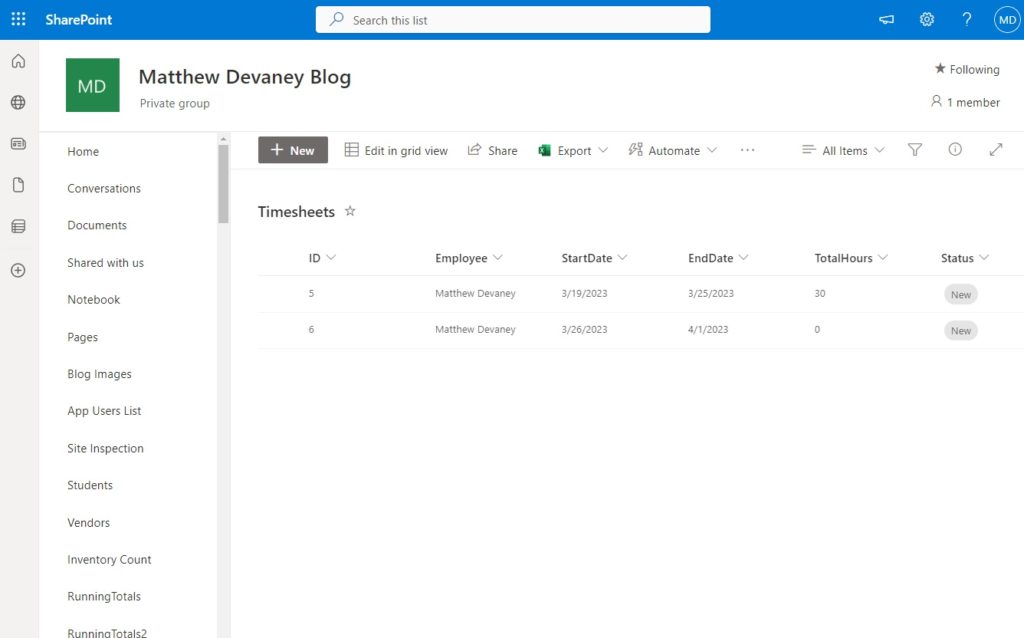
Setup The Timesheets SharePoint List
Create a new SharePoint list with the following columns:
- Employee (Person)
- StartDate (Date)
- EndDate (Date)
- TotalHours (Number)
- Status (Choice) [New, Submitted, Accepted, Rejected]
The SharePoint list will look like this once it becomes populated with data.
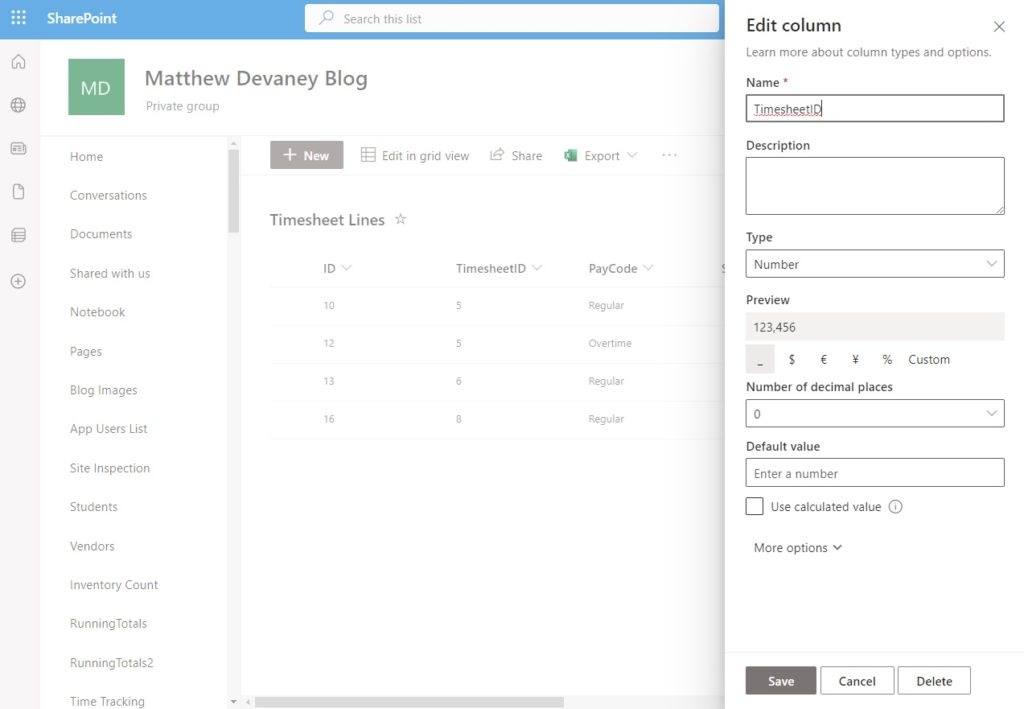
Add A LookUp Column To The Timesheet Lines SharePoint List
Each timesheet will have one or more associated timesheet lines. Therefore, we must create a relationship between the Timesheet List and the Timesheet Lines. Go to the Timesheet Lines SharePoint list and add a new number type column named TimesheetID.
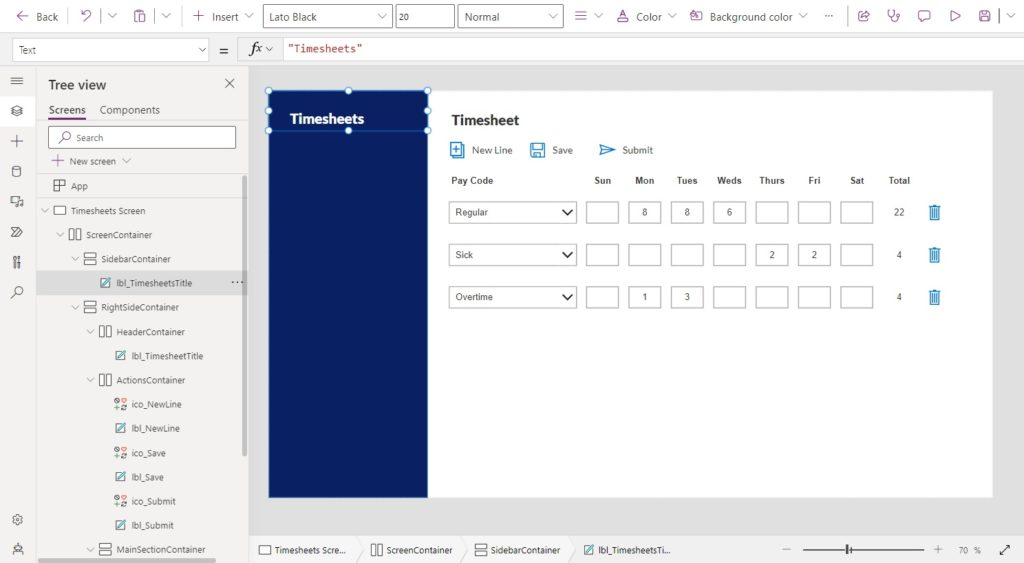
Design The Sidebar Menu
Add a new label to the SidebarContainer with the text “Timesheets.” Give it the same styling as the “Timesheet” label in the HeaderContainer but make the Color property White.
Give the Timesheets label these property values to give it some padding.
AlignInContainer: AlignInContainer.Stretch
Height: 75
PaddingLeft: 40
PaddingTop: 35Code language: HTTP (http)
Insert a horizontal container named NewTimesheetContainer into the SidebarContainer.
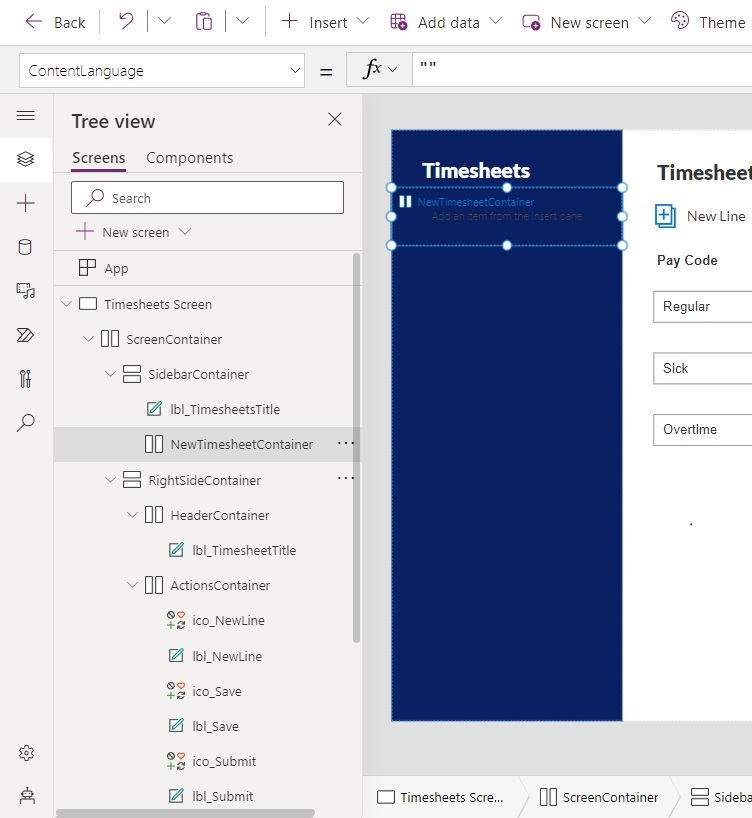
Place an Add Document icon and a label with the text “New Timesheet” inside the NewTimesheetContainer.
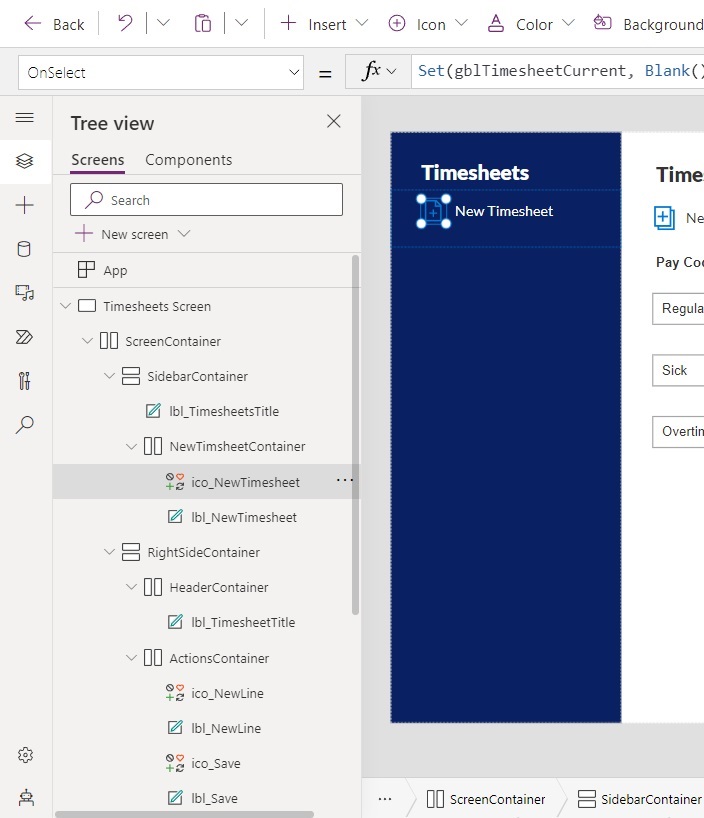
Write this code in the OnSelect property of the icon to set the current timesheet value to blank and clear the deleted time sheet lines collection.
Set(gblTimesheetCurrent, Blank());
Clear(colDeleteTimesheetLines);Code language: JavaScript (javascript)
Create A New Timesheet
When a user presses the New Timesheet icon a form will appear and ask the user to select the new timesheet’s week. Insert the following 4 controls into the MainSectionContainer.
- Label – with the text “Select Timesheet Week”
- DatePicker
- Label – empty
- Button – with the text “Next”
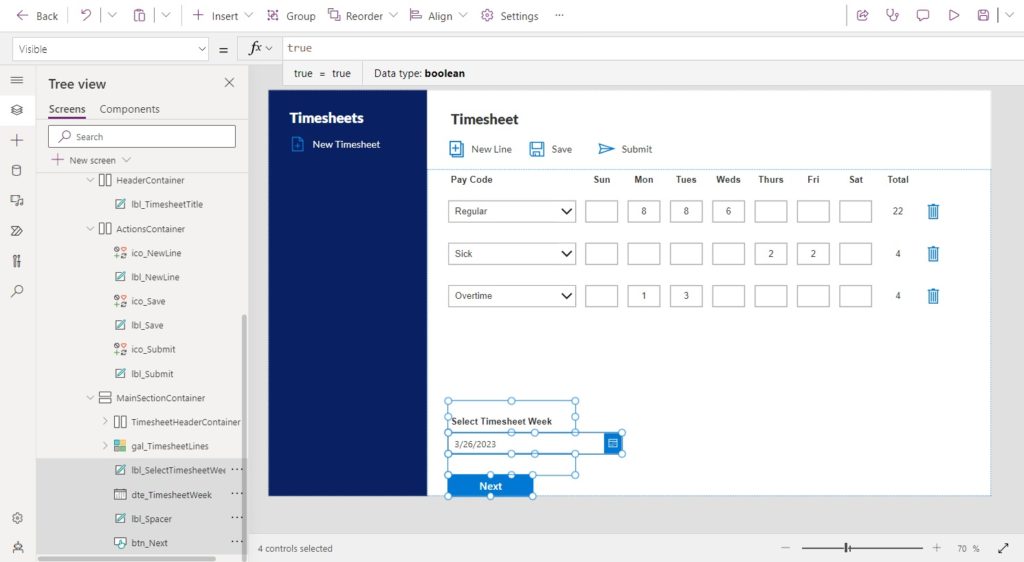
The highlighted areas will conditionally shows based upon whether the variable gblTimesheetCurrent is blank or is not blank.
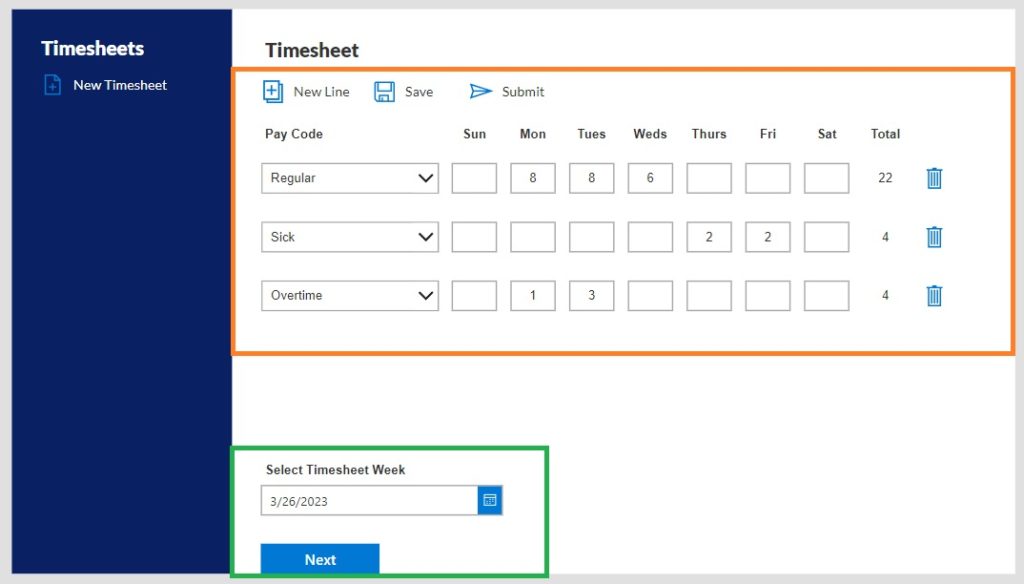
Set the Visible property of all controls highlighted in green to this code…
IsBlank(gblTimesheetCurrent)
…and set the Visible property of all controls highlighted in orange to this code.
!IsBlank(gblTimesheetCurrent)
Update the timesheet title label to show the text “Create A New Timesheet” when the variable gblTimesheetCurrent is blank.
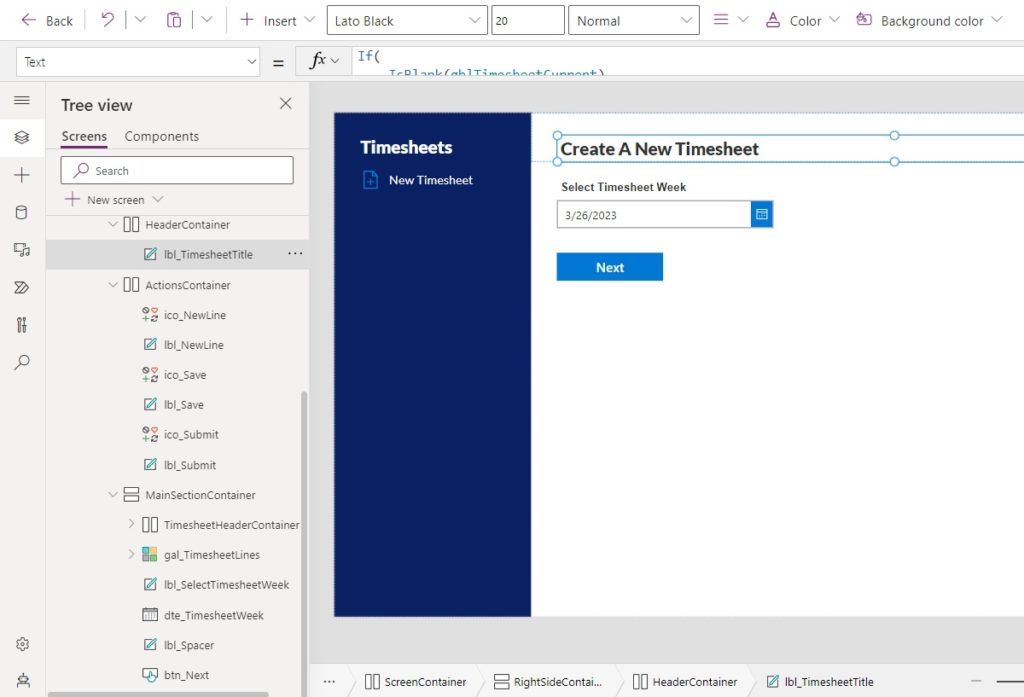
Use this code in the Text property of the title label. When the variable gblTimesheetCurrent is not blank display the selected timesheet’s
If(
    IsBlank(gblTimesheetCurrent),
    "Create A New Timesheet",
    $"Timesheet: {Text(
        gblTimesheetCurrent.StartDate,
        "mmmm d"
    )} - {Text(
        gblTimesheetCurrent.EndDate,
        "mmmm d, yyyy"
    )}"
)Code language: PHP (php)
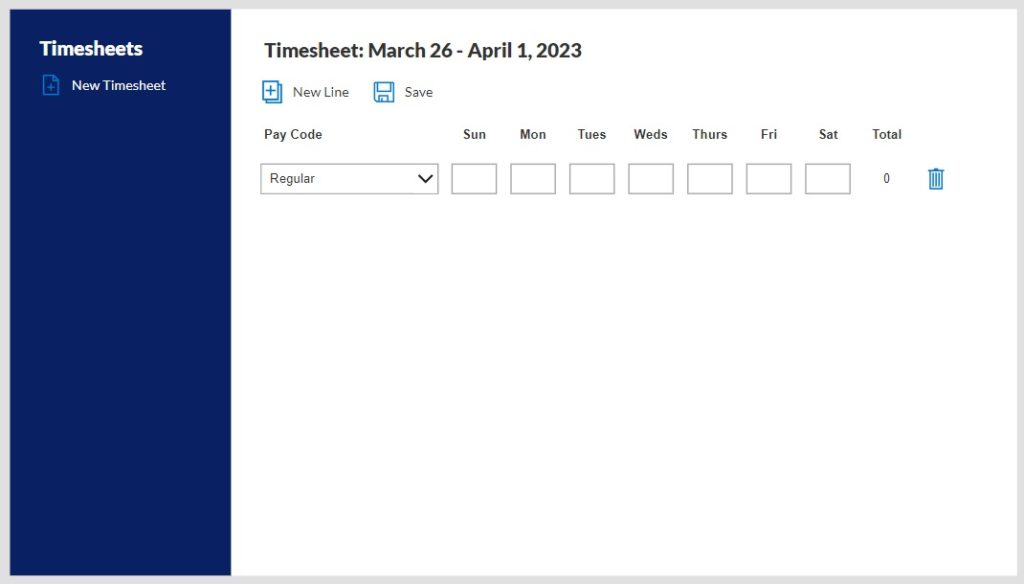
Save The New Timesheet To The SharePoint List
Once the user clicks the next button the timesheet is saved to SharePoint and they can begin to enter their time worked.
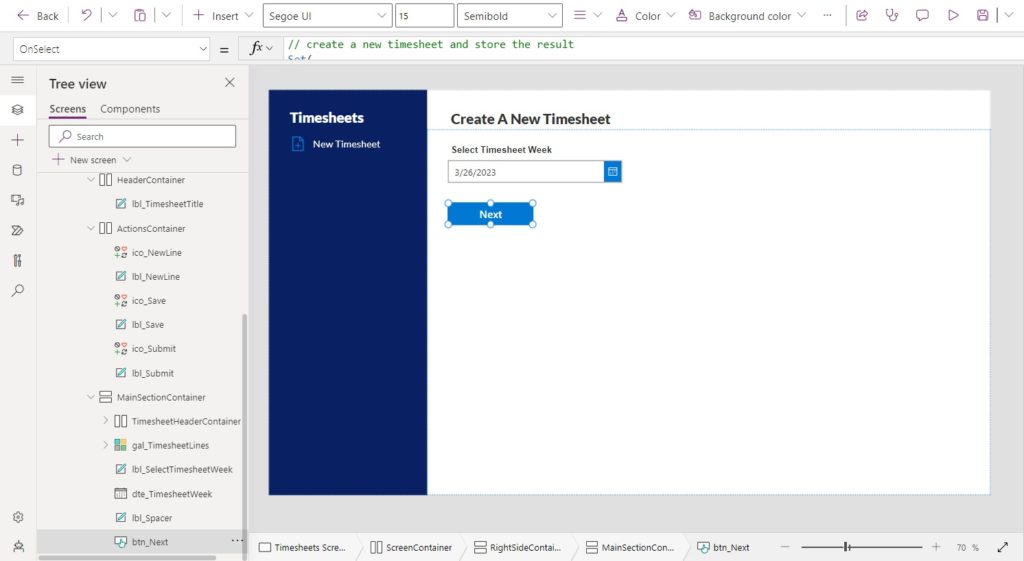
Write this code in the OnSelect property of the button. The Employee field is populated with a person type value. StartDate and EndDate are set to the Sunday and Saturday of the selected week. Status is New and TotalHours are 0.
// create a new timesheet and store the result
Set(
    gblTimesheetCurrent,
    Patch(
        Timesheets,
        Defaults(Timesheets),
        {

            // set timesheet employee to current user
            Employee: {
                '@odata.type':"#Microsoft.Azure.Connectors.SharePoint.SPListExpandedUser",
                Claims: $"i:0#.f|membership|{User().Email}",
                Department: "",
                DisplayName: User().FullName,
                Email: User().Email,
                JobTitle: "",
                Picture: ""
            },


            // set start date to Sunday of the selected week
            StartDate: DateAdd(dte_TimesheetWeek.SelectedDate,1-Weekday(dte_TimesheetWeek.SelectedDate,StartOfWeek.Sunday),TimeUnit.Days),

            // set end date to Saturday of the selected week
            EndDate: DateAdd(dte_TimesheetWeek.SelectedDate,1-Weekday(dte_TimesheetWeek.SelectedDate,StartOfWeek.Sunday)+6,TimeUnit.Days),

            Status: {Value: "New"},
            TotalHours: 0
        }
    )
);
// create the first timesheet line
ClearCollect(
    colTimesheetLines,
    Patch(
        'Timesheet Lines',
        Defaults('Timesheet Lines'),
        {TimesheetID: gblTimesheetCurrent.ID}
    )
);
// reset date picker to blank
Reset(dte_TimesheetWeek)Code language: JavaScript (javascript)
After the Next button is pressed the RightContainer updates to look like this.
Update The New Timesheet Line Code
We must update the new line icon code to apply the Timesheet ID.
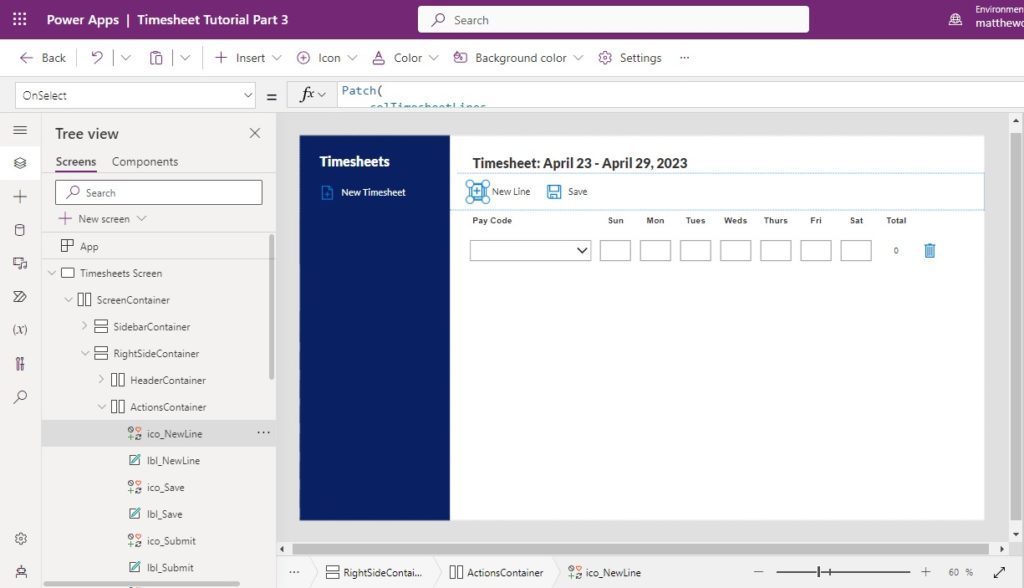
Replace any code in the OnSelect property of the new line icon with this code.
Patch(
    colTimesheetLines,
    Defaults('Timesheet Lines'),
    {TimesheetID: gblTimesheetCurrent.ID}
)Code language: JavaScript (javascript)
Submit The Completed Timesheet
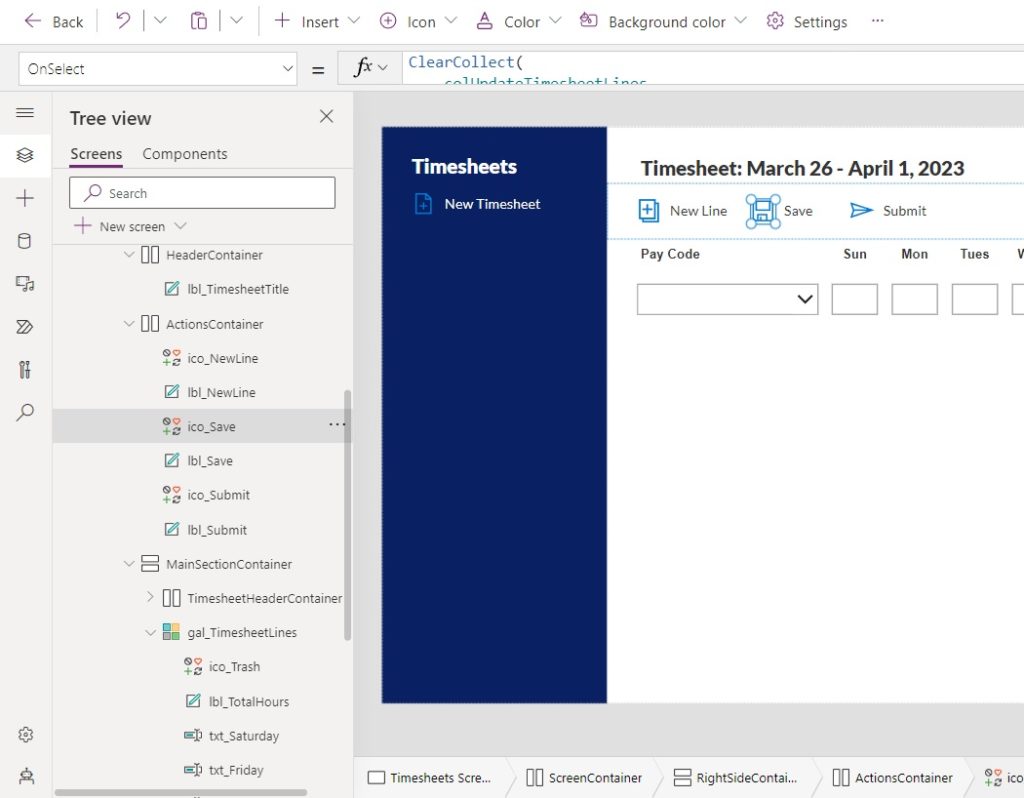
The save button writes timesheet data back to the SharePoint list but it does not update the timesheet status to “Submitted”. To do this, insert a new Send icon into the ActionsContainer and label with the text “Submit.”
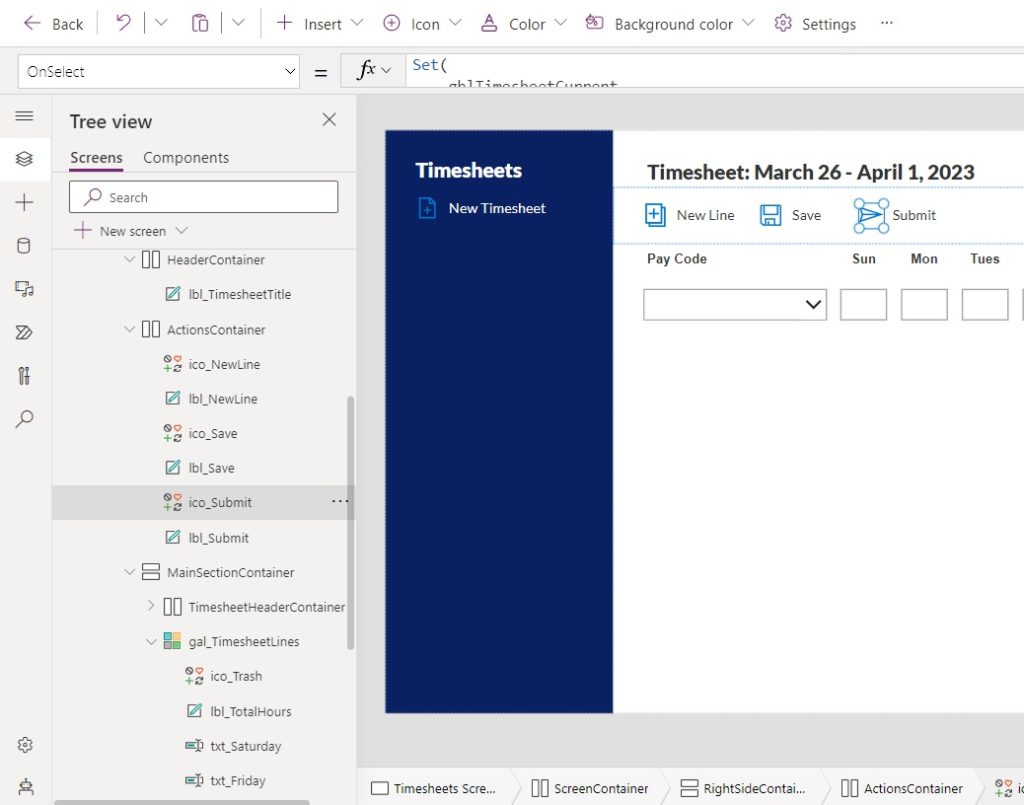
Write this code in the OnSelect property of the Submit icon. The final line of code uses the the Select function to run the code found in the OnSelect property of the Save icon. We will update that code next.
// update the timesheet status to submitted
Set(
    gblTimesheetCurrent,
    Patch(
        Timesheets,
        gblTimesheetCurrent,
        {Status: {Value: "Submitted"}}
    )
);
// save the timesheet lines
Select(ico_Save);Code language: JavaScript (javascript)
Update The Save Button Code
The Save button must now perform one additional action to update the timesheet’s total hours.
Add the new code below to the OnSelect property of the Save icon.
// collection to update timesheet lines
ClearCollect(
    colUpdateTimesheetLines,
    ForAll(
        gal_TimesheetLines.AllItems,
        'Timesheet Lines'@{
            ID: ID,
            TimesheetID: gblTimesheetCurrent.ID, // <----- NEW CODE
            PayCode: drp_PayCode.Selected.Value,
            Sunday: Value(txt_Sunday.Text),
            Monday: Value(txt_Monday.Text),
            Tuesday: Value(txt_Tuesday.Text),
            Wednesday: Value(txt_Wednesday.Text),
            Thursday: Value(txt_Thursday.Text),
            Friday: Value(txt_Friday.Text),
            Saturday: Value(txt_Saturday.Text)
        }
    )
);

// update timesheet lines and store the results
ClearCollect(
    colTimesheetLines,
    Patch(
        'Timesheet Lines',
        gal_TimesheetLines.AllItems,
        colUpdateTimesheetLines
    )
);


// delete timesheet lines
ForAll(
    colDeleteTimesheetLines,
    Remove(
        'Timesheet Lines',
        ThisRecord
    )
);
Clear(colDeleteTimesheetLines);

// ***NEW CODE***

// update total hours on timesheet record
Set(
    gblTimesheetCurrent,
    Patch(
        Timesheets,
        gblTimesheetCurrent,
        {
            TotalHours: Sum(
                colUpdateTimesheetLines,
                Sunday
            ) + Sum(
                colUpdateTimesheetLines,
                Monday
            ) + Sum(
                colUpdateTimesheetLines,
                Tuesday
            ) + Sum(
                colUpdateTimesheetLines,
                Wednesday
            ) + Sum(
                colUpdateTimesheetLines,
                Thursday
            ) + Sum(
                colUpdateTimesheetLines,
                Friday
            ) + Sum(
                colUpdateTimesheetLines,
                Saturday
            )
        }
    )
);Code language: JavaScript (javascript)
Lock The Text Input Fields When Timesheet Is Submitted
The user must not be able to change the timesheet lines once the timesheet is submitted.
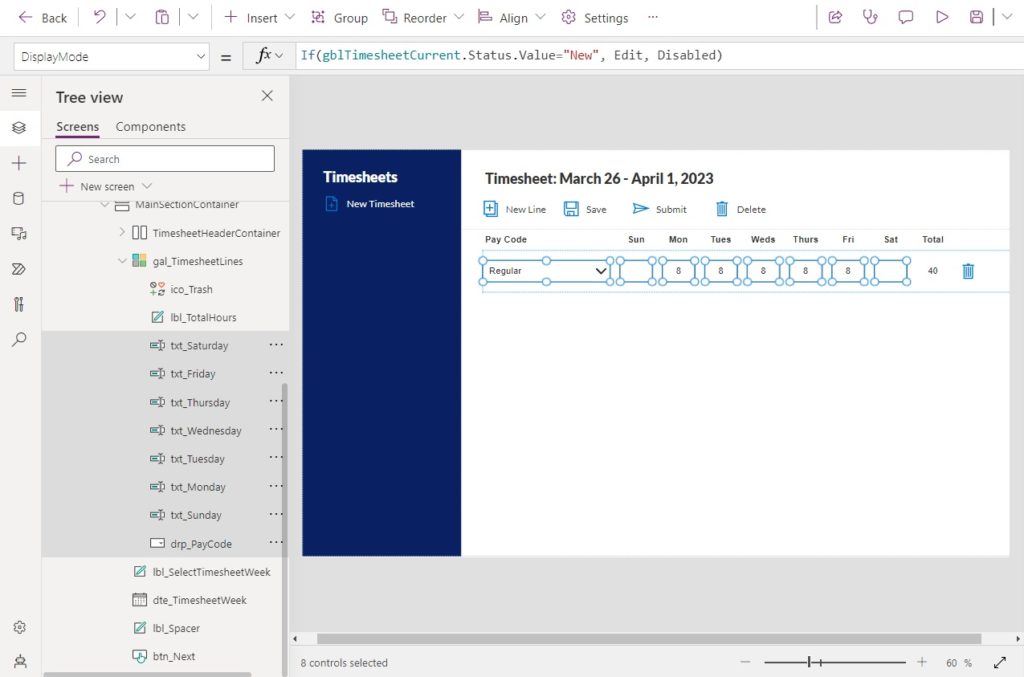
Use this code in the DisplayMode property of the timesheet lines pay code dropdown menu and all of the text input fields.
If(
    gblTimesheetCurrent.Status.Value="New",
    DisplayMode.Edit,
    DisplayMode.Disabled
)Code language: JavaScript (javascript)
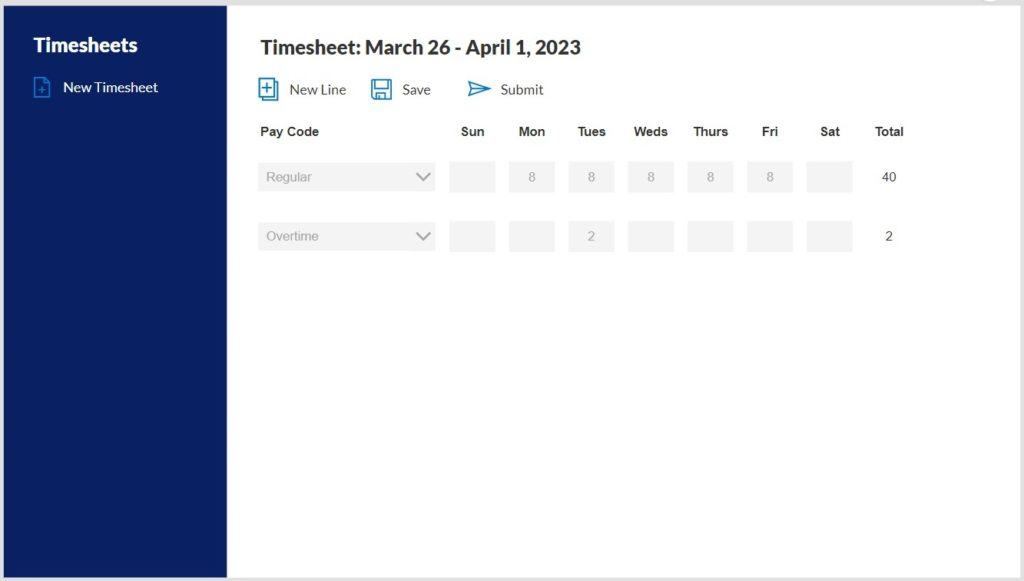
Hide the ability to delete timesheet lines by setting the Visible property of the Trash icon to this code.
gblTimesheetCurrent.Status.Value="New"Code language: JavaScript (javascript)
A submitted timesheet should look like this.
Delete An Existing Timesheet
We must add one more ability to the ActionsContainer to delete a timesheet. Insert a Trash icon and a label with the word “Delete” into the container.
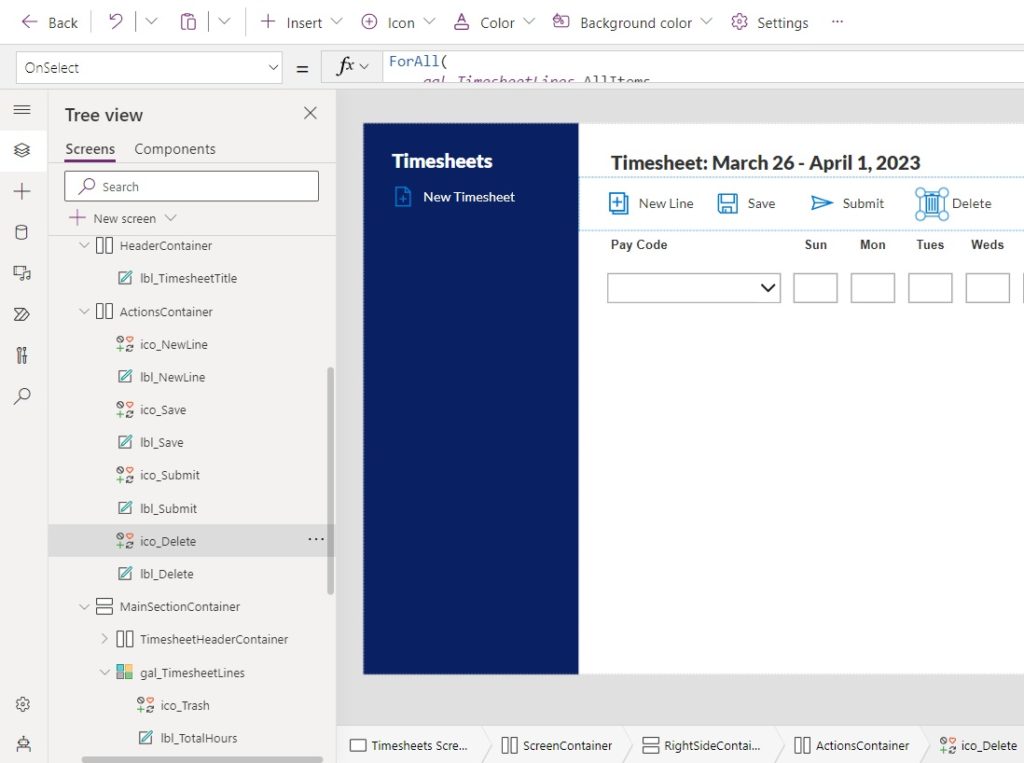
Write this code in the OnSelect property of the Trash icon.
ForAll(
    gal_TimesheetLines.AllItems,
    Remove(
        'Timesheet Lines',
        {ID: ThisRecord.ID}
    )
);
Clear(colDeleteTimesheetLines);
Remove(
    Timesheets,
    gblTimesheetCurrent
);
Set(
    gblTimesheetCurrent,
    Blank()
)Code language: JavaScript (javascript)
Display The Current User’s Timesheets In The Sidebar
New timesheets will appear in the sidebar menu as they are created. The user can change to a different timesheet by clicking on it. Add a blank vertical gallery to the SidebarContainer.
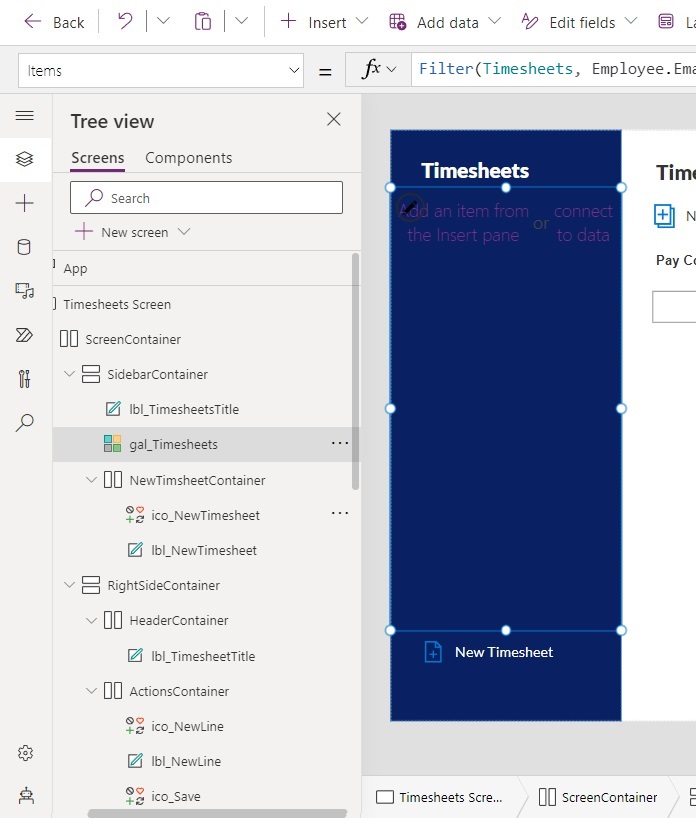
Set the Flexible Height property of the gallery to true.
Use this code in the Items property of the gallery to show only the current user’s timesheets.
Sort(
    Filter(
        Timesheets,
        Employee.Email = User().Email
    ),
    StartDate,
    SortOrder.Descending
)
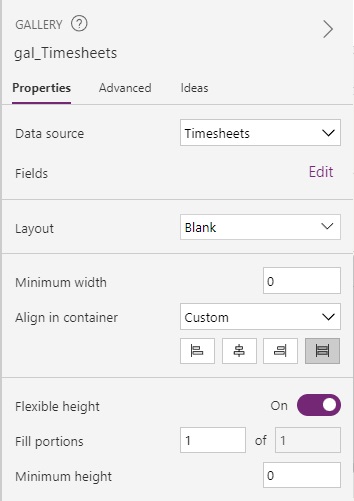
Insert two labels into the gallery to display the timesheet start & end date and status,
Use this code in the Text property of the date range label.
$"{Text(
    ThisItem.StartDate,
    "mmm d"
)} - {Text(
    ThisItem.EndDate,
    "mmm d"
)}"Code language: PHP (php)
Write this code in the Text property of the status label.
ThisItem.Value.StatusCode language: CSS (css)
Select A Timesheet From The Sidebar
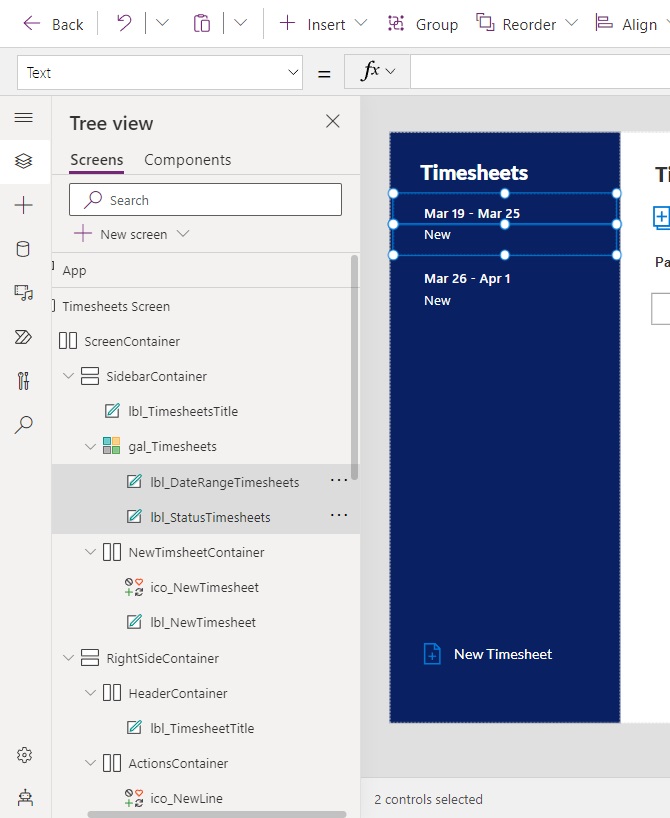
When a user selects a timesheet from the sidebar it should appear in the RightContainer. Add a button to the gallery and make it fill the entire gallery row. Remove any text found in the button.
Use this code in the OnSelect property of the button to select the current timesheet and load its timesheet lines.
Set(
    gblTimesheetCurrent,
    ThisItem
);
ClearCollect(
    colTimesheetLines,
    Filter(
        'Timesheet Lines',
        TimesheetID = gblTimesheetCurrent.ID
    )
);
Clear(colDeleteTimesheetLines)Code language: JavaScript (javascript)
Make the button Fill property transparent when the timesheet is not selected and show a slightly transparent white color when the timesheet is selected.
If(
    ThisItem.ID=gblTimesheetCurrent.ID,
    RGBA(255, 255, 255, 0.15),
    Color.Transparent
)
Also update the HoverFill and PressedFill properties to this code.
RGBA(255, 255, 255, 0.15)Code language: CSS (css)
Timesheets App Completed
The timesheets app is now completed. Add any additional features that are required then deploy it to the organization.

Did You Enjoy This Article? 😺
Subscribe to get new Copilot Studio articles sent to your inbox each week for FREE
Questions?
If you have any questions or feedback about Make A Power Apps Timesheet App – Part 2 please leave a message in the comments section below. You can post using your email address and are not required to create an account to join the discussion.


Very inspiring. We will be working on an application similar to this internally. This will be a very good start. Thank you very much Matthew!
Anh,
Good luck 🙂
Hi Matthew, thank you for the tutorial; l keep getting ‘TimesheetID’ doesn’t exist. on this code
// create the first timesheet line
ClearCollect(
colTimesheetLines,
Patch(
‘Timesheet Lines’,
Defaults(‘Timesheet Lines’),
{TimesheetID: gblTimesheetCurrent.ID}
)
);
Thank you
Eldon,
Good point. I’ve added a section to my tutorial called “Add A LookUp Column To The Timesheet Lines SharePoint List.” Do this step and it will fix the problem.
very nice,
starting from
If(
IsBlank(gblTimesheetCurrent),
“Create A New Timesheet”,
$”Timesheet: {Text(
gblTimesheetCurrent.StartDate,
“mmmm d”
)} – {Text(
gblTimesheetCurrent.EndDate,
“mmmm d, yyyy”
)}”
)
i start getting errors did i miss somthing not mentiond in the blog ?
I too am getting errors here. I get “Name isnt valid. “StartDate” isnt recognized”. Same for EndDate. Not sure how to fix this.
How did you fix the StartDate and EndDate problem?
Is there a solution to the error on changing the text on the TimesheetTitle using the If Statement? I am getting “Incorrect format specifier for ‘Text'”
I had the same error. I solved it by skipping this step, doing the next step in the process and then coming back to this code.
Also:
// create the first timesheet line
ClearCollect(
colTimesheetLines,
Patch(
‘Timesheet Lines’,
Defaults(‘Timesheet Lines’),
{TimesheetID: gblTimesheetCurrent.ID}
)
);
hi Mathew
its works ok now i hade to remove
{TimesheetID: gblTimesheetCurrent.ID}
but if u have explination that will be nice
hi Matthew Devaney
u can delete my oyther comments its woreks nice and now i understand the logic thank you that was so inspiring
Hello Matthew,
thank you for this i cant wait for part3,
i have question how to display the selected week if it have multi lines ? beaucse right now its only display 1 line (with the id) but if we add more then line in same week its sum them but not display them in Timesheets only 1 line ..
2nd question
i did add timer to it but how i can take the value of the timer and add it for one of the days in that case we have 7-5 days
thank you again
Prof,
I do not plan to write a part 3… can you please rephrase you question? I do not understand it.
when we insert new line they all get same timesheetID how can we show them ( 2 lines or more ) after submitting the timesheet.
and my 2nd question is :
is it possible to add Timer control value to one of them text inputs
Hi Matthew! Another master piece. Congratulations.
Please, take a note that “TimesheetID” doesn’t exist in SharePoint list ‘Timesheet Lines’.
Review Part 1 ?
Hello, I am having issue with the “Save” and “Next” buttons, codes are not working and giving the red errors, I am new to powerapps, thank you
Mr. Young,
Please tell me what error message are the Save and Next buttons giving? Attaching a screenshot will also help.
Hi Matthew, I appreciate your reply, everything worked out well, I had an error in the code at my end, your code worked perfectly. Thank you so much for the knowledge sharing and hope to see more coming!! 😀
M. Young,
I’m glad to hear it. You’re welcome 🙂
Dear
Thank you for making these posts!
I followed the instructions as per the post & reached almost at the app completion. However, I am getting “This formula uses scope, which is not presently supported for evaluation” Error on lbl_StatusTimesheets control. Please see the attached screenshot
Is this something you can assist?
Thaks
Tere,
You code shows: ThisItem.Value.Status
I think it should be this instead: ThisItem.Status.Value
Hi Matthew
I changed the code as per your suggestion & its ok now
Thanks you so much!!
Thank you for putting this together Matthew! I have almost everything working except the timesheet status label is showing the following error for the text field:
Name isn’t valid: ‘Value’ isn’t recognized.
Invalid use of “.”
Any thoughts what I might have done wrong?
Also, I am really a novice at PowerApps and have used your tutorial as a basis for learning to tool; is there a possibility you would share thoughts on how to transition this app from working on a weekly basis for timesheets to more of a custom date range, e.g. 1st-15th, 16th-31st for timesheets?
Hi Matthew
Thanks so much for this. I am not sure where gblTimesheetCurrent.id gets set. I can follow the logic of using the id record but where does the ID from the TimeSheets list get assigned to the variable?
Many thanks!
Hi Matthew
Thanks a lot for the this blog:)
I have question
I dont want any duplicate in paycode
Example if regular is chosen it should not be visible in the paycode dropdown in the next row.
In case if I use delete the row it should be visible again.
Could you help me out with this one?
Hi Matthew
This looks excellent. I am having a problem with the code. It will be working fine, I’ll reload it, and my screen is covered in red errors, mostly the visible properties saying “Incompatible Types for comparison. These types can’t be compared: Error, Text”
This stems from a problem with my gblTimesheetCurrent variable. I am getting “Incompatible type. We can’t evaluate your formula because the context variable types are incompatible with the types of values in other places in your app”
Could you please help me troubleshoot this? It is a bit beyond my skill level
I am in the same boat
Has this ever been resolved for you? I’m encountering the same problem now when it was working just fine previously.
This is a great article, I’m struggling to recreate it though. I noticed you offered to send the file to subscribers. I just subscribed and am hoping to get access to that file so I can dig in and see what I am doing wrong. Thanks again for creating this, I’m looking forward to getting that file so I can get it to a working state to make modifications on.
Morning Matthew thank you for the write up.
My app works except for the add new line has stopped working not sure why
Patch(
colTimesheetLines,
Defaults(‘Timesheet Lines’),
{TimesheetID: gblTimesheetCurrent.ID}
)
I can’t get this to work either
Hi Matthew
I’m having an issue with the coding on the Next Button, the following errors have occurred. The function ‘Patch’ has some invalid arguments and The type of this argument ‘Title@ does not match the expected type ‘Text. Found type ‘Record’
Hi Matthew,
I get “Name isnt valid. “StartDate” isnt recognized”. Same for EndDate
Love the app, thank you for your work, having issues and with formula, complaining about needing ‘Title’ field, for your Setup The Timesheets SharePoint List, which item should be setup as the ‘Title’ field?
Vandam,
Go to SharePoint list settings. Then open the Title column settings. Make the Title column Not Required.
Hey Matthew, just wanted to say thank you so much for these tutorials!
I do have a question though, in this part of the code I’m getting an error that StartDate and EndDate isn’t recognized. I’ve added the second SharePoint list to the data, so I’m not too sure what the issue could be. Do you have any insight on this problem I’m having?
If(
IsBlank(gblTimesheetCurrent),
“Create A New Timesheet”,
$”Timesheet: {Text(
gblTimesheetCurrent.StartDate,
“mmmm d”
)} – {Text(
gblTimesheetCurrent.EndDate,
“mmmm d, yyyy”
)}”
)
Eren,
When the error “StartDate and EndDate isn’t recognized” it means the gblTimesheetCurrent variable has either not been declared or not declared properly. Make sure gblTimesheetCurrent has been declared earlier in your code, ensure StartDate and EndDate are setup as columns in the SharePoint list, and refresh your datasource.
I have gone back to test this tutorial and it will work if all the same code is used. So we can likely rule out that the tutorial is incorrect 🙂
Hi Matthew,
I’m having trouble at this point too where I’m getting the error that StartDate and EndDate are not defined. I have them listed as columns in my Sharepoint list, and I defined gblTimesheetCurrent above, but unsure why I’m still getting an error. Would you mind maybe going into some more detail on how to define that variable? Maybe I did something wrong here. Thanks
Hello Kevin,
I´m facing the same issue for a while now and wanted to know if you were able to get through this wall, do you mind sharing a guidance with this, may you have a good one