Power Apps Form Modes – NewForm, EditForm and ViewForm

Forms are the most important skill you can master on your journey to becoming a master Power Apps maker. A single form in Power Apps can be used to create a new record, edit an existing record or view a record depending on its mode. We change the mode of a form by using the functions NewForm, EditForm, ViewForm and we reset a form with Reset Form function. In this article I will show you how to use Power Apps form modes to input, change and view data.
Introduction: The Restaurant Inspections App
The Restaurant Inspections app is used by food safety inspectors to evaluate restaurants are following food safety procedures. Inspectors add new inspections, edit inspections and view inspections all in the same form.
Setup The SharePoint List
Create a new SharePoint list called Restaurant Inspections with the following columns:
- RestaurantName (single-line text)
- StreetAddress (single-line text)
- InspectionDate (date ony)
- PassedFailed (choices) with two options Passed or Failed
Then input this inspections data into the list:
| RestaurantName | StreetAddress | InspectionDate | PassedFailed |
| Clementine Cafe | 120 North Haverbrook Drive | 9/21/2021 | Passed |
| Kenny Rogers Steakhouse | 13 Main Street | 9/21/2021 | Failed |
| Pho No 1 | 67 Selkirk Avenue | 9/21/2021 | Passed |
| Stella’s Bakery | 10 Cherry Lane | 9/22/2021 | Passed |
| Olive Garden | 123 Foxgrove Road | 9/22/2021 | Failed |
| Pony Corral | 90 Tuscon Avenue | 9/23/2021 | Passed |
| Taco Del Mar | 16 Macgregor Street | 9/23/2021 | Passed |
Create A New Screen With A Form
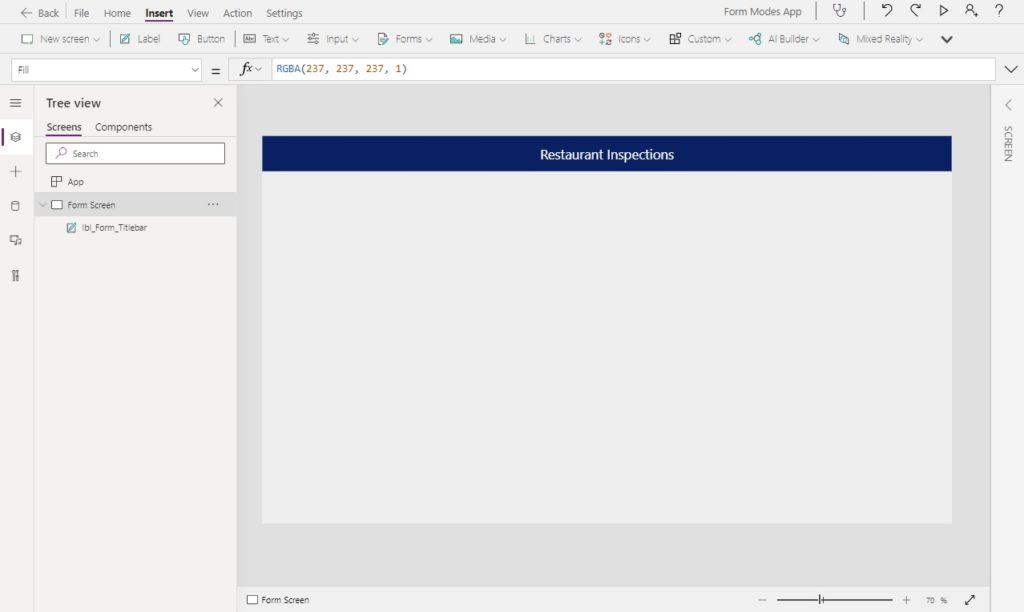
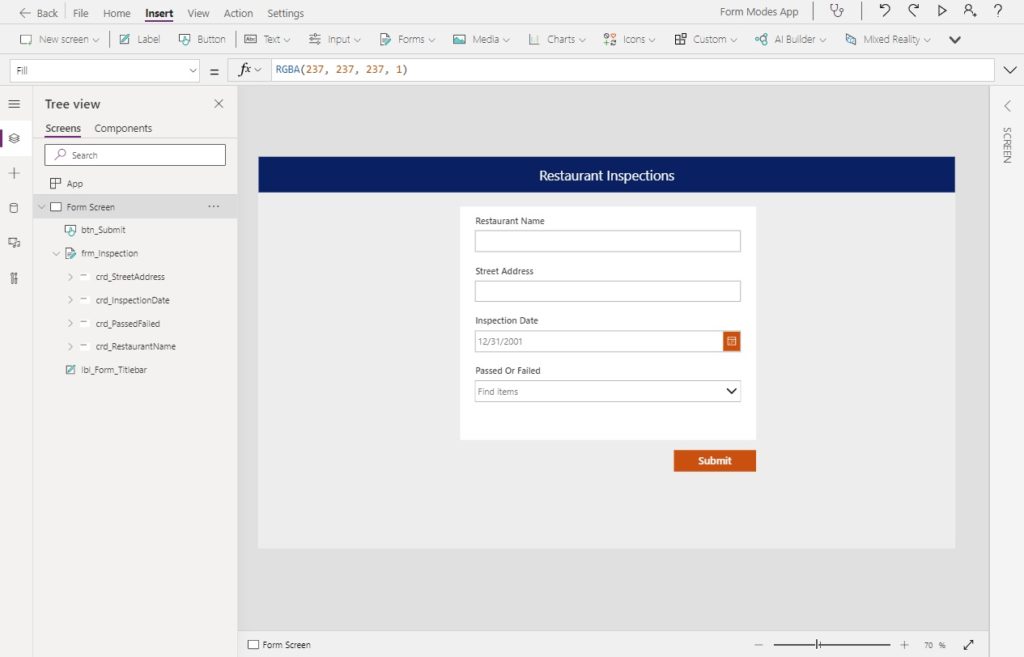
The first screen we make will have a form to record inspection results. Open Power Apps Studio and create a new app from blank. Add a new screen called Form Screen and insert a label at the top of the screen with the text “Restaurant Inspections.”
Go to the left navigation bar and open the Data menu. Add the Restaurant Inspections SharePoint list to connect it to the app. Then insert a new form onto the screen and select Restaurant Inspections as the datasource.
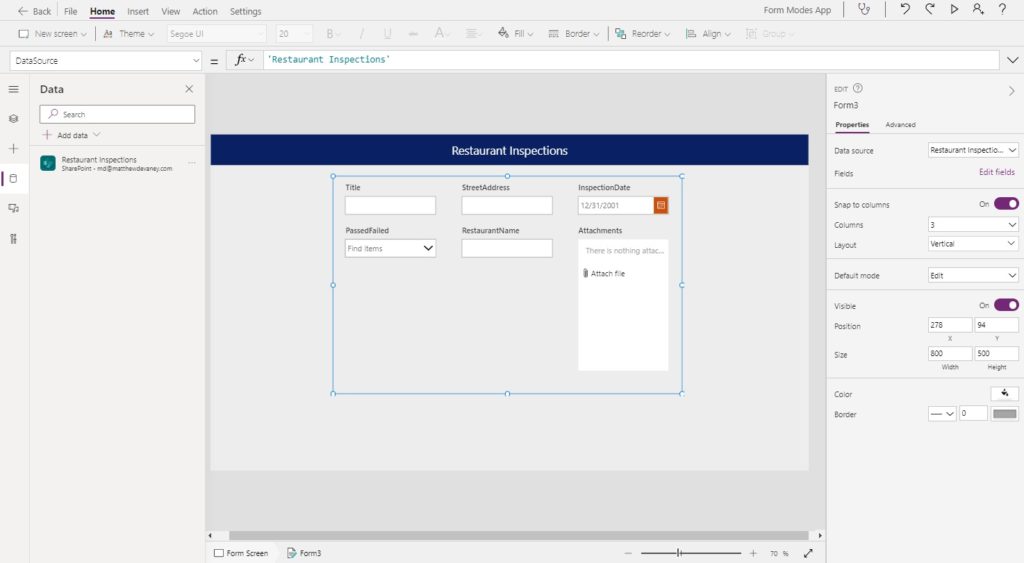
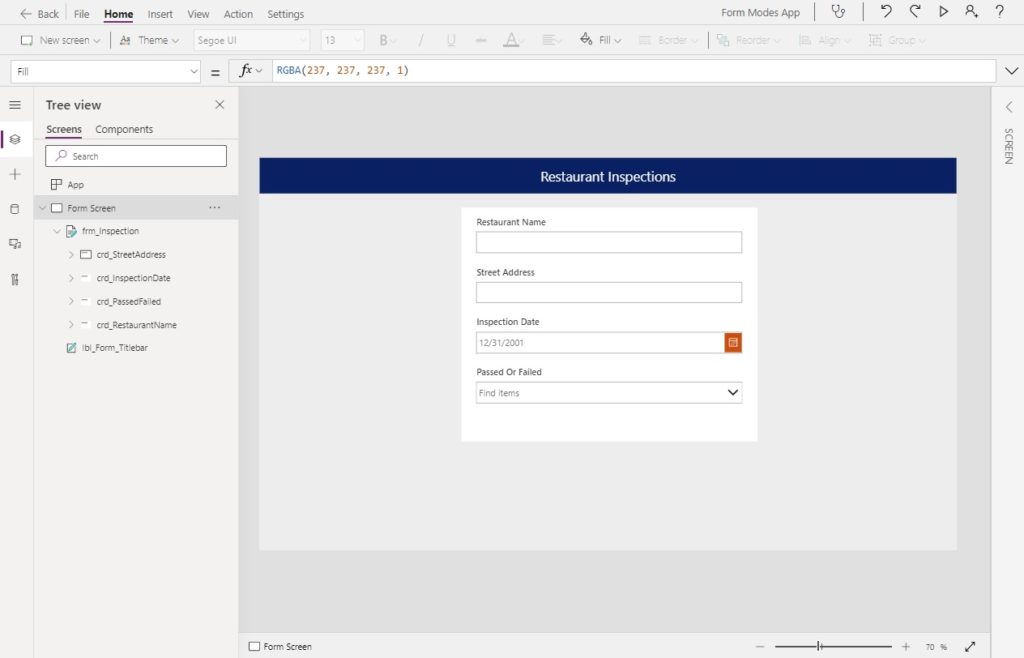
Delete the title and attachments cards. We do not require any input for those fields. Then change the form to a 1 column/vertical layout by selecting form and changing those properties in the right-side menu.
To complete the form, insert a submit button at the bottom…
…and add this code to the OnSelect property to submit the form when the inspector presses it.
SubmitForm(frm_Inspection)
Create A New Screen With A Gallery
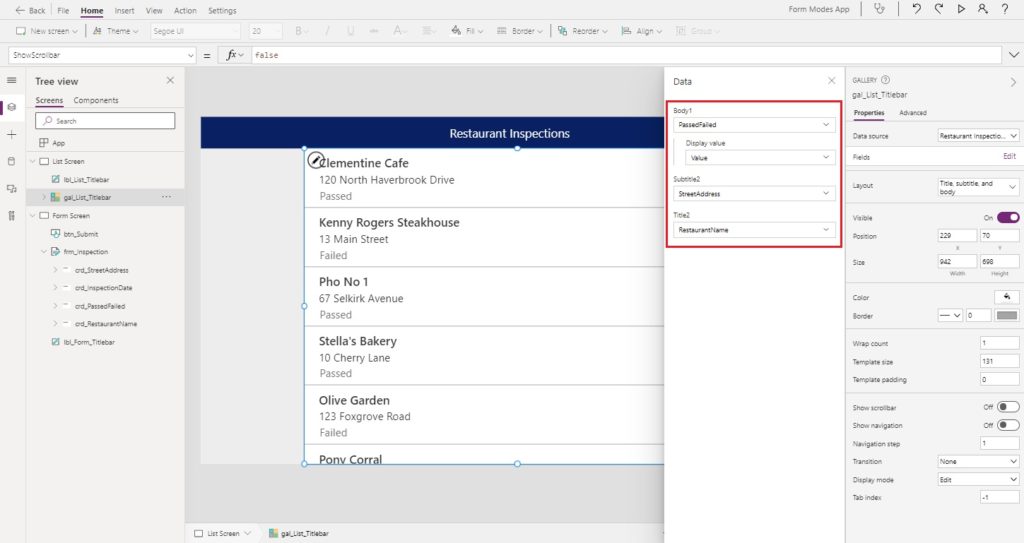
The next screen we will setup is a gallery to display all of the previously entered inspections. Duplicate the Form Screen and delete everything except the titlebar label. Then insert a gallery in the center of the screen and choose the Title, subtitle and body layout. Then click Edit fields to change the gallery’s contents.

Select these fields for the following options:
- Title – RestaurantName
- Subtitle – StreetAddress
- Body – PassedFailed
View A Gallery In The Form (ViewForm Function)
A food safety inspector selects an inspection from the gallery to view its details in read-only mode.
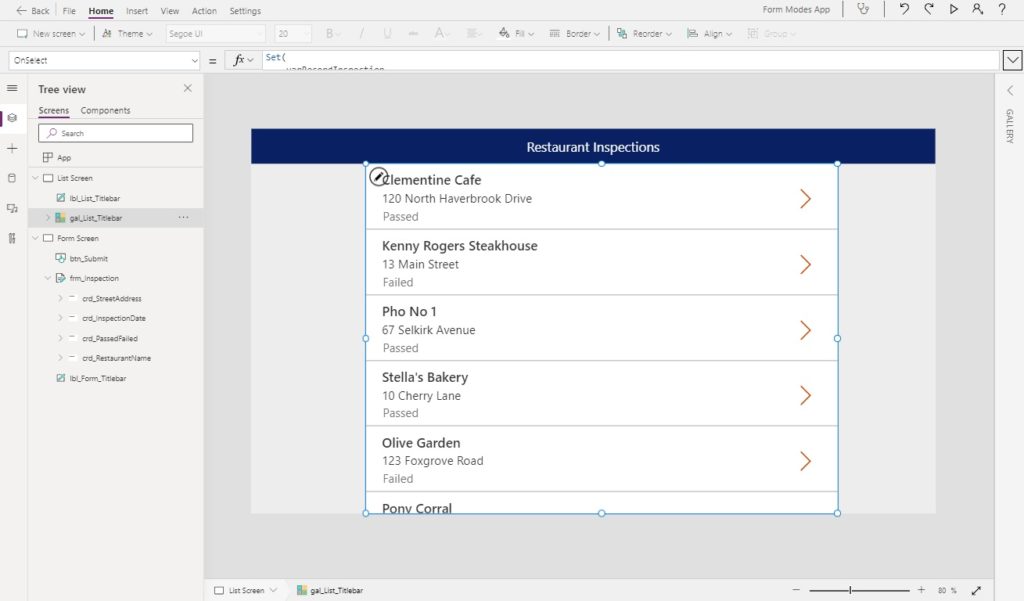
Write this code in the OnSelect property of the gallery to get the inspection record, change the form to view mode and then navigate to the form screen.
Set(varRecordInspection, ThisItem);
ViewForm(frm_Inspection);
Navigate('Form Screen');Code language: JavaScript (javascript)
Then use the app in preview mode and select one of the inspections in the gallery. When the form screen opens it will not show any values. This is because we need to supply the inspection record to the form.

Fill-in this code in the Item property of the form to tell it which record to show.
varRecordInspection
Now the form shows data from the selected inspection. One more thing we need to do is hide the Submit button when the form is is view mode.
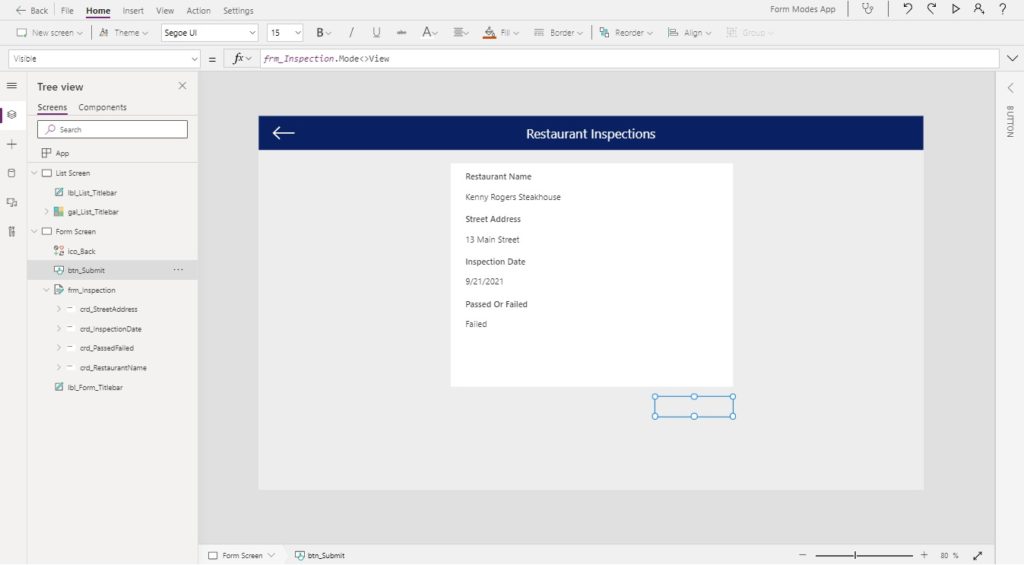
Use this code in the Visible property of the button.
frm_Inspection.Mode<>FormMode.ViewCode language: CSS (css)
Edit A Gallery Item In The Form (EditForm Function)
Food safety inspectors must be able to edit an inspection to correct data-entry errors. Insert a new Edit icon onto the titlebar.
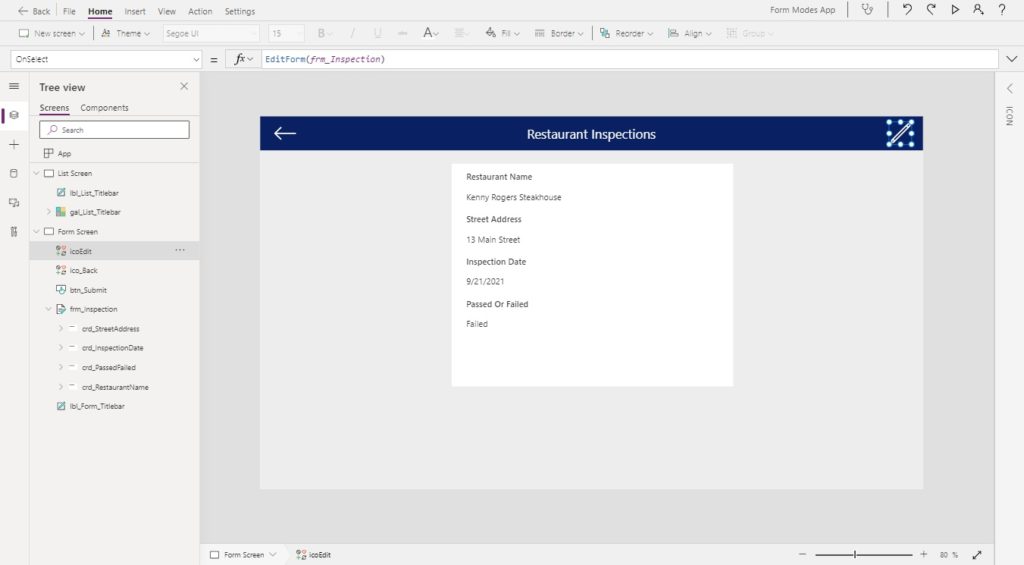
Then use this code in the OnSelect property of the Edit icon. Now when we click the icon it changes the form to edit mode and the input fields appear.
EditForm(frm_Inspection)
Before we submit the changes we must tell the form what to do when the data is successfully saved to the SharePoint list.

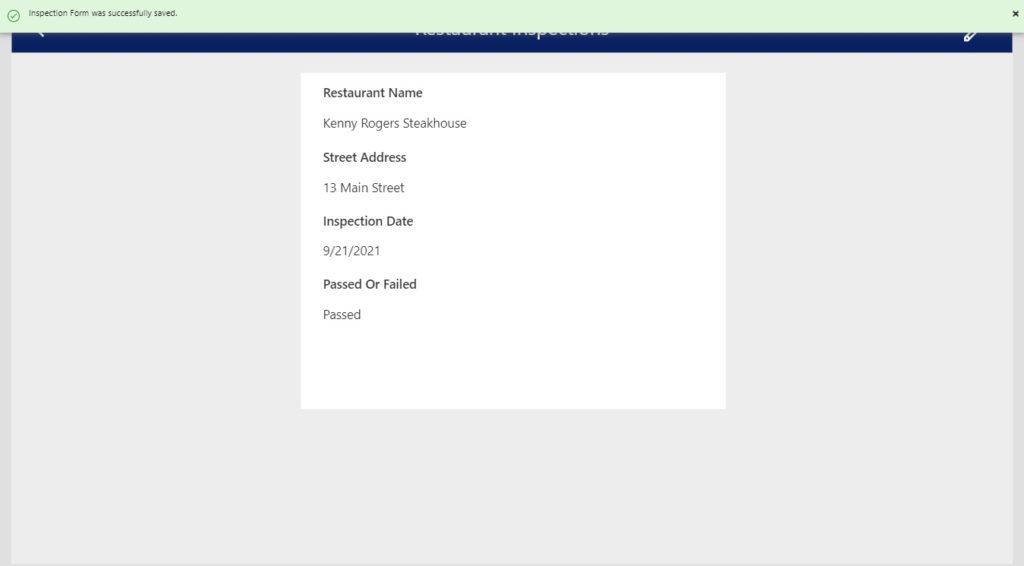
Use this code in the OnSuccess property of the form. After the form is saved, it stores the edited record in the varRecordInspection variable, changes the form to view mode and then notifies the inspector the form was saved by showing a green banner at the top of the scree.
Set(varRecordInspection, frm_Inspection.LastSubmit);
ViewForm(frm_Inspection);
Notify("Inspection Form was successfully saved.", NotificationType.Success);Code language: JavaScript (javascript)
We must also define what happens when the form cannot be saved. Write this code in the OnFailure property of the the form to show a red banner with an error message.
Notify("Error: inspection form was not saved", NotificationType.Error);Code language: JavaScript (javascript)
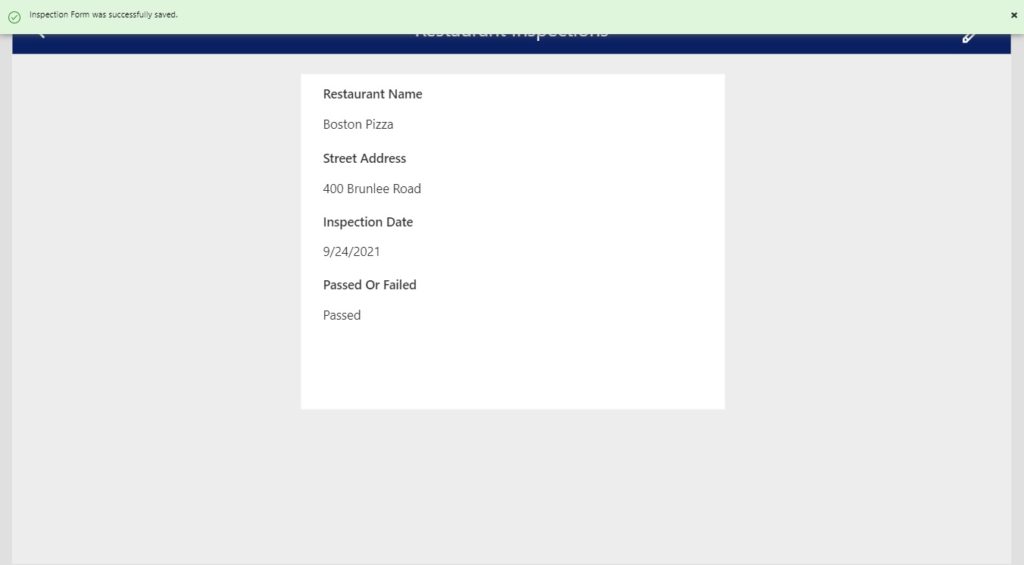
Now give the form a try. When we click the Submit button the form changes to view mode and we see a success notification at the top of the screen.
Reset The Form When Leaving The Screen (ResetForm Function)
When the food inspector leaves the screen we need to reset the form. If we do not reset the form any data entered into it will remain showing even though a another record might have been selected. Insert a new left arrow icon on the left side of the titlebar.
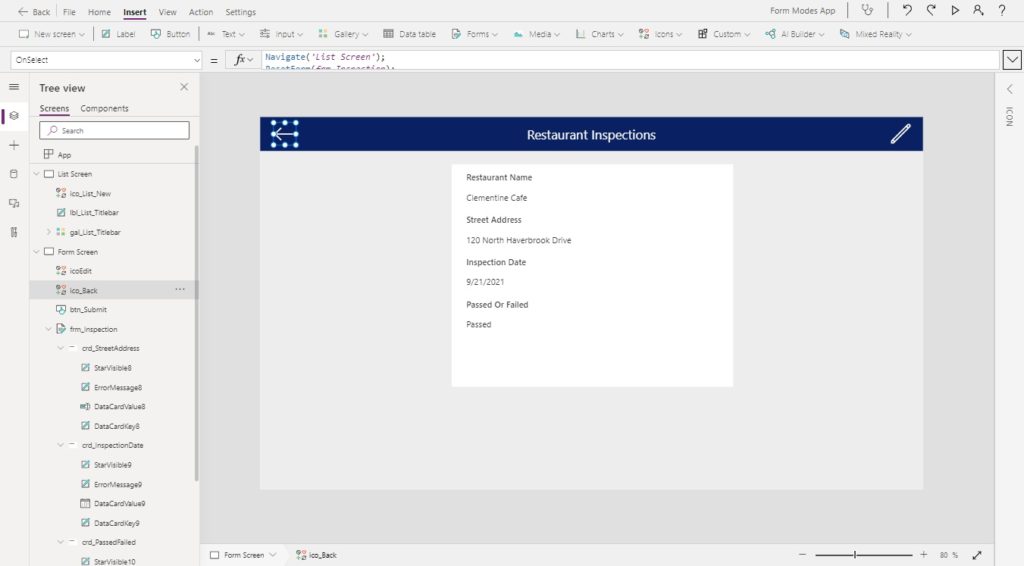
Then use this code to return to the gallery and reset the form.
Navigate('List Screen');
ResetForm(frm_Inspection);Code language: JavaScript (javascript)
Add A New Item To The Gallery (NewForm Function)
The last feature food inspectors require is the ability to create a new inspection. Insert an Add icon on the right-side of the titlebar.
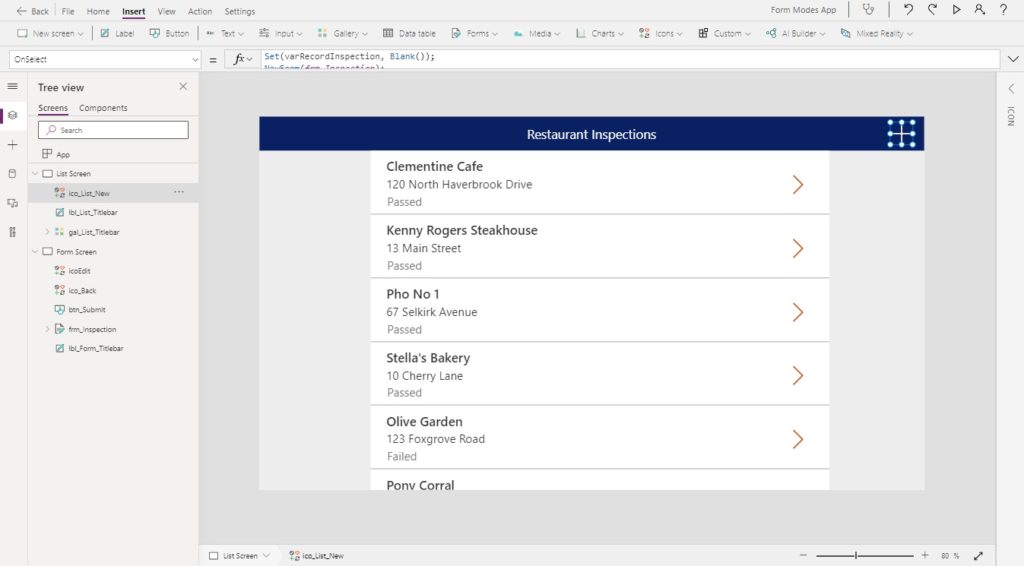
Then fill-in the OnSelect select property with this code. It will set the varRecordInspection to blank, change the form to new mode and navigates to the form screen.
Set(varRecordInspection, Blank());
NewForm(frm_Inspection);
Navigate('Form Screen');Code language: JavaScript (javascript)
When we click on the Add icon and go to the form screen initially the Edit icon is showing. An inspector should not have an option to edit while creating a new record.
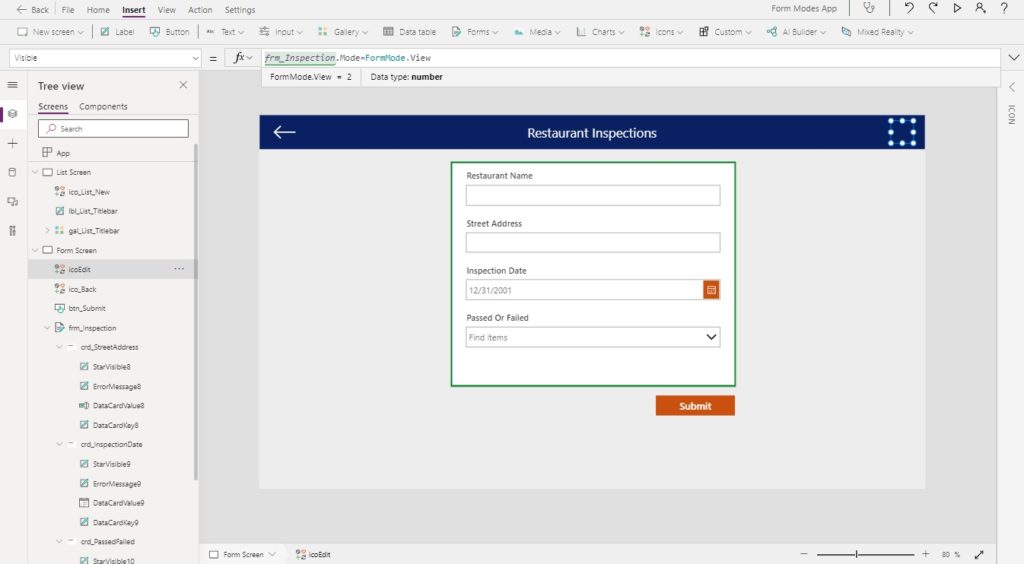
Use this code in the Visible property of the Edit icon to hide it.
frm_Inspection.Mode=FormMode.View
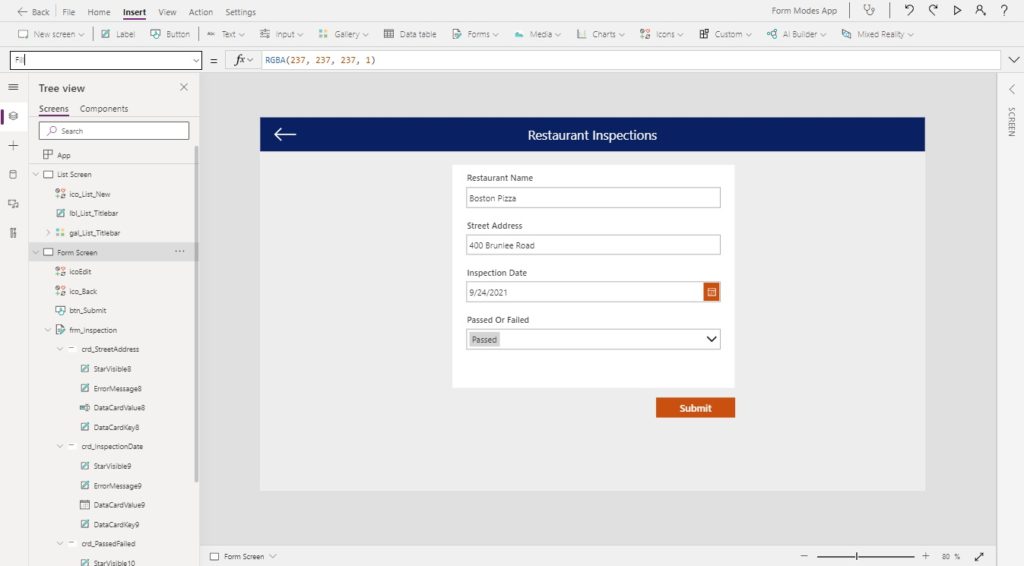
Now we are ready to test the form. Fill-in the form with inspection details and click the Submit button.
When we submit the form a success notification shows at the top of the screen…
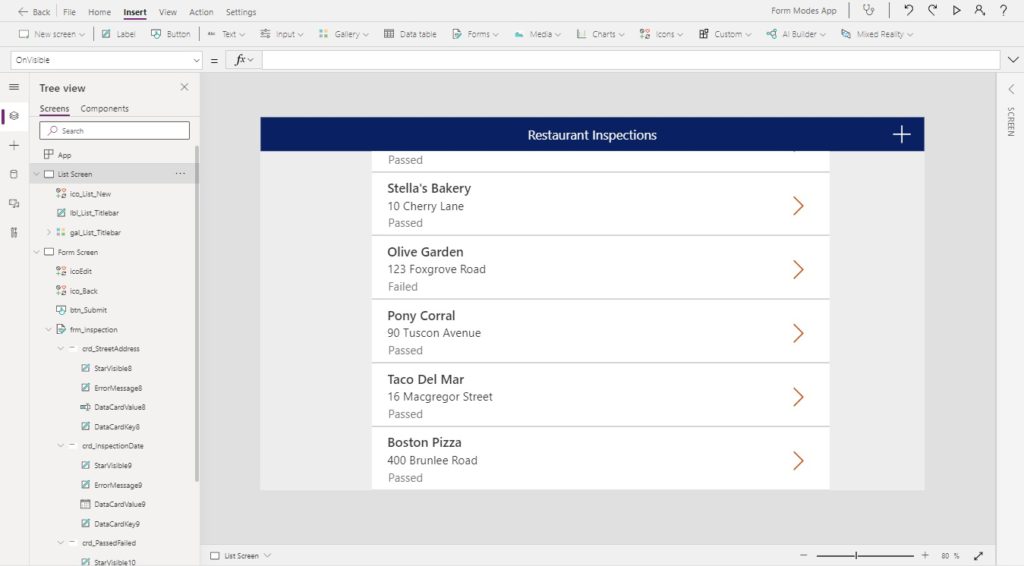
…and the new inspection shows at the bottom of the gallery.
Did You Enjoy This Article? 😺
Subscribe to get new Copilot Studio articles sent to your inbox each week for FREE
Questions?
If you have any questions or feedback about Power Apps Form Modes – NewForm, EditForm and ViewForm please leave a message in the comments section below. You can post using your email address and are not required to create an account to join the discussion.


Not only enjoy I love it
Necdet,
I appreciate the feedback. Your messages let me know which topics you enjoy so I can do more. Thank you for your continued support my friend! ?
Hi Matthew,
Are you sure the button OnSelect property must have SubmitForm(btn_submit) ???
Necdet,
Silly mistake on my part. Now it’s corrected. Much love!
Great article! Thanks! One question :
Why do you use the Lookup function to populate varRecordInspection and not Gallery1.Selected?
Thanks!
Dominik,
There are two reasons why I do this:
#1 A gallery can lose its selection so its safer to store in a variable
#2 The gallery is on another screen and referencing it keeps that screen in memory.
What I meant is why not use Set(varRecordInspection, Gallery1.Selected)?
Dominik,
Yes, that method would also be successful. I’ve gotten into the habit of doing a LOOKUP because I believe Gallery1.Selected would also contain information about controls in the gallery and their properties. But your method is valid as well. I will think about this for a little while and decide whether or not to updated my blog post.
On your side, Gallery1.Selected will run faster since its already loaded into the app’s memory. It’s also simpler.
the reason why i prefer the LOOKUP instead of Gallery1.Selected, is because if you use Gallery1.Selected and use the Form.Unsaved property on another screen.. then unsaved will give incorrect results.
wont it?
Kam,
Good call out! I did not know that fact about the Unsaved property. In fact, sometimes I wondered why it was wrong 🙂
Why Set(varRecordInspection, LookUp(‘Restaurant Inspections’, ID=ThisItem.ID)); and why not Set(varRecordInspection, ThisItem);
Hello Sir!!!!
I have no word to express you. I can say just simply fantastic!!!
I have a question, may be I am not right
Why don’t you make a record power apps and power automate full course and sell for those who are demanding it???
Could you please make a video and help us?
please don’t keep this much priceless knowledge only with you.
I never see a power app expert like you.
please please please help us!!!
Many thanks.
I am really interested to catch your brilliant knowledge at any cost.
I hope, you will give the answer for my question.
I apricate you
Many thanks Mr Mattew Davaney
sincerely
Zewdu Kebad
Columbus,OH,USA
Zewdu,
I would love to record videos someday and develop a Power Apps course. An easy place to start would be recording some of the topics I have blogged. Thank you for the words of encouragement. If I do this you’ll be the first to know!
Thanks So much Matt for your positivity. I am waiting.
Hi Matthew thanks for sharing the valuable information for us.I really appreciate the way you are doing for others that sharing your knowledge
Can you please share a detailed knowledge on power Automate.that could be a great
Bala,
I would like to start sharing more Power Automate knowledge. Thanks for the words of encouragement!
I get an error saying ‘Title’ field is required when I try to submit a new entry. I expected that as Title field is a required field in SharePoint lists. How did you get around this please?
Bob,
To solve the issue, please open the list settings, scroll down to the Title field and click on its name to open column settings, mark it as not required then select Save 🙂
Hello Sir!!!
I have a question???
I saw that you built multiple forms on a single screen for one data Sources.
If we want build multiple forms on a single screen on different data sources for each form with out add gallery(all buttons are added on the screen .
The problem is when each form has been submitted by its on submit button and it is in view Mode, the rest forms do not display/ load any thing and even can’t edit /add each form in view mode by its own edit/add icon or by a single i con for all forms. I need to edit and add new item on each Form in view mode after submit. How could I do this for each form ???
many thanks
When using NewForm(frm_Inspection);Navigate(‘Form Screen’); can we specify SetFocus( Control ) when navigating to that new form screen with blank form fields, so that focus is on a specific form field without having to select, tab, or touch it first?
Mike L,
Wow, what an excellent idea? I am going to use this on every form I make going forward. Try this code in the OnVisible property of the form to initialize the cursor instead the restaurant name text field:
SetFocus(DataCardValue_RestaurantName)
Matthew, LOL. I don’t know if what I suggested actually works. I’m asking if it would be possible, because I’m unclear if “NewForm” is different from an edit screen, which doesn’t seem to allow setting focus on fields.
@Matthew Devney. Everything works perfectly alright. I cannot save a new entry. Instead its editing the last saved entry. Can you please help me what am I missing here ?
Nithish,
Your code likely has the variable for CurrentRecord still referencing the past record.
Superb Matthew. Question: Pls how can I print to a zebra (z410) label printer from either a desktop, phone, or both. thanks
Martin,
I do not own a Zebra label printer. You’ll want to ask this question on the Power Apps forums:
https://powerusers.microsoft.com/t5/Power-Apps-Community/ct-p/PowerApps1
Thank you Mattew.
Hi Matthew, I thought I’d pull you back in time a bit… 🙂
Wondering if there’s a way to format a number on a New Form similar to how you do this on an Edit Form? I’ve added this to the Default of an Edit Form,
and the field displays perfectly. But, on a New Form I simply get the imputed text, no formatting…because the value isn’t saved yet. Any work-arounds?
Ron,
Unfortunately, Power Apps does not support input masks. I would love if this feature existed, but I don’t know how it can be done.
Man, you are a lifesaver! I greatly appreciate all the hard work it took for you to get all of these examples online. I’m old school and I’ve been doing SharePoint since 2006 and I’ve always worked with Visual Studio C#. I’ve been reluctant to move to the modern technology and the Power platform. I’ve been doing Power Apps and Power Automate for almost two years now, and you’ve been instrumental in my success. Thank you!
Jose,
Thank you for saying this 😊
Thanks Matthew. I want a button to cancel & refresh the form but stay on the ‘Form Screen’ switching it back to view. However, the edited data is retained. Sometimes it resets in a second or two. Sometimes it doesn’t at all. Any suggestions?
Hey, I really enjoyed this article. Found it when I got frustrated making a lovely form (we all know how hard that is) then discovering I had to make it all over again to be able to edit it
Hi Matthew – thanks for this. I’ve searched and searched to figure out how to deal with creating an expenditure app. I need to be able to populate a gallery in order to create a collection of expenses (child list) that belong to one invoice (parent list). The child list requires some cascading dropdowns which I can’t seem to figure out how to add to a gallery but can add to a form. Do you think it would be possible to add the expense fields (child list) and cascading dropdowns (reference list) to the form and have those then populate the gallery using the method here? Any thoughts or nudge in the right direction would be really appreciated!
Hi Matthew,
I’m having the following issue: when I leave a field blank it is being filled in with value from the last submission. I want to leave it blank as it is not mandatory.
How could I solve this?
Thank you very much !
Assigning variable to the form control doesn’t seem to work for me with the latest powerapps version. Not sure is a bug or not. Previous version works just fine.
Hello – Can you add a Delete record with this method?