Power Apps Excel-Style Editable Table – Part 2

This is a tutorial series where you will learn how to build an Excel-style editable table in Power Apps. In Part 1 we learned how to display data in a table, modify the contents and save the changes back to a datasource. Now we are going to build a data-entry table to add new records and learn how to delete any unwanted records as well.
If you haven’t read Part 1 yet I would highly encourage you to read it first. Or if you’ve read it already and are ready for what comes next this is Part 2.
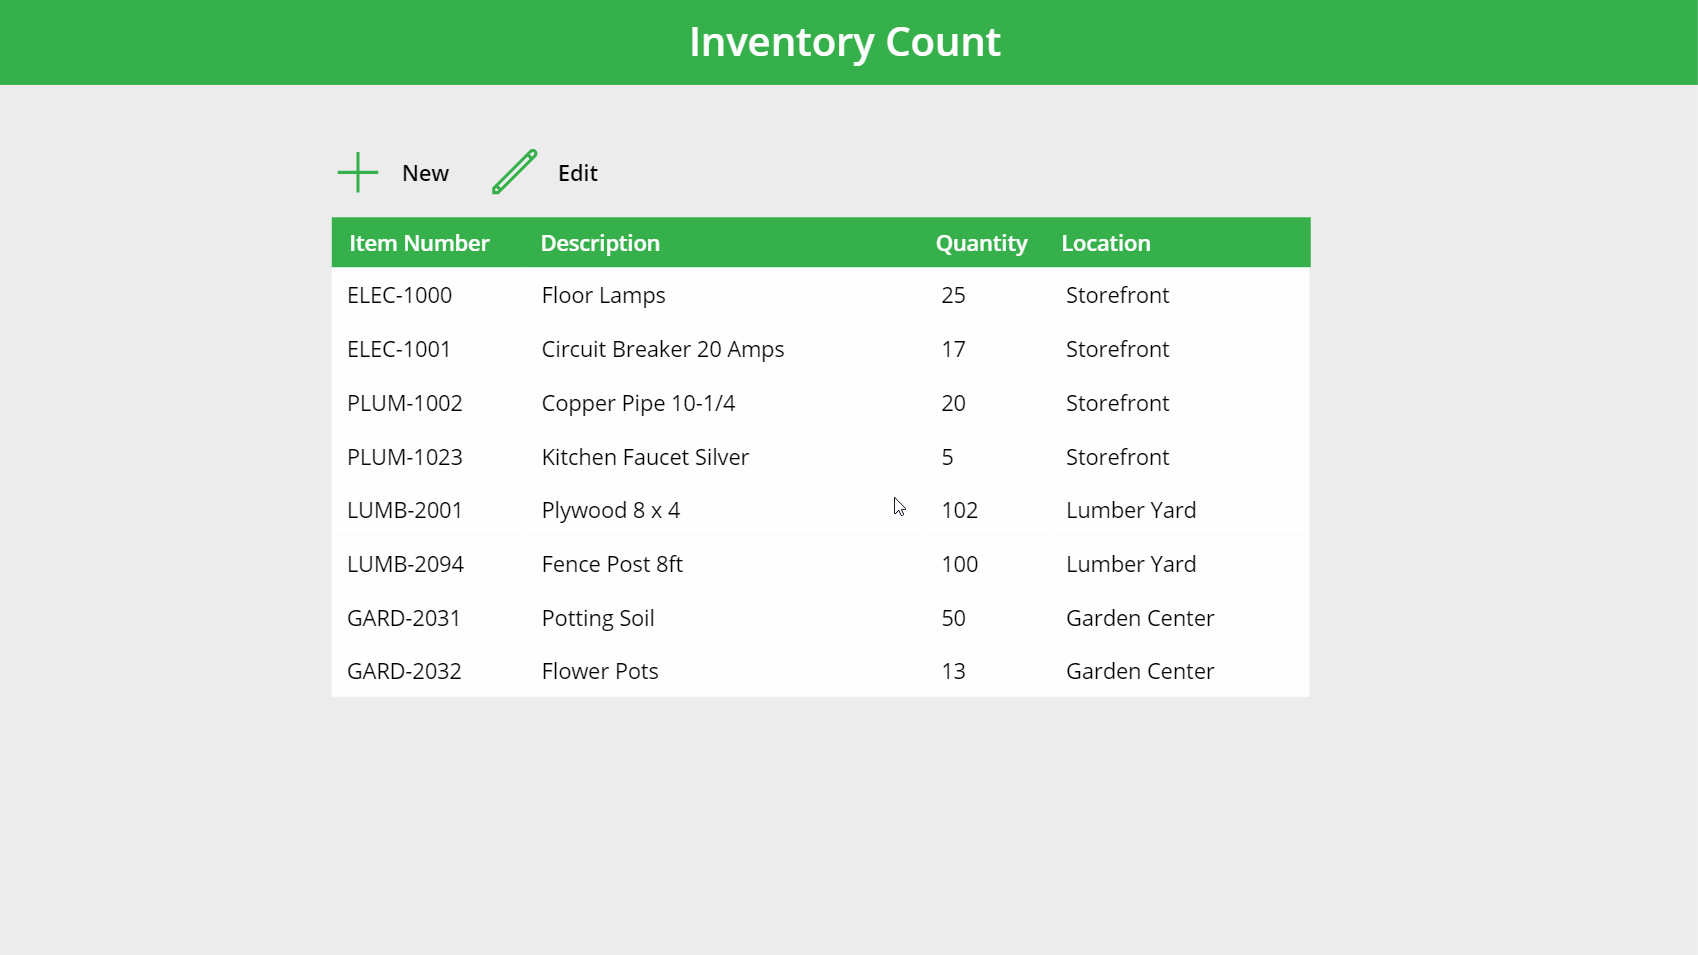
Inventory Count App Continued
The Inventory Count App is used by employees of a home improvement store to record the actual amount of each product the business owns. Employees add new records for products when there is no existing product in the datasource. If a product is no longer sold at the store employees can delete the record entirely.
Adding New Records
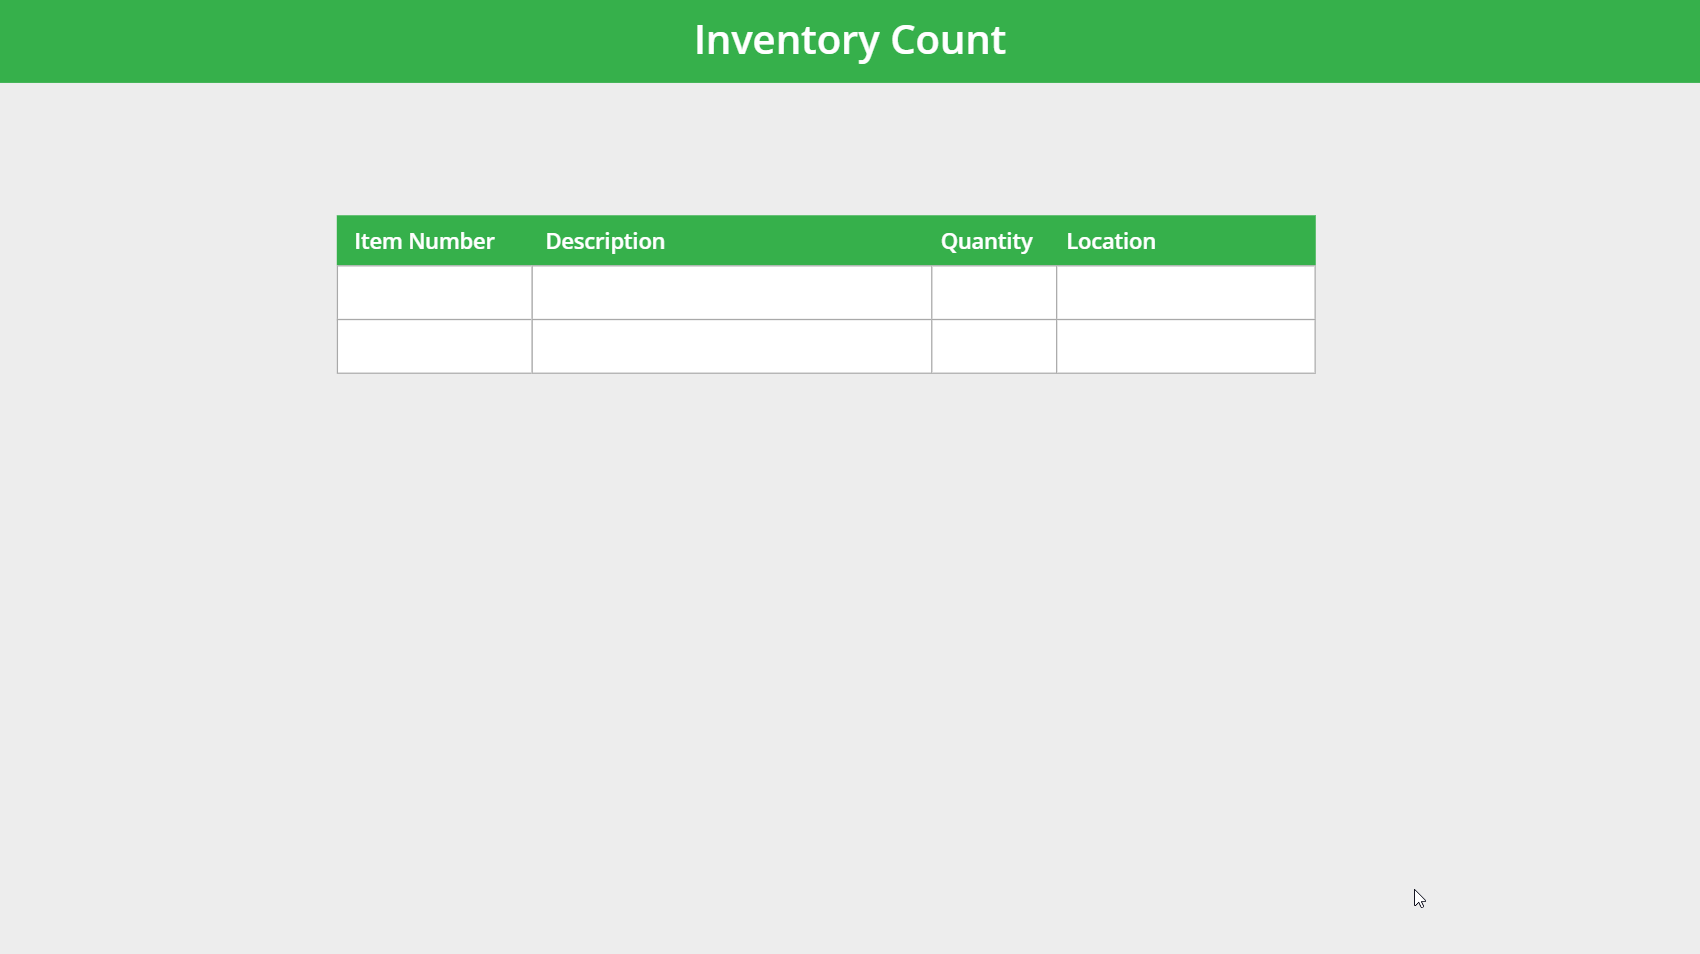
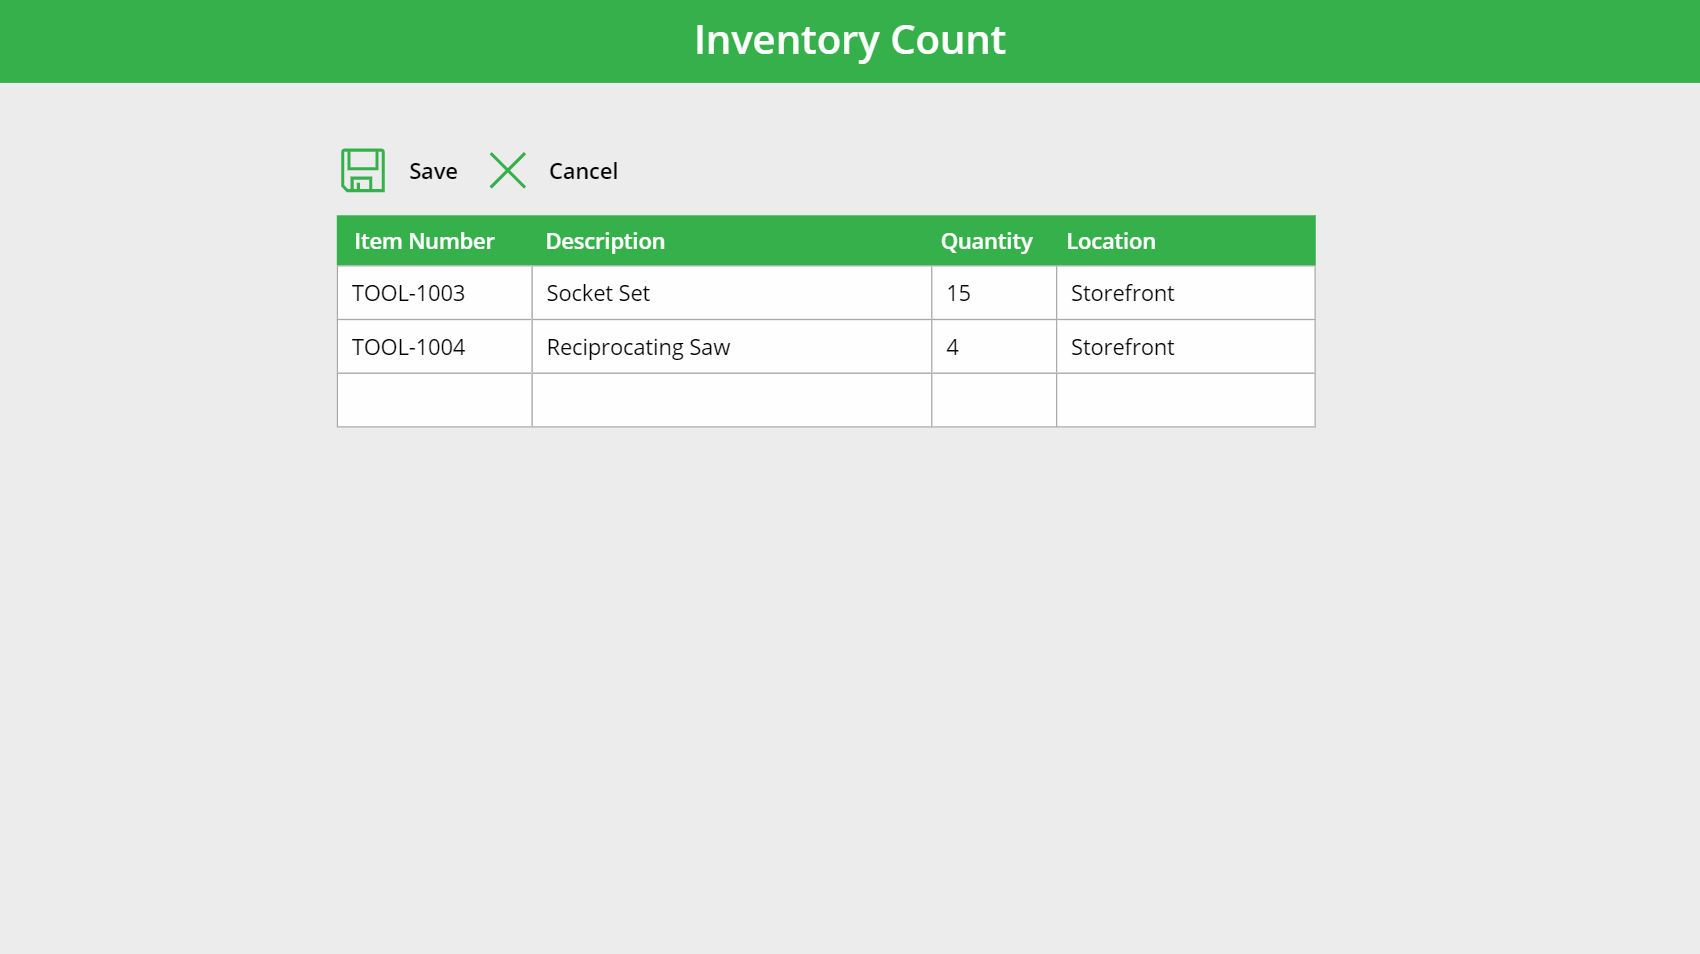
To add a new record the employee clicks the New icon and a data-entry table appears.
Place an ‘Add’ icon on the screen (ico_New) and a label with the text “New” (lbl_New). Then write this code in the OnSelect property of both the icon and label. It will create two blank records in the collection colUpdates with the ID numbers 1 and 2 and change the editable table to new mode.
ClearCollect(colUpdates, {ID:1},{ID:2});
Set(varGalleryMode, "New");Code language: CSS (css)
Use this code in the Items property of the gallery to make it show records from colUpdates when in new mode.
If(varGalleryMode="New", colUpdates,'Inventory Count')Code language: JavaScript (javascript)
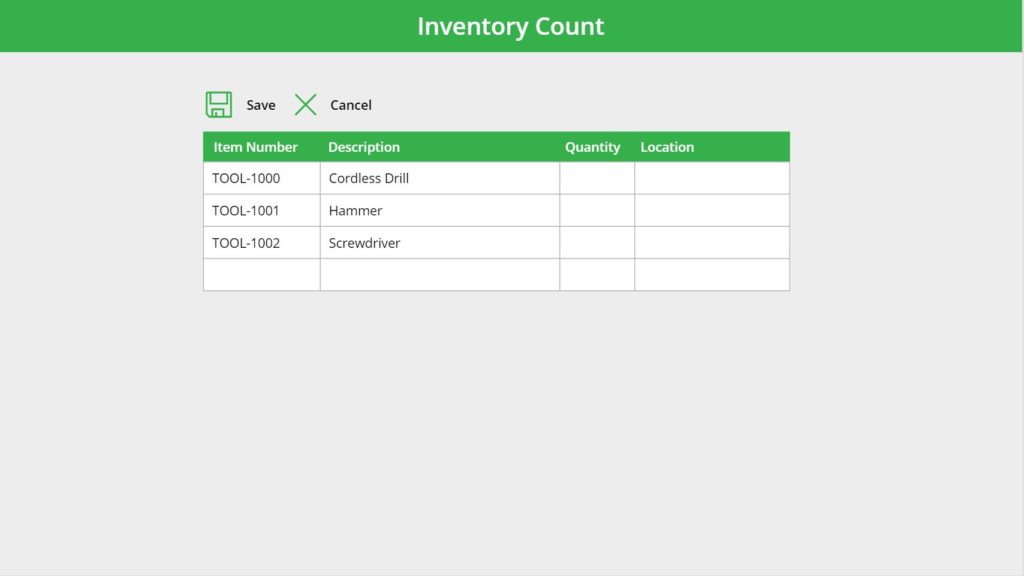
Allow the employee to write values in the text inputs: txt_ItemNumber, txt_Description, txt_Quantity and txt_Location by changing their DisplayMode property to this code. Now table will convert to new mode when the icon is clicked.
If(varGalleryMode in ["New", "Edit"], DisplayMode.Edit,DisplayMode.View)Code language: CSS (css)
Next, we want the employee to be able to add as many new items as they see fit. When a value is typed into any text input in the last row of the table another row will appear directly underneath it.
To add this feature put the code below into the OnChange property of all 4 text inputs: txt_ItemNumber, txt_Description, txt_Quantity and txt_Location.
With(
    {wLastID: Last(colUpdates).ID},
    If(varGalleryMode="New" And ThisItem.ID=wLastID, Collect(colUpdates, {ID: wLastID+1}))
);Code language: JavaScript (javascript)
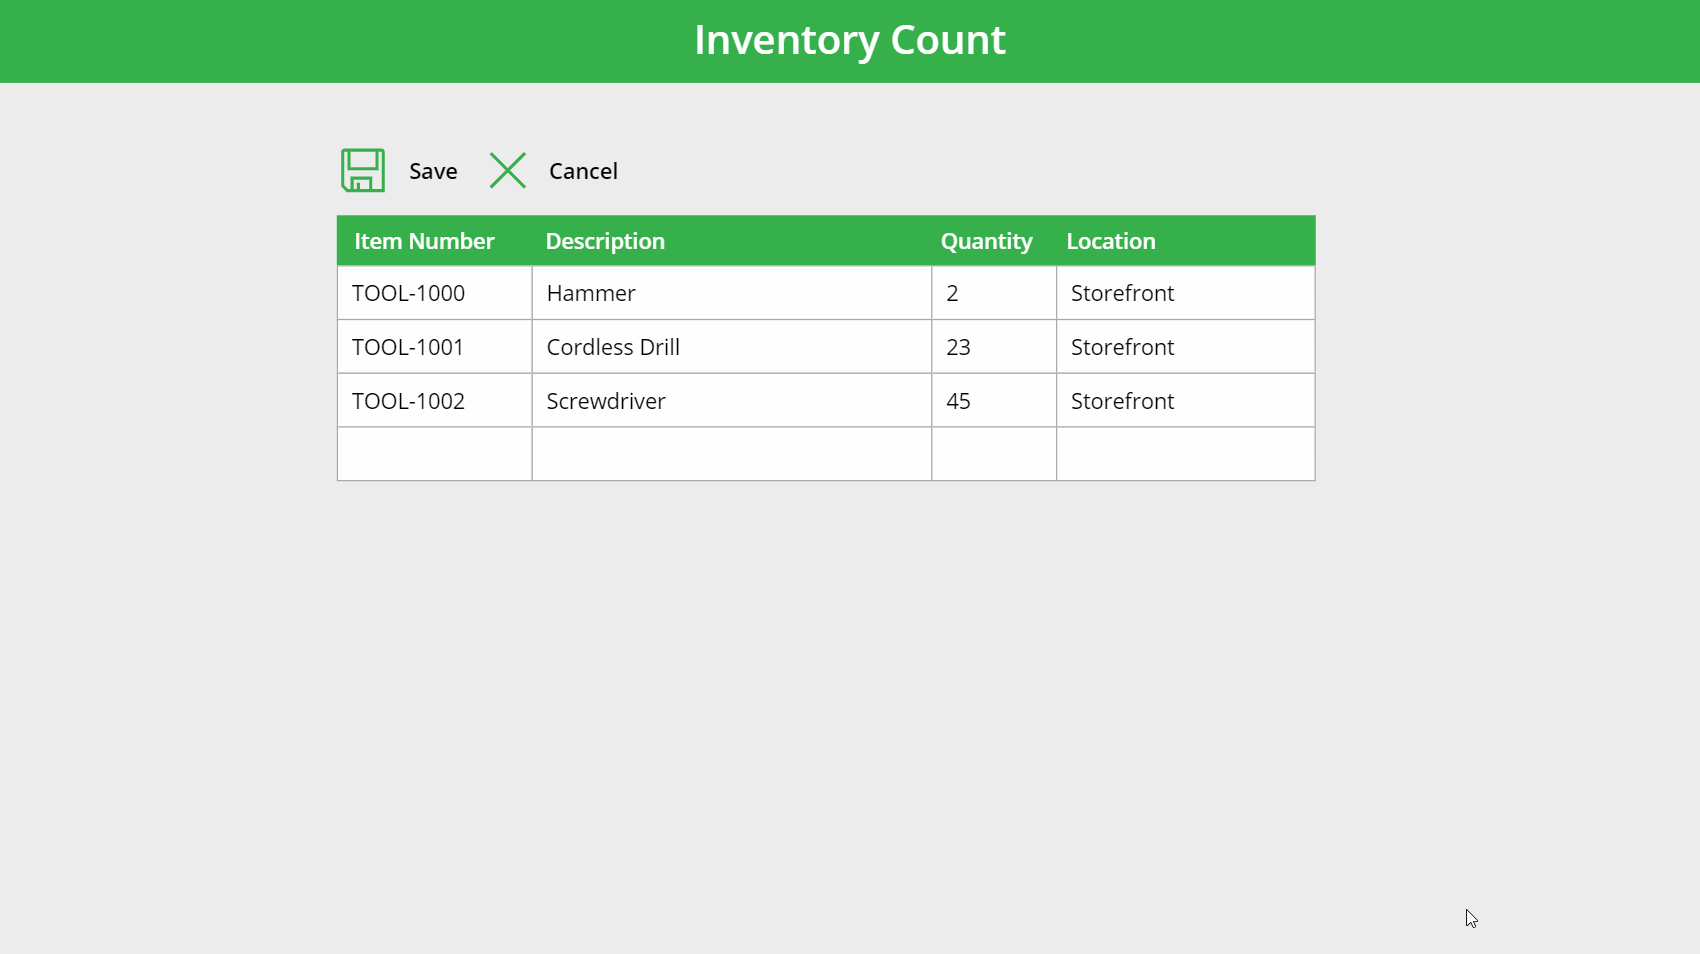
Saving & Cancelling New Records
When the employee is done entering data they can click the ‘Save’ icon to write all of the new records back to the datasource at-once. Or they can click ‘Cancel’ button and not save anything at all.
To do this we will re-use the Save icon (ico_Save), the Cancel icon (ico_Cancel) and the labels beside them (lbl_Save, lbl_Cancel) from Part 1 of the tutorial.
Change the code in the Visible property of the Save/Cancel icons and labels to this instead.
varGalleryMode in ["New", "Edit"]Code language: CSS (css)
The save icon has a different behaviour when the gallery is in new mode vs edit mode. Within the OnSelect property create an IF statement as shown in the code block below. Again, it will include all of the previously written code for edit mode.
// Create a collection to store updated values
If(
    // Do this when new entries are being created
    varGalleryMode="New",

    // Load all new entries into the collection colUpdates
    ForAll(
        gal_EditableTable.AllItems As NewRows,
        Patch(colUpdates,
        LookUp(colUpdates, ID=NewRows.ID), {
            ItemNumber: NewRows.txt_ItemNumber.Text,
            Description: NewRows.txt_Description.Text,
            Quantity: Value(NewRows.txt_Quantity.Text),
            Location: NewRows.txt_Location.Text
        })
    );

    // Clear any ID numbers from colUpdates and delete the last row which holds no info
    UpdateIf(colUpdates, true, {ID: Blank()});
    Remove(colUpdates, Last(colUpdates)),

    // Do this when entries are being edited
    varGalleryMode="Edit",

    // Load changed entries into the collection colUpdates
    ForAll(
        Filter(
                gal_EditableTable.AllItems,
                tog_isChanged.Value
        ) As ChangedRows,
        Patch(colUpdates,
        Defaults(colUpdates), {
            ID: ChangedRows.ID,
            ItemNumber: ChangedRows.txt_ItemNumber.Text,
            Description: ChangedRows.txt_Description.Text,
            Quantity: Value(ChangedRows.txt_Quantity.Text),
            Location: ChangedRows.txt_Location.Text
        })
    )
);

// Update SharePoint with new values or changed values for existing rows
Patch('Inventory Count', colUpdates);
Clear(colUpdates);

// Return gallery to view mode
Set(varGalleryMode, Blank());
Code language: PHP (php)
Clicking the save button will now insert new records into the datasource.
The Cancel icon does not need any additional code in its OnSelect property. We can rely on the code that’s already there.
// Reset text inputs to erase any edits made
Set(varResetTextInputs, true); Set(varResetTextInputs, false);

// Clear any changes from colUpdates
Clear(colUpdates);

// Return gallery to view mode
Set(varGalleryMode, Blank());Code language: JavaScript (javascript)
Just as in edit mode when Cancel is clicked the records do not get saved.
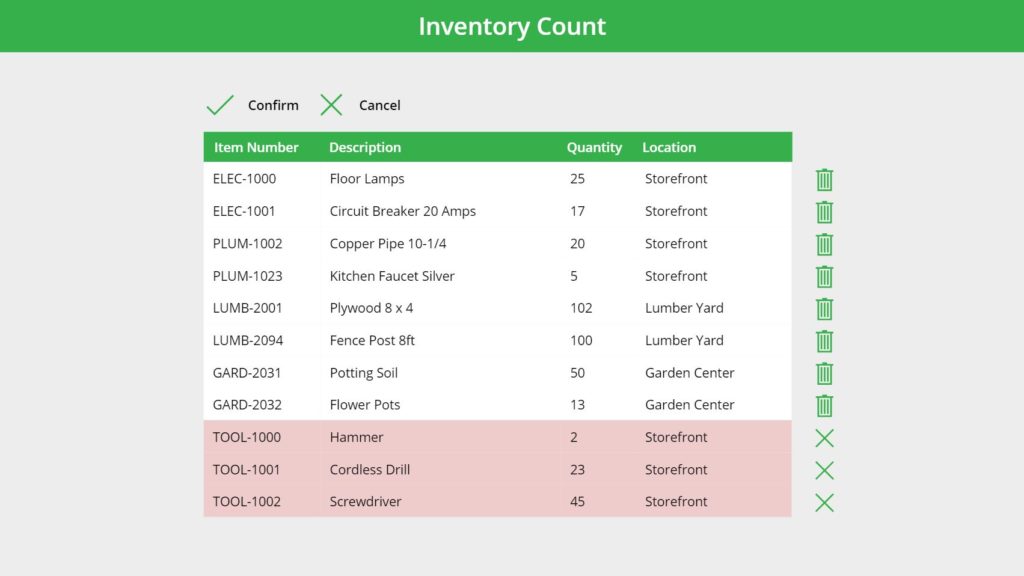
Deleting Records
If a product is no longer stocked by the company or a data-entry error is made the employee can delete it. Place a Trash icon on the screen (ico_Delete) and a label beside it (lbl_Delete)
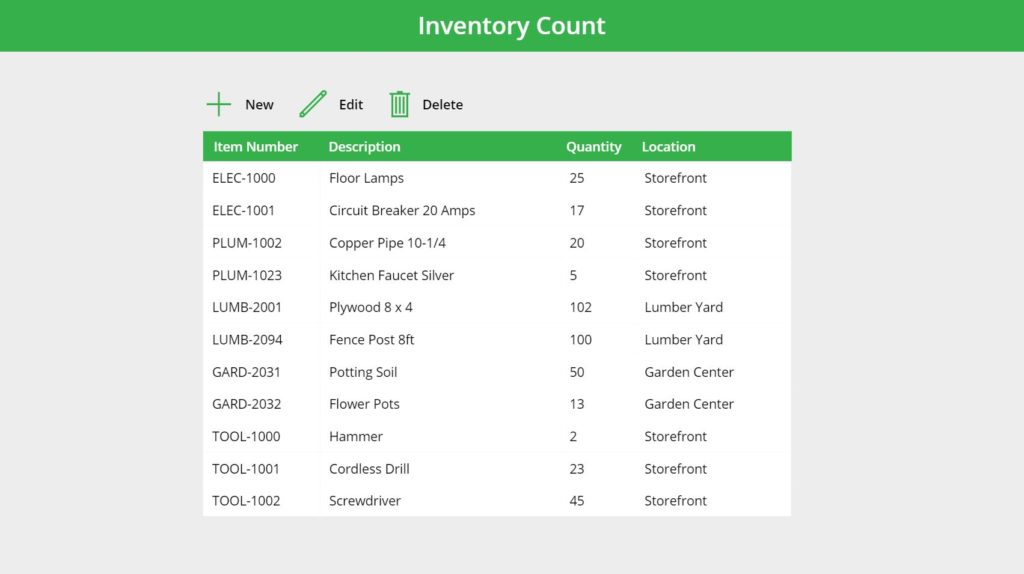
Put this code in the OnSelect property of the Delete icon then click to change the table to delete mode.
Set(varGalleryMode, "Delete");
Set(varIsDeleteMode, true);Code language: JavaScript (javascript)
Employees will select which records to delete by clicking the trash icon beside it. Place a trash icon inside the gallery (ico_DeleteLine) as shown in the image below.
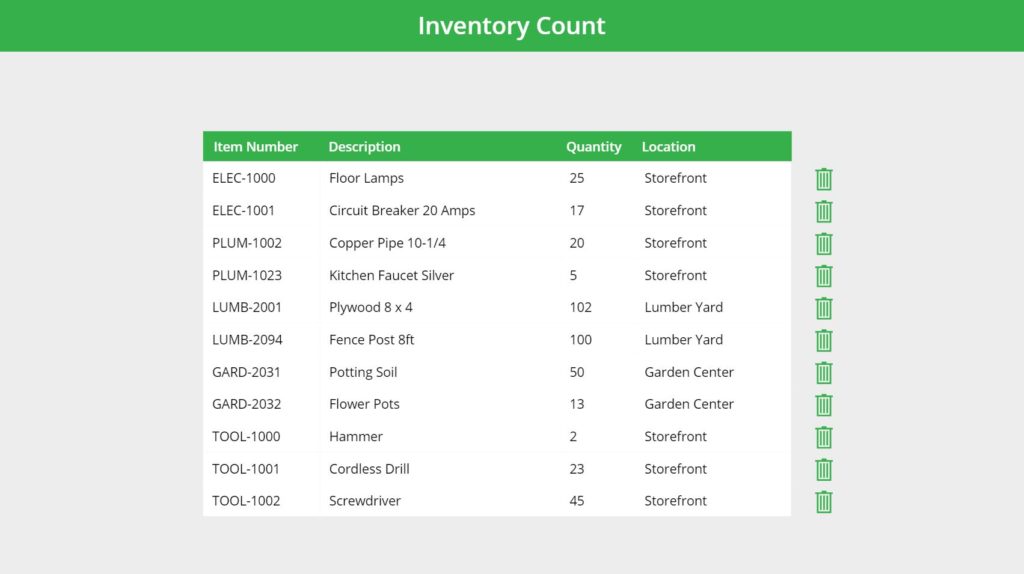
When a record is selected for deletion it becomes highlighted in red. The trash icon changes to a cancel icon so the employee can deselect the record if needed.
Use this code in the OnSelect property of ico_DeleteLine to select the record and add it to the collection colDeleteRecords to be deleted.
If(Self.Icon=Icon.Trash, Collect(colDeleteRecords, ThisItem), Remove(colDeleteRecords, ThisItem));
If(CountRows(colDeleteRecords)>0 Or varGalleryMode="Delete", Set(varIsDeleteMode, true), Set(varIsDeleteMode, false));Code language: JavaScript (javascript)
This code goes in the Icon property of ico_DeleteLine and controls whether the Trash or Cancel icon is shown.
If(ThisItem in colDeleteRecords, Icon.Cancel, Icon.Trash)Code language: CSS (css)
Input this code in the Visible property of ico_DeleteLine to make it appear when the form is in edit mode. Additional code is included to allow deletions during new mode and edit mode.
varGalleryMode in ["Delete","Edit"] Or (varGalleryMode="New" And ThisItem.ID<Max(colUpdates,ID) And CountRows(colUpdates)>1)Code language: JavaScript (javascript)
Once records are selected for deletion employees can click the Confirm icon to remove them or the Cancel icon to return exit delete mode. Place a Check icon on the screen (ico_ConfirmDelete), a Cancel icon (ico_CancelDelete) and labels beside each.
ico_ConfirmDelete and ico_CancelDelete should only appear when the gallery is in delete mode. Use this code in the Visible property.
varIsDeleteMode
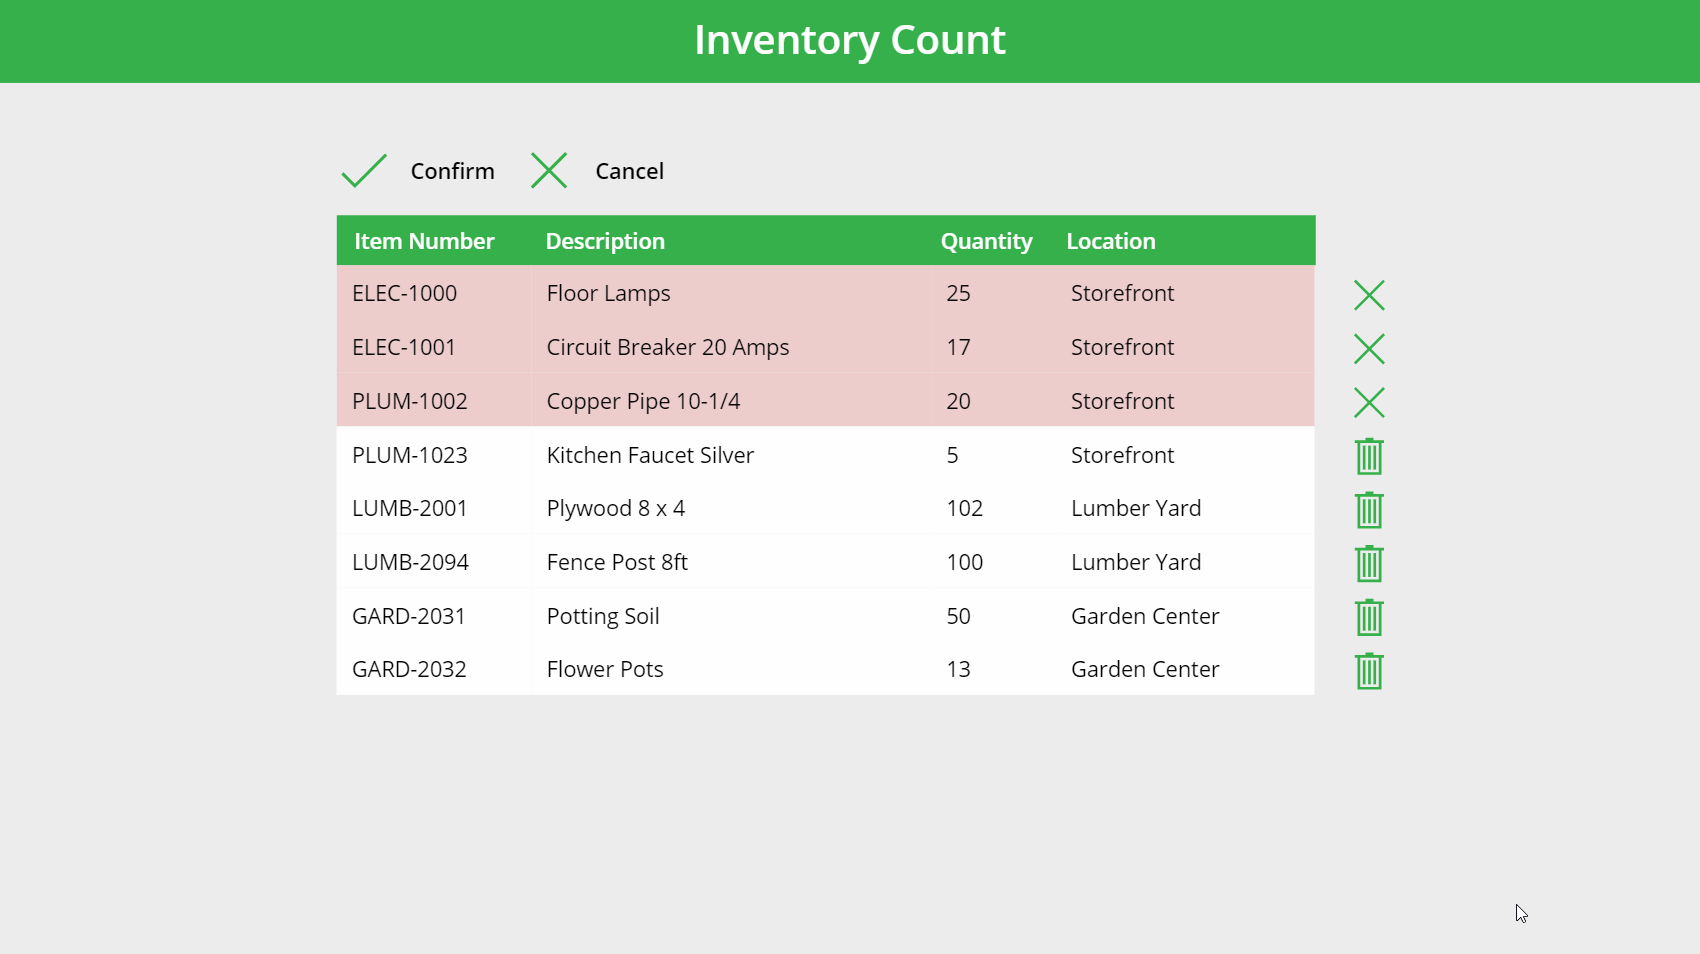
When ico_ConfirmDelete is clicked all selected records will be deleted and the gallery will return to view mode. Put this code in its OnSelect property
// Delete records from datasource or collection depending on mode
If(
    varGalleryMode in ["Delete", "Edit"],
    Remove('Inventory Count', colDeleteRecords),
    Remove(colUpdates, colDeleteRecords)
);

Clear(colDeleteRecords);
Set(varIsDeleteMode, false);
If(varGalleryMode="Delete", Set(varGalleryMode, Blank()));Code language: JavaScript (javascript)
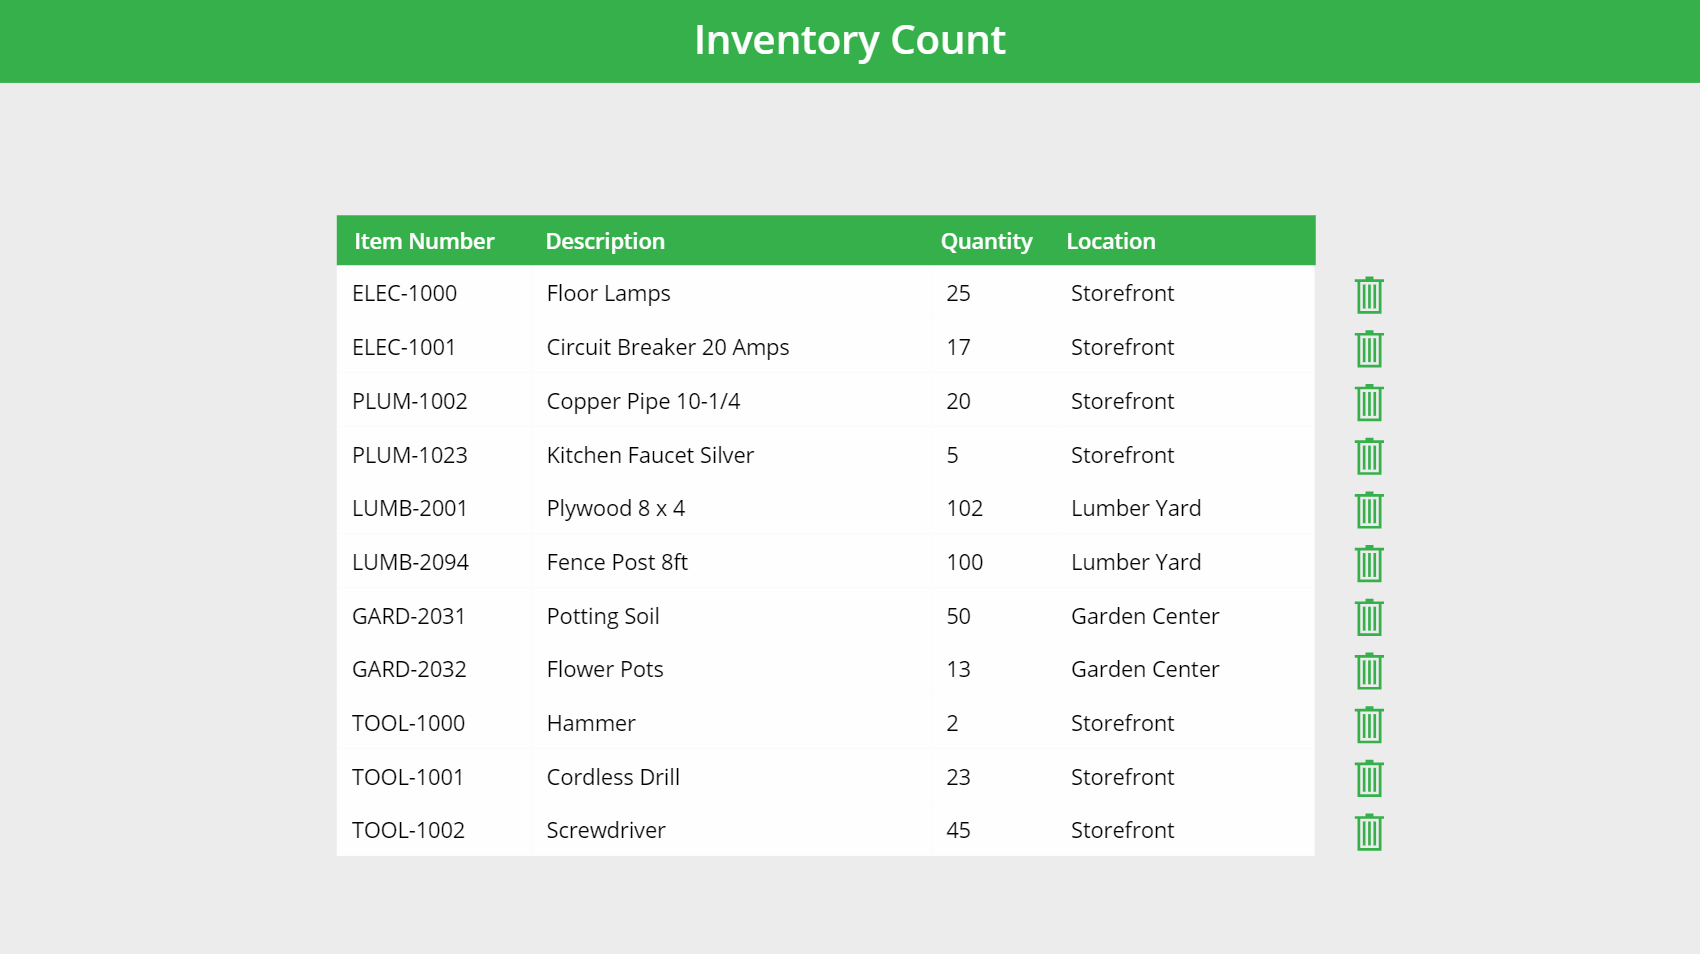
Try to delete a few records. The result should look like this.
Finally, use this code in the OnSelect property of ico_CancelDelete.
Clear(colDeleteRecords);
Set(varIsDeleteMode, false);
If(varGalleryMode="Delete", Set(varGalleryMode, Blank()));Code language: JavaScript (javascript)
Cancelling the deletion of records will return the table to view mode.
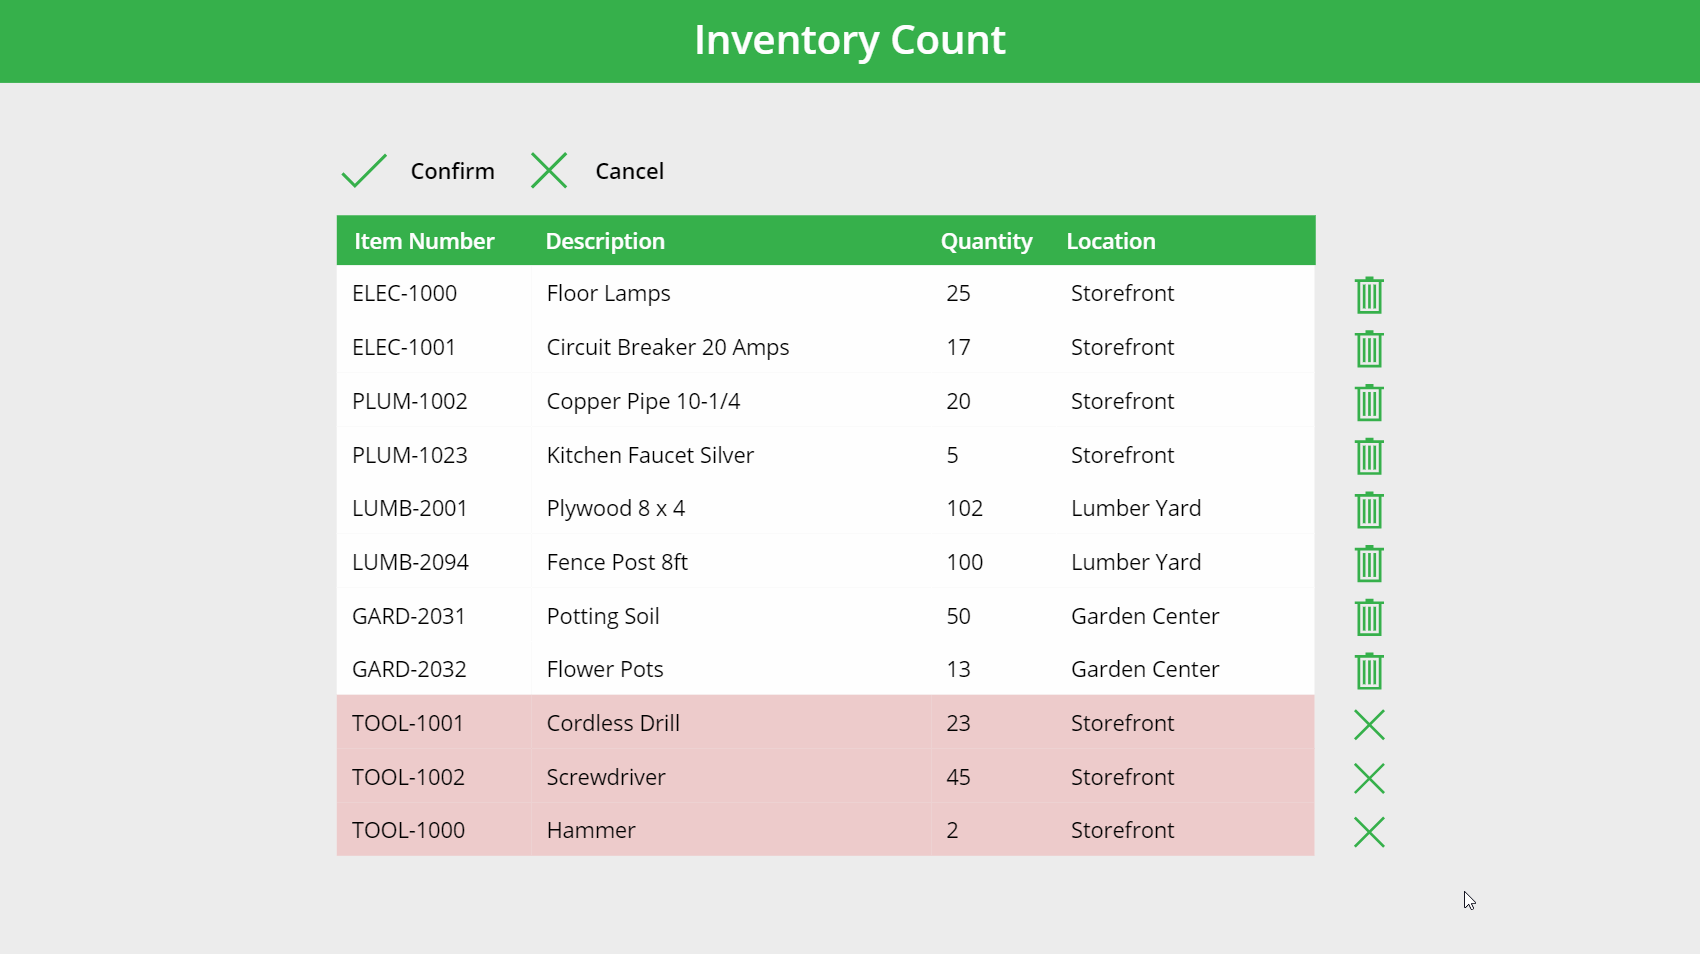
Deleting Records While in New Mode Or Edit Mode
For ease-of-use employees should also be able to delete records while in new mode and edit mode as well as delete. One additional line of code is needed to get this feature working. Change the Visible property of ico_Save, lbl_Save, ico_Cancel and lbl_Cancel to the following code.
varGalleryMode in ["New", "Edit"] And !varIsDeleteModeCode language: CSS (css)
Deleting records while in new mode or edit mode is done as shown in the image below.
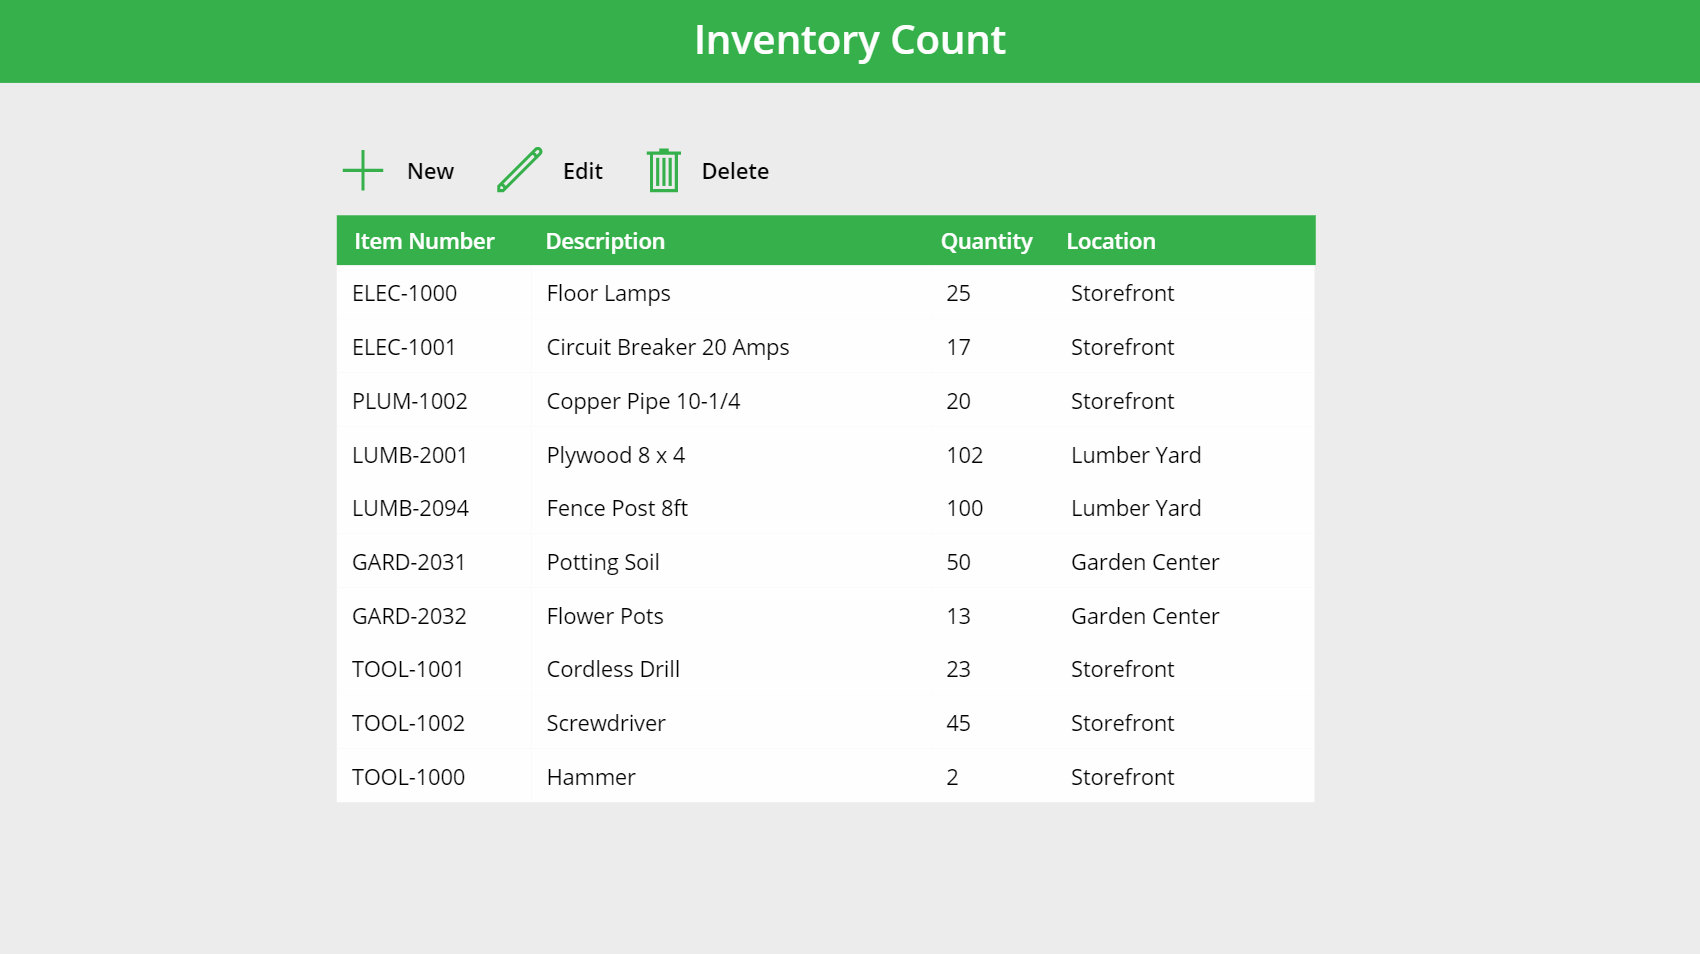
Our Power Apps Excel-Style Editable Table is now completed. Employees have the ability to add, edit and delete records.
Did You Enjoy This Article? 😺
Subscribe to get new Copilot Studio articles sent to your inbox each week for FREE
Questions?
If you have any questions or feedback about Power Apps Excel-Style Editable Table – Part 2 please leave a message in the comments section below. You can post using your email address and are not required to create an account to join the discussion.


Thanks Matt, this is great. My attempts at something similar have been clunky at best but you’ve demo’d here and in Part 1 a very neat solution – I feel I will be using parts of this in future apps 🙂
Just quickly, when using the SAVE icon, I did notice some small lag. I know my users would get longer lag than that so I’ll probably add a full screen loading spinner to stop users clicking any buttons/icons/etc during Save – just in case!
I’m glad your enjoyed the solution Eelman!
Agreed on the SAVE icon lag and your idea for a loading spinner/clickshield. I was finding it had more lag on the first submit of my session and was near instant every other time.
Hey Matt, i was wondering how to make user designation, by other means to allow user logins, and control who sees what? and thanks for such a wonderful article
Hi, great. I want to more funtion:
Ducnghina,
Awesome! Its a great idea to build more features on top of this basic tutorial. Let me know how it goes for you 🙂
Hi Matthew, is this possible to do with Dataverse? I’m struggling to know how to add lines with Dataverse. You use ID:1, ID:2.
How would I go about this with Dataverse? I tried using the unique identifier but its expecting a GUID then even if I passed “1”, it seemed to have a negative effect on the rest of my code. Thanks!
Brilliant article, just what I needed right now. 👏
When a record is selected for deletion, it becomes highlighted in red. I followed your example but do not get the red background. What have i missed in your sample code?
Thanks
Siva,
Set the Fill property of these controls:
txt_Location, txt_Quantity, txt_Description, txt_ItemNumber
To this code:
If(ico_DeleteLine.Icon=Icon.Trash, White, RGBA(238, 204, 204, 1))
Hi Matthew, excellent blog.
I was wondering, if you could explain how to add, let’s say 5 items in one command, and these items would be previously filled (item number and Description), so the user should just put data in quantity and location. Moreover, if the user put the same location and quantity it would be denied.
Joao,
Yes you could do this. However, it would take another full blog post explain. Suggest you ask for advice on the Power Apps community forums. Best of luck in building your next app!
Also, can we put a limit range of quantity? if the quantity is above or below it would be denied or be in red colour.
Hi Matthew Thank you for your great power apps lessons; I found everything that I need in your site; this section for inventory is very usefull for me. I try to make a ”board” for employé to take inventory each week for the 7 sames items; I should see 7 new line every week with new inventory qty. It is possible I create master page with these 7 fix items, only quanity to add, and clear the page?
Nancy,
Yes, it is possible.
Hi Matt,
This is great! Quick question: everything works on perfectly for me, no errors, but when I click the save button in New mode, it looks like a bunch of blank records are being added. However, when I check the gallery and SharePoint list, there were no blank records added and no issues with saving. Do you have an idea for why this glitch may be happening? Thanks for your help!
Ella,
I’ve reached out to your email for a copy of the canvas app (msapp file).
Matthew,
Thanks for the post as it has been very useful. I am new to PowerApps and have implemented your code but am having troubles when adding new records. I am using SQL Server instead of Sharepoint and I don’t understand how to proceed after adding placeholders for the new records :
ClearCollect(colUpdates, {ID:1},{ID:2});
Set(varGalleryMode, “New”);
How do I matchup these ID’s to the gallery items (NewRows) unless there is a Rownumber in the gallery?
// Load all new entries into the collection colUpdates
ForAll(
gal_EditableTable.AllItems As NewRows,
Patch(colUpdates,
LookUp(colUpdates, ID=NewRows.ID),
If I change the code to use just one new record it works fine as long as I hardcode the value in the Lookup.
ClearCollect(colUpdates, {ID:1});
// Load all new entries into the collection colUpdates
ForAll(
gal_EditableTable.AllItems As NewRows,
Patch(colUpdates,
LookUp(colUpdates, ID=1),
I’ve got record editing squared away since I can lookup based on existing keys, it’s just the new records where I am having issues.
Any help you can provide is appreciated.
Hi Matt, I am looking into building something similar but the “spreadsheet” needs to do a lookup and validation from SQL. is this possible or should I be using another method?
Uma,
This tutorial will give you a good idea of the general technique. Once you get it working then you will be able to adapt it to your scenario.
Thanks Matthew 🙂 For some reason my edit button has disappeared following the first part of this tutorial. What could have went wrong?
Thanks Matt, I follow the steps and create the apps successfully. How wonderful!
Fonda,
This article was one of the first I wrote so I’m glad you are still finding value in it.
Good day Matthew, thank you very much for the demo.
Just a quick question, I want to develop something similar to what you created in your demo, but instead I want to track my team’s projects that are going live every month. So currently I have a sheet (excel) for all the months in the financial year that lists all the projects for that specific month. Instead of having a delete button can I possibly have a “move” button that moves a specific line item (Project) to the next month instead of us having to create a new line item on another sheet. Release dates for projects change all the time, so I want a way to manage those changes without having to create a new line item in the new month.
Matthew, I have a SharePoint list of locations. I’m wanting to bring in all of those locations into a grid format be able to filter it, and then have the user check a box if the location is closed and fill out some other dropdown and text information. I then want to load all of the checked stores into another SP list, so we can keep track of which stores closed. Sometimes we have weather events that cause hundreds of stores to close, so I’m wanting to do a bulk insert. Could you explain in general how to accomplish?