Power Automate Email Templates Made Easy

Power Automate email templates can show dynamic values from SharePoint as part of a beautifully formatted message. I’ve researched the best method to create responsive Power Automate email templates and I’ll show you where to find templates, how to add dynamic values and include images. You can customize it even further with your knowledge of HTML and CSS.
Introduction: The New Project Task Email Notification
The project management department of a company uses Power Automate to notify team members when a new task is assigned to them. An responsive HTML email is sent with the company’s logo, details about the project task and a clickable button to open the task in a web browser.

Setup The SharePoint List
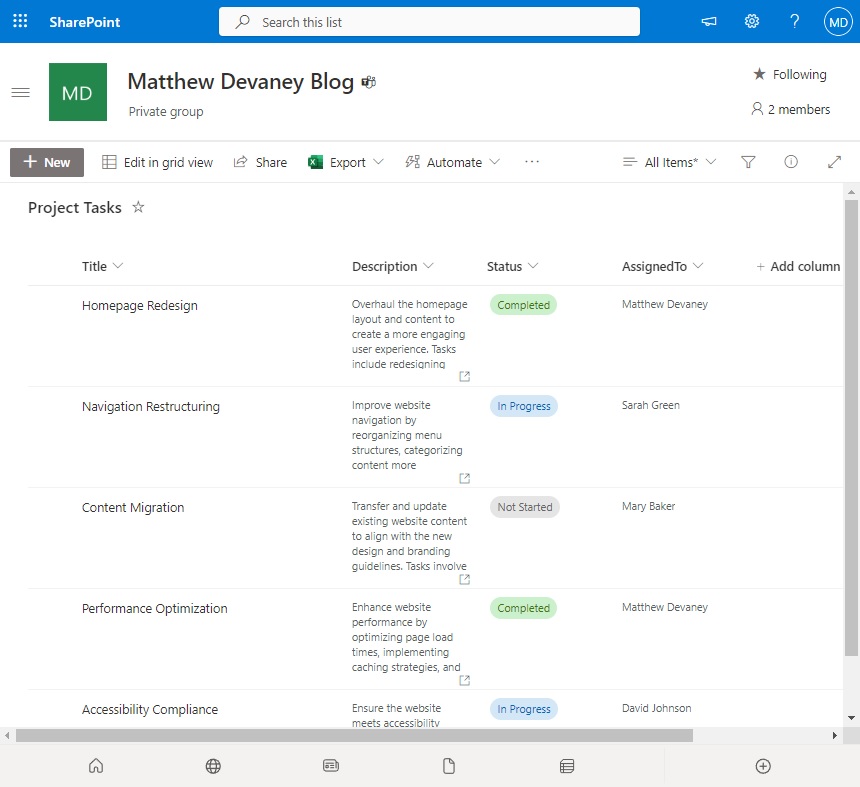
Create a SharePoint list named Project Tasks with the following columns:
- Title (single line of text)
- Description (multiple lines of text)
- Status (choices: Not Started, In Progress, Completed)
- AssignedTo (person type)
Populate the SharePoint list with this data:
| Title | Description | Status | AssignedTo |
| Homepage Redesign | Overhaul the homepage layout and content to create a more engaging user experience. Tasks include redesigning visual elements, optimizing call-to-action buttons, updating featured content, and ensuring mobile responsiveness for seamless viewing across devices. | Completed | Matthew Devaney |
| Navigation Restructuring | Improve website navigation by reorganizing menu structures, categorizing content more effectively, and implementing intuitive search functionality. Responsibilities include conducting user experience (UX) audits, creating new navigation pathways, and testing usability across various browser platforms. | In Progress | Sarah Green |
| Content Migration | Transfer and update existing website content to align with the new design and branding guidelines. Tasks involve reviewing and editing content for accuracy and relevance, optimizing images and multimedia elements, and ensuring consistent formatting throughout the site. | Not Started | Mary Baker |
| Performance Optimization | Enhance website performance by optimizing page load times, implementing caching strategies, and minimizing server requests. Responsibilities include conducting performance audits, optimizing codebase, and integrating Content Delivery Network (CDN) solutions for faster content delivery. | Completed | Matthew Devaney |
| Accessibility Compliance | Ensure the website meets accessibility standards by implementing features that accommodate users with disabilities. Tasks include conducting accessibility audits, incorporating keyboard navigation, adding alternative text for images, and ensuring compliance with Web Content Accessibility Guidelines (WCAG) standards. | In Progress | David Johnson |
The Project Tasks list will look like this after it is setup.
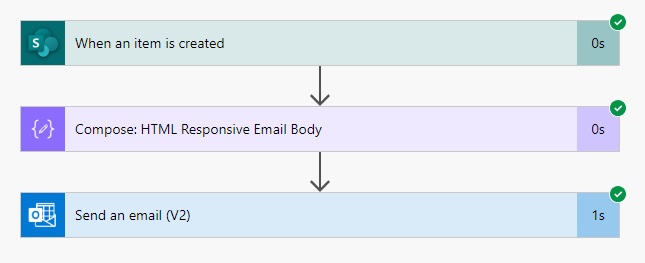
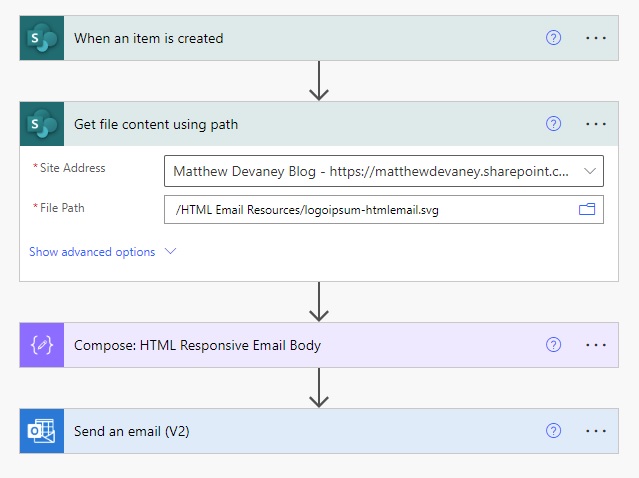
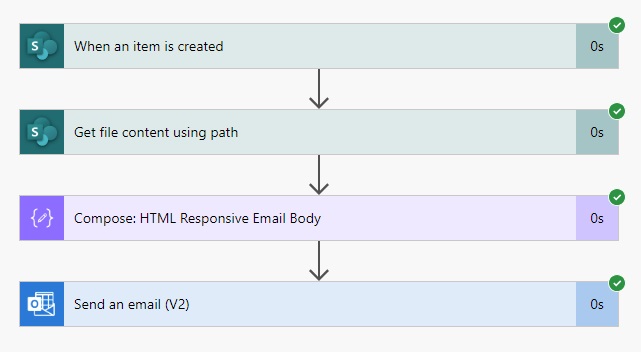
Trigger The Flow When An Item Is Created
Open Power Automate and create a new automated flow. Select the trigger named SharePoint – When An Item Is Created and choose the Project Tasks list.
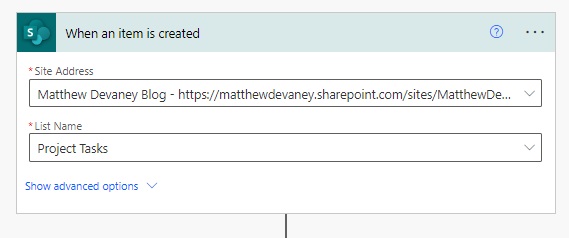
Add a Data Operations – Compose action beneath the trigger. We will fill the inputs field of the compose action with the email template body.
Select An HTML Email Template
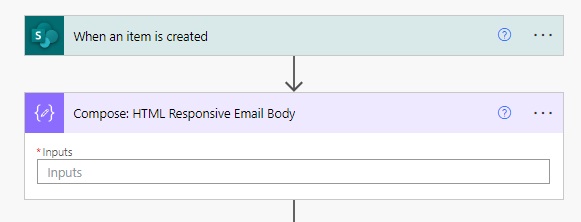
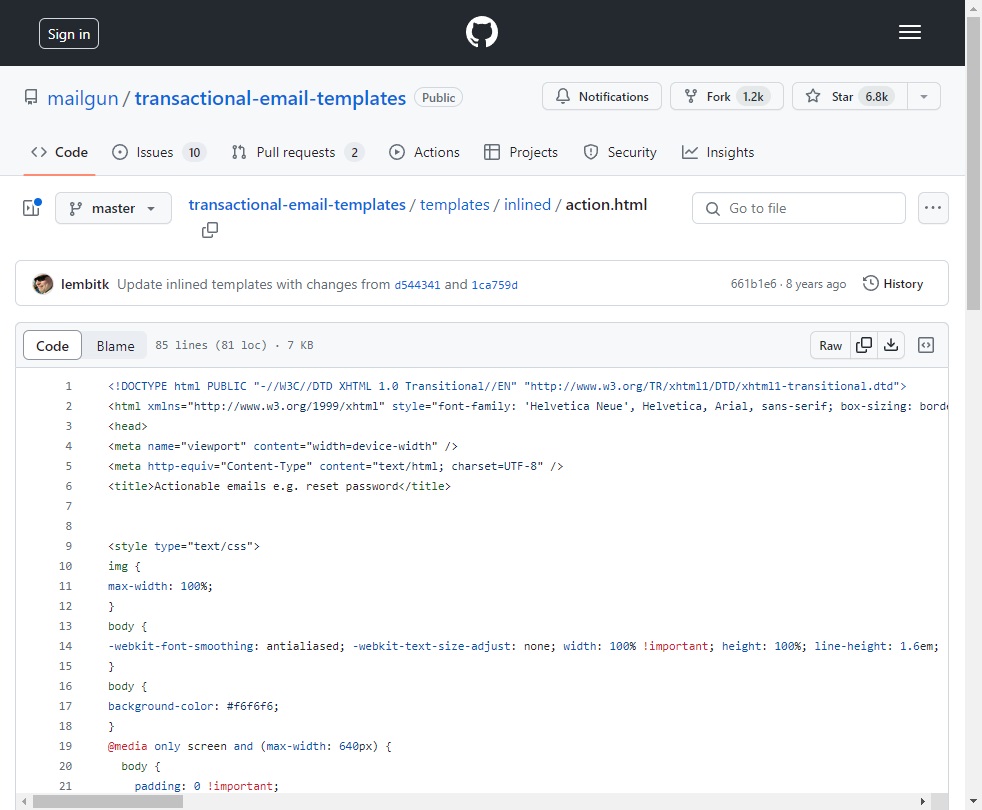
There are many places on the internet to find email templates. Using the Google search terms “Responsive Transactional Email Templates” I found several good options. We will use a free template provided by Mailgun. Go to Mailgun’s transactional email templates Github repository and open the templates folder.
Browse to the location mailgun/transactional-email-templates/templates/inlined/action.html. This template has the CSS inlined which is required for sending HTML email.
Copy and paste the HTML of the email template into the Compose action in Power Automate.

Send The Email Template To The Assigned Person
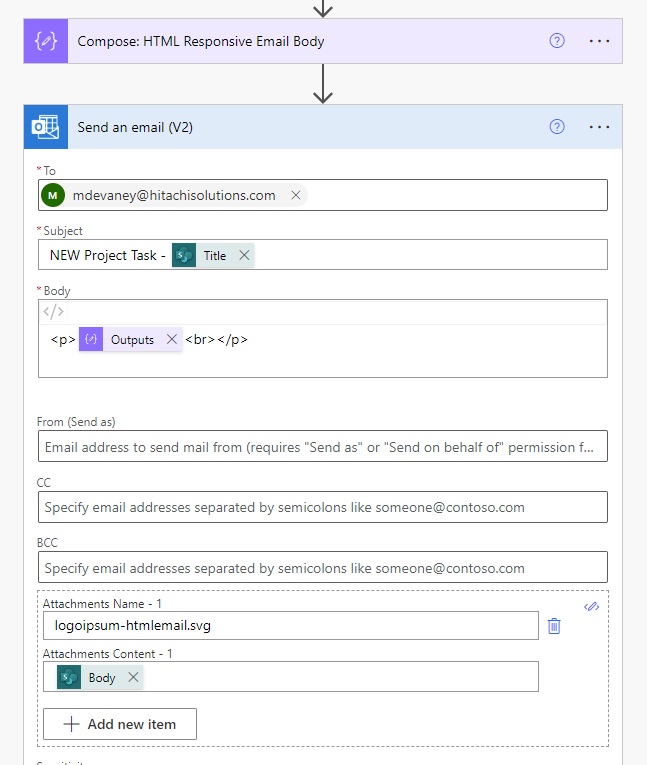
Before we fill-in the email template let’s try to send it to a recipient to ensure it works. Add an Office 365 Outlook – Send An Email (V2) action with the AssignedTo column in the To field. Include the Title column in the Subject line and use the Outputs of the Compose action in the email Body.

Test run the flow.
The HTML responsive email template looks like this.
Fill-In The Email Template With Dynamic Values
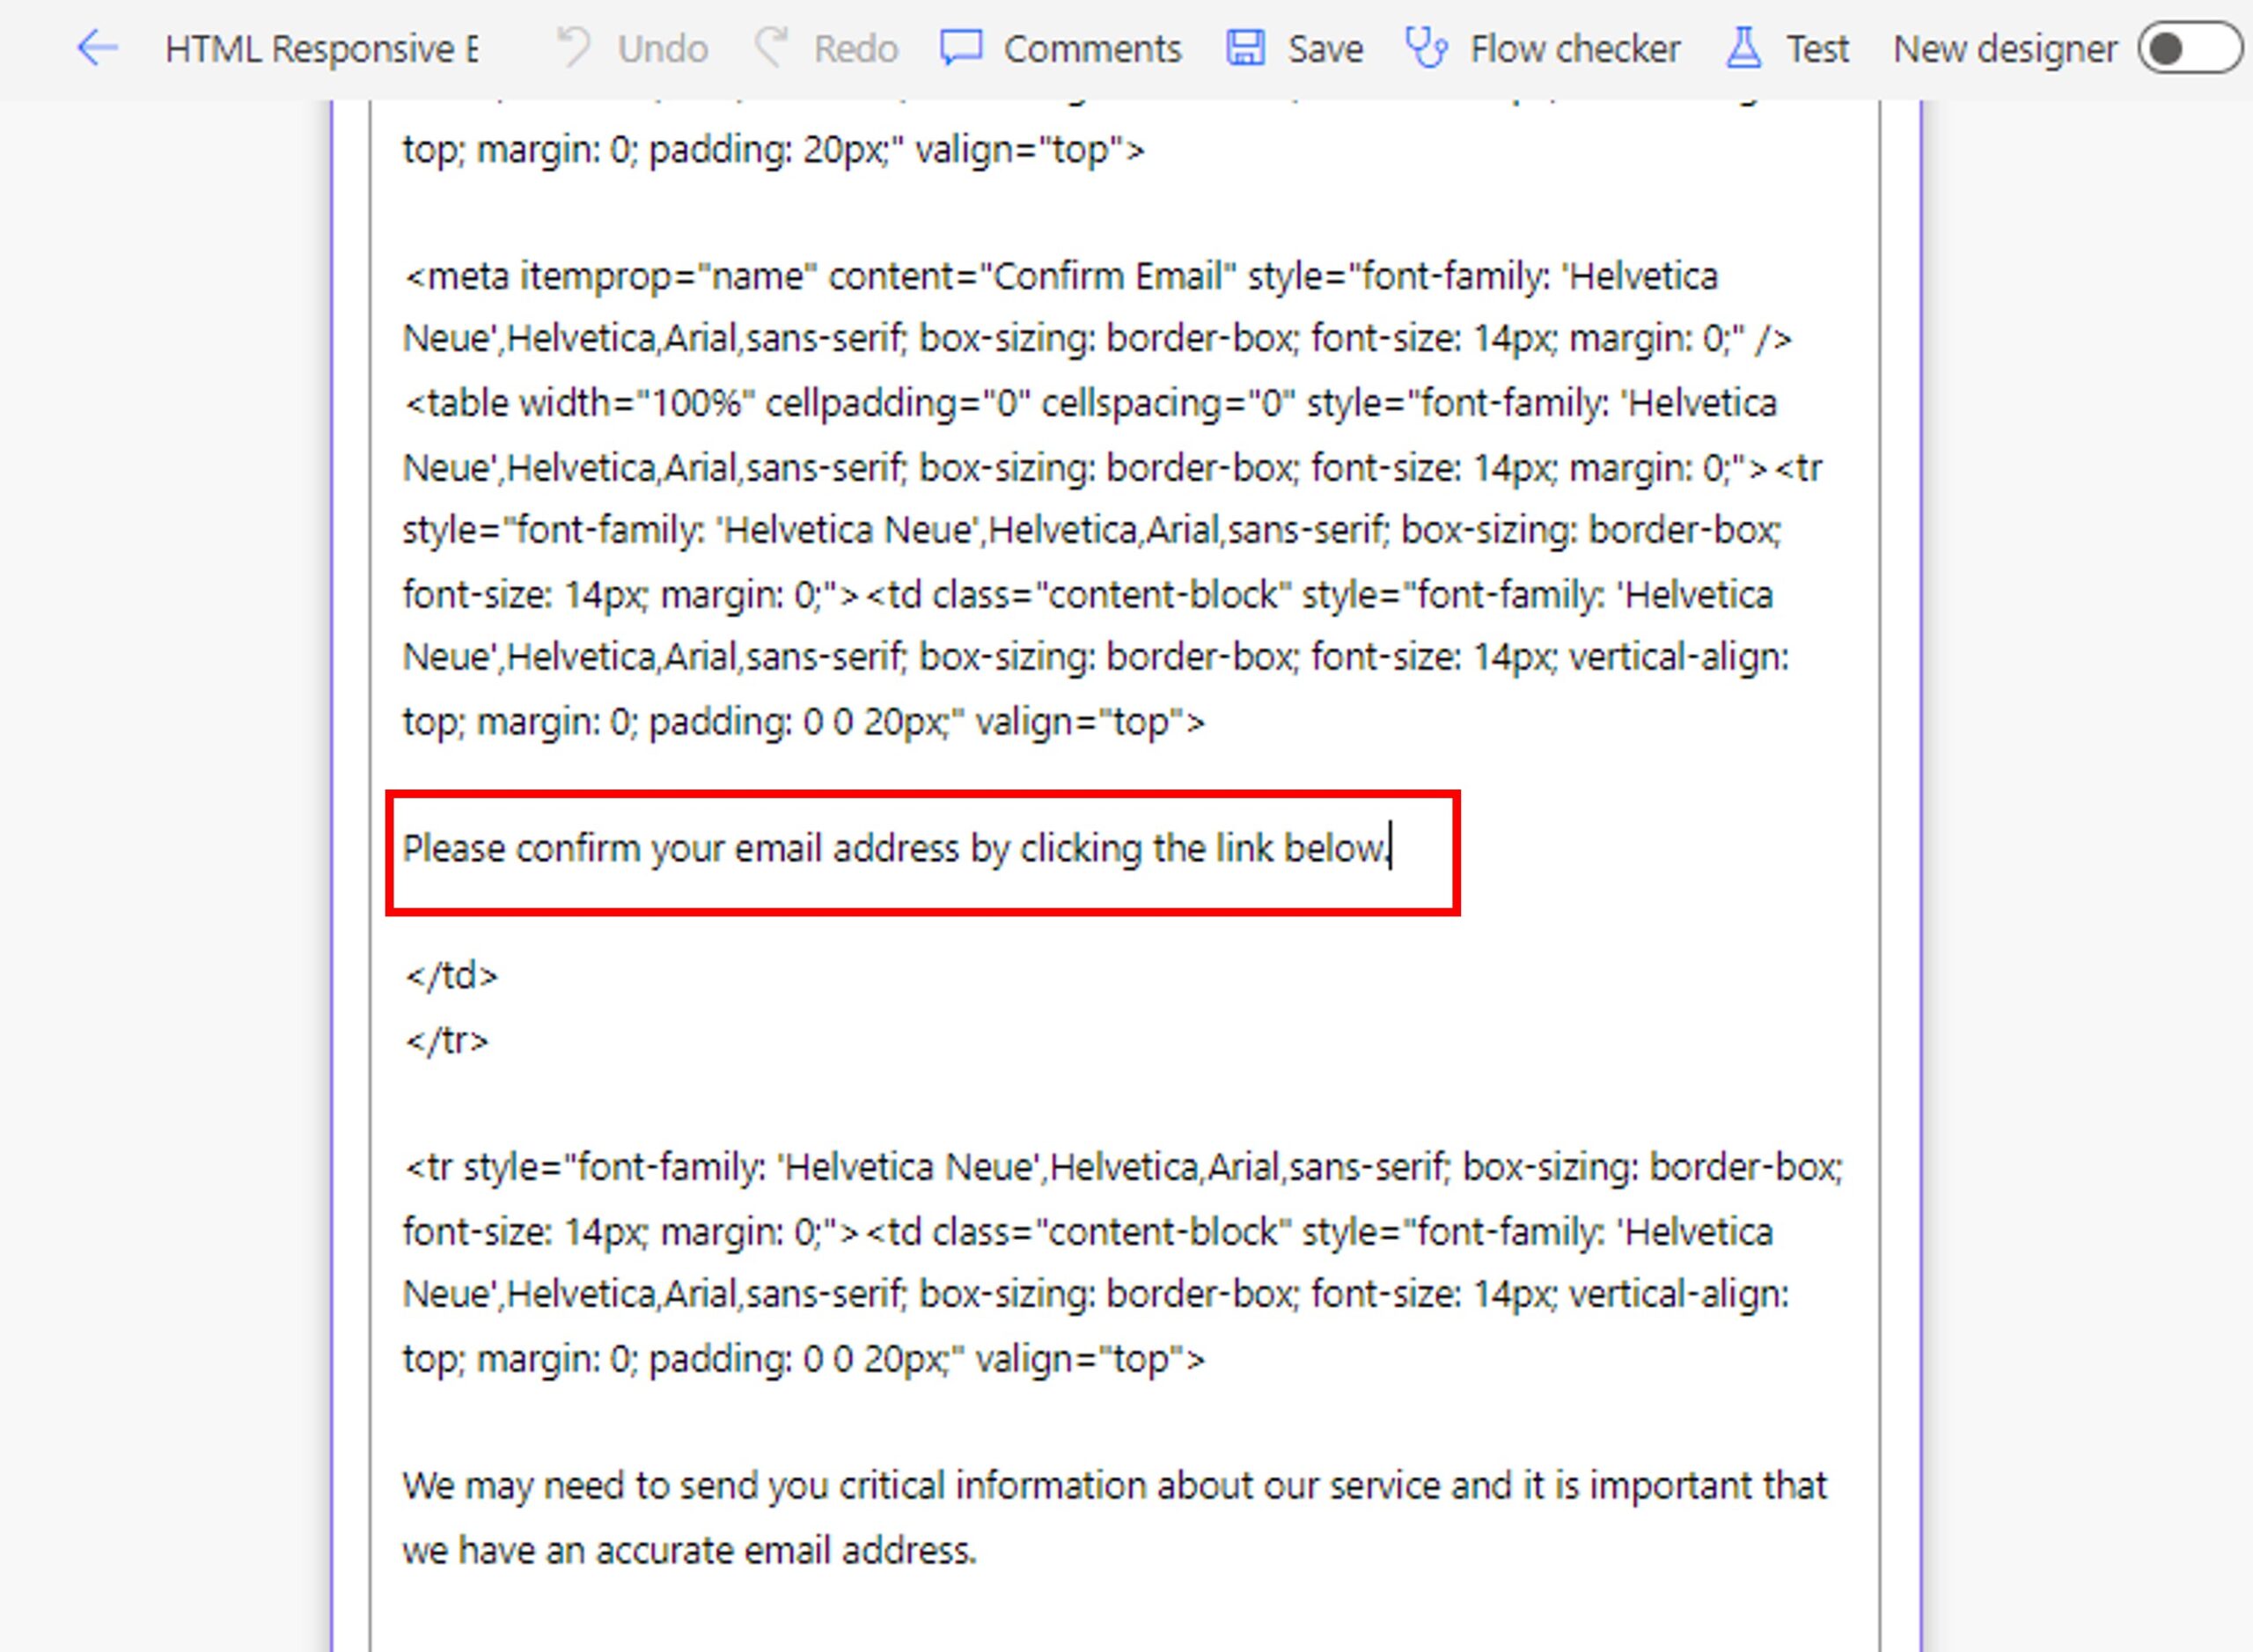
We want Power Automate to fill-in the email template with values from the new SharePoint list item. First we will insert the Title into the template. Locate the text “Please confirm your email address…” inside of the Compose action.
Then replace it with this code:
<h4>NEW Project Task - @{triggerOutputs()?['body/Title']}</h4>Code language: HTML, XML (xml)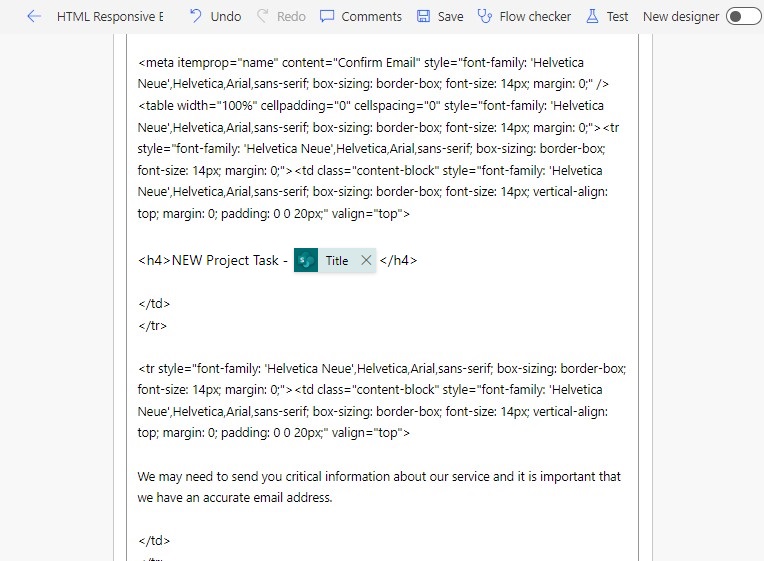
Next, find the text “We many need to send you critical information…”.
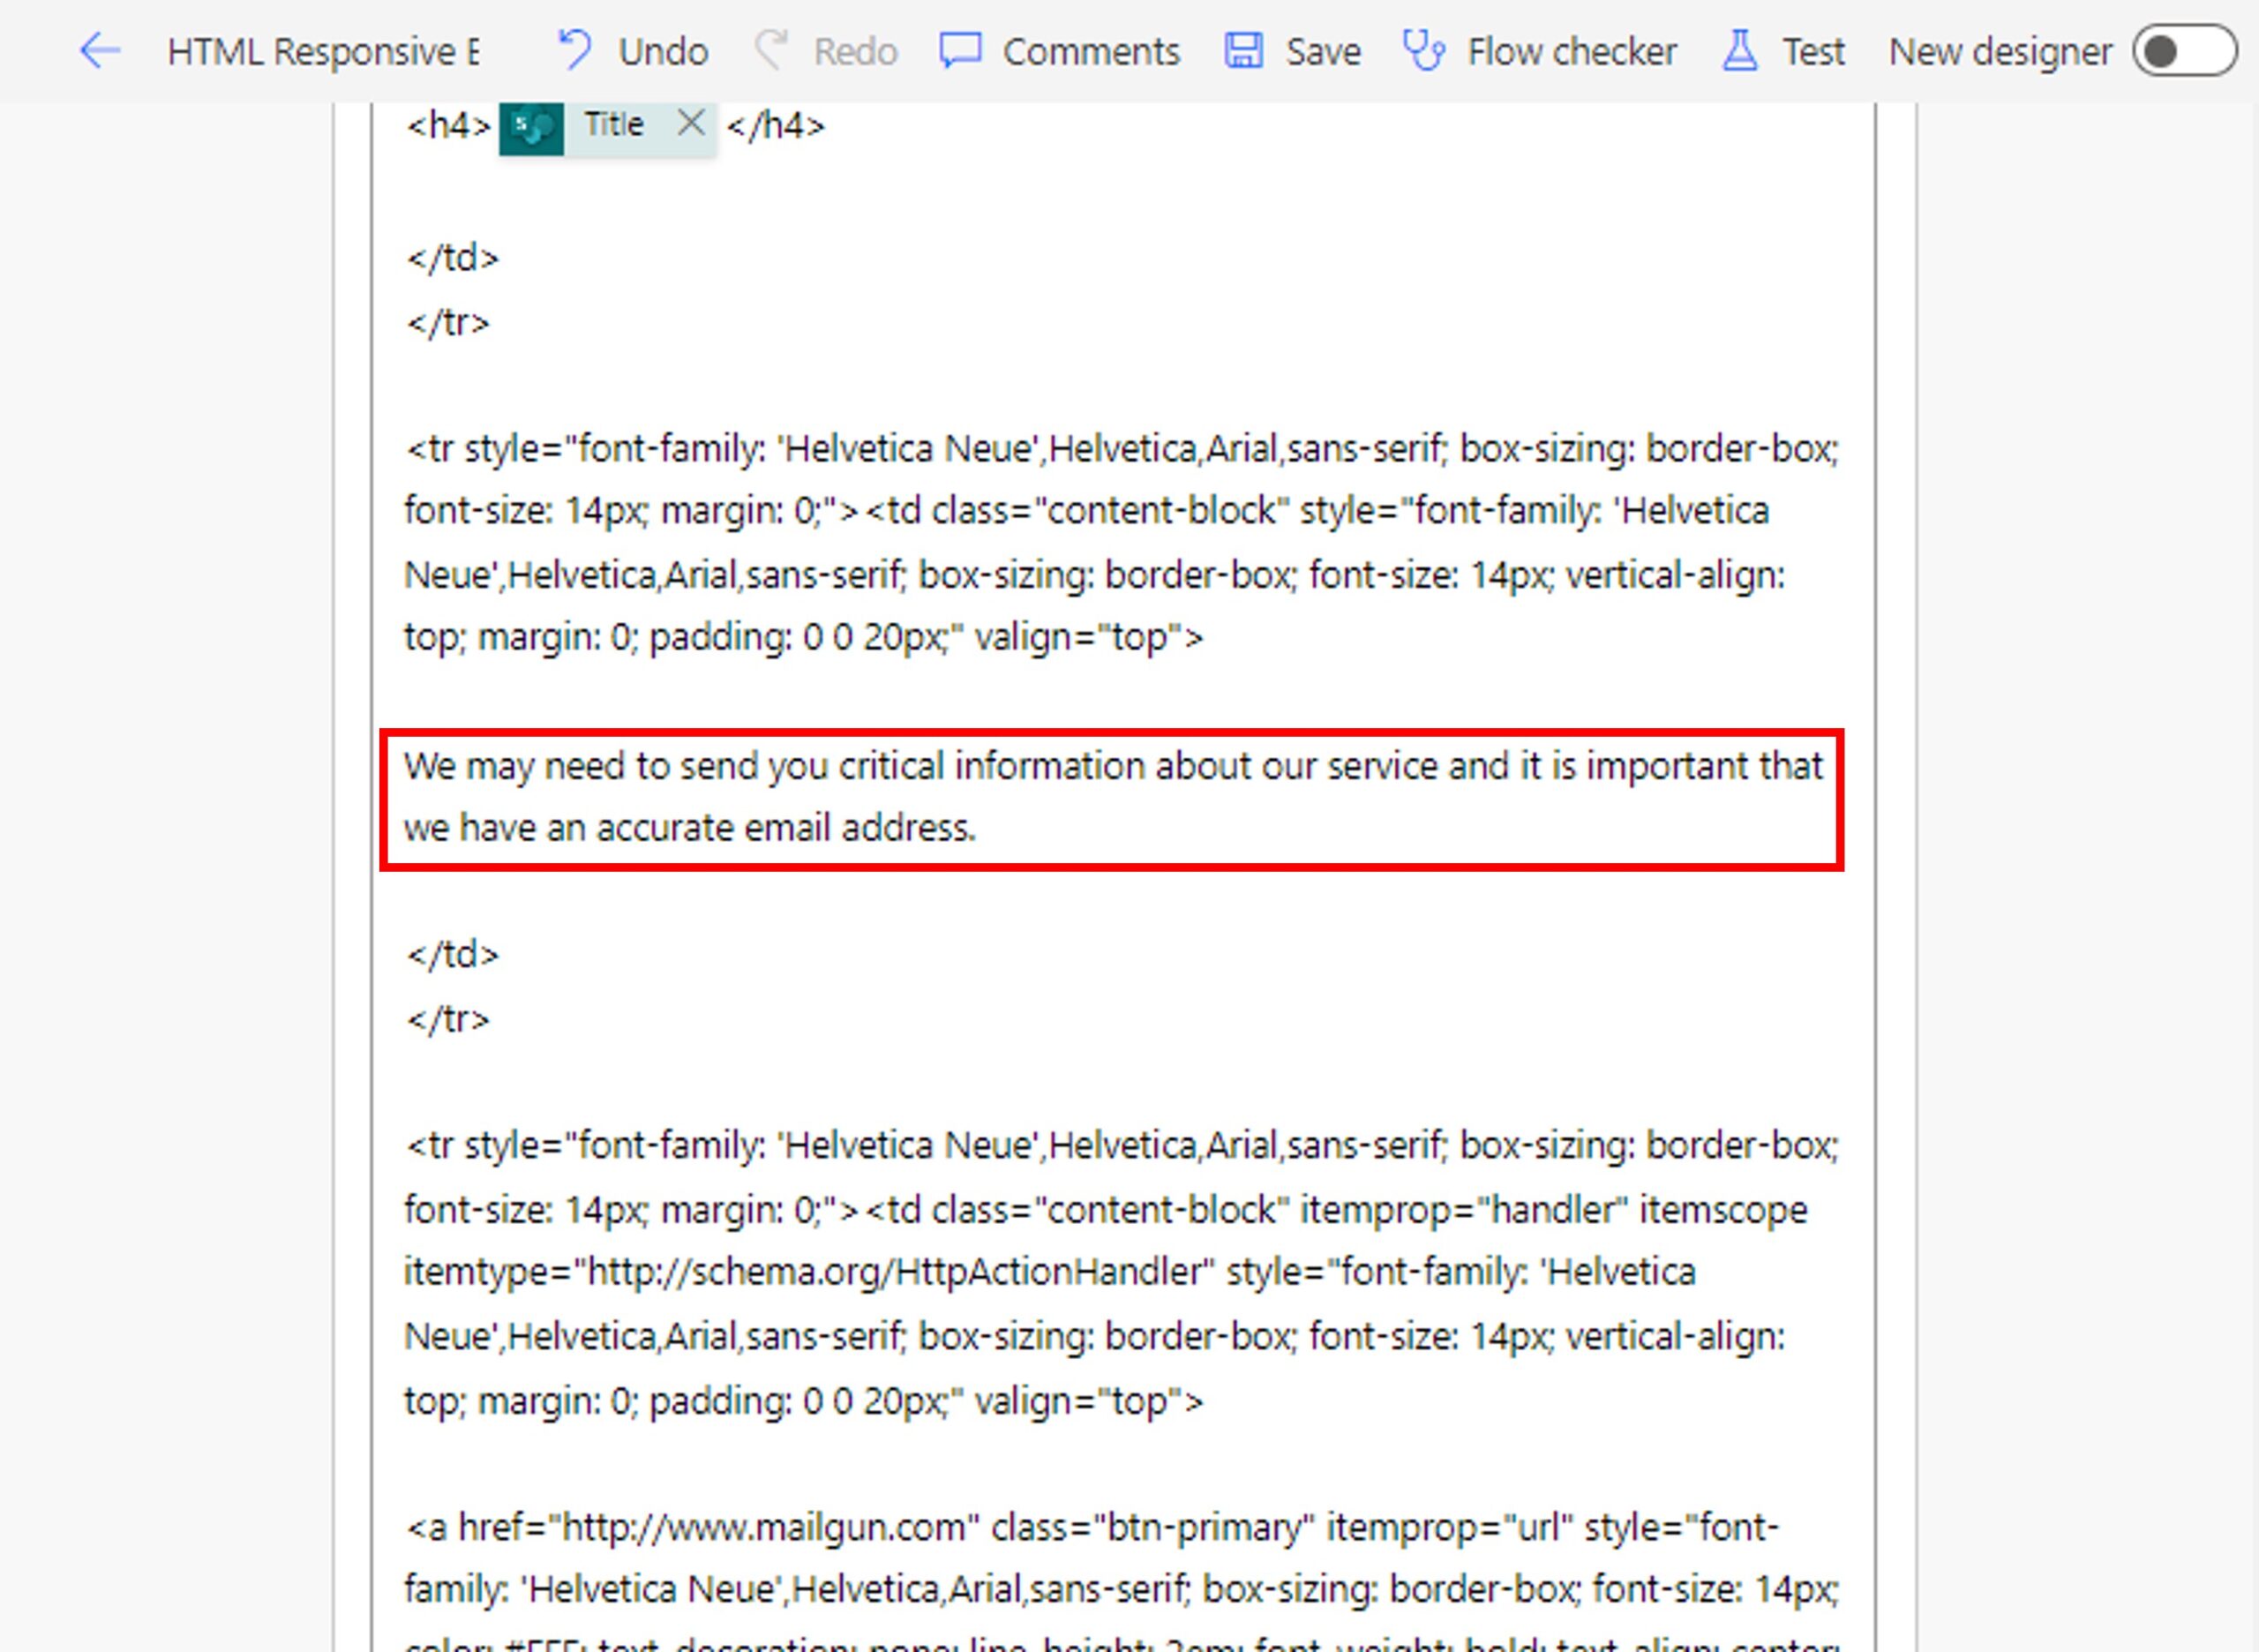
And replace it with the Description of the SharePoint list item instead.

Link The “Open Project Task Button” To The SharePoint List Item
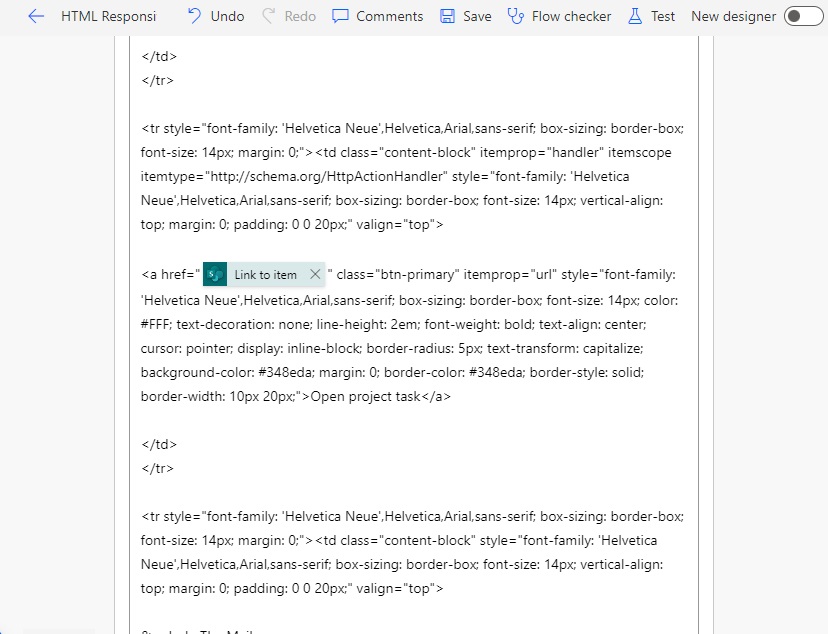
When the email recipient presses the “Open Project Task” button it should navigate them the SharePoint list item in a web browser. Find the the HTML <a> tag with a link to mailgun.com and the text “Confirm Email Address.”
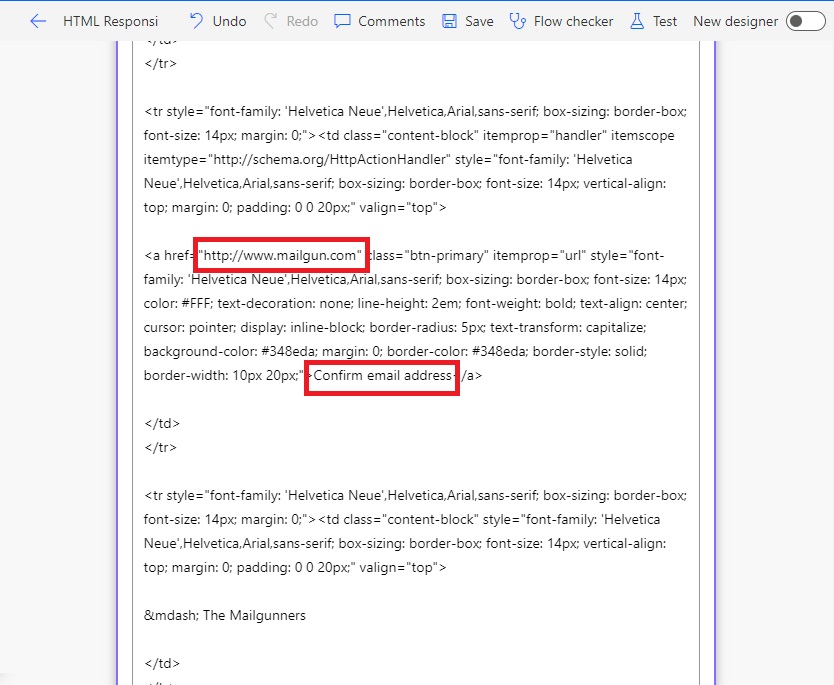
Replace the mailgun.com link with the SharePoint Link to item value and use the text “Open project task” instead.
Remove “— The Mailgunners” from the HTML code.

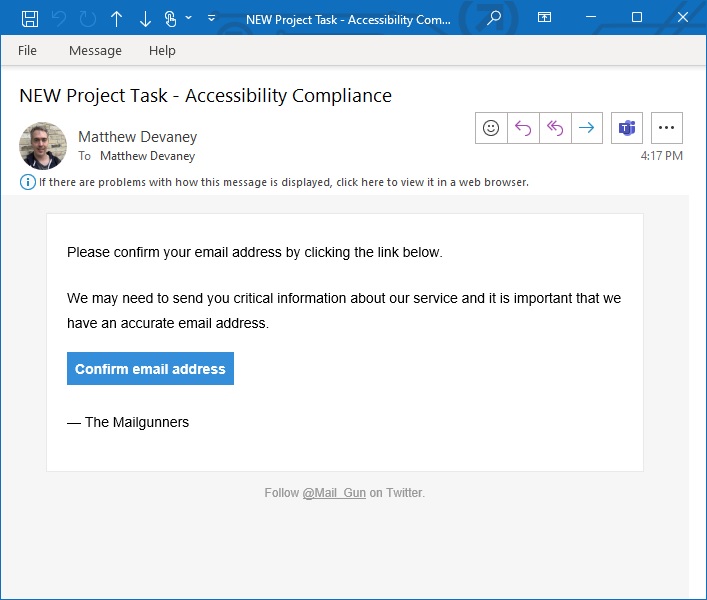
Resend the test email. The email template is now filled with dynamic values from SharePoint

Get A Logo Image From A SharePoint Document Library
As a final touch we can add a company logo image to the email template. Go to logoipsum.com and download any sample svg image.
Create a new SharePoint document library named HTML Email Resources and save the logo image to it.
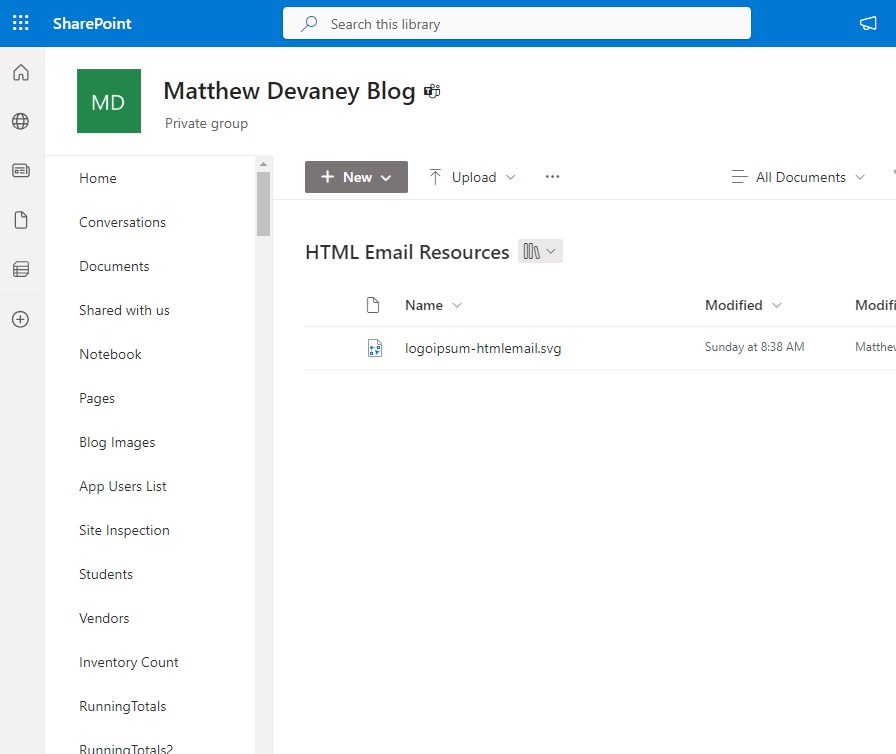
Then go back into the flow an add a SharePoint – Get File Content Using Path step after the trigger. Select the logo image we just uploaded to SharePoint.
Embed A Logo Image Into An Email Template
Now we will embed the logo image into the email template using the Content-ID method. Locate the table tag shown in the screenshot below and insert the new <img> tag code inside of the red box.

Copy and paste this code into the Compose action. Make sure the filename matches the logo image stored in SharePoint.
<img src="cid:logoipsum-htmlemail.svg" /></br>Code language: HTML, XML (xml)
Update the Send An Email action to include an attachment. Use the same attachment name and extension as in SharePoint and supply the Body of the get content action to the attachments field.
Send An Email Template With A Logo Image
To see the logo image appear in the email give the flow a test run.
The logo image appears at the top of the email.
Did You Enjoy This Article? 😺
Subscribe to get new Copilot Studio articles sent to your inbox each week for FREE
Questions?
If you have any questions or feedback about Power Automate Email Templates Made Easy please leave a message in the comments section below. You can post using your email address and are not required to create an account to join the discussion.


Hi Matthew, I love the summary above. Sending personalised emails indeed has a huge business value that Power Platform brings in, hence it has been a project in my team for quite a while now.
Our goal is to go even step further and build a WYSIWYG type of email editor in PowerApps that first displays a custom email (using the HtmlText control), and then sends it out to the specified sets of audiences.
However one obstacle that we can’t stop struggling with is the very end of the process – making sure the html code renders properly in all Outlook clients that are used across our organization. Do you have any advice or cheat sheet that could serve as a guide as to which html / css styling is supported in the older versions of outlook? As of now, even though our flow set up for sending emails works perfectly fine, designing email templates (or using ready made templates from the internet) is virtually impossible as we never now how the message is going to end up rendering in the end.
Kudos for your work and greetings from Poland 🇵🇱
Mark,
The next article I publish will show 3 different ways to embed images in email and explores compatibility with several email clients.
Your challenge is a tough one. Email marketing companies have spent millions on this problem. I don’t have the answer to the complex question you posed. Like you, I must identify all of the known email combinations and then test.
I love your WYSIWYG email template maker idea. Let me know how that turns out!
This is a very interesting article and could have saved me a lot of time when we set up a similar flow to manage all the notifications sent by PowerAutomate. Even if it does take time to set up, once it’s in place, adding a notification with the right ‘style/crumb/header/logo/…’ only takes a few minutes.
In our project, we went one step further
– Different branding
– Different types of templates (1 column, 2 columns)
– Different layouts (Buttons, datalist, etc.)
But it’s all easy to use because everything is managed centrally in a few sharepoint lists. This is much more practical than dozens of different flows, each sending emails in their own way.
The biggest problem is the button design (border-radius, hover…). The text is different, you can’t use images. If you reply, the layout gets really ugly. If you have time to find a solution, I’d be very happy to read it.
Michael,
I love the idea of a centrally managed email template SharePoint list. What you’re doing sounds so cool. The button issue is not something I’ve researched. My thought would be to look at other email templates on the internet and see what they are doing.
Hi Mikael, I’m working on a very similar project. I can only say my team also struggles with the buttons, the best solution we found is to design the button as a static image, and then convert it to base64 before embedding into the email.
Have you considered making your solution with SP lists open source? I’d love to see how you approached it.
Perfect timing! I was just working on a multi stage approval workflow and didn’t know this was possible. Thanks!
Brian,
I didn’t know it was possible either until I wrote the article and learned about “transactional email templates.” There are quite a few free (and paid) designs that look awesome.
Hello Matthew,
Thanks alot for sharing this,
I was working on a complaint form that employee could enter a multi-line text and the team lead email address.
However, I noticed the multi-line message wasn’t keeping the text paragraph Format. It just sends the long message to my outlook as a single line. This made me gave up on that project.
Any idea as to how I could get this solved?
Oyeleye,
Suggest you go back to the classic flow editor and toggle HTML code in the Outlook Send Mail action. It will allow you to input the paragraph tags.
Hi Matthew, what are the benefits of using the flow instead of just using code in the app❓ This can simply done by some code in the app with the 365 connector — My point is, this might be worth using if it has a good advantage over what I use now. Thanks for your input!
Roystreet,
I like the flow gives you a history and it’s an easy way to easily check what happened when people complain they did not receive any email.
Thanks for a great walkthrough. I was nearly missing the last step of adding the logo as an attachement 🙂
And a great tip with the “cid” method. I did not know the existens of this.
/Frank
i enjoyed your articles. thanks
Hello Matthew,
It’s great how detailed and well described you have presented the flow.
Unfortunately, the image is not displaying correctly for me and the attachment mentions an “unsupported file format”.
I have followed your instructions exactly and still can’t solve the problem.
Could this be due to the SharePoint I am using? If I save the file locally on my computer and then embed it in the HTML code, the image is displayed. So the file doesn’t seem to be broken.
Have you ever had a similar problem and can you help me?
Thank you very much in advance!
Kind regards
Jan
thank you ,awesome
Hi Matthew, thanks for the post! I learn so much from your blog.
Just a quick question, waht type of Microsoft 365 subscription sould i have in order to send email? I currently have Microsoft 365 Apps for business and got a connection error when i chose Send an email(V2) action.
According to the pricing page, i should upgrade to the Standard Plan at least, right?
Thanks!
Tina,
I don’t see any error message shown in your commment. But yes, you at least need a standard license for Power Apps.
My apology. Here is the warning message i saw. I do have a premium (paid) PowerApps license , but only the basic plan for Microsoft 365 Apps, that comes with all the office suite, but not email capability. Seems like i need to upgrade my 365 plan?
Thanks for your reply, Matthew.
BTW, greetings from Taiwan : )
Yes, you would need to purchase an M365 plan that includes Outlook for this to work.
Hello there Taiwan! 🇹🇼 👋
Thanks for this wonderful article!!
really appreciate your efforts for all the article, have been following you since many days.
i have implemented this article, but it the image and content coming correctly on web outlook but not on outlook desktop does not work correctly any suggestion for this?
Hello, Matthew –
Thank you for this. I am going to try compose instead of initialize variable.
Is it possible to do this for an entire list and include personalized email using data from each row?
The problem I am running into is that I can’t put the initialize variable inside a for each. So I can send the same email to each person/row but not personalize the email.
Hope this makes sense.
Best regards,
Daniel