Power Apps Form Design & UX Guidelines

Table Of Contents:
• Restrict Text Input Values
• Validate Form Data
• Implement Error Handling
• Protect Against Loss Of Unsaved Data
• Use A Single Form To Create, Edit & Display Records
Restrict Text Input Values
When a text input should only contain a number, change the default Format property to number. It prevents users from typing any character than number. Also, update the MaxLength property to match the field’s maximum character limit.
// Format property of a text input named Year Project Started
Format.Number

// MaxLength property of a text input for Project Name
DataSourceInfo(Projects, DataSourceInfo.MaxLength, "Project Name")
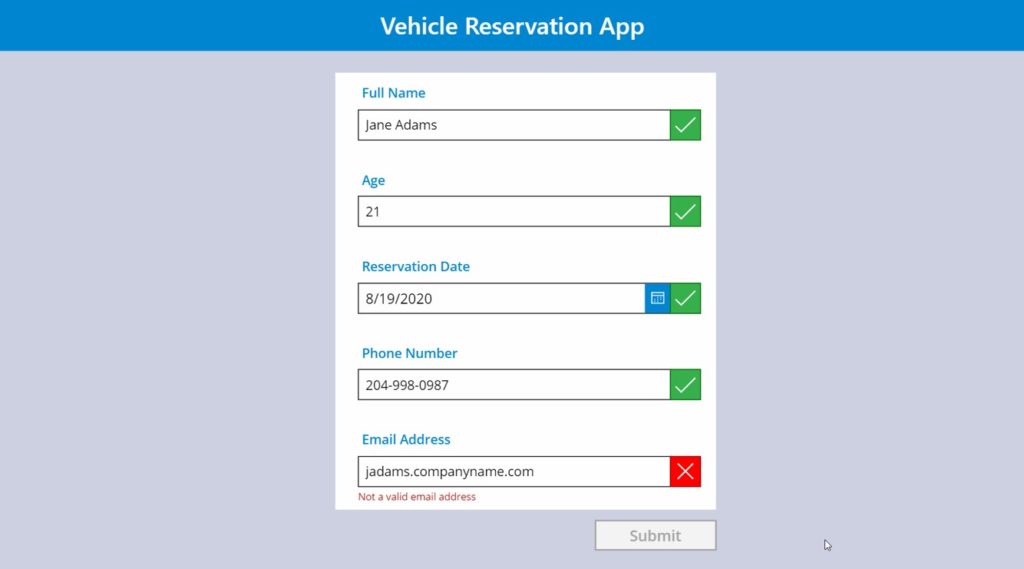
Validate Form Data
Perform data validation to ensure a form is properly filled-in before submission. Check the following items:
- Required fields are not blank
- Proper formatting for phone numbers, email addresses, postal codes, URLs, dates, etc.
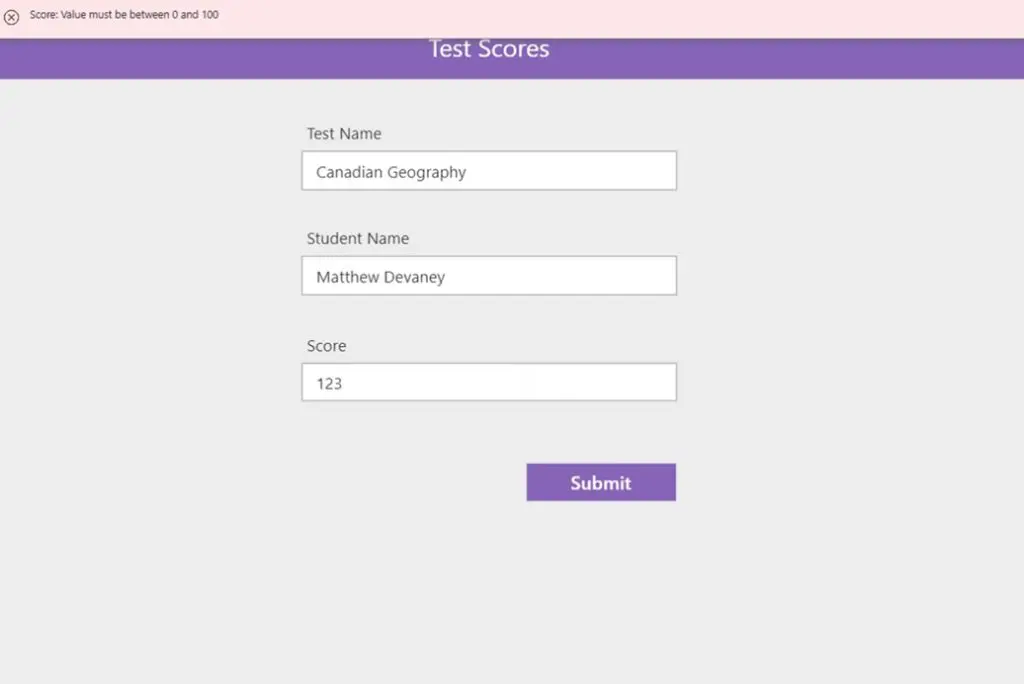
- Number fields are within the allowed minimum and maximum range
- Confirmation fields are matching (passwords, etc.)

Give the user feedback when the form does not pass validation. There are 2 feedback strategies to choose from:
- After Submission – check if the form passed validation when the user presses the submit button
- Before Submission – check if a field passed validation as the user types. Once a field meets all data validation criteria immediately indicate it passed.
Good feedback tells the user which fields failed and how to fix them. Use one or more of these strategies to deliver feedback:
- List the fields that failed validation and why at the top of the form
- Highlight any fields that failed validation in red
- Display an error message beside any fields that failed
Do not disable a form’s submit button until validation passes. If you use this pattern visually indicate why the submit button is disabled on the screen at all times.
Implement Error Handling
Never assume a form submitted successfully. Always check to make sure.
Error-handling for Power Apps form control and patch forms are performed differently. If using a Power Apps form control, catch errors using the OnSuccess and OnFailure properties. For a patch form, wrap the Patch function in an IfError function to detect an error.
When an error occurs, notify the user that form could not be submitted and why it was not successful. Do not move on to another screen until corrective action is taken.
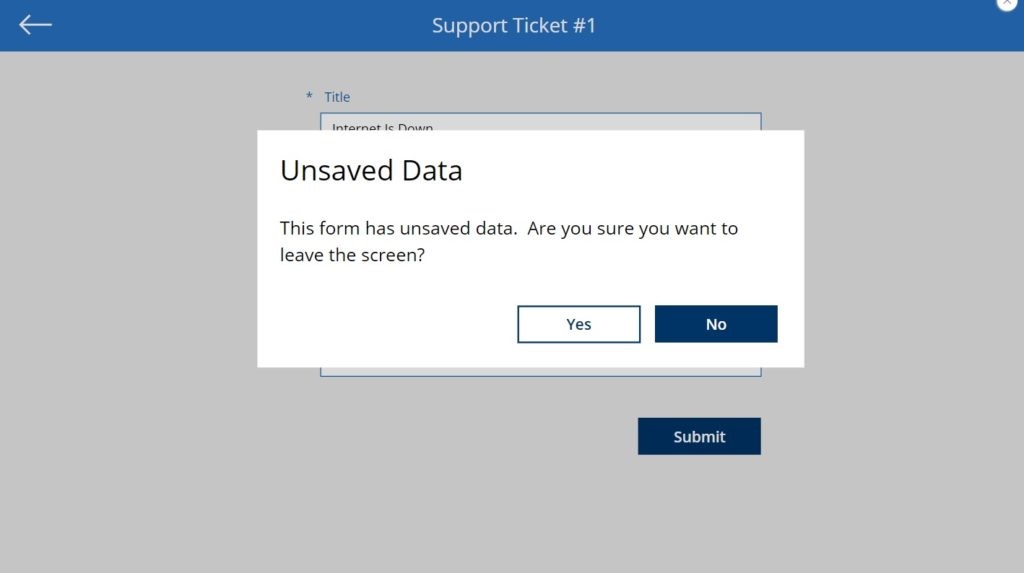
Protect Against Loss Of Unsaved Data
Prevent users from accidentally exiting a form and losing unsaved data. Before a user leaves the screen prompt them for confirmation. Display this message in a pop-up menu: “This form has unsaved data. Do you really want to close the form?” and present the choices OK or Cancel.
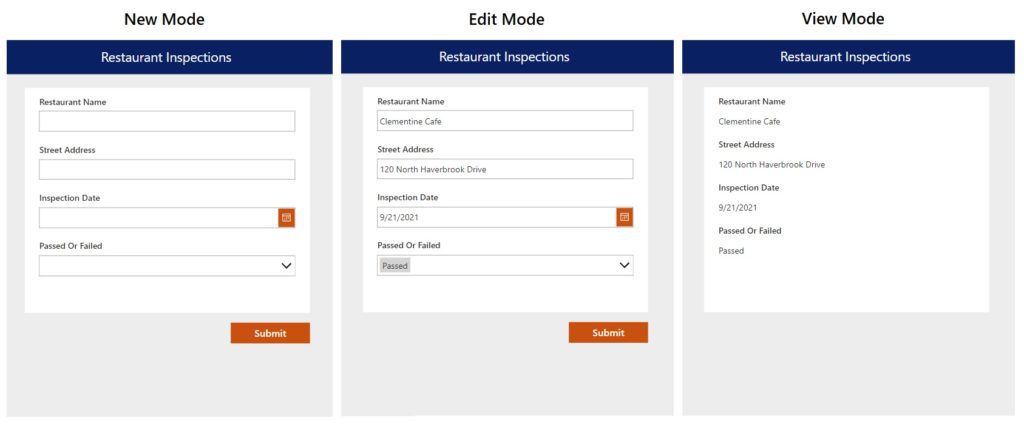
Use A Single Form To Create, Edit & Display Records
Re-use the same form to create new records, edit existing records and display records in view only mode. Having only one form reduces development & maintenance time and ensures consistency. Change the mode of a Power Apps form using the NewForm, EditForm and View form functions. Patch forms require additional code to change the DisplayMode of each individual control manually.
Did You Enjoy This Article? 😺
Subscribe to get new Power Apps articles sent to your inbox each week for FREE
Questions?
If you have any questions about Power Apps Form Design & UX Guidelines please leave a message in the comments section below. You can post using your email address and are not required to create an account to join the discussion.