10 Things You Should Know About Power Apps Forms

Power Apps makes building data entry forms surprisingly simple – just insert a new form onto the screen, watch all of the fields in your data source magically appear in the form, then add a ‘submit’ button and you’re done. But forms also have many feature experienced makers must know to use them effectively. After you’ve learned to do the basics, what should you learn to do with forms next? I’ve created a top 10 list of the most useful and unexpected tips & tricks to help you become a master at building Power Apps forms.
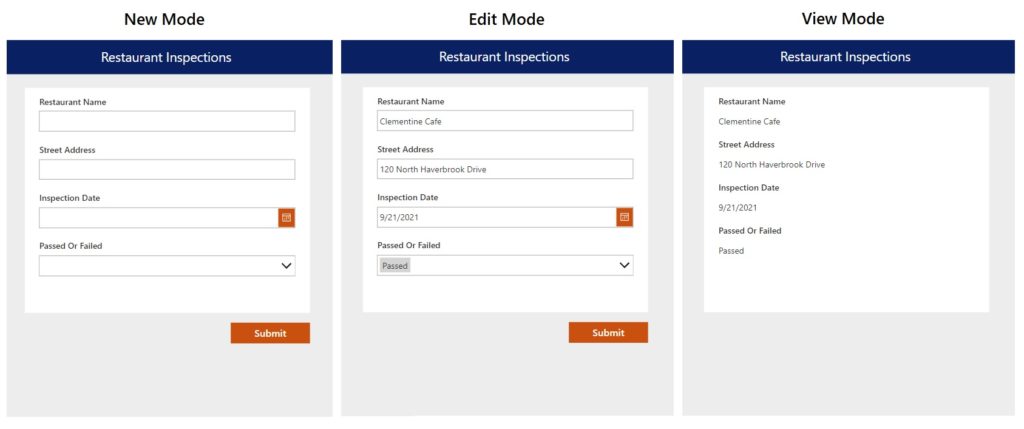
1. Use One Form To Create, Edit & View Records (NewForm, EditForm, ViewForm Functions)
New Power Apps makers often create two copies of the same form on separate screens: a fillable edit form for submitting data and another non-fillable form for viewing data. Making duplicate forms for creating, editing and viewing records is not necessary. Instead, you can use a single form and apply the NewForm, EditForm and ViewForm functions to change the Form Mode to what you currently need.
Here’s some sample code showing how to use each function. For a full tutorial about Form Modes check out this article.
// when form is submitted a new record is created
NewForm(Form1);

// when form is submitted, the current record is updated
EditForm(Form1);

// form cannot be submitted, input fields are view-only
ViewForm(Form1);Code language: JavaScript (javascript)
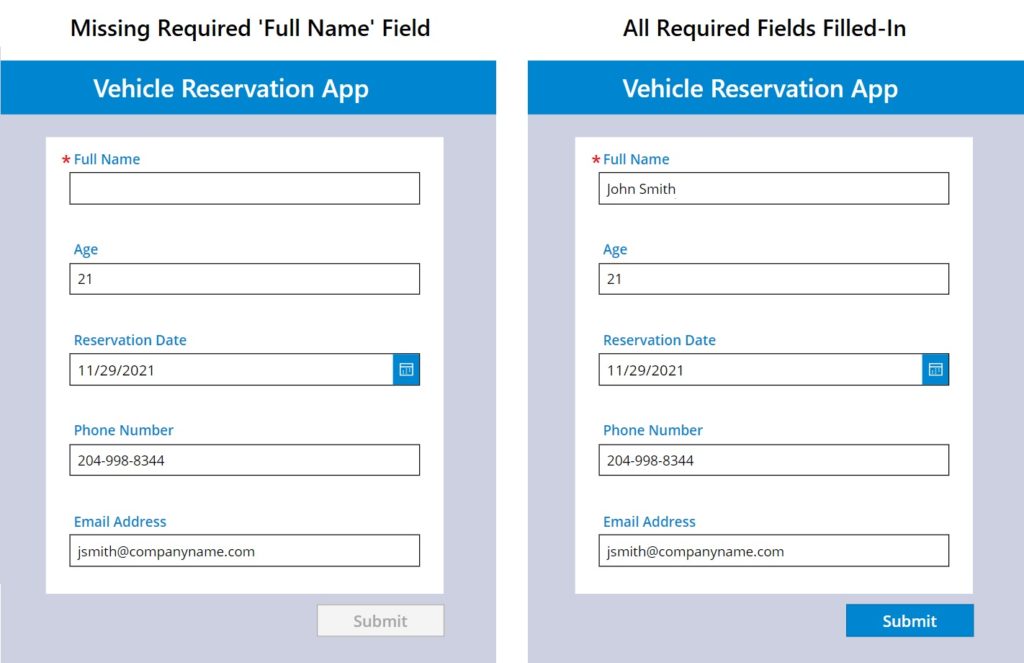
2. Easily Perform Data Validation With One Line Of Code (Valid Property)
Validating the data in a Power Apps form prior to submission is important. A form submission will be rejected when any field does not follow the rules in the data source. We can check if the form will pass data-validation with one-line of code like this. The Valid property will return a value of true for a pass and false for a fail.
Form1.ValidCode language: CSS (css)
When you know a form submission will fail you should prevent a users from submitting it in the first place. Use this code in the DisplayMode of a Submit button disable it when data validation fails.
If(Form1.Valid, DisplayMode.Edit, DisplayMode.Disabled)Code language: CSS (css)
For more advanced Power Apps data validation techniques check out this article.
3. Success Or Failure Message After A Form Is Submitted (OnSuccess/OnFailure Property)
After a Power Apps form is submitted you should tell the user whether the data was successfully saved. The wrong way to do it would be using this code in the OnSelect property of the form’s submit button because the form will always say it saved if even when it did not.
SubmitForm(Form1);
Notify(
    "Success: form was successfully saved",
    NotificationType.Success
);Code language: JavaScript (javascript)
Power Apps forms have a OnSuccess property that runs immediately following a successful save. Put the notification message there instead.
Notify(
    "Success: form was successfully saved",
    NotificationType.Success
);Code language: JavaScript (javascript)
There is also an OnFailure property that triggers after a failed save where you can write your failure notification message.
Notify(
    "Failed: form was not saved due to an error",
    NotificationType.Error
);Code language: JavaScript (javascript)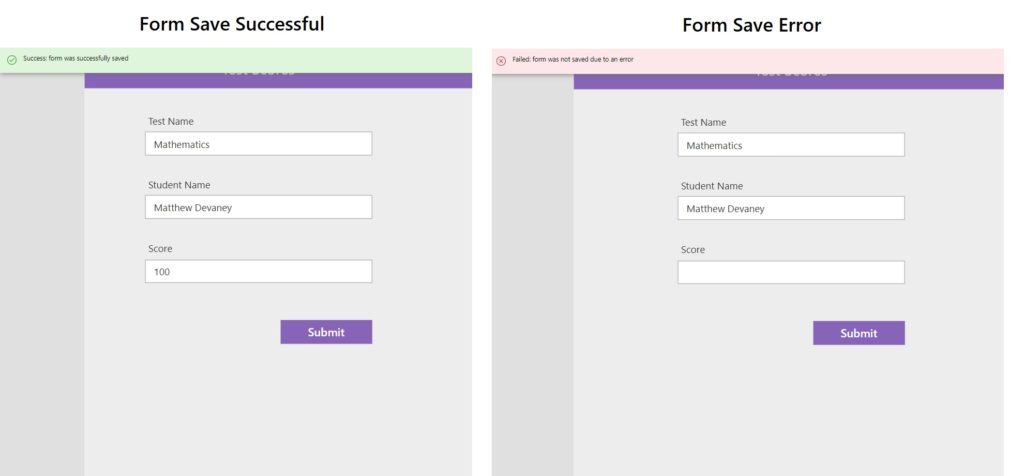
4. Get The Form’s Last Submitted Record (LastSubmit Property)
When a Power Apps form is successfully submitted a several fields not present in the app are automatically added to the record – ID, Created Date, Created By, Modified Date and Modified By. We can retrieve the updated record with these new values by using the form’s LastSubmit property.
Set(varRecordFormCurrent, Form1.LastSubmit);Code language: JavaScript (javascript)
Form1.LastSubmit looks like this:
{
    ID: 2
    Test Name: Mathematics,
    Student Name: Matthew Devaney,
    Score: 100,
    Created: Matthew Devaney
    Created By: 2021-11-16 5:23 PM
    Modified: Matthew Devaney
    Modified By: 2021-11-16 5:23 PM
}Code language: CSS (css)
The record found in this property is always the last submitted record for the current user’s session. Once the app is closed the LastSubmit property is cleared. It does not retrieve the last created/modified record for other users.
5. Check If A Form Is Unsaved (Unsaved Property)
When a user navigates away from a screen without saving a Power Apps form they should receive a warning to ensure there is no accidental data-loss. But how do we know if any fields on the form were updated with new values? Every form has an Unsaved property which evaluates to true when there unsaved changes and false when there are none.
Form1.UnsavedCode language: CSS (css)
We can use this code in the OnSelect property of a navigation button to check the the Unsaved property before going to the next screen.
If(
    Form1.Unsaved,
    Set(varBoolShowWarning, true),
    Navigate('Home Screen')
)Code language: JavaScript (javascript)
For more instructions on how to make pop-up menus in Power Apps check out this article.

6. Get A Single Record Showing All Form Updates (Updates Property)
As a user updates a Power Apps form a record is silently generated to track the changes. That record is what gets sent to the data source when we use the SubmitForm function. We can see the record by looking at the form’s Updates property.
Form1.UpdatesCode language: CSS (css)
The result will look something like this:
{
    Title: Bruno Mars
    Description: Superbowl Performance of a lifetime
    Date: 2021, 2, 14
}Code language: CSS (css)
The form record can be useful in these scenarios:
- Using the Patch function to write data to the data source instead of SubmitForm
- Calling a function from another connection than the data source
- Storing the record in a collection data-type
- Writing data to the local-device when in offline-mode
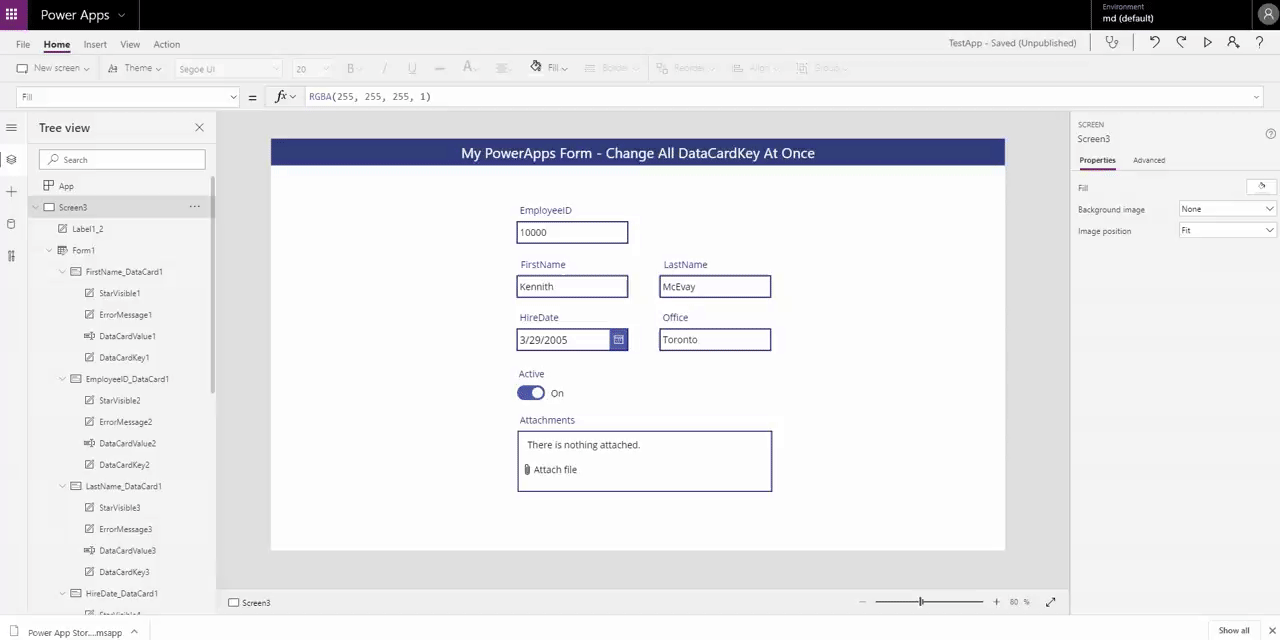
7. Style All Form Controls At Once Trick (Tips & Tricks)
Power Apps forms a huge time-saver because all of the input fields automatically appear and you don’t need to add them one-by-one. However, forms also have one big drawback: if you want to change the style of a form you must edit each control individually. There is no official way to perform mass-changes in studio-mode. Fortunately, this strange trick was discovered by Alan Chai to select all the form controls at once.
- Select the form
- Change the form layout from vertical to horizontal
- Click the undo button in the top right corner of Power Apps Studio
- All of the form’s controls will now be selected
For more awesome Power Apps tips and tricks check out this article.
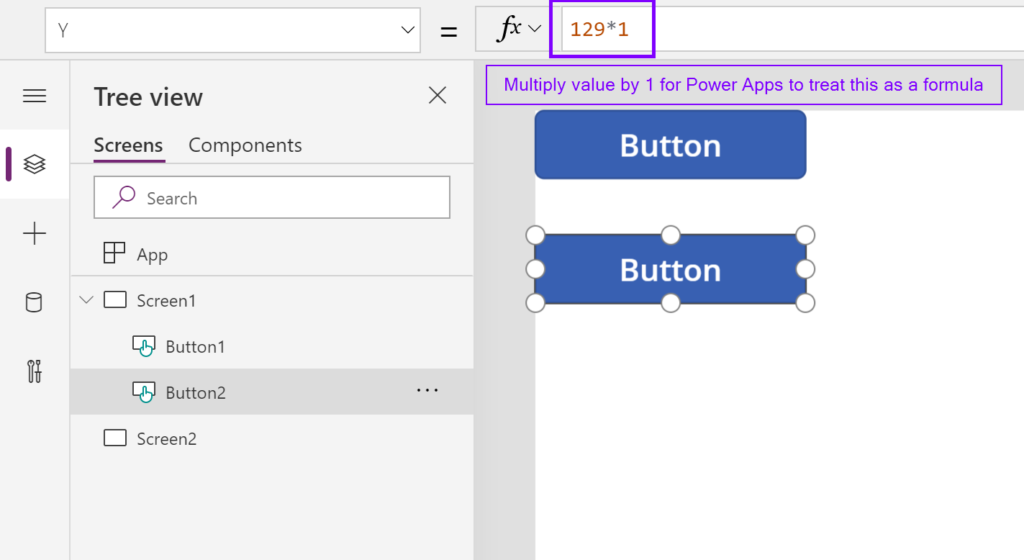
8. Maintain X & Y Position When Copying Controls Inside A Form (Tips & Tricks)
Re-using a control you’ve already setup is a great way to save development time. But if you try copying it from one card in a form to another card the control moves to a random X & Y position. If you want to maintain the same X & Y properties multiply their value by 1 like this because Power Apps does not break formulas when copying a control
X: 30 * 1
Y: 10 * 1Code language: HTTP (http)
This tip by Sancho Harker is so awesome I use it multiple times per day.
9. Create Multiple Page Forms On A Single Screen (Tips & Tricks)
Some forms are very long and have too many questions to fit on a screen. Fortunately, Power Apps forms can be split into multiple pages, dividing questions into smaller sections.
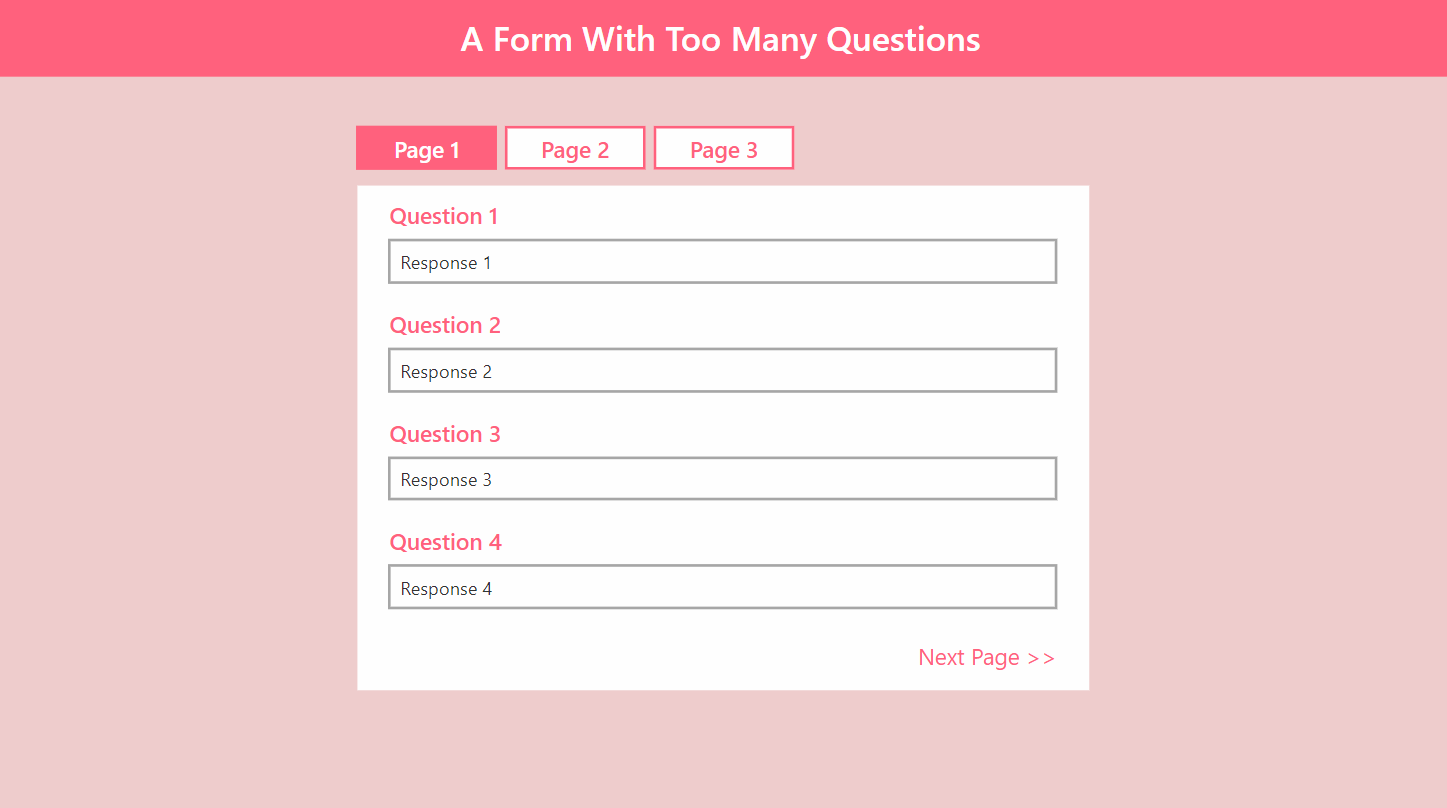
This is done by changing the visibility of each data card to show only when a variable storing the current screen matches page number
// show the data card only when on page 1 of the form
Visible: locCurrentPage = 1Code language: JavaScript (javascript)
For a full-tutorial on how to make multiple-page forms check out this article.
10. Responsive Forms Change To Fit Screen Size (Tips & Tricks)
Responsive app-design ensures a great user-experience whether user’s screen-size is large or small. A responsive-app changes its layout to best fit the display it is being viewed on. No extra work is needed to make a Power Apps form responsive – this feature is already included. Just insert a form inside your responsive-app and watch the fields become repositioned as you stretch and collapse the browser window.
Did You Enjoy This Article? 😺
Subscribe to get new Copilot Studio articles sent to your inbox each week for FREE
Questions?
If you have any questions or feedback about 10 Things You Should Know About Power Apps Forms please leave a message in the comments section below. You can post using your email address and are not required to create an account to join the discussion.


These are great tips. I have been working with PowerApps for about 2 years and I did not know most of these.
Paul L,
Hearing you say that means it’s “Mission Accomplished” for me! That’s exactly what my goal was. Teaching all of the little things that someone who uses forms might not have known.
Thanks for reading my article and leaving a comment 🙂
Thanks Matt. I have been using PowerApps for the last 2 months to build an app for my org, but never ventured into forms as my datacollection was more complex. Wanted to build a screen today for a simple user collection and update and your article is timely to adopt best practices in design. A big fan of your work, though I never got the opportunity to say so, since comments are restricted in other articles beyond 3 months from date of publishing 🙂
Very well written post with most important tips. Thank you for putting together.
Krishna,
You’re welcome! Glad you enjoyed the article.
Thanks for sharing!!
Awesome set of tips! Appreciate you putting this together
Is there a way to obtain the name(s) of the control(s) or the mandatory field(s) that prevent the Form.Valid function from giving a true?
In a multipage form, this would be really helpful.
Right now I use an Or with the !IsBlank(ErrorMessageXXX) to guide the user to the page where a field requires input, but it is not elegant.
Would also like to use the Focus function, but it seems Form and Focus don’t go together.
Michel,
I don’t know of any way to obtain the mandatory fields directly inside Power Apps… If you are very creative maybe with a Flow and grabbing the table schema somehow. But that seems very complicated.
Hi Mat,
This is a great post (I have read over it more than once, I come back when I am looking for something that I know that is here).
I have a question regarding this code
I have a screen that has several forms on it (I posted about it in one of your other blog posts) and I need to do that to all of then. To make it more tricky, in some cases not all of the forms needs to be submitted.
To make it easy for you to understand, the onselect for my submit button is
Do you know of a simple way that I could have the .valid option while taking into account that not all forms needs to be submitted?
Thank you
Daniel,
Awesome. I wrote this post as a way for people who are familiar with forms to discover some new tricks. From your message I can tell this post has served it purpose!
Here’s what I would do in your scenario. I’ve only done the 1st two lines but I think you’ll be able to easily repeat the pattern for the rest.
If(incident_check.Value And incident_form.Valid, SubmitForm(incident_form));
If(property_check.Value And property_form.Valid, SubmitForm(property_form));
Hi Matt,
Thank you so much for that, I wonder why I didn’t think of doing it like that 🙂
Thank you again
I’m an accountant with multiple clients. Can I create a timekeeping app using PowerApps?
Bill,
There’s a pretty good template you can use that’s freely available. It’s made by April Dunnam. Here’s a video overview and a link to download.
https://www.youtube.com/watch?v=A8SiNTnQw0Q
Hi, Matt,
Great stuff. I am trying to debug one of my forms. Specifically, I’m trying to determine exactly which form elements have changed. I have a view of the form that shows both the current value and the DataCard’s update value, but I can’t seem to pinpoint what’s changed.
I came across #6 above and thought this would be a great way to see the information I’m after; showing me only those items that have been modified. However, I’m having trouble finding the form’s “Updates” property”; it doesn’t seem to be listed in the form’s properties pane anywhere. I tried adding several controls to my form to view this data, including a data table with the items property set to MyFormsName.Updates. The various controls recognize the form and its Updates property, but I can’t see the data listed in that property.
Above, where you indicate “the result should look something like this”, how can I view or display this data?
{
Title: Bruno Mars
Description: Superbowl Performance of a lifetime
Date: 2021, 2, 14
}
Thanks in advance for your help. I appreciate all of the great content you put out there. It is of great benefit to me, and many other’s I’m sure.
GREAT TIPS!!! Thank you 🙂
The *1 trick on #8 no longer works (at least not on customized list forms). I had to put an invisible field on the form and set it to 1 and multiply everything by that.
Sam,
That’s unfortunate. If that’s true, it was a nice little trick while it lasted.
Still works if you do it the advanced properties area
In the SharePoint list, how to create a power app that is able to data entry that contains below SP list? Item and Quantity can vary based on what each individuals beneficiary will have received example Person XX may receive two Items and Person YY will 3 or 5 Items based on the Household or family size have
Berihun,
I believe this matrix should be split into 2 SharePoint lists. One list for the beneficiaries. Another list for the items. One beneficiary can receive many items.
thank you for the clue! if there is materials or tutorials which could be able to show the step?
Berihun,
Try this article I wrote on SharePoint list relationships
https://www.matthewdevaney.com/power-apps-sharepoint-list-relationships/
Thanks, awesome tips. I am a newbie and the one item I cannot seem to easily find is Remove/Delete Form Record. Can you advise of the easiest method to Remove/Delete existing record?
Muha,
I don’t have an article on this topic. Please try this video to find an answer.
https://www.youtube.com/watch?v=xKXPmK00DCA
Hi Paul,
amzing information thank you! Nevertheless using form with a MySQL database as backend where you have to deal with primary key (usually ID) with autoincrement property it becomes a nightmare.. actually doesn’t work, so I’ve to use the Patch function without an “autogenerated form from data”
Roberto,
You are using MySQL and Power Apps together? That’s amazing. I’ve never heard of someone doing that before.
Newbie questions:
TimoR,
Here’s my response to your questions:
“I wish to set the updater information on form, so UpdatedBy = User.Email”
SharePoint lists have a modified field which already track this info. There’s no need to it manually
“I am trying to add a selection list, but the value I select doesn’t get updated to DB”
The UPDATE property of a Card controls what info gets written when the form is submitted. Suggest you check there.
Hi, does the OnSuccess and OnFailure work if you need to submit an App with three screens and a form on each screen? Thanks
Garry,
You would likely want to submit the form each time you advance to the next screen. If the form succeeds, goto the next screen, if it fails stay on the same screen.
One point about getting a form’s last submitted record:
The .LastSubmit property of a form only seems to be set if you are using SubmitForm().
If you are using Patch() (because, for e.g., your data is split across more than one form), you will find the property is blank.
Instead, Patch() returns the record it’s just submitted, so you can assign it’s return value to a variable, e.g.:
Set(varLastSubmit,
Patch(‘List 1’, Defaults(‘List 1’), Form1.Updates, Form2.Updates))
You can then access properties of the record using this variable, for example varLastSubmit.ID
Hi Mat, Thanks for your useful blog as usual. I have question, in my app I have more than one form which I linked all by Patch to submit them all at once, so in this case I have to put this code of the success and failure en each form or it just enough to put it in the last form where the button of submit is?
Thanks, Matthew. I learned a lot from your blog and videos. Recently I am trying to build a Power App form based on a Microsoft Forms form we used to collect staff qualification information. Some questions in the original MS form is in matrix format with radio button choices and the labels on top of the matrix. It there anyway to build such a matrix form in Power App?
Lijun,
Yes, you can do this. But its not an out-of-the-box control. You must build it for yourself.
Hi, I’m looking for the most streamlined way to retrieve a record, then update it. I have a Power App that submits records to a SPO list with attachments. I added historical data to the list, but want to use the app to add photo or scan attachments to each record. I want to input the historical identifier, call up the record, adjust it and resave. Please & Thank you.
Hi, I discovered that a combo box, with a variable set OnChange:
Set(varSelectedItem, LookUp(‘SPO List’, FieldOfInterest = ComboBox2.Selected. FieldOfInterest))
Then varSelectedItem will call up the record to an Edit form.
Hi Matthew, thanks for all the great input you deliver with your documentations.
But one question i never get answerd in the whole internet… How can i get a list of the objects and there properties from a powerapps form?
Is there any kind of access to these data?
Greetings Marcel