Power Apps: Customize A SharePoint List Form

Power Apps can be used to customize a SharePoint list form. For example, you might want to change a control type (example: dropdown to radio buttons), add data validation for email addresses, change the form’s size. It can do all of this and more. Form customization used to be done with InfoPath forms but Power Apps is the more modern way to go. In this article I will show you how to design a SharePoint List Form with Power Apps.
Introduction: The Job Interview SharePoint List Form
Managers at a construction company use a SharePoint list to record job interviews and track candidate ratings. When a manager wants to create a new job interview in the SharePoint list they press the new button and a custom Power Apps form appears.

Setup The SharePoint List
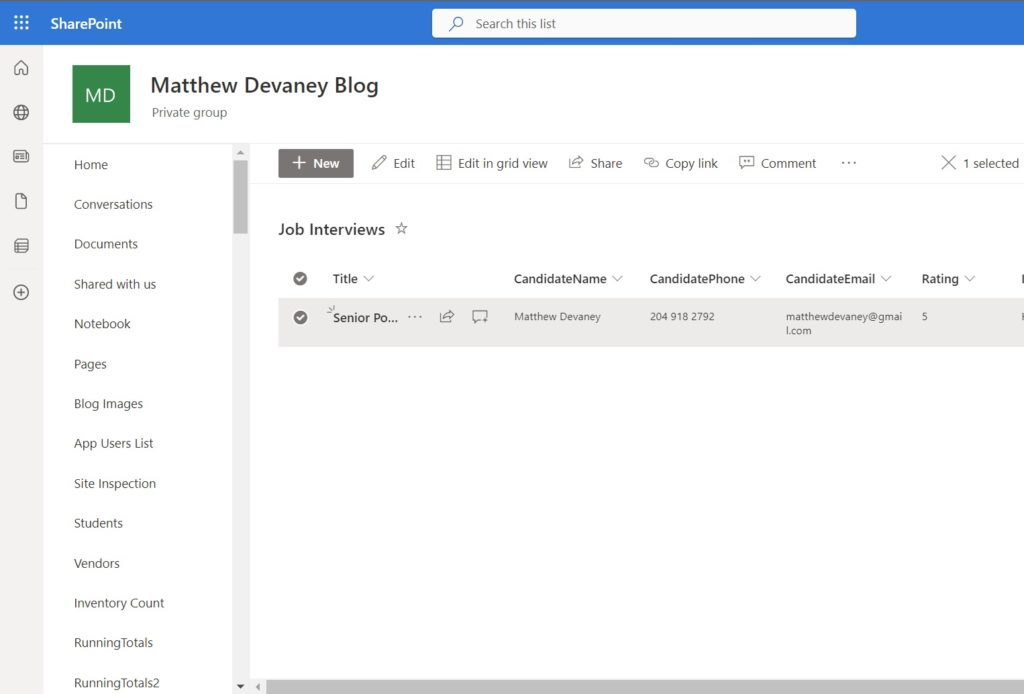
Create a new SharePoint list named Job Interviews with the following column
- Title
- CandidateName
- CandidatePhone
- CandidateEmail
- Rating
- InterviewNotes
- InterviewedBy
When a user presses the new button a SharePoint list form appears that looks like this.

Open The SharePoint List Form In Power Apps Studio
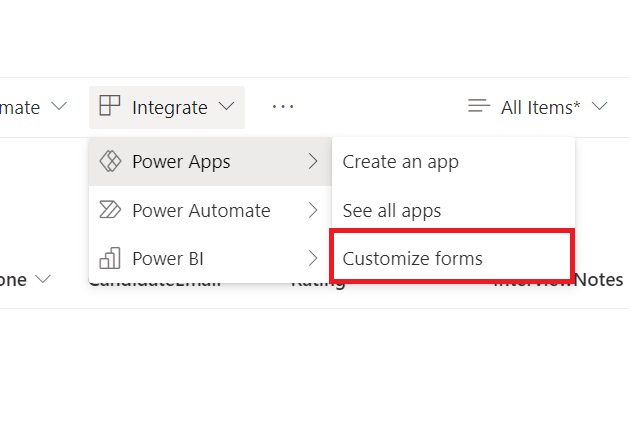
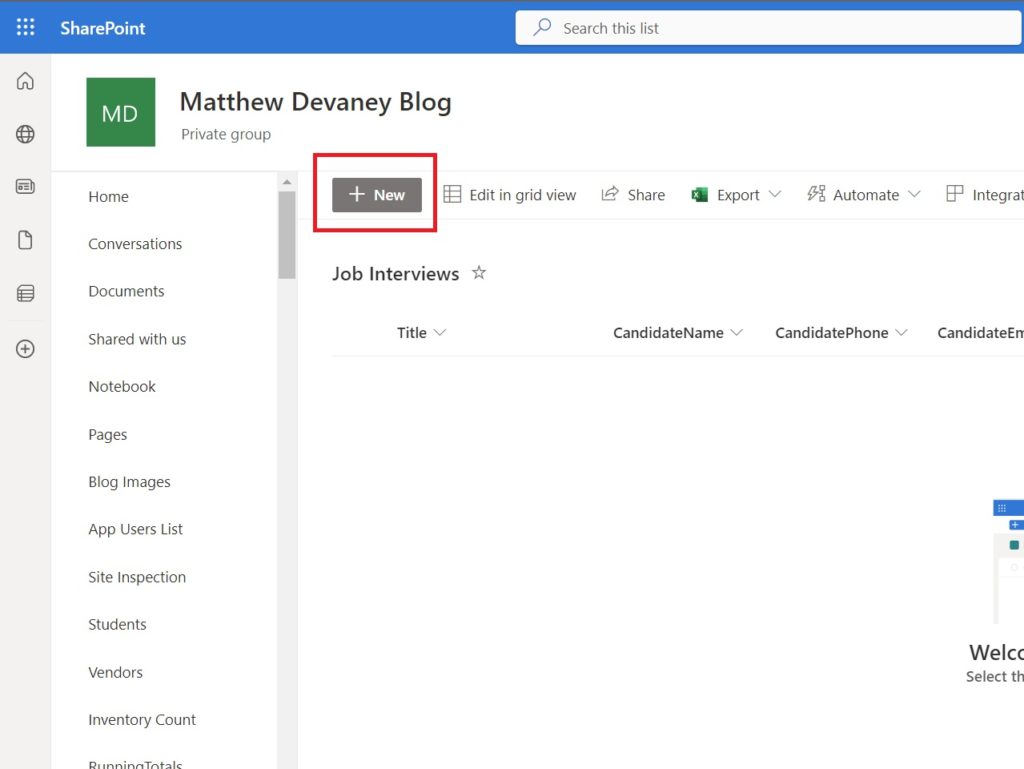
Go the the Job Interviews SharePoint list and select the Integrate button from the menu. Choose Power Apps then Customize Forms.
The SharePoint list form will appear in Power Apps Studio. We can use Power Apps to modify the form however we like.

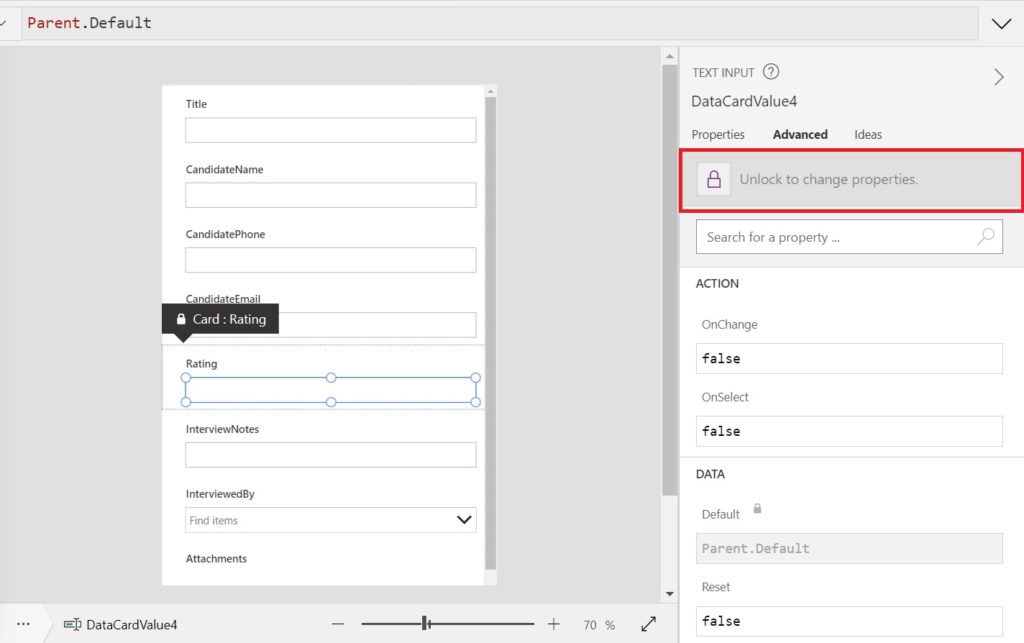
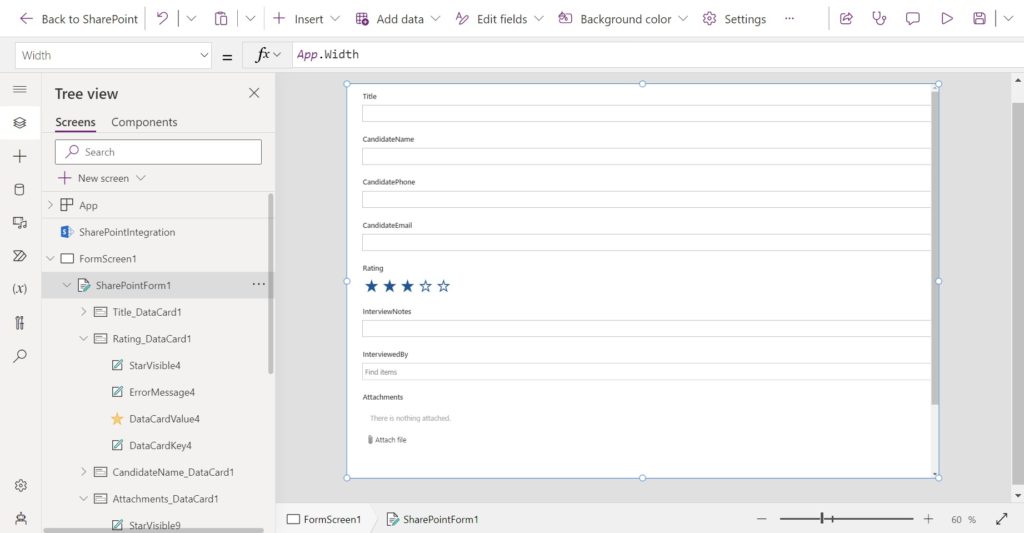
Change A Text Input Into A Rating Control
By default a number type column will appear as a text input in the SharePoint list form. We want to delete the text input control for the Rating column and replace it with a rating control. Select the Rating text input (in this case DataCardValue4) and click the icon to unlock it.
Remove the Rating text input.
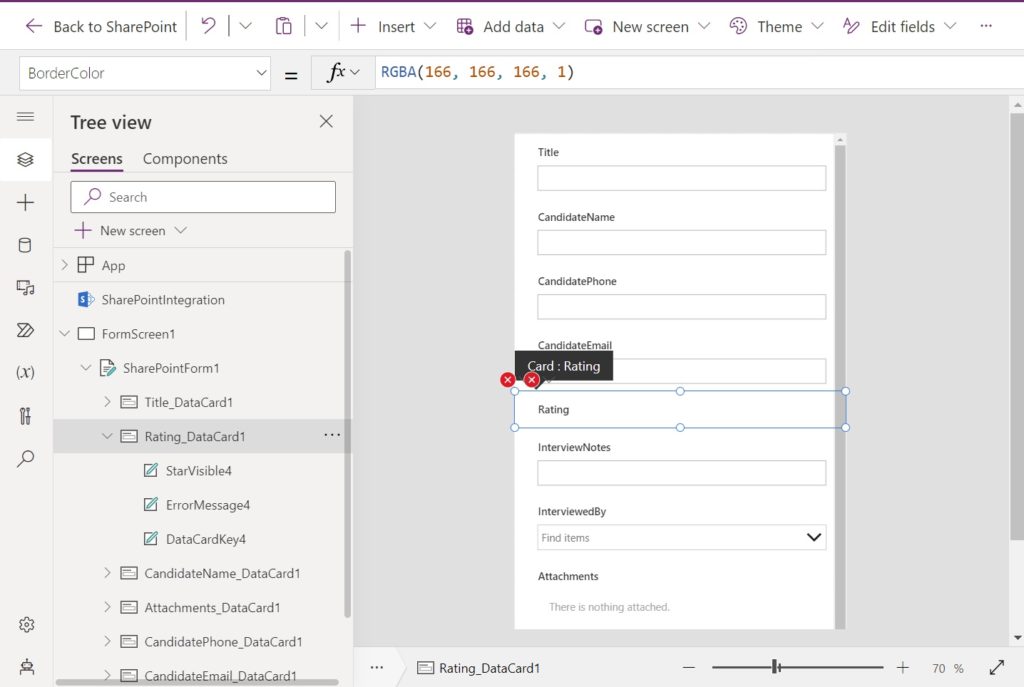
Add a new rating control to the card in its place.
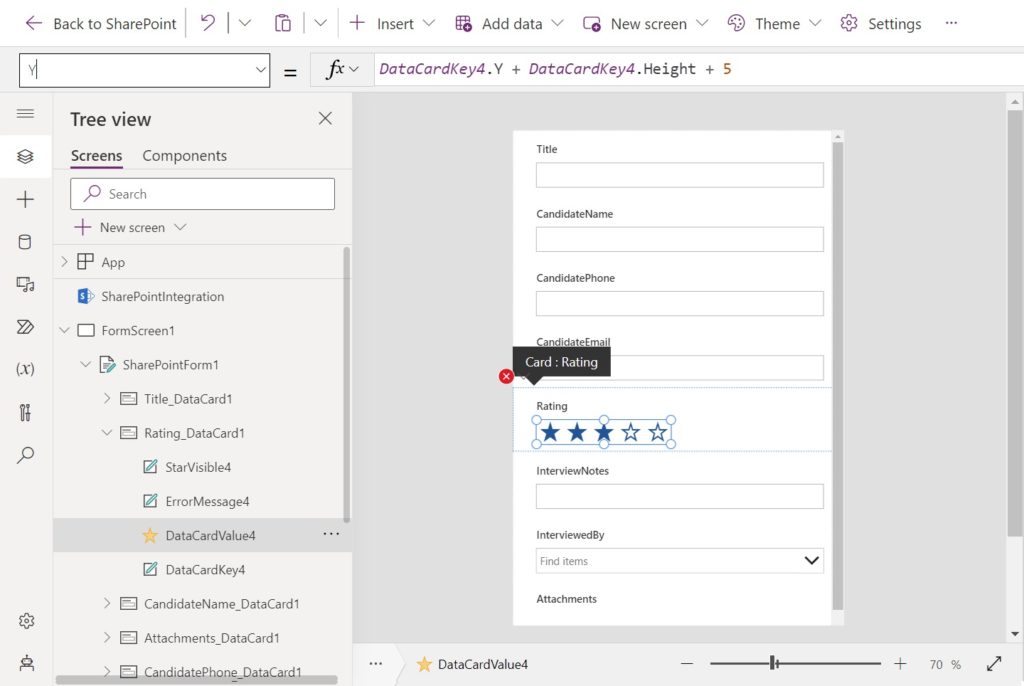
Use these values in the X and Y properties of the rating control to position it where the text input was previously.
X: 32
Y: DataCardKey4.Y + DataCardKey4.Height + 5Code language: CSS (css)
Next, we must indicate what number value to write to the SharePoint list based on the number of stars chosen in the rating control. Select the data card for the rating field.
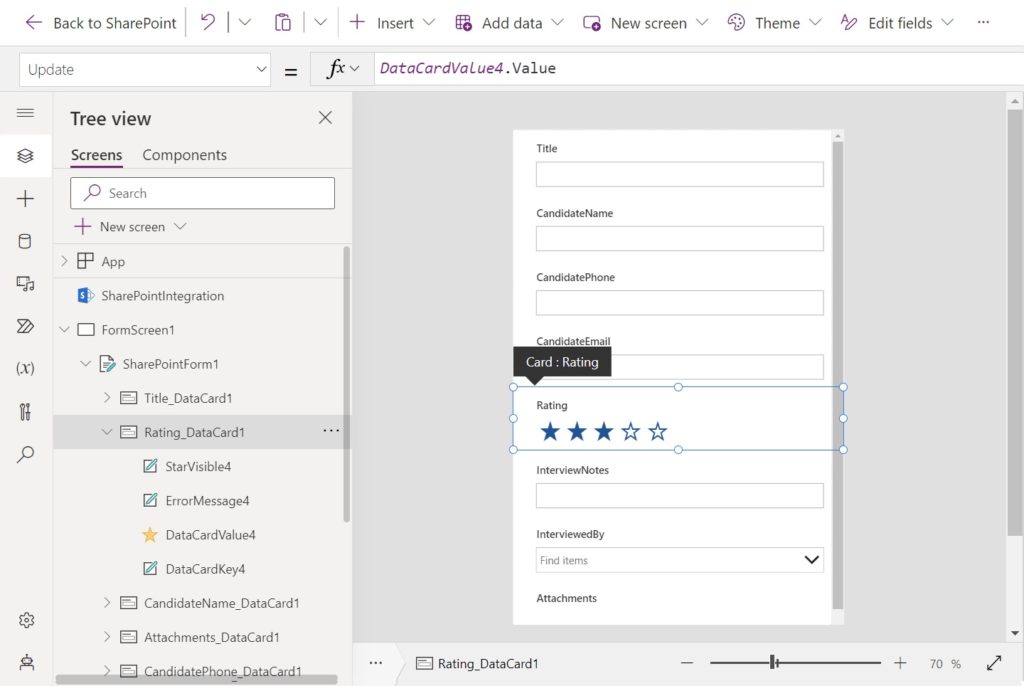
Then change the Update property to this value.
DataCardValue4.ValueCode language: CSS (css)
Also, use this code in the Default property to ensure the property rating appears when editing an item.
Parent.DefaultCode language: PHP (php)
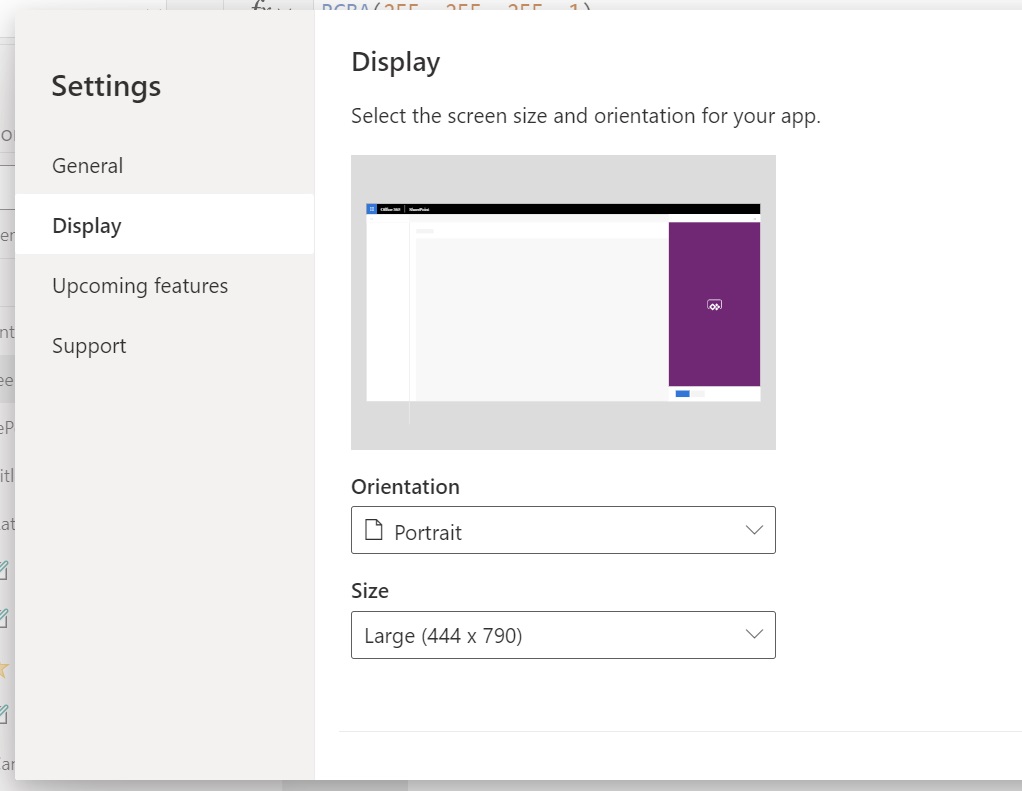
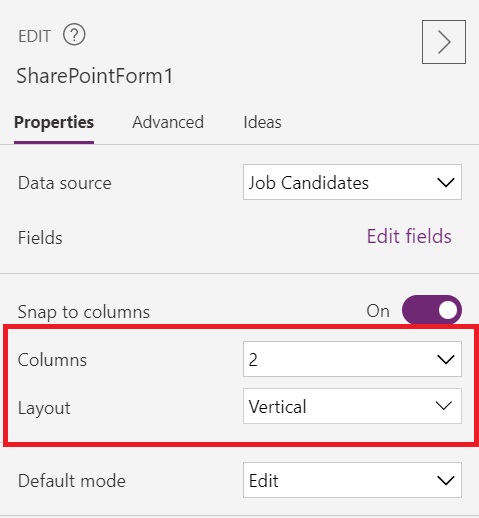
Set The SharePoint List Form Screen Size
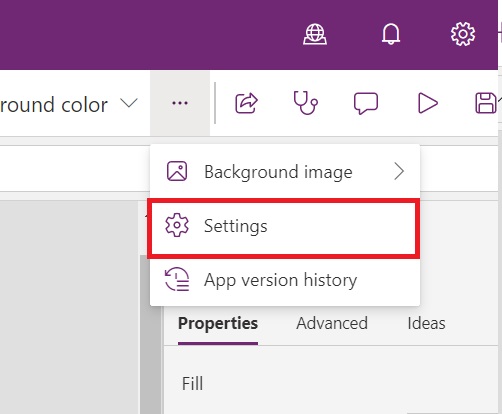
The SharePoint list form is too long to fit all of its fields on the screen at once. We can solve that problem by making the form wider and changing it from a 1 column layout to a 2 column layout. Open the Power Apps Settings menu.
Go to Display. The default value for Orientation is Portrait and the size will be Large.
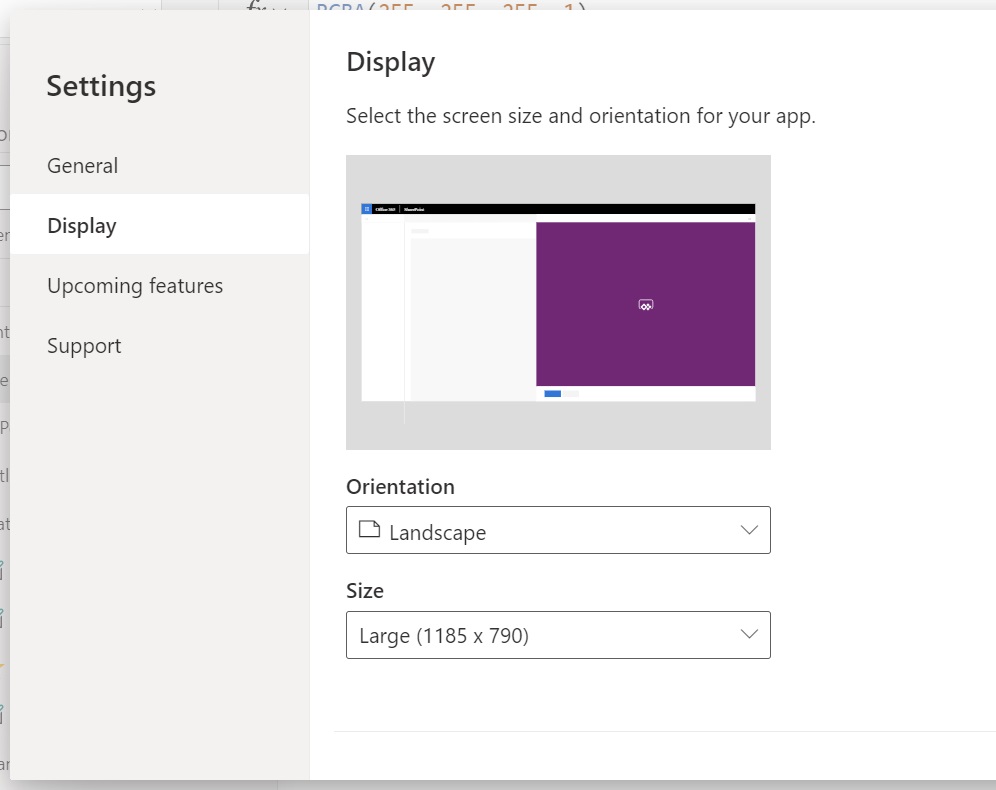
Change the Orientation to landscape instead. Confirm your decision when Power Apps warns that the app’s design could be affected by switching orientation.
Reposition the SharePoint list form so it fits on top of the newly resized screen.
Use this code in the Height and Width properties of the form to make it cover the screen.
Height: App.Height
Width: App.WidthCode language: CSS (css)
While selected on the SharePoint list form change the Columns property to 2 and the leave the Layout property as vertical.
Now that the form has been redesigned it can shows all of its fields on the screen without scrolling.

Perform Data Validation On The Email Field
We want to ensure all emails entered into the SharePoint list form are valid and follow the format [email protected].
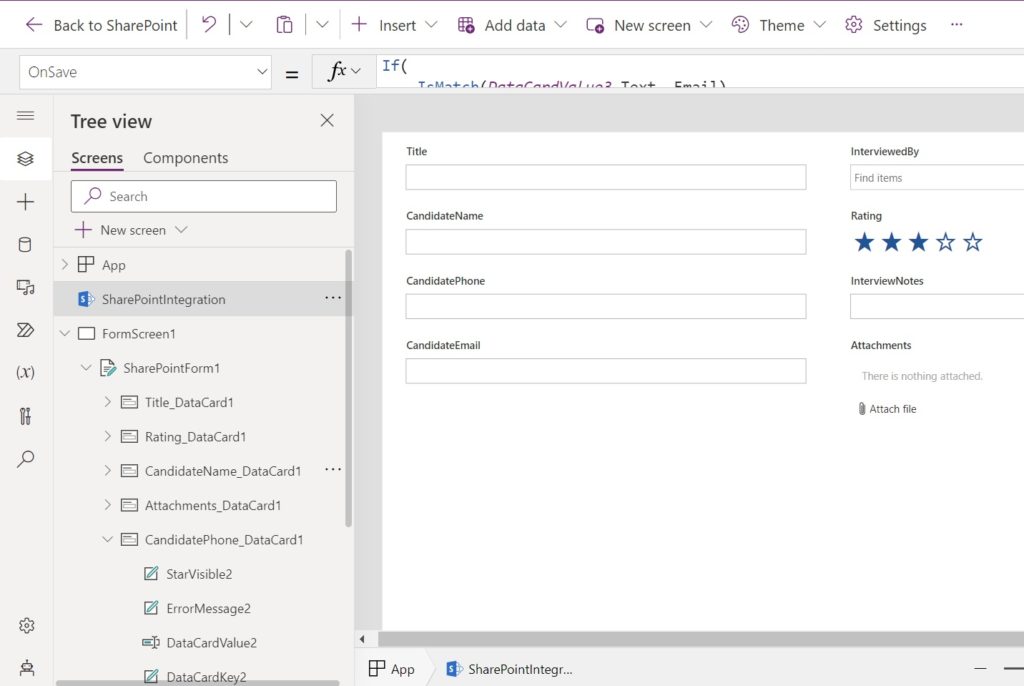
Use this code in the OnSave property of the SharePointIntegration object. The IsMatch formula checks if the Candidate Email text input (DataCardValue3) contains an email. If the validation fails the user sees an error message when they try to save the form.
If(
    IsMatch(DataCardValue3.Text, Match.Email),
    SubmitForm(SharePointForm1),
    Notify("Candidate Email does not follow the format username@domainname.extension")
)Code language: CSS (css)
Create A Save Button And A Cancel Button
The original SharePoint list form had a Save button and a Cancel button at the bottom of the form. We should recreate those in the PowerApps form as well. Insert a new button onto the screen with the text Save.
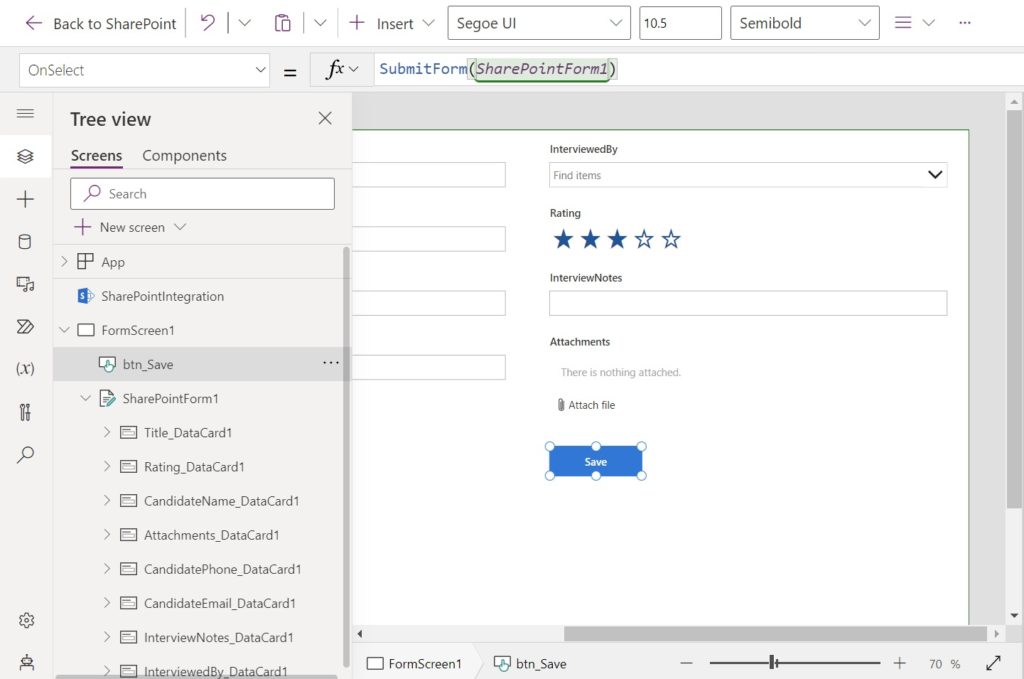
Use this code in the OnSelect property of the save button to submit the form.
SubmitForm(SharePointForm1)
Make another button with the text Cancel beside the Save button.
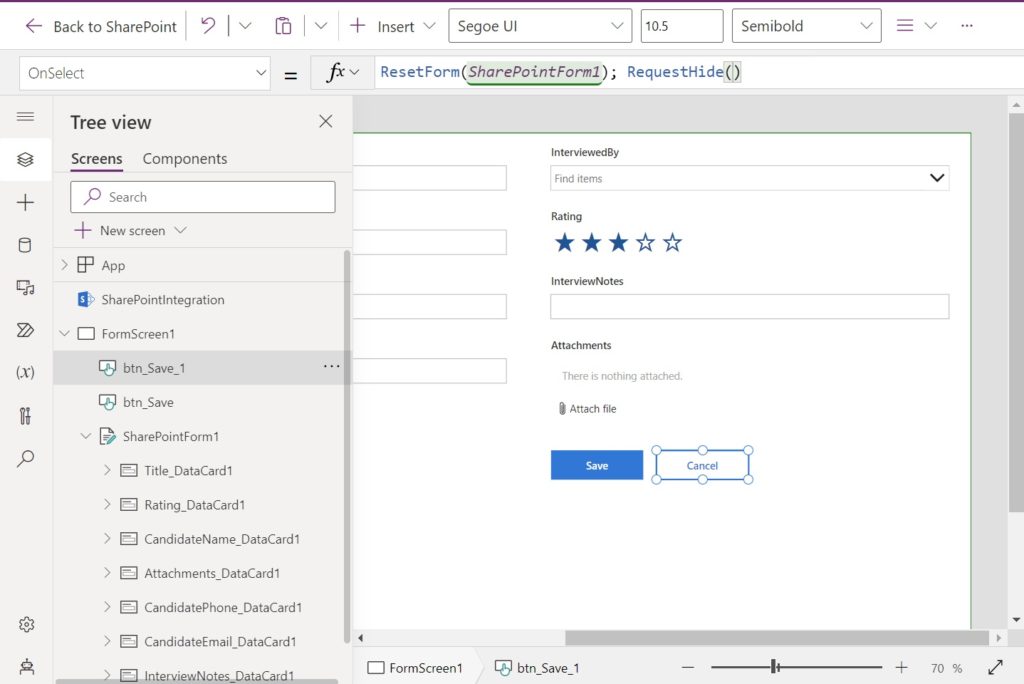
Write this code in the OnSelect property of the cancel button to reset the form. Then use the RequestHide function to close the form.
ResetForm(SharePointForm1); RequestHide()
Style the cancel button to have a white fill with blue text and borders using this code.
BorderColor: RGBA(0, 120, 212, 1)
BorderStyle: BorderStyle.Solid
BorderThickness: 2
Color: RGBA(0, 120, 212, 1)
Fill: Color.WhiteCode language: HTTP (http)
We are now done creating the SharePoint List Form in Power Apps. Save & publish the app.
Test The Power Apps SharePoint List Form
Go to the SharePoint list and press the new button to make the custom SharePoint list form appear.
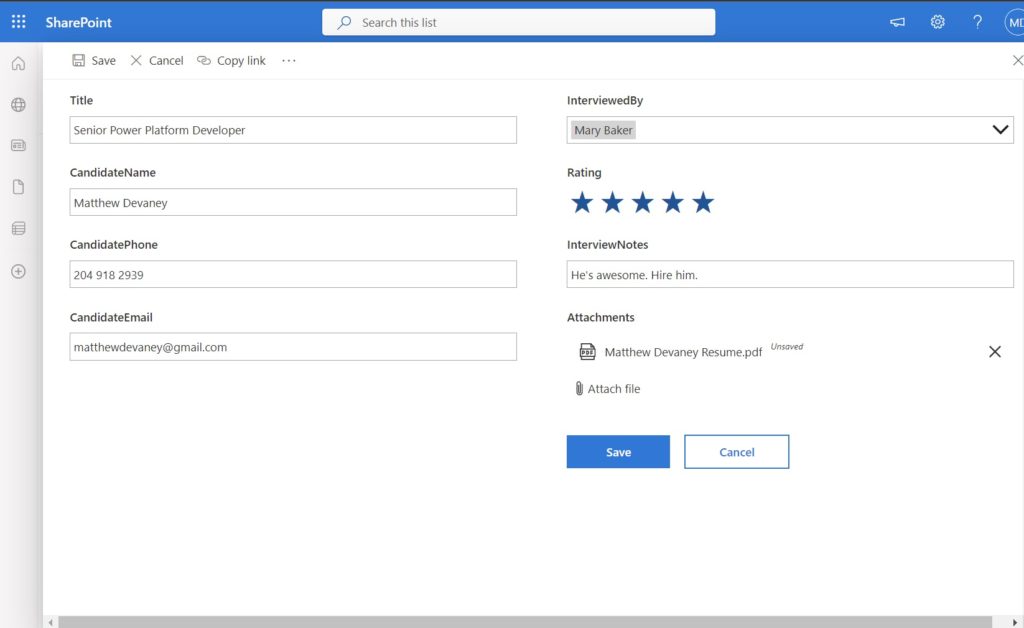
Fill-in the SharePoint list form with some data and press the Save button.
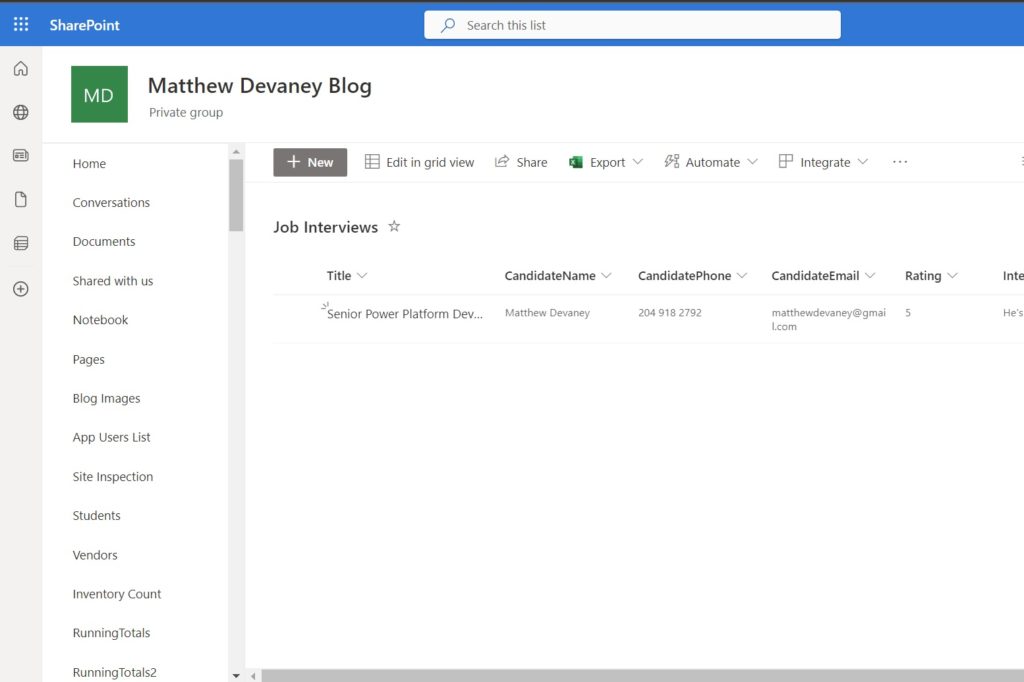
The new record will show in the SharePoint list.
To edit a list item, select it and press the Edit button.
Its data will be shown in the SharePoint list form.

Revert To The Original SharePoint List Form
If we change our minds and want to use the original SharePoint list form again we can do so. Open the SharePoint list settings and select Form settings.

Choose Use the default SharePoint form then press OK.

The original SharePoint list form will now appear instead of the Power Apps custom form.
Did You Enjoy This Article? 😺
Subscribe to get new Copilot Studio articles sent to your inbox each week for FREE
Questions?
If you have any questions or feedback about Power Apps: Customize A SharePoint List Form please leave a message in the comments section below. You can post using your email address and are not required to create an account to join the discussion.


hey there Mr. Matt! For the part two, or a supplement, perhaps some notes or guidance on the limitations to forms (solutions, printing, etc.) as some folks might construe or take for granted some abilities that are actually not allowed or must be handled differently 🙂
Hello Mr. Ralph 👋
It’s a good callout. I think the best place to do this might be a limitations section at the bottom of this article
Thank you for the insight this provides.
Think we may have settings on our tenant or possible a different version of SharePoint/Power Apps that prevents the final modified form appearing.
I have applied the work as described and published. However, New within the SP list shows the default form.
I can see in the List settings that the customized form has been applied. But it says that it requires new list experience.
Not sure what that implies I should be switching on.
If I go and modify the form, I jump back to the Power Apps Maker and see the customised version.
Many thanks
Additional Note :
It may be laggy, update for the publish, but I also clicked on the ‘Return to classic Sharepoint’ that appears at the bottom of vertical navigation. This didn’t return to the classic view, but the New button started to display the customised form.
There had been at least a 5 minute wait since the last publish. I love so much of what the power platform provides, but the waftiness of some bits is very frustrating.
Hey there! How should I go around if I want the title of the item in the list to be the same as the file name?
Diego,
This is a SharePoint list so there’s no guarantee to be any files/attachments.
in an automate, you could attempt to initialize and compose a string comprised of the attachment name value and then write it to the title… just thinking??!
Hi Matt,
Great blog for any newbies
Question:if we want to use the link to this form at the homepage of the SharePoint site in the call to action webpart;I want when user clicks the link it takes them to the list powerapps form and upon save or cancel it should return to the home page instead of SharePoint list
Any thoughts on that.Thanks!!
Amit,
I don’t know much about SharePoint web parts. Let’s see if someone else can respond with the answer.
Hi Amit, Matthew,
Sorry this is two months late. I have an idea you may want to try.
You could add a query string to the URL used in your CTA web part, something like ‘return to’, where you provide the URL of your homepage. You could then add an element to your custom form to identify this query string value from the URL. You can modify the action of the form’s save button to apply the change to the SharePoint list before redirecting the page to the homepage URL rather than letting it default back to the SharePoint list.
Worth a try?
Matt
Hi Matthew – great article and love following your blog btw.
Quick question: Is the SharePoint customised app stored in the default environment and if so can this be changed? Our M365 tenant is provisioned in the US but we are based in the UK and have to use UK region environments – any advice or best practice?
Dan,
I recommend watching this video by Druvin Shah to answer your questions:
https://www.youtube.com/watch?v=MCHpFwaHNXY
Hi Dan, SharePoint customised list forms (i.e. using the SharePoint integrate option) are tied to the list and cannot be migrated out of your default environment, as far as I know. Microsoft have an article on this. See Q and A section: Customize a Microsoft Lists or SharePoint form by using Power Apps (contains video) – Power Apps | Microsoft Learn
how to add attachment section?
Nhan,
If you are using a SharePoint list form there’s no need to add it, the control just appears.
thanks
Hello,
I would like to customize a form by adding a field that will return the count of fields with a certain answer .
Background : I have a sharepoint list , where each column ( choice type ) represent a question ; I need to add a calculated column with the formula count if , however it’s not supported by sharepoint , I’m looking for workarounds.
Your help will be much appreciated ,
Thanks .
Hello Matthew, your blogs are always clear and precise and really appreciate reading you.
I have a Sharepoint list I want to give access to external users, will they be able to load the form even if they do not have a powerapps basic licence ?
Pierre,
Your external users will need a SharePoint license and a standard Power Apps license. Last time I checked both are included in E3.
Here’s a tutorial for when you get the licensing purchased.
https://www.matthewdevaney.com/a-fool-proof-way-to-share-power-apps-with-external-users/
Hi Matthew, I am curious if you can tell the difference between the native SharePoint form “Cancel” button and the “Exit” or “X” button at the top-right of the form’s dialogue box (see attached image).
As far as I know, these cannot be removed from the SharePoint form dialogue box, so to avoid confusing my users with extra buttons, I have decided to utilize the native buttons rather than create custom buttons in my PowerApps SharePoint Integration form.
However, I have noticed that when I use the “X” button in the top-right versus the “Cancel” button, the formulas in my Power Apps form do not always cooperate the same. For example, I have OnCancel, OnSave, and OnEdit arguments applied in the SharePoint Integration properties, but there doesn’t appear to be any way to customize properties in the event that someone chooses the “X” button instead of the three aforementioned options (Save, Edit, Cancel).
If it were possible, I would remove those buttons altogether and use custom buttons, but I do not know of a way. Appreciate any assistance you can offer.
Hi Matt,
I have created a list (listA) with the custom form that I made in PowerApps. Now when I create a new List (ListB) and I use ListA as a template, the custom form is not there. Is there a way how we can move the custom form to ListB?
Hey Matthew, great instructions (best I have seen so far) Ihave a very similar scenario and have successfully created a custom form. My next step is to include an auto increment ref number – that should take the form of ABCD-YY-### – Do you have a part two to these instructions that would include an auto number?
Hey Matthew, I made a custom from and it will use my custom power apps form when i use the https://www.mysharepointurl.com/newform.aspx
But when I use the New button to create a new item it uses the default form. Am I missing a setting somewhere
Hello Matt,
thanks for this tutorial it was very helpful.
however I am struggling with the “person field” on share point when creating the column its person that was selected as the category but when using the customize on power App its changes that field to find item, same applies with the “choice field” as well same thing is seen on your screenshot above
any idea how to correct those field back to its initial field input?
Hi Matthew,
I created PowerApps form for a SharePoint list using this tutorial and used Landscape large orientation. My forms however appear in a dialog box . And because of the large orientation there is now a horizontal scroll bar at the bottom of the form. Also under list settings the option to open forms in a dialog box is selected as No. I tried changing settings of the app, but the dialog box seems to have a fixed max width it can display. Am I missing something here?
Hi Matthew,
Do you also have any knowledge on how to localize these custom forms?
We like to work with two languages. And the form needs to display the user’s prefered language. The descriptions I found in the web all reference to Power Apps solution where you need to add a .resx resource. But I seems this is not possible with custom forms.
Any thoughts?
Hi Matt and colleagues.
I have a complex SP list custom form, that works well, except that after editing and saving an item, if I go to edit the same or any other item without reload/refresh the SP List, I will not be able to edit any values in the selected item – and the display will jitter in the form if I scroll to the lower controls.
If I refresh the SP List page after a save and before an edit, the form works perfectly. Form has two collections, SP list data, Excel data, and SQL data, as well as two stored procedure flows in it, which return data through JSON to the collections. As noted… it all works well… except the nuisance of having to refresh the list after a save. That means you lose your place in the list. A nuisance for time and efficiency in a list with 750 rows – especially when editing somewhere in the middle.
I’m not sure if it’s a session state issue, or a post back or value retention issue with the controls.
Help! Insight! Thank you. KenHiggins
Hi, Matthew
Is it possible to change “New Item” title after form has been customized?
I customized SP form. And paste the link of the form to another page. When users open the page they see New Item title above the customized form.
I know that it’s possible when form hasn’t customized yet (header in layout section), but how to handle it in custom form?
Hi
Recently in 2024 power app with sharepoint custom form stop opening on the panel. It opens in a weird seperate browser and looks very ugly. I did it both on document library and list.
So may people are experiencing the same in the Microsoft community.
Help!