Make A Calendar In Power Apps – Part 2
This the 2nd article in a tutorial series where you will learn how to build a calendar app in Power Apps. In part 1 we learned how to make a basic calendar using a gallery and created buttons to change the current month. In part 2 we will display events from a SharePoint list on the calendar and add several features to add a new event, edit an event and delete an events.
If you haven’t read Part 1 yet I would highly encourage you to read it first.

Displaying Events On The Calendar
A common use for a calendar app is to display company events. In this example, we will use a calendar to show when a company is holding employee training.
Create a new SharePoint list called ‘Training Events List’ including the columns: Title (single-line text), StartDateTime (date & time), EndDateTime (date & time) and description (multiple-line text). Input this data into the list.
| Title | StartDateTime | EndDateTime | Description |
| Health & Safety Course | 11/3/2020 9:00AM | 11/3/2020 11:00AM | event description goes here |
| Health & Safety Course | 11/10/2020 9:00AM | 11/10/2020 11:00AM | event description goes here |
| Health & Safety Course | 11/17/2020 9:00AM | 11/17/2020 11:00AM | event description goes here |
| Health & Safety Course | 11/24/2020 9:00AM | 11/24/2020 11:00AM | event description goes here |
| I/T Security Course | 11/10/2020 2:00PM | 11/10/2020 3:00PM | event description goes here |
| I/T Security Course | 11/20/2020 11:00AM | 11/20/2020 12:00PM | event description goes here |
| I/T Security Course | 11/25/2020 4:30PM | 11/25/2020 5:30PM | event description goes here |
| Corporate Ethics Training | 11/5/2020 1:30PM | 11/5/2020 3:30PM | event description goes here |
| Corporate Ethics Training | 11/19/2020 1:30PM | 11/19/2020 3:30PM | event description goes here |
| New Employee Onboarding | 11/10/2020 8:00AM | 11/10/2020 10:00AM | event description goes here |
| New Employee Onboarding | 11/17/2020 8:00AM | 11/17/2020 10:00AM | event description goes here |
Once you’ve entered the events into SharePoint open the calendar app and connect it to the ‘Training Events List’.
The basic calendar is already setup but we must make a change to the gallery so it calculates both the current day and the next day. This is important because it helps us avoid a delegation warning when filtering the training events by date.

Replace any code in the Items property of gal_Calendar_Days with this code.
ForAll(
    Sequence(42),
    {Value: varFirstDayOfMonth + Value - 1 - Weekday(
        varFirstDayOfMonth,
        StartOfWeek.Sunday
    ) + 1,
    NextDay: varFirstDayOfMonth + Value - 1 - Weekday(
        varFirstDayOfMonth,
        StartOfWeek.Sunday
    ) + 2}
)Code language: CSS (css)
Now we are ready to add events to the calendar. To do this we will use a technique called ‘nested galleries’ which means to put a gallery inside another gallery. Select the 1st cell in gal_Calendar_Days and insert a new blank vertical gallery called gal_Calendar_Events.
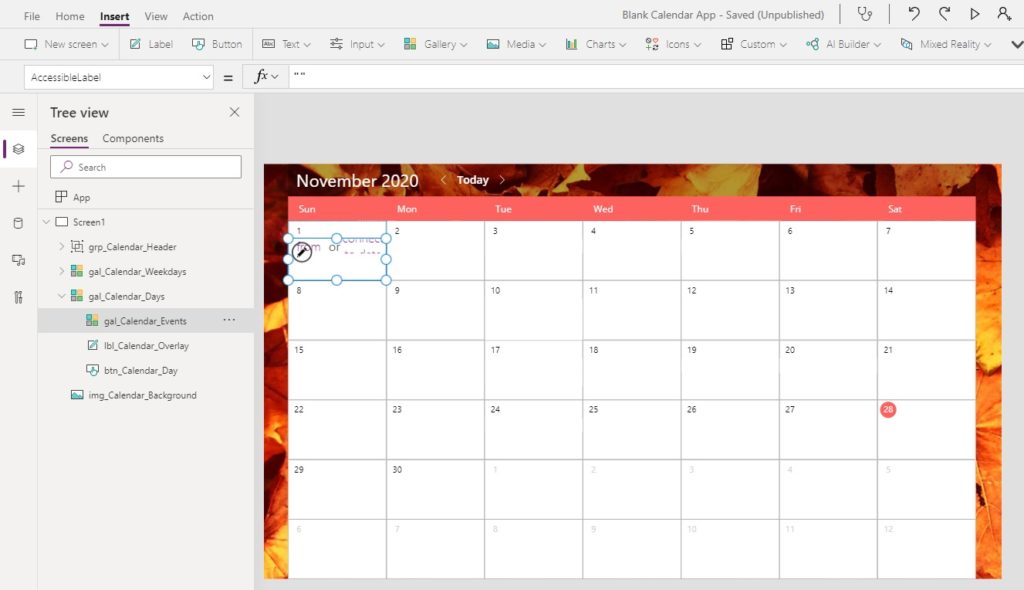
Write this code in the Items property of gal_Calendar_Events to filter on only the current day’s events.
Filter(
    'Training Events List',
    StartDateTime < ThisItem.NextDay
    And EndDateTime >= ThisItem.Value
)Code language: HTML, XML (xml)
We also want to apply styling to gal_Calendar_Events so the events appear nicely formatted on the calendar. Put this code in the following properties.
TemplateFill: Pink
TemplatePadding: 1
TemplateSize: Self.Height/3Code language: HTTP (http)
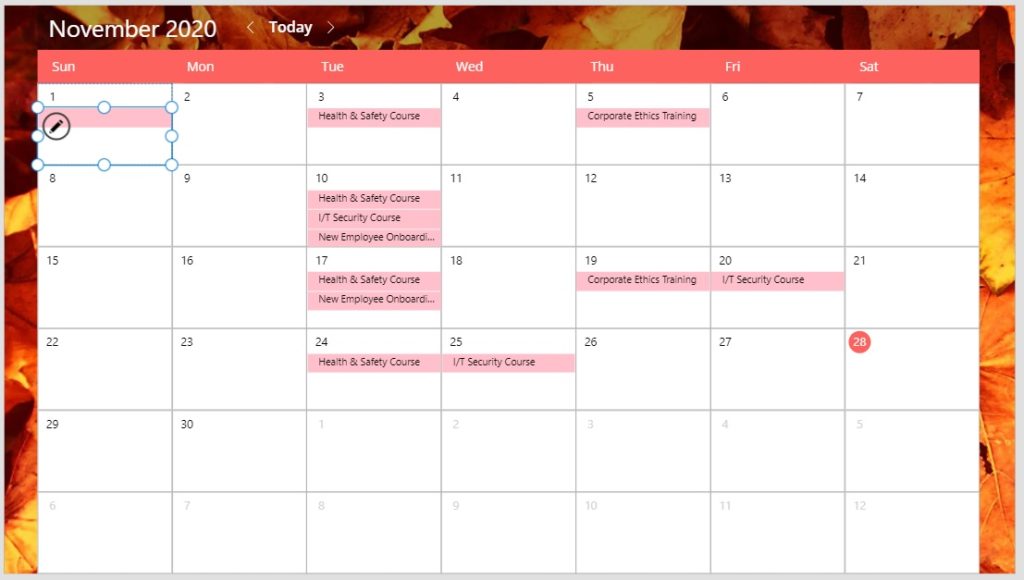
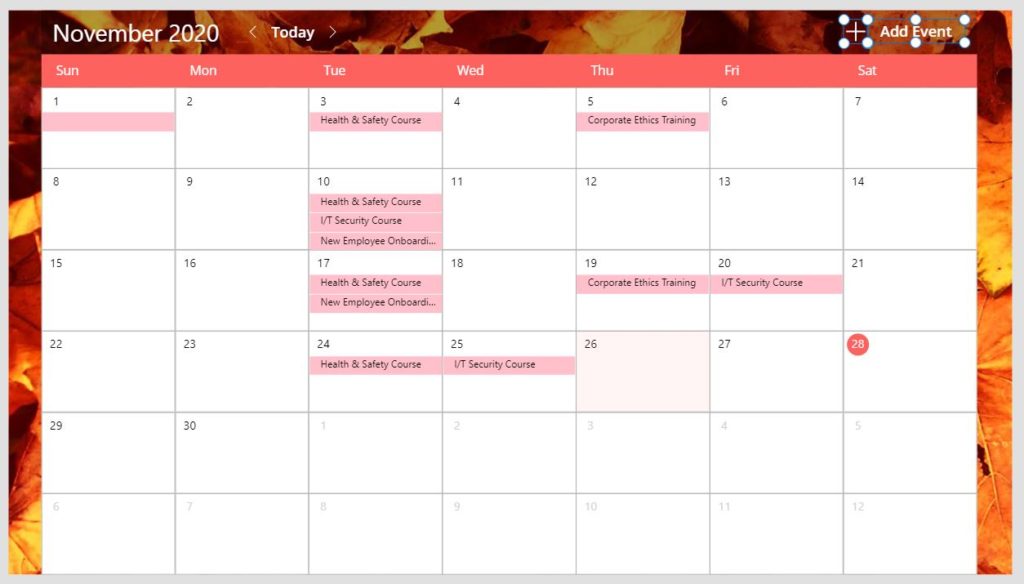
After doing this you will see several pink lines appear on the calendar on the dates with training events. One more step is needed to display the event titles as shown below. Insert a new label into the gal_Calendar_Events gallery…
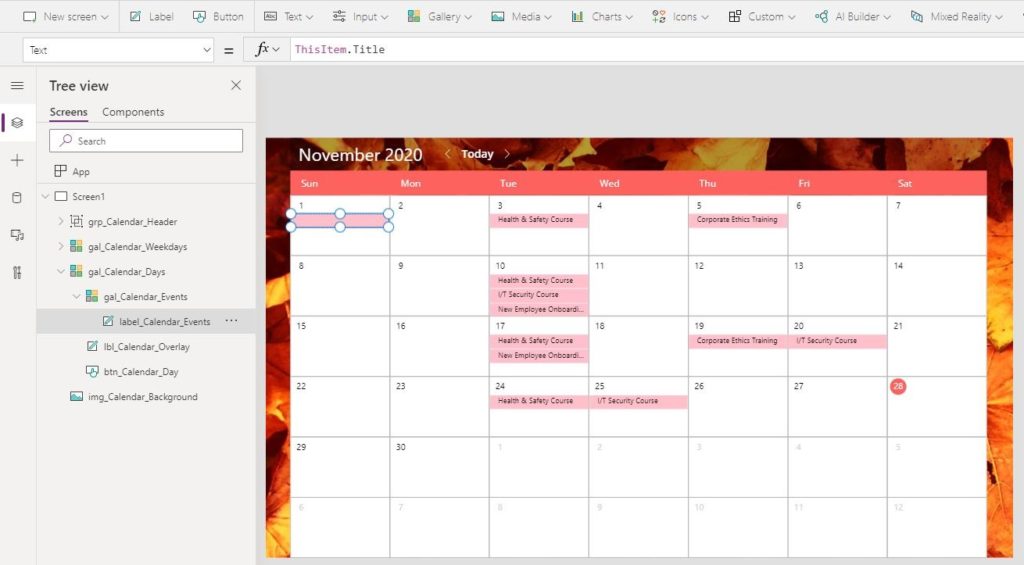
…then write this code in the Text property of the label.
ThisItem.TitleCode language: CSS (css)
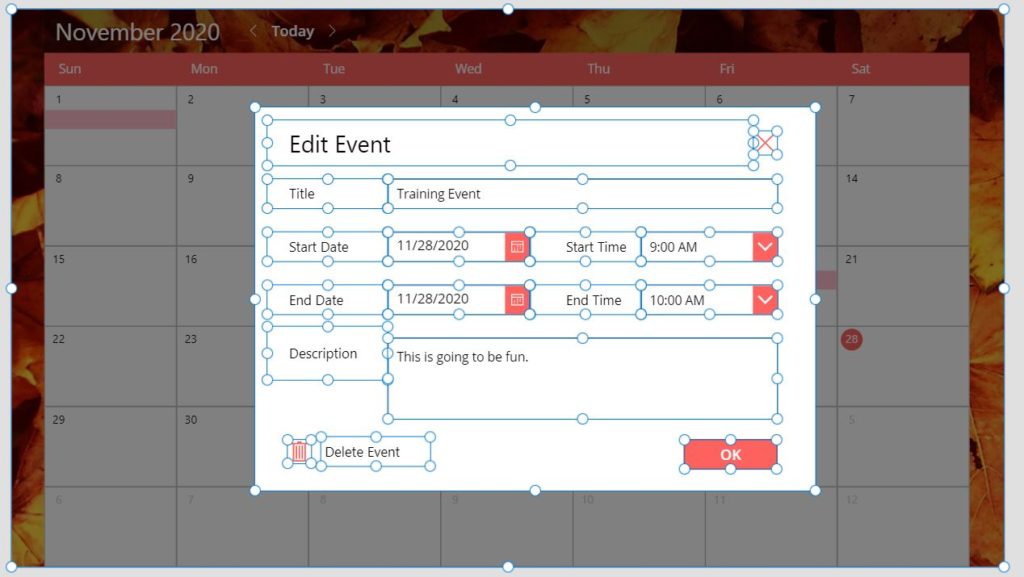
Editing An Event
The next feature we want to add is the ability for an employee to edit a training event. When the employee clicks on an event a pop-up menu will appear. Once the user is done making changes they click the OK button to submit them to SharePoint.
Click on the gal_Calendar_Events gallery…
and write this code in the OnSelect property.
// store the 'clicked on' event in a variable
Set(
    varCurrentEvent,
    ThisItem
);
// make the pop-up form appear
Set(
    varShowEventForm,
    true
);
Code language: JavaScript (javascript)
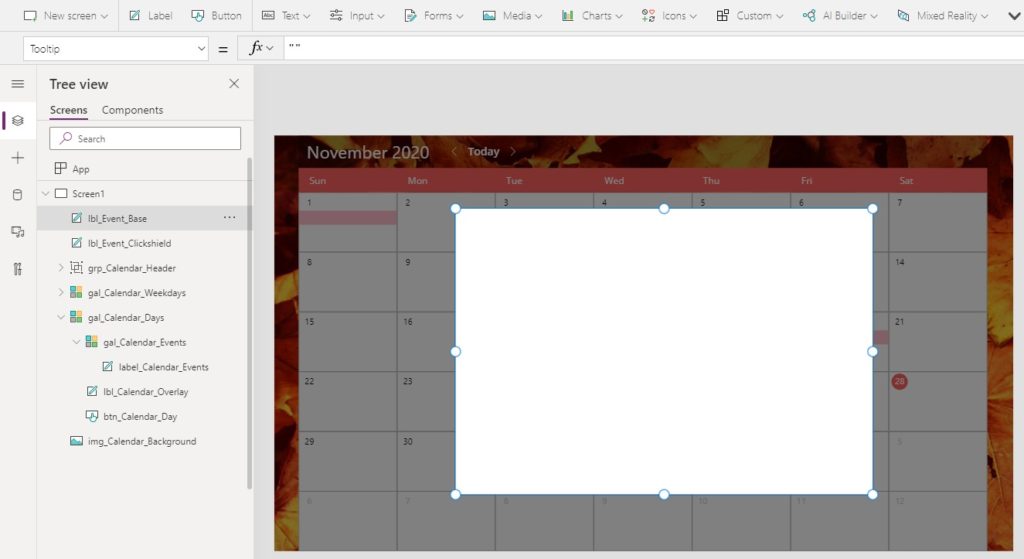
Next, we will create the pop-up form by making two new labels. The first label called lbl_Event_Clickshield will be the size of the entire screen. Its purpose is to prevent the user from clicking anything while the pop-up is open.
Put this code in the following properties of lbl_Event_Clickshield.
Fill: RGBA(0, 0, 0, 0.5)
Height: App.Height
Width:  App.WidthCode language: CSS (css)
Then place another label on top called lbl_Event_Base which will be the background of our menu. Change the Fill property to this color.
White
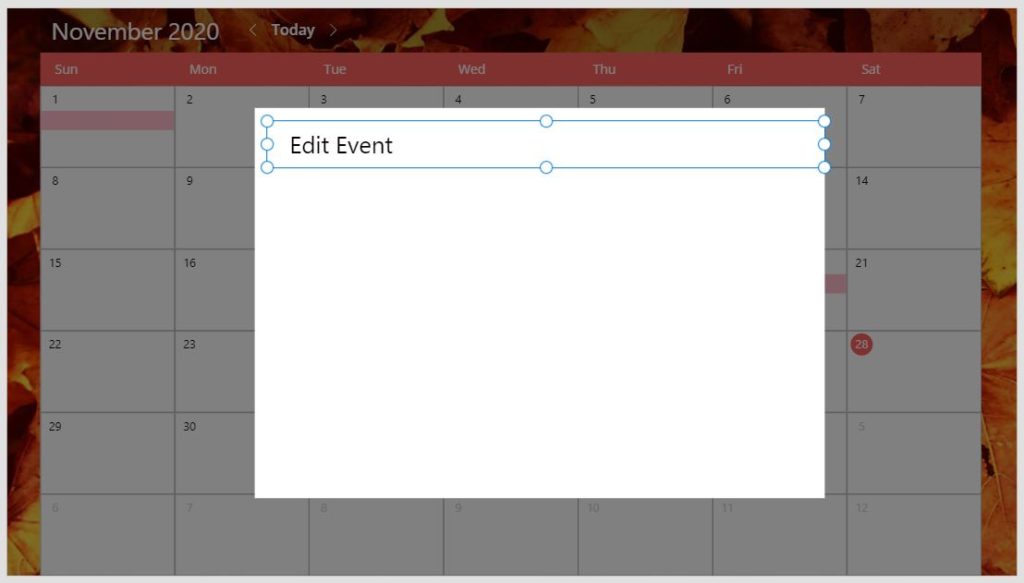
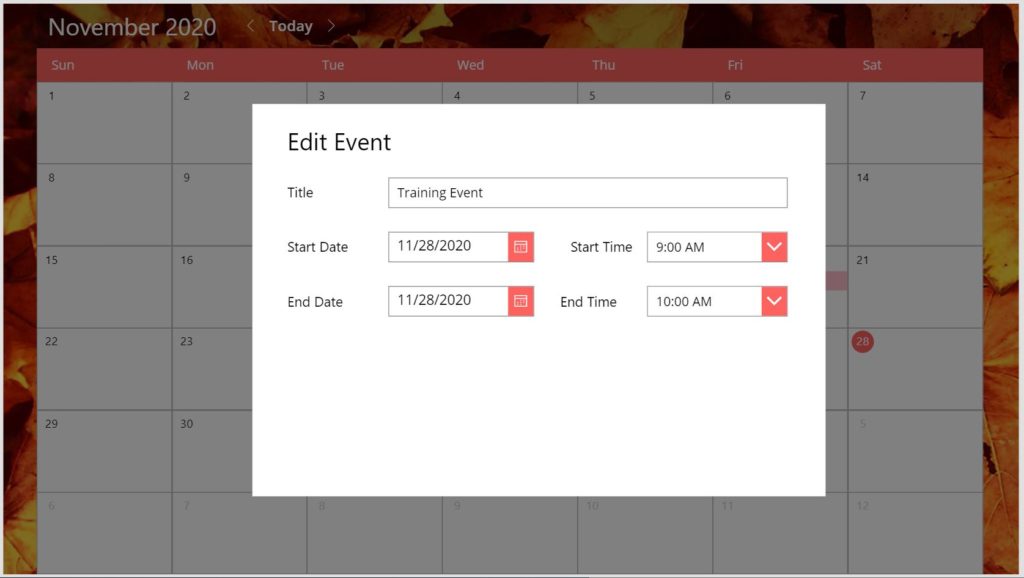
Now we will begin to create the contents of the form. Start by adding a label with the text ‘Edit Event’.
Below ‘Edit Event’ insert another label with the text ‘Title’ and a text input called txt_Event_Title beside it.

Use this code in the Default property of the text input. It will show the title of the ‘clicked on’ event.
varCurrentEvent.TitleCode language: CSS (css)
Every training event is held on a specific date. Add a label with the text ‘Start Date’ and a Date Picker named dte_Event_StartDate to the right of it.
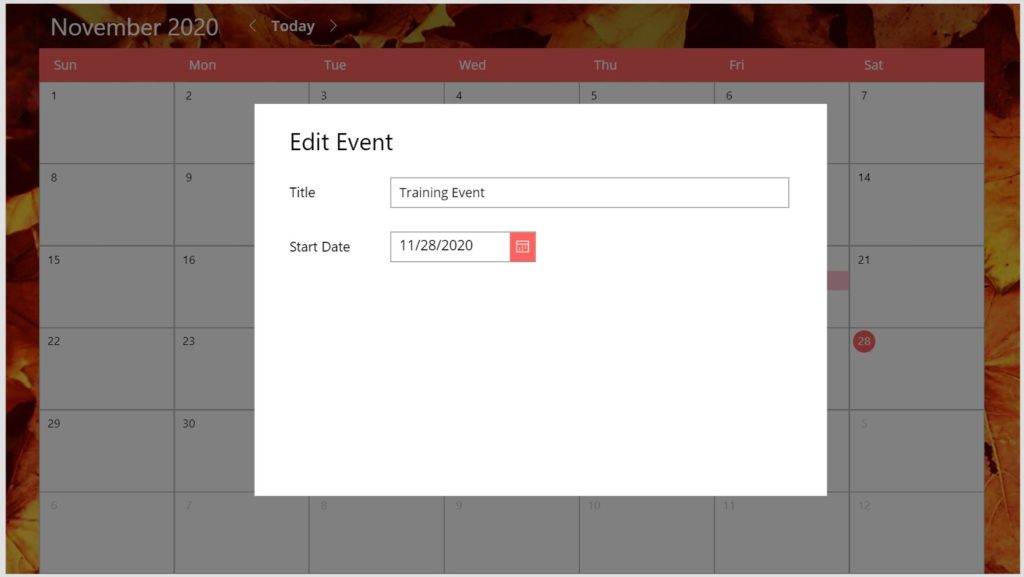
Use this code in the Default property of the date picker to show the start date. We are using an IF function here to show today’s date instead when a new event is being added (which will be implemented later on).
If(
    IsBlank(varCurrentEvent),
    // when adding a new event default to today
    Today(),
    // when editing an event use its date
    Date(
        Year(varCurrentEvent.StartDateTime),
        Month(varCurrentEvent.StartDateTime),
        Day(varCurrentEvent.StartDateTime)
    )
)Code language: JavaScript (javascript)
Training events must also have a start time. Place a label with the text ‘Start Time’ on the menu and a dropdown control called drp_Event_StartTime beside it.
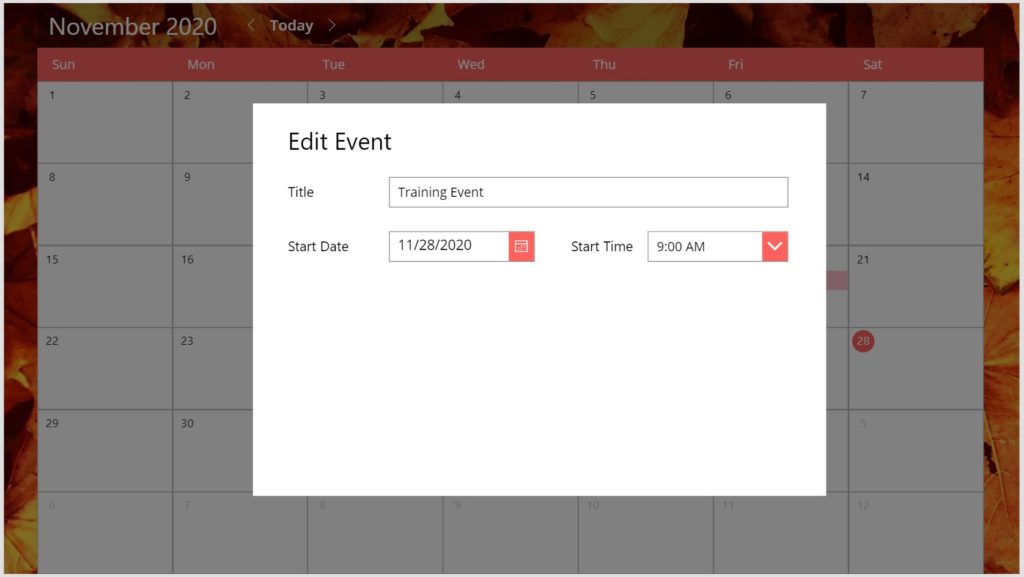
This code will determine the start time of the training event. Write this code in the Items and Default properties of the dropdown.
Items:
ForAll(Sequence(96), Time(0,Value*15-15,0))

Default:
Time(
    Hour(varCurrentEvent.StartDateTime),
    Minute(varCurrentEvent.StartDateTime),
    0
)Code language: CSS (css)
Another pair of controls is required here to show the training event’s end date and end time. Name the date picker dte_Event_EndDate and the dropdown drp_Event_EndDate.
Almost identical code to start date and time goes in these controls. Put this code in the Default property of the date picker…
If(
    IsBlank(varCurrentEvent),
    Today(),
    Date(
        Year(varCurrentEvent.EndDateTime),
        Month(varCurrentEvent.EndDateTime),
        Day(varCurrentEvent.EndDateTime)
    )
)Code language: CSS (css)
…and write this code in the Items and Default properties of the dropdown.
Items:
ForAll(Sequence(96), Time(0,Value*15-15,0))

Default:
Time(
    Hour(varCurrentEvent.EndDateTime),
    Minute(varCurrentEvent.EndDateTime),
    0
)Code language: CSS (css)
Finally, we will add a label with the text ‘Description’ and a text input called txt_Event_Description. Change the text input to multi-line mode so a longer description can be written.
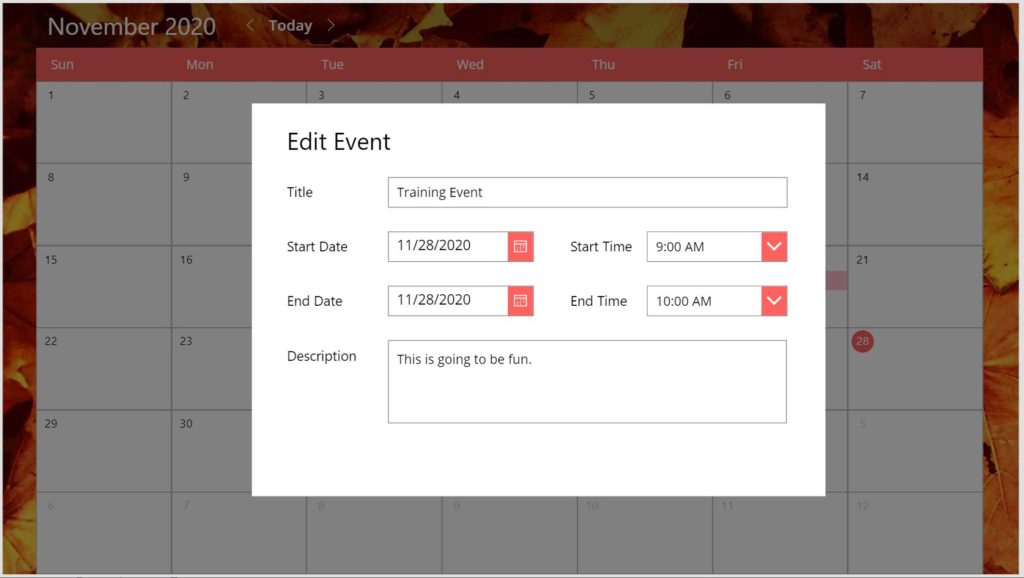
Use this code in the Default property of the text input to show the training event description.
varCurrentEvent.DescriptionCode language: CSS (css)
Submit, Cancel And Delete Buttons
The employee can now fill in the pop-up menu fields but any changes won’t actually save back to SharePoint list until we write some more code. Make a new button with the text ‘OK’ and position it in the bottom-right hand corner of the menu.
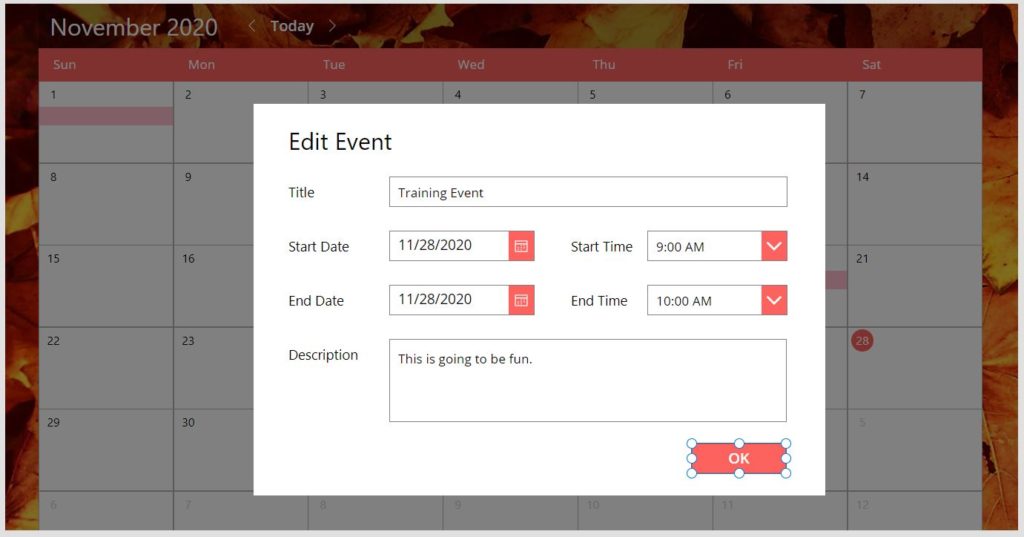
To save the record back to SharePoint place this code inside the OnSelect property of the button. You may notice that the PATCH function only has two arguments here. We are using PATCH in a special way that allows us to update a record when it exists in SharePoint, otherwise, add a new record. This will come in handy later when we make an ‘add event’ feature.
// save the record back to SharePoint
Patch(
    'Training Events List',
    Table(
        {
            ID: varCurrentEvent.ID,
            Title: txt_Event_Title.Text,
            StartDateTime: dte_Event_StartDate.SelectedDate
                + drp_Event_StartTime.Selected.Value,
            EndDateTime: dte_Event_EndDate.SelectedDate
                + drp_Event_EndTime.Selected.Value,
            Description: txt_Event_Description.Text
        }
    )
);

// hide the pop-up menu
Set(
    varShowEventForm,
    false
);

// reset all fields to default values
Reset(txt_Event_Title);
Reset(dte_Event_StartDate);
Reset(drp_Event_StartTime);
Reset(dte_Event_EndDate);
Reset(drp_Event_EndTime);
Reset(txt_Event_Description);
Code language: JavaScript (javascript)
An employee might also decide that they don’t want to actually make any changes. Create a cancel and icon place it in the top-right corner of the menu.

Write this code in the OnSelect property of the icon to close the menu without saving.
// hide the pop-up menu
Set(varShowEventForm, false);

// reset all fields to default values
Reset(txt_Event_Title);
Reset(dte_Event_StartDate);
Reset(drp_Event_StartTime);
Reset(dte_Event_EndDate);
Reset(drp_Event_EndTime);
Reset(txt_Event_Description);Code language: JavaScript (javascript)
We also want to include the ability for an employee to delete an event. Make another Trash icon along with a ‘Delete Event’ label and put it in the bottom-left corner of the menu.
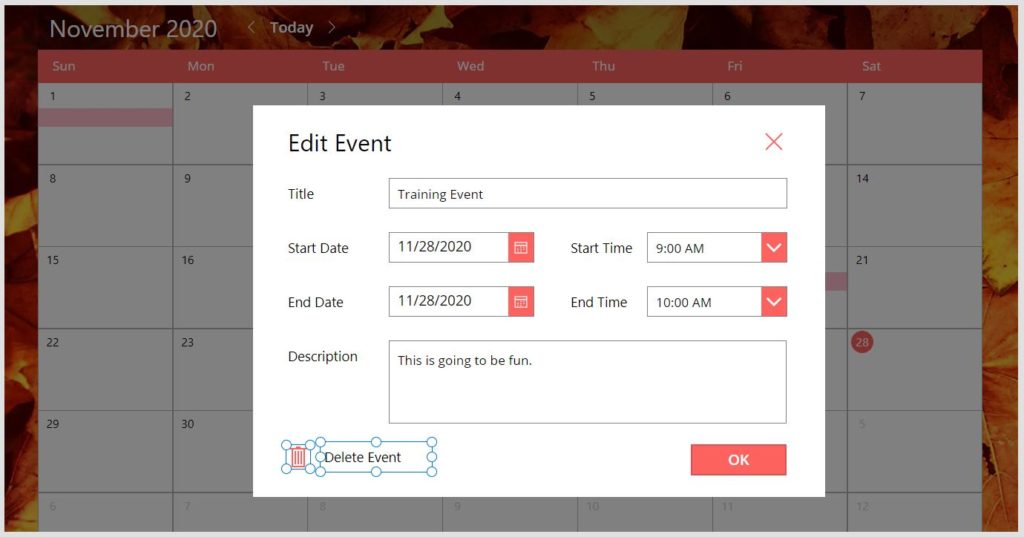
Copy this code into the OnSelect property of the trash icon and ‘delete event’ text.
// remove the record from SharePoint
Remove(
    'Training Events List',
    LookUp(
        'Training Events List',
        ID = varCurrentEvent.ID
    )
);

// hide the pop-up menu
Set(varShowEventForm, false);

// reset all fields to default values
Reset(txt_Event_Title);
Reset(dte_Event_StartDate);
Reset(drp_Event_StartTime);
Reset(dte_Event_EndDate);
Reset(drp_Event_EndTime);
Reset(txt_Event_Description);Code language: JavaScript (javascript)
Now that we’ve created all of the controls on the form the last step is to select all of them and…
…write this code in the Visible property so the form appears/disappears when expected.
varShowEventForm
This would be a good point to test out all of the features we just added and make sure the changes are writing to SharePoint as expected.
Adding An Event
Adding events will be relatively simple now that the pop-up menu is created. Make an add icon and a label with the text ‘Add Event’. Position them in the top right corner of the calendar.
Write this code in the OnSelect property of the add icon and label. Setting varCurrentEvent to blank will indicate a new record.
Set(
    varCurrentEvent,
    Blank()
);
Set(
    varShowEventForm,
    true
);
Code language: JavaScript (javascript)
The last thing we need to is change the pop-up menu title to ‘New Event’ when an event is being added.
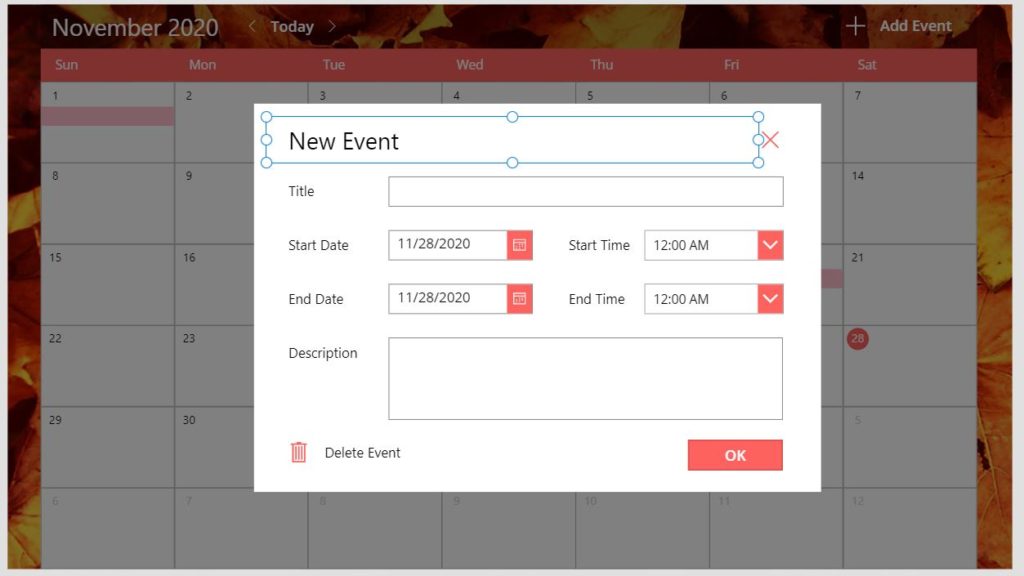
Replace the code in the label’s text property with this code to make it dynamically display the correct words.
If(IsBlank(varCurrentEvent),"New Event", "Edit Event")Code language: JavaScript (javascript)
The add event feature is now implemented. Try adding a new event for yourself to make sure the app works.
Did You Enjoy This Article? 😺
Subscribe to get new Copilot Studio articles sent to your inbox each week for FREE
Questions?
If you have any questions or feedback about Make A Calendar In Power Apps – Part 2 please leave a message in the comments section below. You can post using your email address and are not required to create an account to join the discussion.


This is great! Thanks! can this be added to Outlook calendar?
The calendar in this particular tutorial cannot be added to Outlook since the data is being stored in SharePoint list. However, I’m sure there is a way it could be done if you are willing to experiment… My first thought is to create a new calendar app in SharePoint, use it as the back-end for this calendar and then connect the SP calendar app to your Outlook calendar.
I think someday I will revisit the article and do this.
Thanks Matt for the detailed Calendar app! I just got a task to create a leave request app, and this calendar is perfect for it! Thank you so much!! You are my life saver!
Very nice job there Matt’! ?
Well hello my friend! Nice of you to leave a comment on the blog. Always great to hear from you Mr. Gallis!
Thanks Matthew, great post as always!
Once these events are added, would it possible to create RSVP, I’m thinking event calendar where Team-A can put all events and anyone in the company can come to this app and RSVP to these events. These pushes calendar invite to the users and organizer.
Do you think it’s possible?
Yes, its definitely possible with some additional effort. I would suggest triggering a flow in Power Automate to create a calendar invite send through Outlook.
This is awesome. Do you think it would be possible to display events that span several days? For example to display employee leave?
I don’t need to add events within PowerApps as my app adds them to a SharePoint calendar but it would be very useful for managers to be able to view existing leave when making a decision on whether to approve. Also for employees to view other people’s leave.
Yes, this calendar example will already work for multiple days of employee leave. No changes are required for the code.
Actually, with current formula it is not showing entries extending over multiple days, I even tried with exact data but the result is same. Single day entries are coming fine but if start and end date has difference of more than 24 hours its not showing, can you suggest what could be wrong?
Sahil,
My apologies. I made another version of the app that supported events over multiple days and thought I implemented it in this app too. My blog is now updated with the proper code.
Here is the code you should use in the Items property of gal_Calendar_Events.
Filter(
‘Training Events List’,
StartDateTime < ThisItem.NextDay And EndDateTime >= ThisItem.Value
)
Great,Thanks, worked like a charm.
I used below and it worked as well, but thanks for detailed blog series on Calendar:
Filter(
‘Training Events List’,
‘Start Date’ <= ThisItem.Value
&& ‘End Date’ >= ThisItem.Value
)
Hey Matthew,
Above filter works for multiple day events but it is Showing an extra day of event in the Calendar for multi day events, For single day events it is working fine.
i.e. I have added a 3 day event but it is showing in 4 days in the calendar.
Can you help me with this problem
Greetings Matthew,
What is the best way to handle a situation where the EndDate is optional? Only used for events that are longer than a single day.
I created a calculated column in my SharePoint using the following
But for whatever reason, it does not seem to be working. I refreshed the connection. It no longer shows a “red” warning, just a “yellow” triangle caution alert stating the filter might not work on larger data sets, 500+, but I have less than 20 records.
***
Okay, so it appears that calculated columns might not be able to be used in sorts and filters
https://docs.microsoft.com/en-us/power-apps/developer/data-platform/calculated-rollup-attributes
***
SOLUTION was to add the following Or statement…
Filter(
calHolidays,
HolidayStart < ThisItem.NextDay
And HolidayEnd >= ThisItem.Value Or HolidayStart = ThisItem.NextDay
)
Unfortunately, this does not work when you have multiple overlapping events that span several days and either start or end on differing days. The gallery row event will be offset from their adjacent days.
Hi Rob, I ran into the same issue here. Did you ever find a way to fix this?
Rob, if you see this, how did you get the different colours for each event?
How did you get the different colours for each event?
Could you give a tip about what should be placed in the Items property of the drp_Event_StartTime dropdown? I am not sure how you managed to get it to display with the time so easily.
Oops, I kind of left that code out, didn’t I? I’ve corrected the article. Put this code in the Items property of the dropdown.
Thanks, Matthew, for such a descriptive blog, it cleared majority of the doubts related to Calendars in Power Apps.
This is really great, was trying to follow blog but for some reason it does not show me event time. shows in number 0,1,2
Any thoughts?
Sorry, also I am trying to patch this to another list to make this as Event Calendar and users can RSVP. Sorry if I am asking for too much help here.
Wow I figured Patch to different list myself. Still trying to figure time from your blog
What code are you using for the Items property of dropdown displaying event time?
I’m also having difficulty in that it is not showing me anything at all. Here is my formula — (MD is added into my variable name)
Items:
ForAll(Sequence(96), Time(0,Value*15-15,0))
Default:
Time(
Hour(varMDCurrentEvent.StartDateTime),
Minute(varMDCurrentEvent.StartDateTime),
0
)
“The error message I’m getting is Unexpected characters. Characters are used in the formula in an unexpected way.”
Matt — Murphy’s Law — after looking it over oh-so-many times before submitting my note — I went back one more and found the error. I’d put the entire thing in the drop down before and expected “Items” did not belong that – that you did — in fact — mean to begin at the ForAll. However, when I deleted the “Items”:, I still s showed an error so I felt something might be wrong. The error remained — of course — because I’d left all the info following “Default…” in the formula!
Thanks – this is great! You also saved my life on an earlier problem today! I’ll note it when I get back to it!
Another great one Matthew. These always seem very timely for me and show me not only some great functions but a better way of approaching and designing. Thanks again!
You’re welcome Andrew. Glad I could help 🙂
Hie Matthew thank you for sharing this
for some reason the title of the event doesnt displays using code : Thisitem.Title may be this has to be defined earlier as well?
ThisItem.Title is defined in Part 1 of this article. I would suggest you start to investigate there.
I’ve run into an issue with Patch. Any idea why I keep getting this message? “Invalid argument type (Table). Expecting a record value instead.”
Thank you.
I also have the same error.
It’s pretty late the answer, but i want to say it for other people who might have the same issue. In my case, the problem on the formula was the fact that i had in Sharepoint the “Title” column renamed in “Auto”, so the fomula at the end was
Title: TxtInp_Event_Auto.Text
instead of the
Auto: TxtInp_Event_Auto.Text
The problem can be something like that, or at least in my case was this one and the output error was the same.
I’m sorry to come back to this again, but want to provide more information.
In my gallery of calendar events, I have the label that shows the calendar items. It has “ThisItem.’Event/Initiative’. I am getting the message “ThisItem.’Event/Initiative’ = This formula uses scope which is not presently supported for evaluation. Data Type: text
However, it does show my events in the right locations on my calendar – beautifully.
I’ve also checked all my source fields to ensure they are exactly as you asked us to set up and they are.
Just thinking this is related to my Patch issue since all the fields in Patch look good; just can’t be past the “Invalid argument type…” in my OnSelect of the submit (OK) button.
Please disregard this…I’ve complete rebuilt it and all is working fine. Love your teaching style!
That is so great and helpful for me !thank you Matt’.
And I would like to ask a question about how to set multiple dates (like weekly meeting) at the same time?For example , if I want to choose a meeting every Monday at 8:00 AM for a whole month at a time.
Some code like this would create meetings on the same day 4 weeks in a row. You would put this code in the submit button. A dropdown could be created to choose the number of days.
ForAll(
Sequence(4) As tblNumberOfMeetings,
Patch(
‘Training Events List’,
Table(
{
ID: varCurrentEvent.ID,
Title: txt_Event_Title.Text,
StartDateTime:
dte_Event_StartDate.SelectedDate
+ (tblNumberOfMeetings[@Value] * 7)
+ drp_Event_StartTime.Selected.Value,
EndDateTime:
dte_Event_EndDate.SelectedDate
+ (tblNumberOfMeetings[@Value] * 7)
+ drp_Event_EndTime.Selected.Value,
Description: txt_Event_Description.Text
}
)
)
)
Matthew, your stuff is great, I’m so glad I found it!.
Question: would this calendar be possible with the “Events List” being created/populated with Excel worksheet instead of a Sharepoint list?
Yes, you can use an Excel worksheet instead.
Hi, Thank you so much for this awesome guide.
Do you have a tip on how to avoid conflict booking?
Thanks again!
Vanessa,
You could put a condition on the Submit button to disable it when the selected date range conflicts with something already booked. The generic code idea would be something like… If (some_condition=true, DisplayMode.Disabled, DisplayMode.Edit)
Hi Matthew,
Thanks for your reply. I gave it a go but I think something is wrong with my formula although power apps is not giving me any info what’s wrong. Would you be able to help, please?
On the Onselect property of the OK button, I added this:
If(dte_Event_StartDate.SelectedDate+drp_Event_StartTime.Selected.Value >=dte_Event_StartDate.SelectedDate+ drp_Event_StartTime.Selected.Value && dte_Event_EndDate.SelectedDate+drp_Event_EndTime.Selected.Value <= dte_Event_EndDate.SelectedDate+drp_Event_EndTime.Selected.Value = true || dte_Event_StartDate.SelectedDate+ drp_Event_StartTime.Selected.Value <= dte_Event_EndDate.SelectedDate+drp_Event_EndTime.Selected.Value && dte_Event_EndDate.SelectedDate+drp_Event_EndTime.Selected.Value>=dte_Event_EndDate.SelectedDate+drp_Event_EndTime.Selected.Value = true, DisplayModeDisabled,DisplayMode.Edit);
I’m so sorry for asking too much, I’m quite new to power apps and I’m still trying to learn. Really appreciate your help. Thanks!
Hi Matthew,
Would you be able to do a Part3 of this tutorial to include recurring dates and avoid conflict booking? I was able to follow your tutorial as it was so clear and you made everything so easy but now I’m stuck. Please. Thank you so much!
Vanessa,
I currently have no plans for Part 3 but I will keep your comment in mind for a future topic!
Thanks Matthew! I got the conflict booking to work, thanks to you!!!
I put this in Display Mode
If(Start >= Start && End <= End = true, DisplayMode.Disabled, DisplayMode.Edit)
Do you have any trick on how on recurring dates?
I need to put in daily, weekly and monthly.
I tried to follow your post above but the startdate post as the next day and not the date selected:
ForAll(
Sequence(4) As tblNumberOfMeetings,
Patch(
‘Training Events List’,
Table(
{
ID: varCurrentEvent.ID,
Title: txt_Event_Title.Text,
StartDateTime:
dte_Event_StartDate.SelectedDate
+ (tblNumberOfMeetings[@Value] * 7)
+ drp_Event_StartTime.Selected.Value,
EndDateTime:
dte_Event_EndDate.SelectedDate
+ (tblNumberOfMeetings[@Value] * 7)
+ drp_Event_EndTime.Selected.Value,
Description: txt_Event_Description.Text
}
)
)
)
How can I manipulate this to make daily, weekly and monthly recurring? and also be able to edit and delete recurring bookings? Appreciate your help. Thank you so much!
Nice! I’m so happy you figured out 🙂
Recurrence is not something I have done yet but I would look into using the Outlook connector and its Create Event feature. This would eliminate any work needed to recreate functionality that already exists.
https://docs.microsoft.com/en-us/connectors/office365/#create-event-(v4)
Hi Matthew,
I got the validation for duplicate date range to work on the calendar app that I’m building. I tested the sequence function separately to create recurring meetings and it worked but when I combined it together, it does create recurring meeting but it stopped validating for conflict date range.
My SharePoint list has StartDateTime and EndDateTime column. I set the Start and End as below and from there set the conflict as varRecord and if it’s empty it should patch with the sequence function. If it’s not blank, then I should get notification error.
Set(Start, start.SelectedDate + stime.Selected.Value);
Set(End, end.SelectedDate + etime.Selected.Value);
Set(varRecord, LookUp(‘Anchorage Working Calendar’, StartDateTime <= Start && EndDateTime > Start || StartDateTime > Start && EndDateTime <= End || StartDateTime < Start && EndDateTime > End));
If(IsBlank(varRecord.ID),
ForAll(Sequence(Value(‘days/weeks’.Text)) As recurringmeetings,Patch(‘Anchorage Working Calendar’, {‘Client Name’: Client.Text, StartDateTime: start.SelectedDate+(recurringmeetings[@Value]*7)+stime.Selected.Value, EndDateTime:end.SelectedDate+(recurringmeetings[@Value]*7)+etime.Selected.Value})),
Notify(“Date Conflict, Booking already exist for selected date and time!”, NotificationType.Error));
Not sure what I’m doing wrong ? Any advise please. Thanks!
Hi Matthew,
I found out the problem why the conflict is not working, it’s because when I use the sequence it patches the date from startdate to enddate and not individual booking time for the selected date range.
With this formula, I can now show booking correctly in SharePoint but it only displays the first day then the next 7days after that, not the days within the selected date range
ForAll(Sequence(Value(recurring.Text),0, 1) As recurringmeetings, Patch(‘SP’, {ID:varCurrentEvent.ID,’Client Name’: drp_ClientName.Selected.Clients, StartDateTime: sDate.SelectedDate+(recurringmeetings[@Value]*7)+sTime.Selected.Value, EndDateTime:sDate.SelectedDate+(recurringmeetings[@Value]*7)+eTime.Selected.Value})),
How can I tweak this formula to show in SP all the time I booked for the selected date range?
Lets say I’m bookings for March 2 -5 from at 6am-8pm and make this booking to occur 2x, I need SP to show entry each from March 2-5 with 6am – 8pm start and end time.
Using the above formula I can see booking for March 2 and March 9 both 6-8am but the rest of the booking within the date range selected is not showing.
I should be able to see from March 2-5 then from March 9-12 same time 6-8am. I tried to follow the sequence tricks that you have but I can’t seem to figure it out. Help, please. Thanks!
Best regards,
Vanessa
Hi Matthew,
My app is working perfectly now. My conflict as well as recurring booking is working.
I have one last question though, how can I sort the calendar events to show by ascending startdatetime ?
I followed your instructions, my nested calendar gallery events items is set to :
Filter(‘Anchorage Working Calendar’, StartDateTime < ThisItem.NextDay
And EndDateTime >= ThisItem.Value
)
The text label in the gallery events is set to:
ThisItem.’Client Name’ & ” ” & Text(ThisItem.StartDateTime,DateTimeFormat.ShortTime) & ” “& Text(ThisItem.EndDateTime,DateTimeFormat.ShortTime)
It’s working but I can’t make it to sort the earliest time booked at the top. Somehow, I need the event to appear with this sorting rule:
SortByColumns(‘Anchorage Working Calendar’,”StartDateTime”, Ascending) but when I change the gallery events item to this, I’m getting all sorts of error. Any advice, please? Thanks again. Appreciate your help.
Cheers,
Vanessa
Hi, Sorry to bother. Ignore this, I figured it out. Thank you so much! I really appreciate all your help and I always check your tips and tricks. Thanks again!
Best regards,
Vanessa
Hi Vanessa,
Could you please share your approach?
Dear Matt,
Thanks for your great guides and tutorials!!
What would say is the best way to create a “global launch” app?
I am experimenting with creating an app with an overview of all relevant countries and their respective deadlines (2-5 per country from now till end-2022) and an “upcoming deadlines” on the landing page.
How would it be best to build this so people can edit the dates on the “backend” or in the app. Would it be best to build it from an excel sheet or a Sharepoint list or something different?
Many many thanks from Denmark,
Magnus
Magnus,
I would suggest a SharePoint list. If too many people access the Excel sheet at the same time the performance will degrade. Then if you have more than 2,000 events you might run into delegation issues. Also, you can control who has access to the SP list using permissions. Personally, I never use Excel sheets to build apps.
Hello , thanks for the calendar!!! I have a question ? Well i have my calendar and i want to display on the calendar more than one person have vacations but the person on question are connected to another sharepoint list that have a project , i want to select the project on a dropdown and show all peoples that are on vacations … i have the dropdown ok, and i can display only one static person… Some ideias ? Thank You
Luis,
Sorry, but I don’t think I could explain this within the comments section of the blog. It’s too complex. You might want to ask this question on the Power Apps Community forums.
Thanks, Matthem it´s done!!!
Hello Matthew! This is very helpful, your post is supporting me to build a time planner for my company. I have only one issue, where I live the start day of the week is always Monday. How can I get Monday instead of Sunday in the header? Thank you very much!
Raquel,
You’ll have to create the table manually like this..
[ “Mon”, “Tue”, “Wed”, “Thu”, “Fri”, “Sat”, “Sun” ]