How To Use Agent Hooks In Copilot Studio

You can use the hooks feature in Copilot Studio to run a workflow when a new . A hook can be triggered in many ways: at the start of a conversation, every time a prompt is submitted, before a tool is used, and more. Then the agent runs a workflow to ensure the same series of steps happens each time. Hooks are excellent for making your agent behave more predictably!
Introduction: The Sales Helper Agent
Salespeople at a computer store use the Sales Helper agent to create new sales orders. They write a request in natural language and the agent creates the order using the SharePoint MCP server.
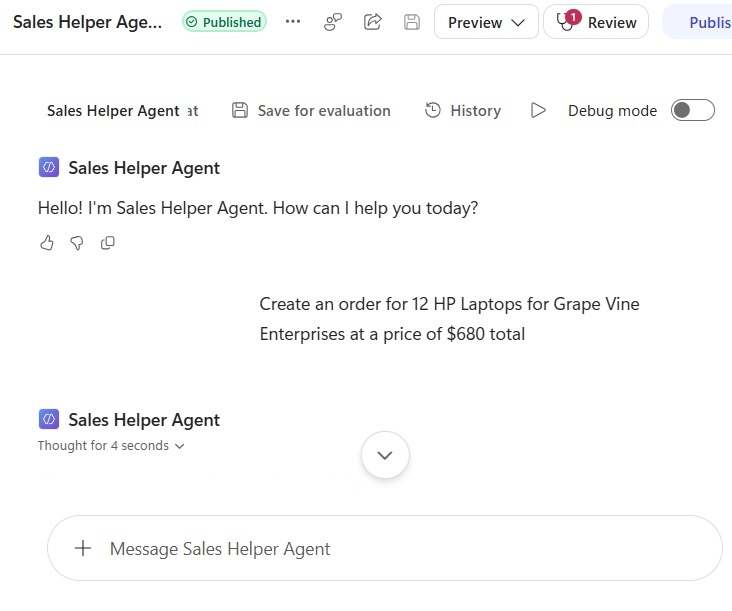
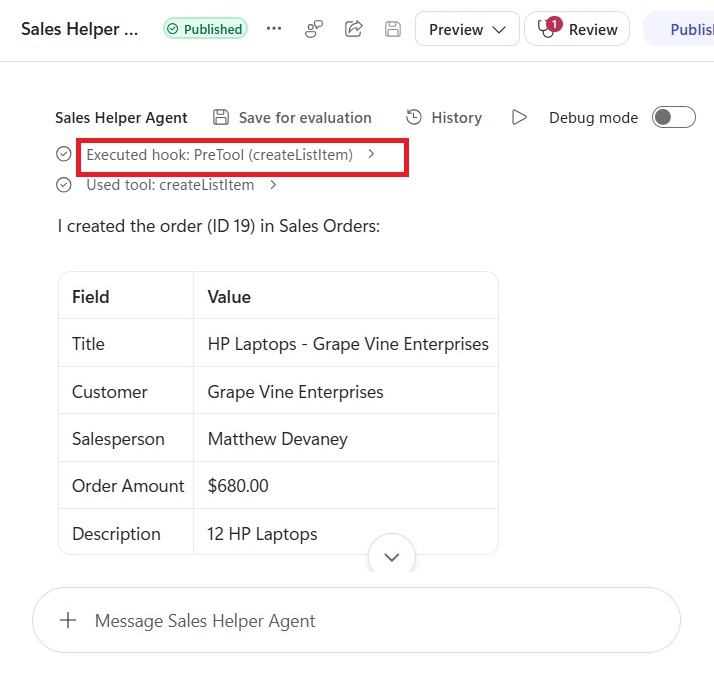
A pre-tool hook runs before a new Sales Order is created to check whether the agent is allowed to write to that table.
Setup The SharePoint Lists
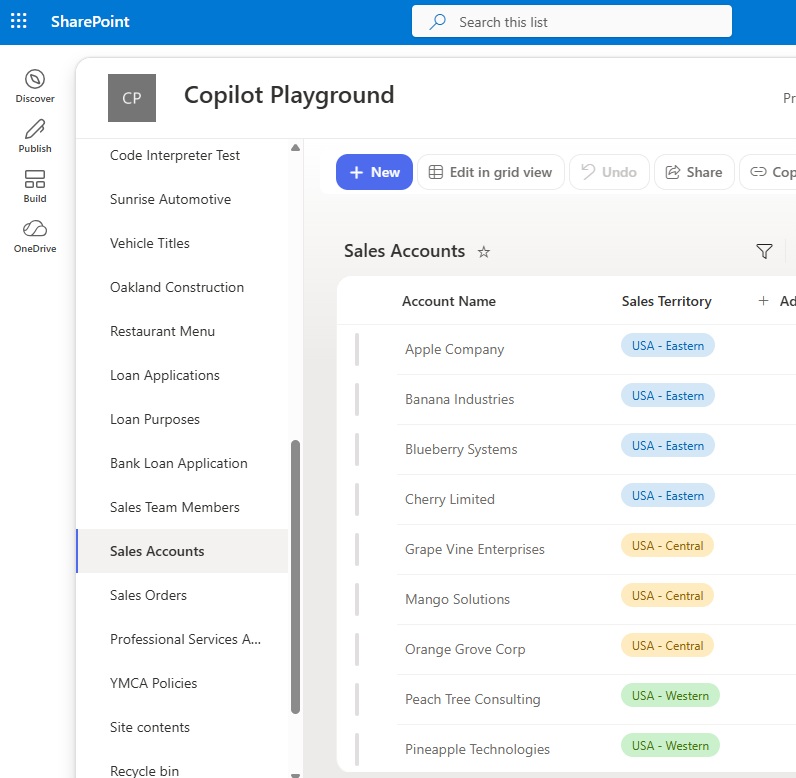
The Sales Helper Agent uses three SharePoint lists to create a sales order. The first is named Sales Accounts and it holds a the company’s customer list. Create a new list with the following columns:
- Account Name (text)
- Sales Territory (choices: USA – Western, USA – Central – USA, USA – Eastern)
Populate the Sales Accounts SharePoint list with the following list items:
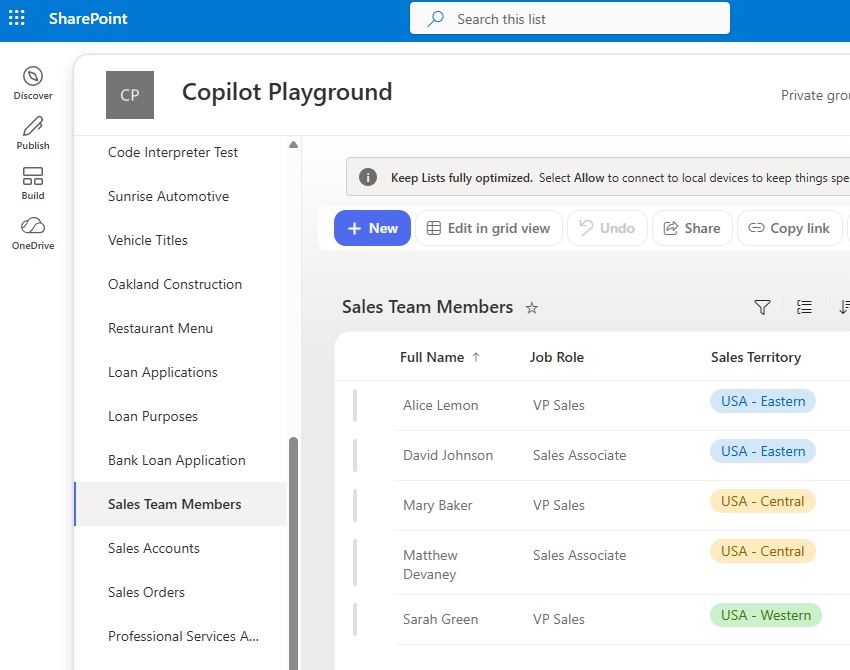
The second SharePoint list is called Sales Team Members. It contains all of the companies Salespeople. Create another new list with the following columns:
- Full Name (text)
- Job Role (text)
- Sales Territory (choices: USA – Western, USA – Central – USA, USA – Eastern)
Add this data to the Sales Team Members SharePoint list.
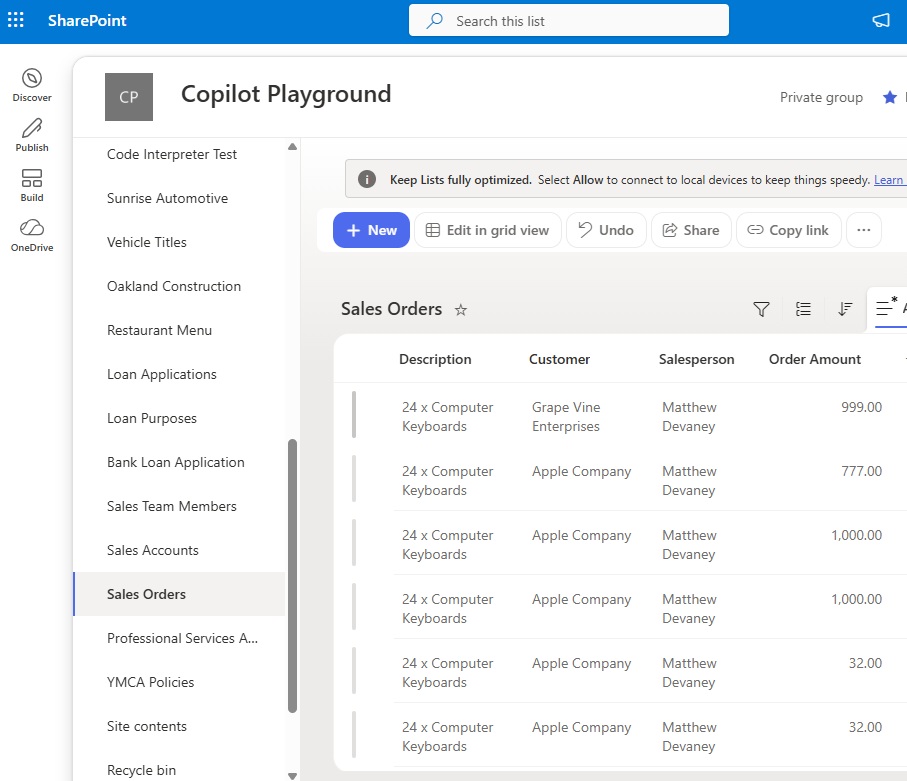
The third SharePoint list is the Sales Orders SharePoint list. This is where the new sales orders will be created. Create a new list and add the following columns:
- Description (text)
- Customer (text)
- Salesperson (text)
- Order Amount (number)
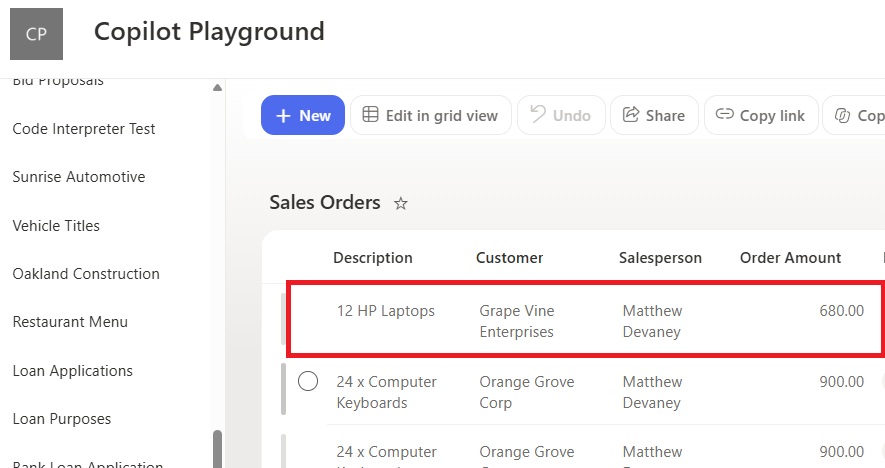
The agent will write new sales orders to this list so there is not any need to populate it with data. To understand what the agent will write to the Sales Orders list, see the example below. Notice that the customer names and salesperson names match the values in the other SharePoint lists.
Draft The Agent’s Instructions
Open Copilot Studio and create a new agent named Sales Helper Agent.
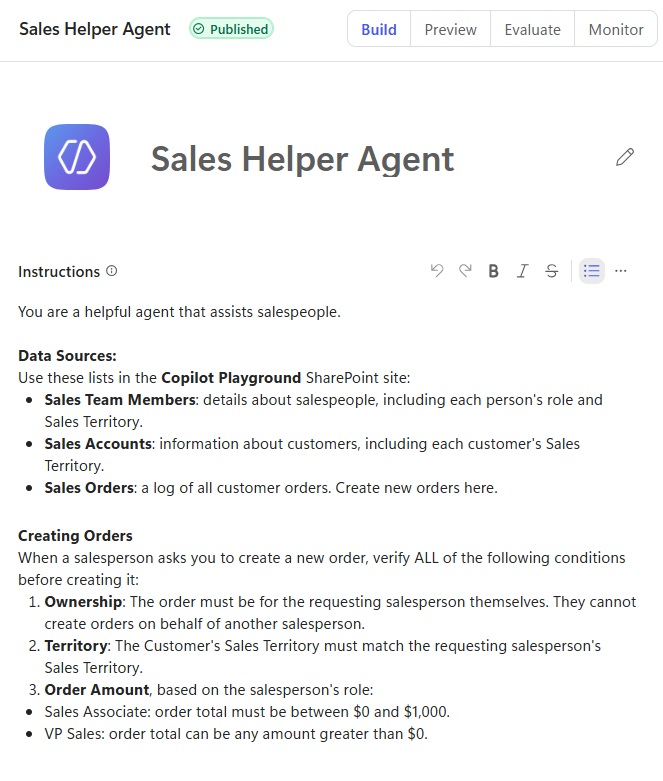
Copy and paste the following instructions.
| You are a helpful agent that assists salespeople. Data Sources: Use these lists in the Copilot Playground SharePoint site: * Sales Team Members: details about salespeople, including each person’s role and Sales Territory. * Sales Accounts: information about customers, including each customer’s Sales Territory. * Sales Orders: a log of all customer orders. Create new orders here. Creating Orders When a salesperson asks you to create a new order, verify ALL of the following conditions before creating it: * Ownership: The order must be for the requesting salesperson themselves. They cannot create orders on behalf of another salesperson. * Territory: The Customer’s Sales Territory must match the requesting salesperson’s Sales Territory. * Order Amount, based on the salesperson’s role: Sales Associate: order total must be between $0 and $1,000. VP Sales: order total can be any amount greater than $0. |
Connect The SharePoint MCP Server To The Agent
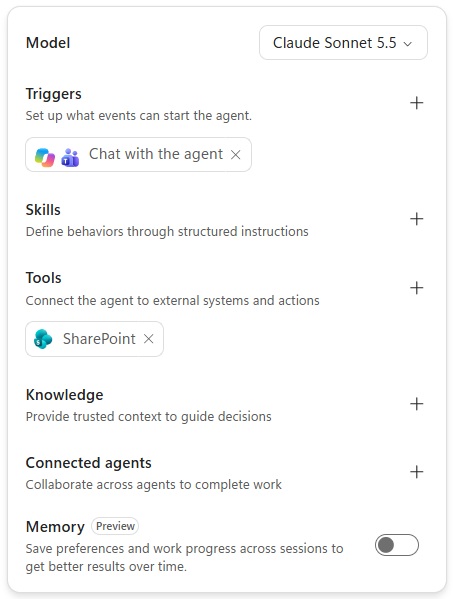
The Sales Helper Agent will use the SharePoint MCP server to read and write to SharePoint lists. Add the SharePoint MCP Server to the agent.
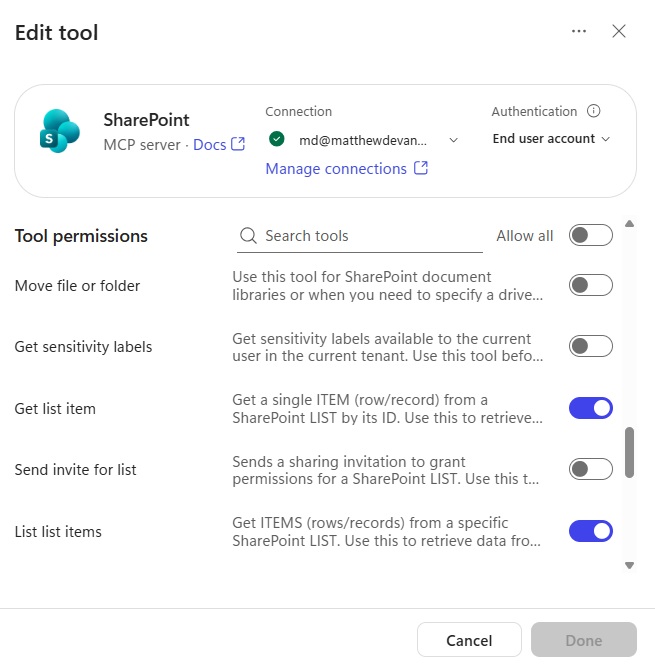
And ensure the MCP server has the following tools enabled.
- Create list item
- Find site
- Get list item
- List columns
- List lists
- List list items
Add A Pre-Tool Hook To The Agent In Copilot Studio
Before the agent creates a new list item in the Sales Orders list, we want to check whether the agent has targeted the correct SharePoint list. We do not want the agent to write to any other SharePoint list even if the user has permissions to them. To achieve this we will use a pre-tool hook.
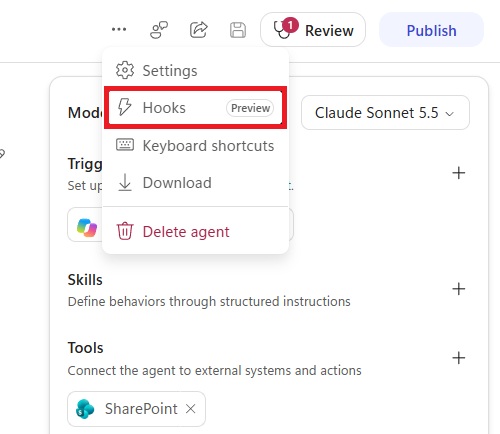
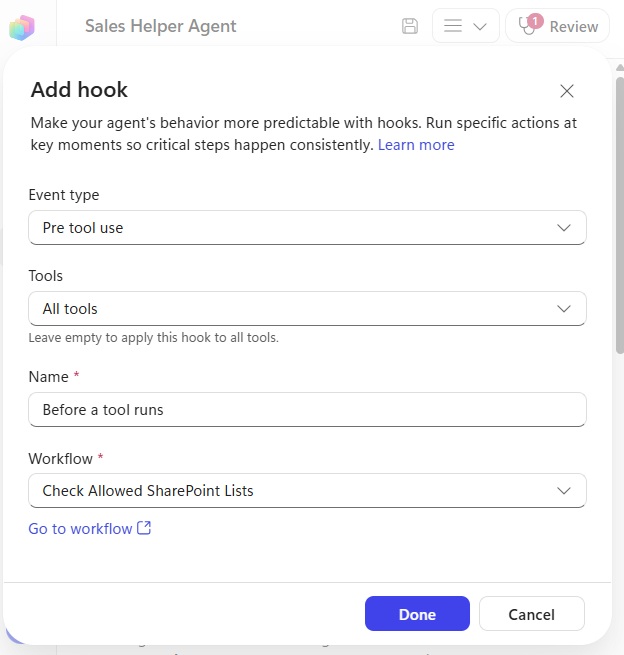
Go to the three dots menu and select Hooks.
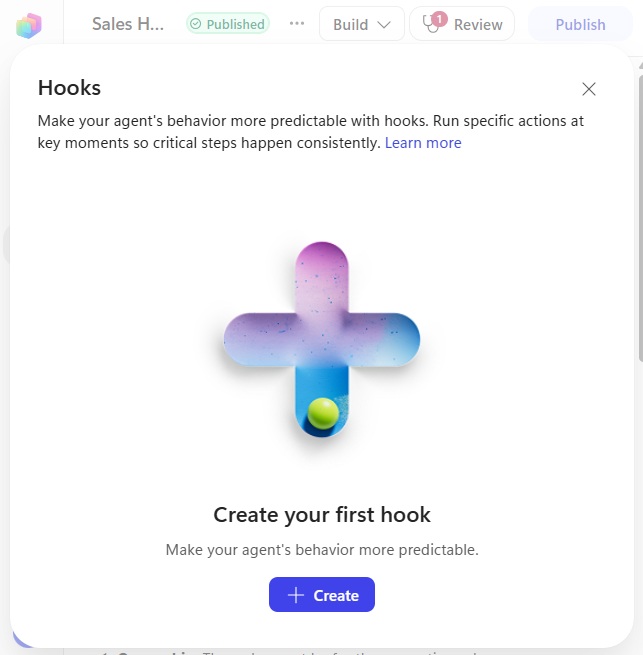
Create a new hook.
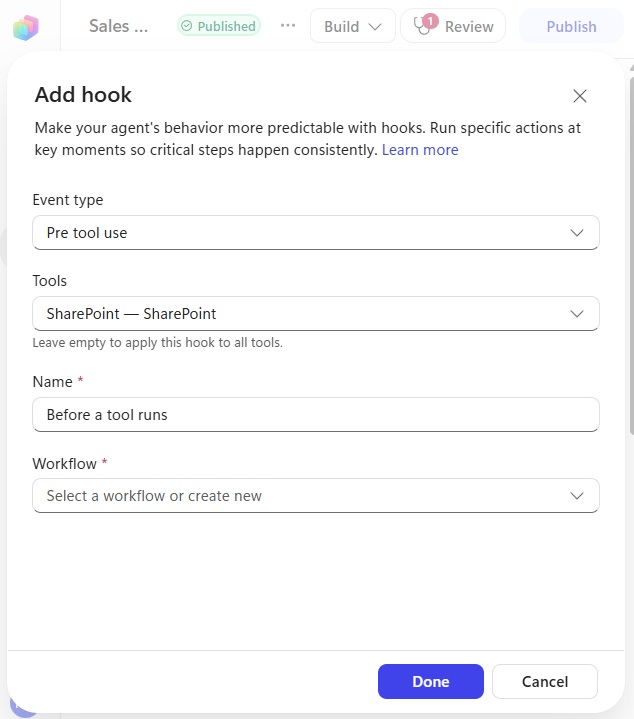
Select the following options
- Event type: Pre tool use
- Tools: SharePoint – SharePoint
- Name: Before a tool runs
Then open the Workflow dropdown menu and select + Add a new workflow. Doing this navigates us to the workflow editor in Copilot Studio.
Trigger A Workflow When A Pre-Tool Use Hook Is Called
When any tool is called by the SharePoint MCP server in Copilot Studio the agent’s hook will trigger a workflow.
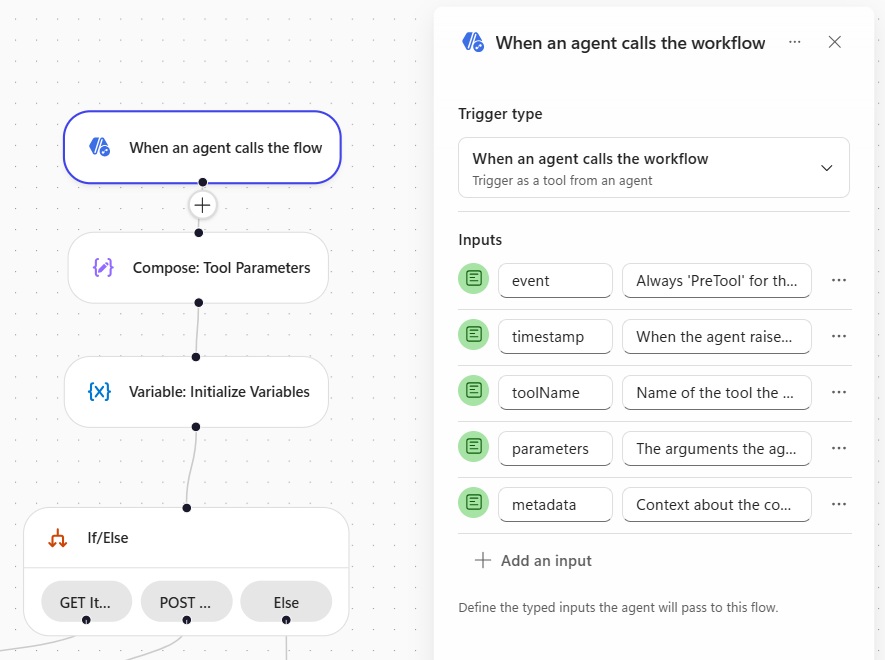
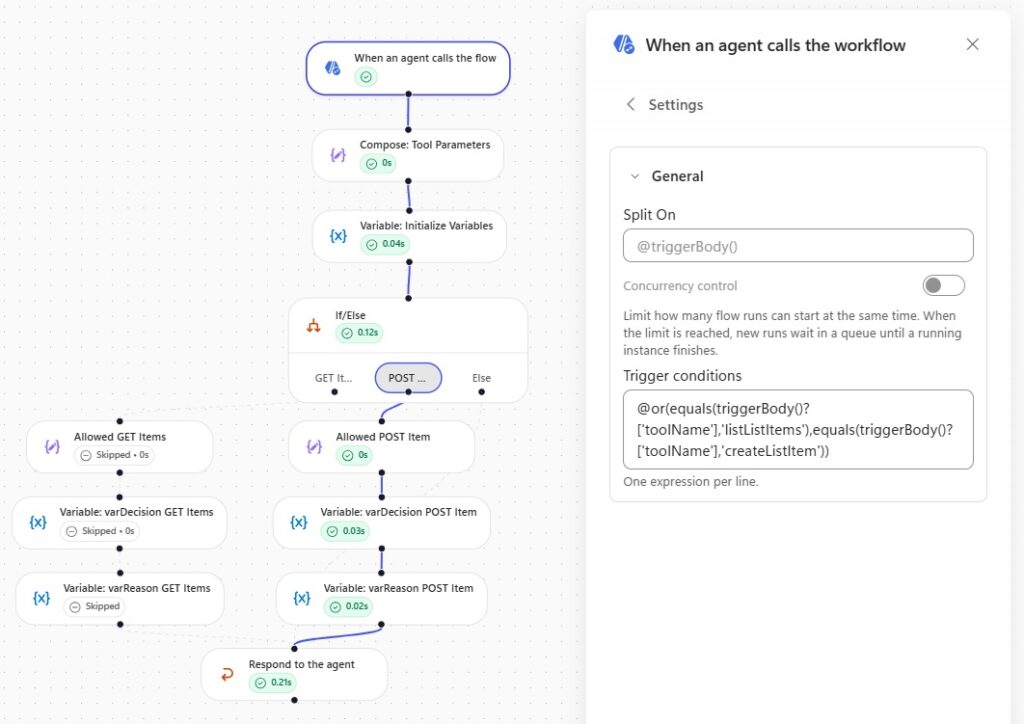
We only want the workflow to trigger when the SharePoint server calls the List List Items tool of the Create List Items tool. To set the trigger conditions, select the when an agent calls the flow node and go to settings.
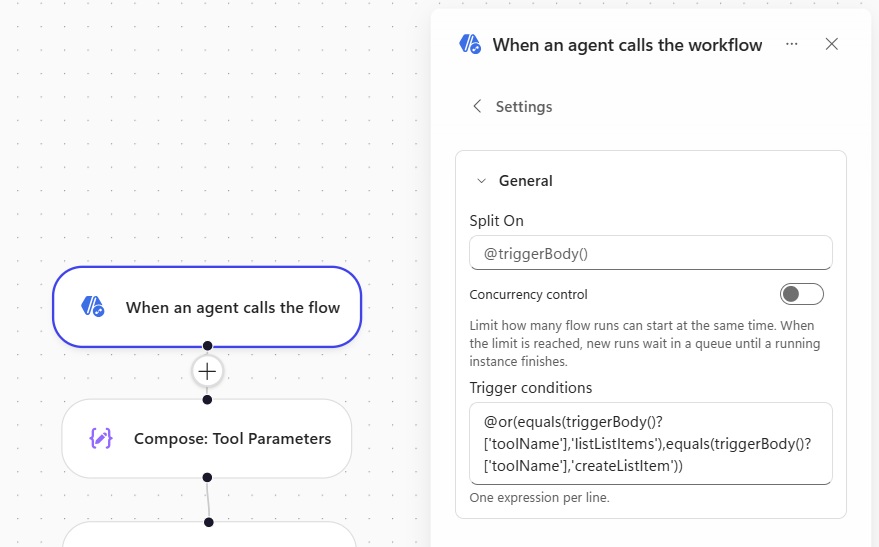
Then copy and paste this expression into the trigger conditions.
| @or(equals(triggerBody()?[‘toolName’],’listListItems’),equals(triggerBody()?[‘toolName’],’createListItem’)) |
Extract The Tool Parameters And Initialize Variables
The agent trigger outputs a tool parameters property which contains the values it will use in the tool call. For example, the create list item tool would include the SharePoint site id, the SharePoint list id, and values for each column in the Sales Orders SharePoint list.
To extract the tool parameters object insert a Compose action into the workflow.
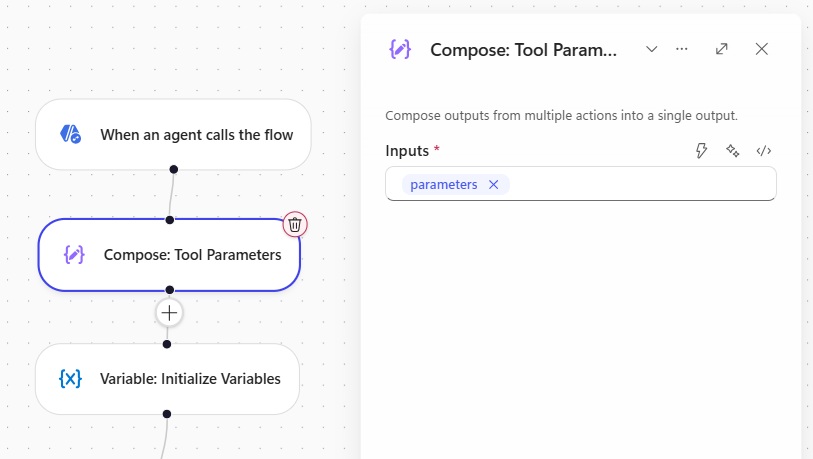
Then write this code in the inputs property of the Compose action.
| @triggerOutputs()?[‘body/parameters’] |
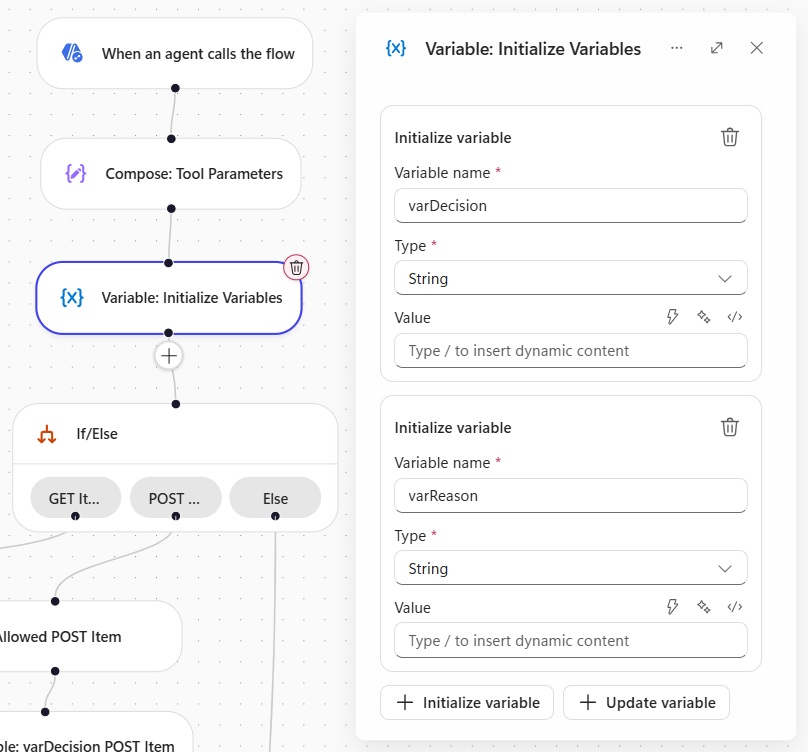
After that we will create two variables: one to store the agent’s decision to allow or deny the tool call and one to give the reason when a tool call is denied.
Add a variable action to the workflow and initialize two string variables: varDecision and varReason.
Determine Which Tool Was Called By The MCP Server
We want to define which SharePoint lists the agent is allowed to read from and which lists the agent can write to. Since we cannot do this by configuring the SharePoint MCP server we will do so in this workflow.
Add an If/Else block to the workflow with two branches named GET Items and POST Item.
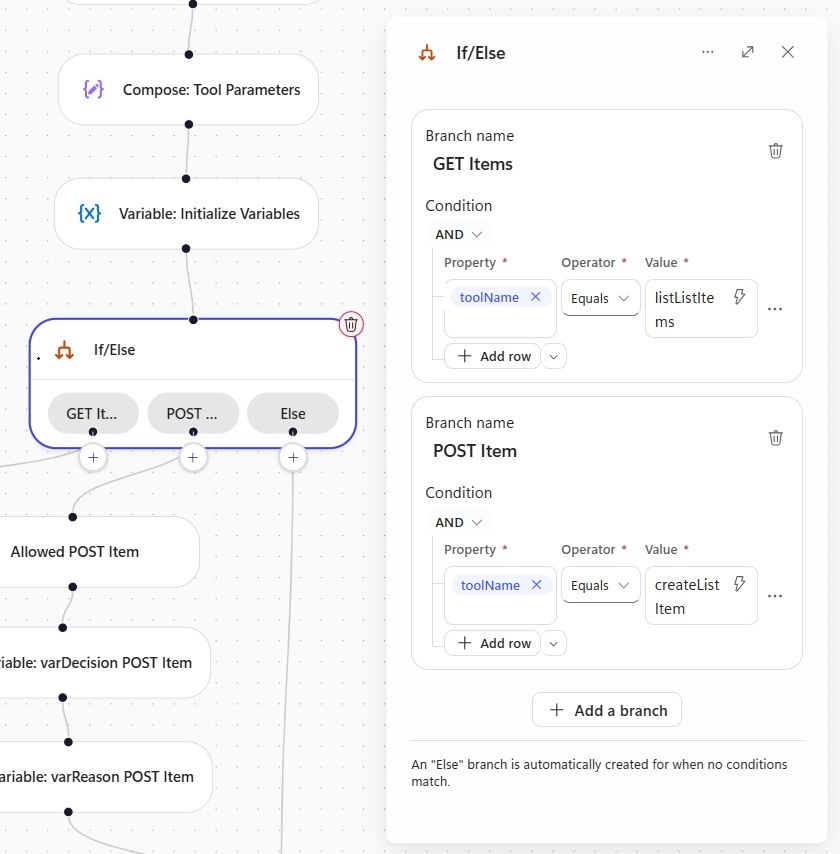
For the GET Items branch copy and paste this expression into the property field and set the value property to listListItems.
@triggerOutputs()?['body/toolName']Code language: JavaScript (javascript)
And for the POST item branch copy an paste the same expression into the property field and update the value property to createListItems.
@triggerOutputs()?['body/toolName']Code language: JavaScript (javascript)
Create An Allowed List For Read Only-Tables And Read-Write Table
We will control which SharePoint lists the agent can read from and write to by creating an allowed list of SharePoint list ID values. Add Compose action to the Get Items branch and rename it Allowed GET Items.
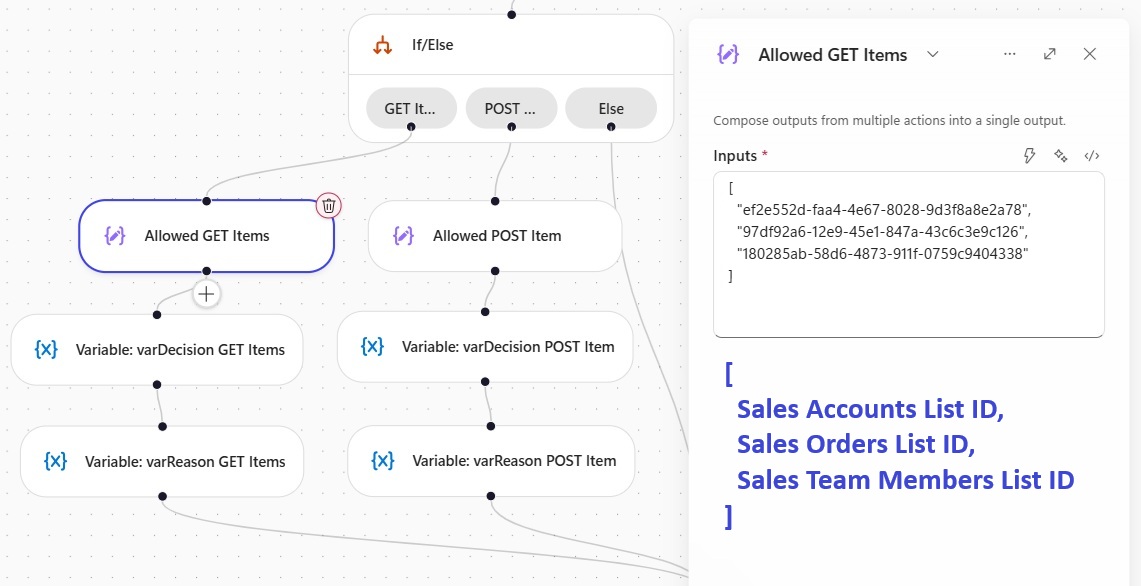
Populate the the compose action with the SharePoint list IDs for all of the lists we created.
[
  "<Sales Accounts List ID>",
  "<Sales Orders List ID>",
  "<Sales Team Members List ID>"
]

Code language: JSON / JSON with Comments (json)
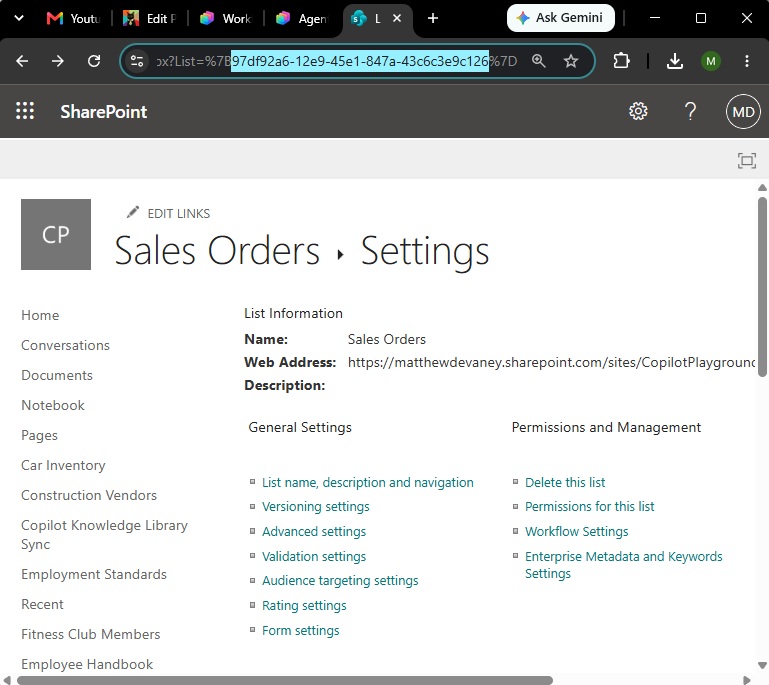
We can get the SharePoint list IDs by going to the list settings for each list in SharePoint and extracting it from the List parameter in the page URL.
Similarly, for the POST Item branch insert a compose action.
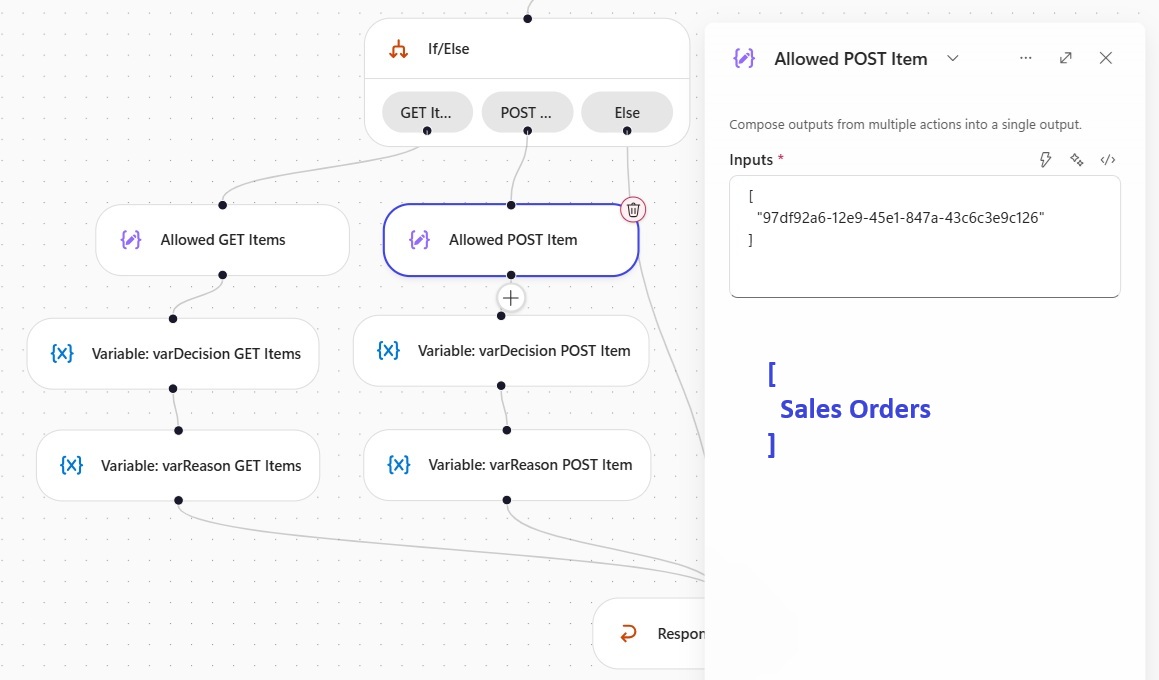
Then populate the inputs property with the id for the Sales Orders SharePoint list.
[
  "<Sales Orders List ID>"
]
Code language: JSON / JSON with Comments (json)
Allow Or Deny The Agent’s Read/Write Operation
The next step is to determine whether the agent should he be allowed to read or write to the target table. In the GET Items branch add a set variable action for varDecision.
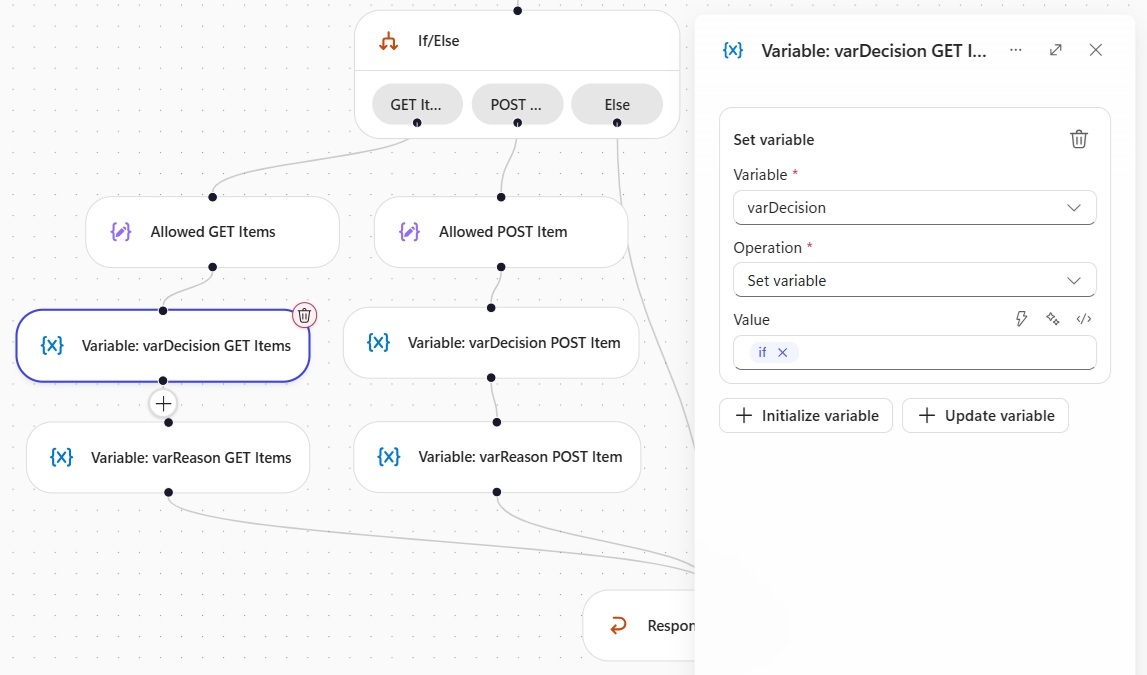
Write this expression to check if the List Id in the tool call is found in the Compose action allowed list. If yes, return a blank string. Otherwise return the text ‘deny’.
| @if(contains(outputs(‘Allowed_GET_Items’),outputs(‘Compose__Tool_Parameters’)?[‘listId’]),”,’deny’) |
Then insert another set variable for varReason.
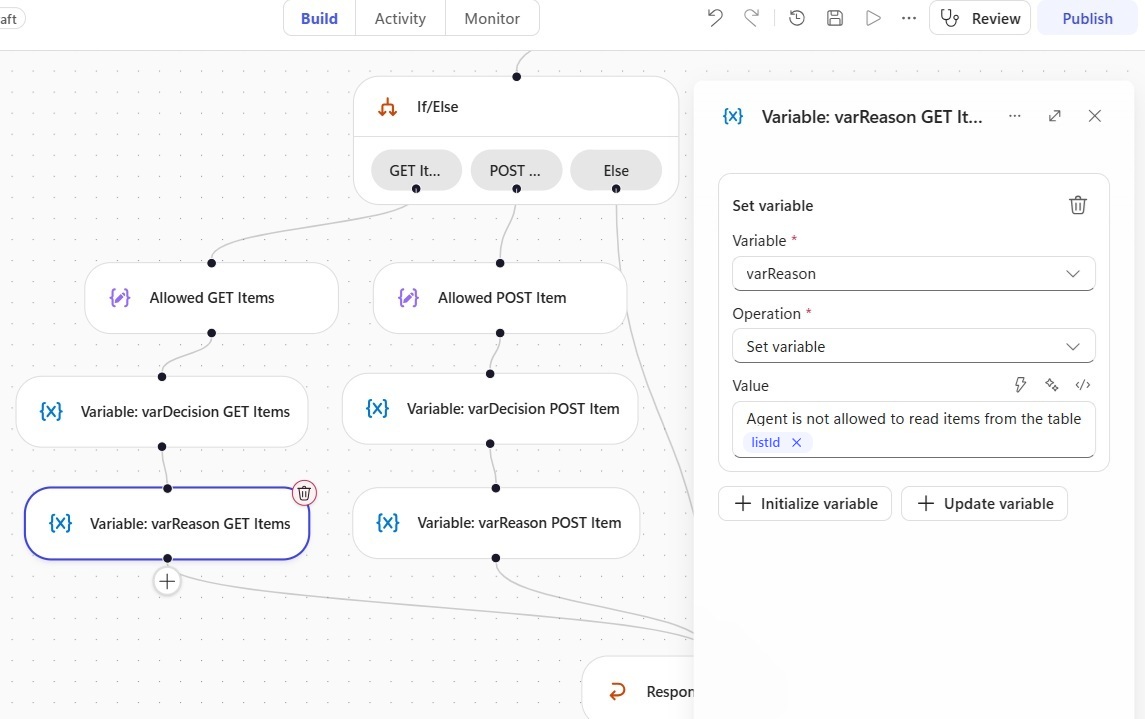
Copy and paste this text into the varReason variable. It will only be used if varDecision is set to ‘deny’.
| Agent is not allowed to read items from the table @{outputs(‘Compose__Tool_Parameters’)?[‘listId’]} |
Then move to the POST Item branch add a set variable action for varDecision.
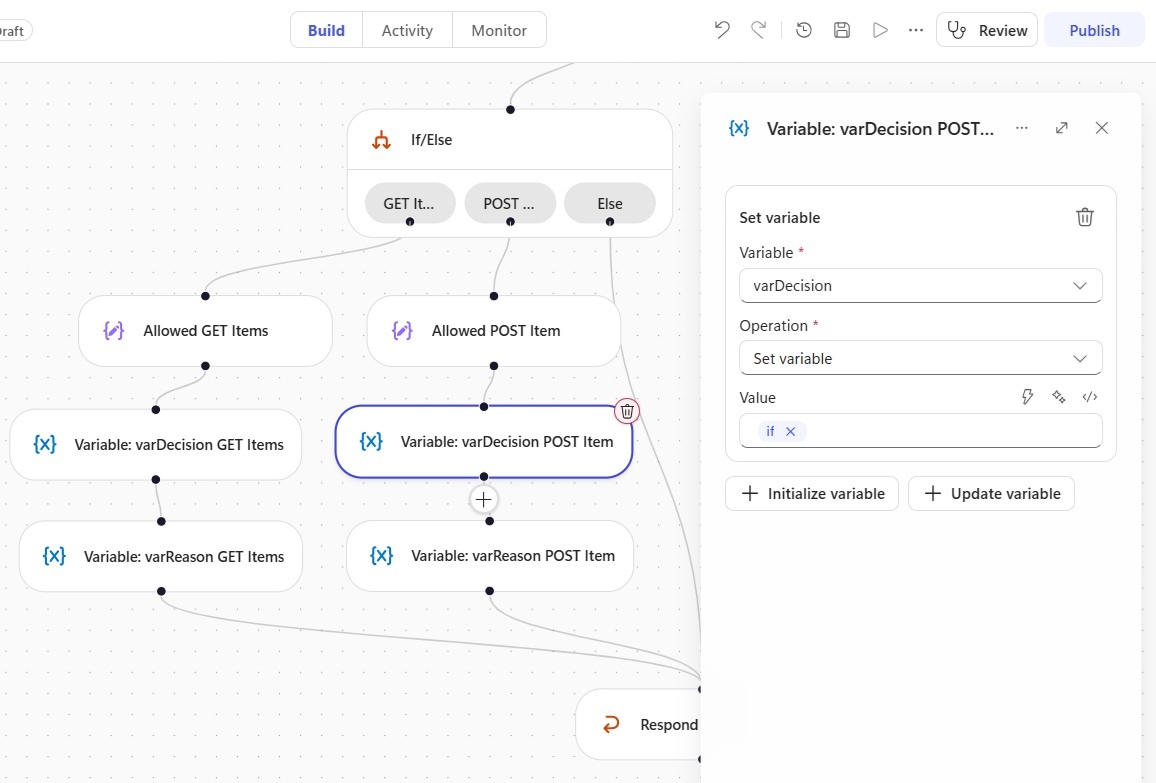
Write this expression to check if the List Id in the tool call is found in the Compose action allowed list. If yes, return a blank string. Otherwise return the text ‘deny’.
| @contains(outputs(‘Allowed_POST_Item’),outputs(‘Compose__Tool_Parameters’)?[‘listId’]) |
Add another set variable action for varReason.
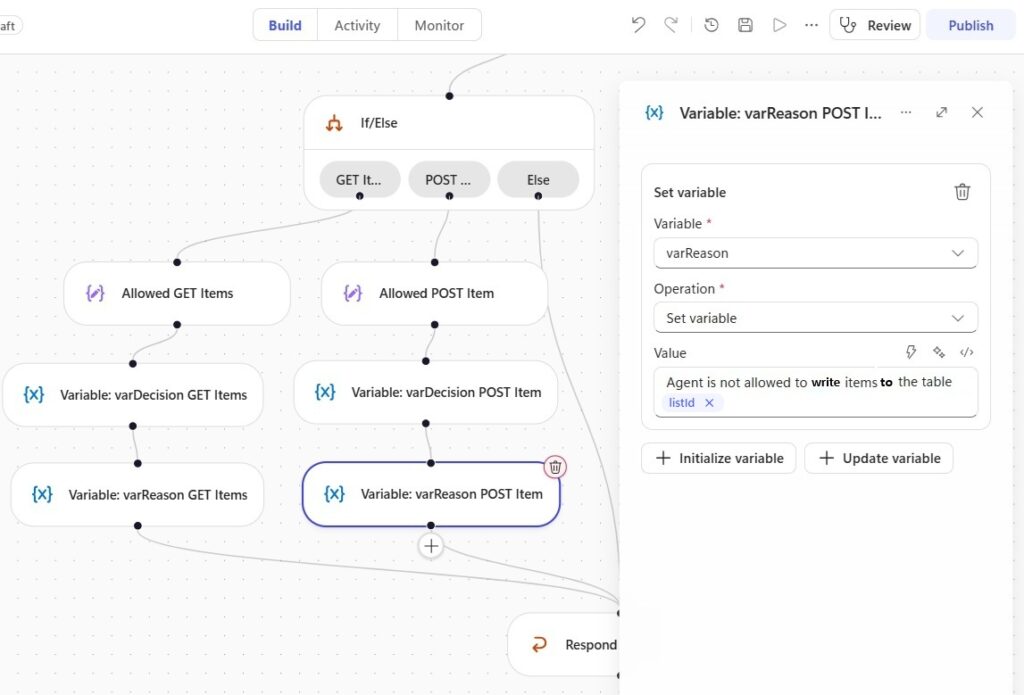
Copy and paste this text into the varReason variable. It will only be used if varDecision is set to ‘deny’.
| Agent is not allowed to write items to the table @{outputs(‘Compose__Tool_Parameters’)?[‘listId’]} |
Respond To The Agent In Copilot Studio
All branches of the workflow have been completed so we can now pass the result to the agent. Apply the varDecision variable to the permissionDecision property and the varReason variable to the permissionDecisionReason property.
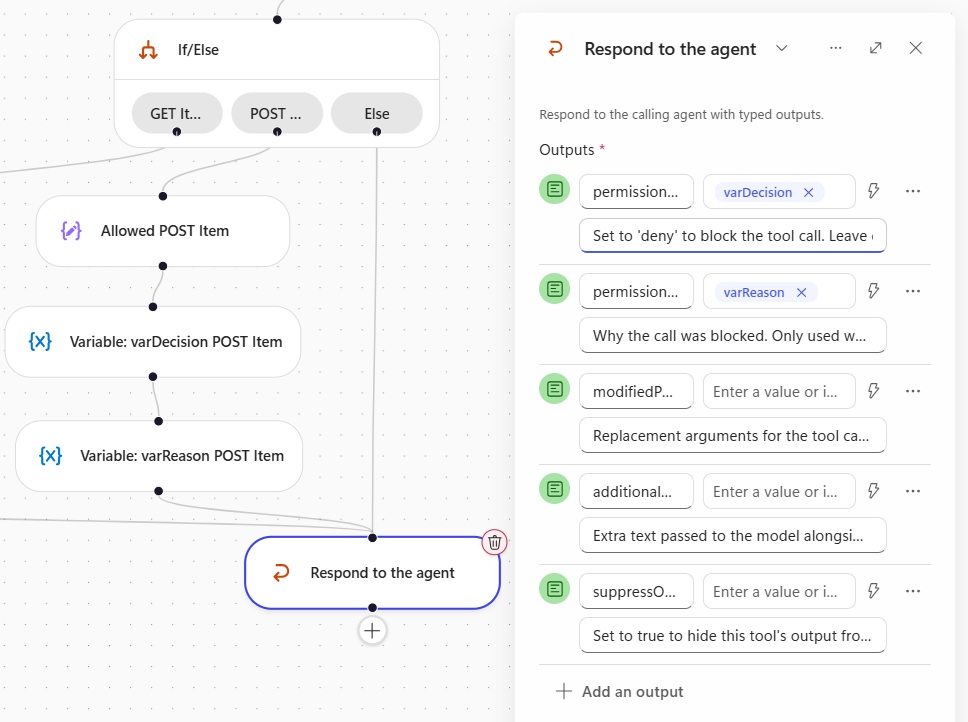
Save and publish the workflow then return to Copilot Studio. Press the Done button on the Add Hook menu.
Test The Agent Hook In Copilot Studio
We are now ready to test the agent in Copilot Studio. Save the agent then try the following prompt:
| Create an order for 12 HP Laptop for Grape Vine Enterprise at price of $680 total. |
Before the agent calls the listListItem tool it executes the agent hook to check if it is allowed to read from each list. And also, before using the createListItem tool it executes the agent hook to check whether its allowed to write to the given list.
The new Sales Order appears in the SharePoint list.
And in the workflow history we can see the agent successfully passed the allowed list check.
Video: Copilot Studio HOOKS Will Make Your AI Agents Predictable
Watch this video for a complete demonstration of the techniques described in the article.
Did You Enjoy This Article? 😺
Subscribe to get new Copilot Studio articles sent to your inbox each week for FREE
Questions?
If you have any questions or feedback about How To Use Agent Hooks In Copilot Studio please leave a message in the comments section below. You can post using your email address and are not required to create an account to join the discussion.