How To Make A Power Apps Custom Page (Full Tutorial)

A Power Apps custom page enables you to build a full page canvas app into a Power Apps model-driven app. Model-driven apps traditionally only have forms and views. Now with custom pages we can build full-screen pages, dialogs and side-panes with the canvas app editor. We can even bring together data from multiple Dataverse tables on the same screen. In this article I will show you how to make a Power Apps custom page in a model-driven app.
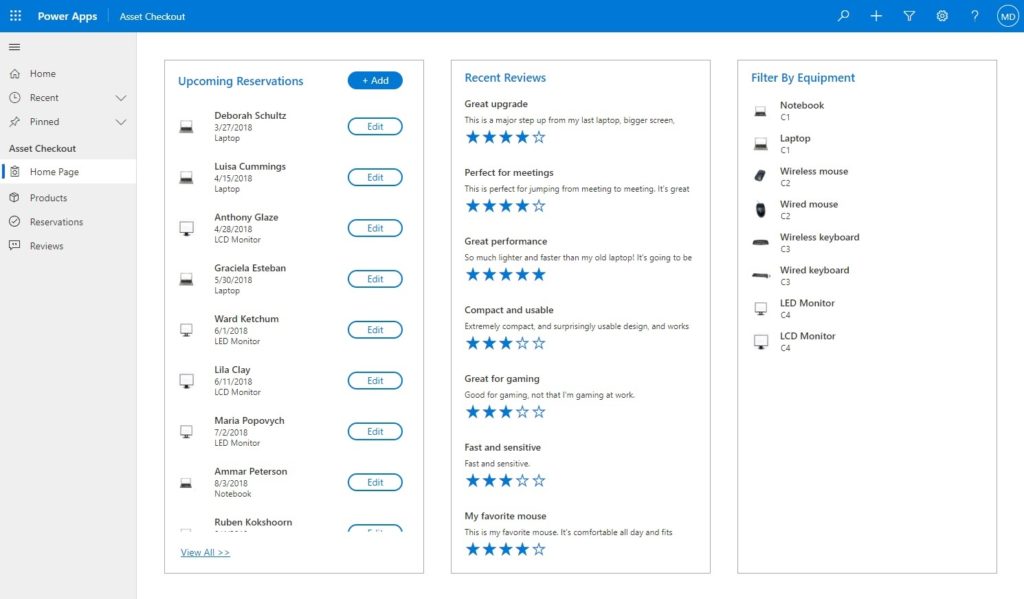
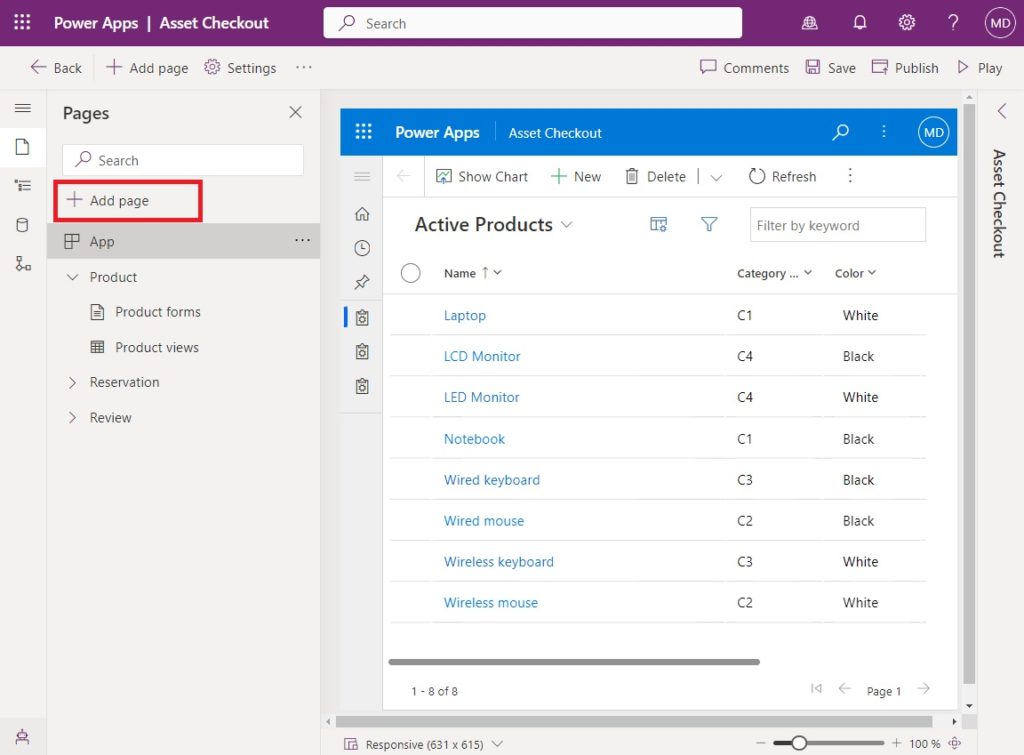
Introduction: The Asset Checkout App Home Screen
The I.T. department uses the Asset Checkout App to manage loaning devices to users. The Home Page shows upcoming reservations, recent reviews of devices and gives the ability to filter by equipment type.
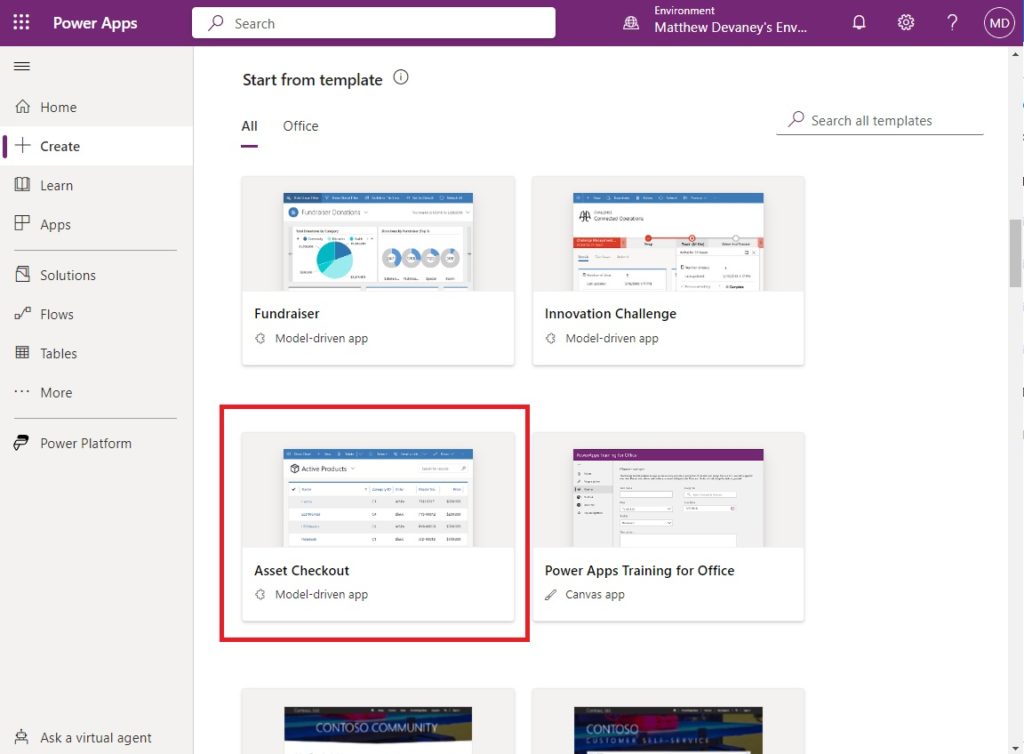
Create A New Power Apps Model-Driven App
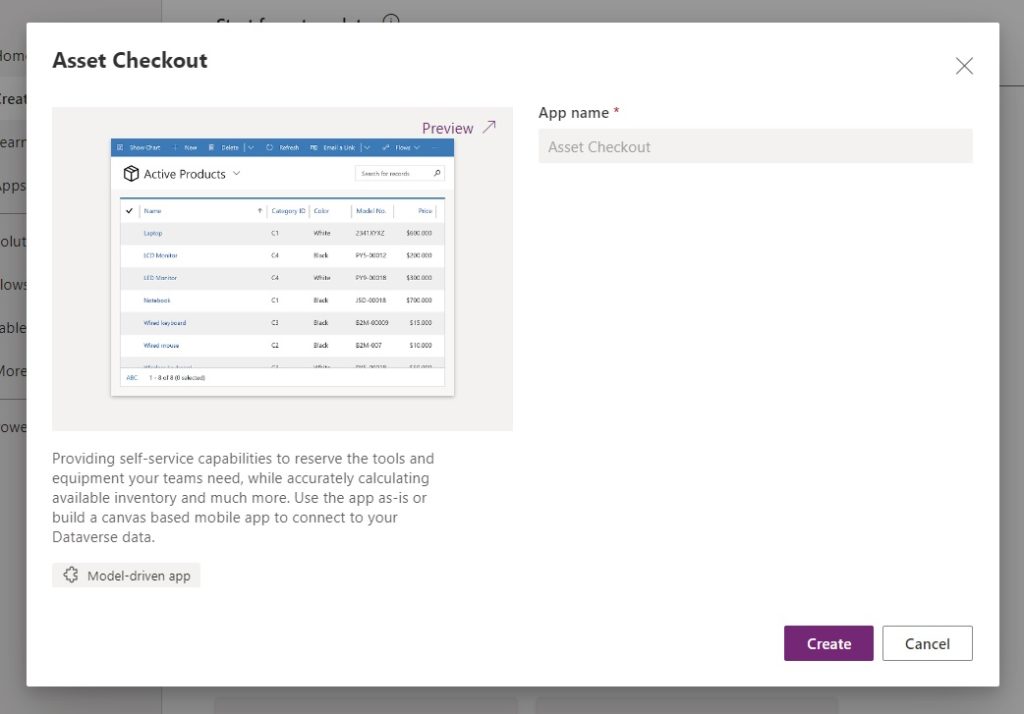
Open Power Apps Studio and navigate to the Create page. Select the Asset Checkout model-driven app template.
Click the Create button.
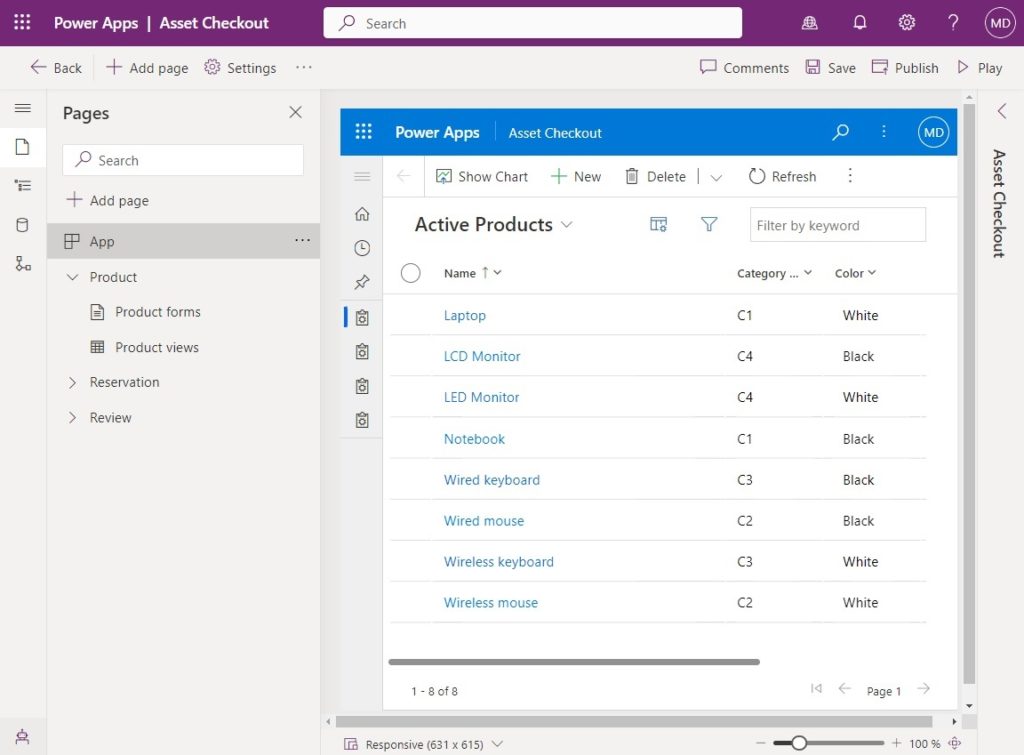
The Asset Checkout app will open in the model-driven app editor.
Add A New Custom Page To The Model-Driven App
Press the Add page button in the model-driven app editor
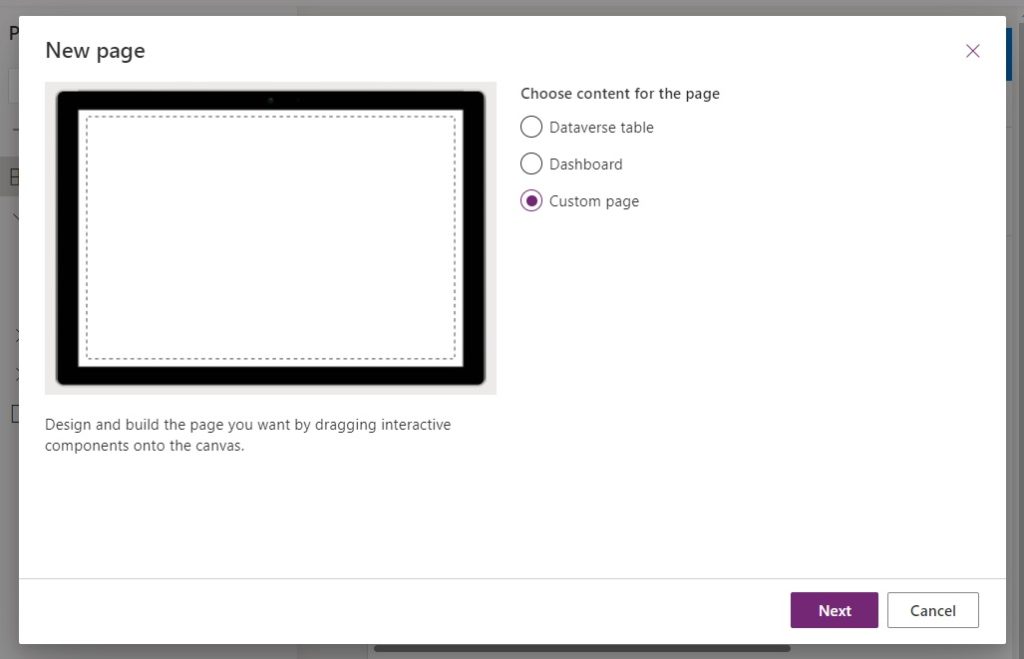
Select Custom page.
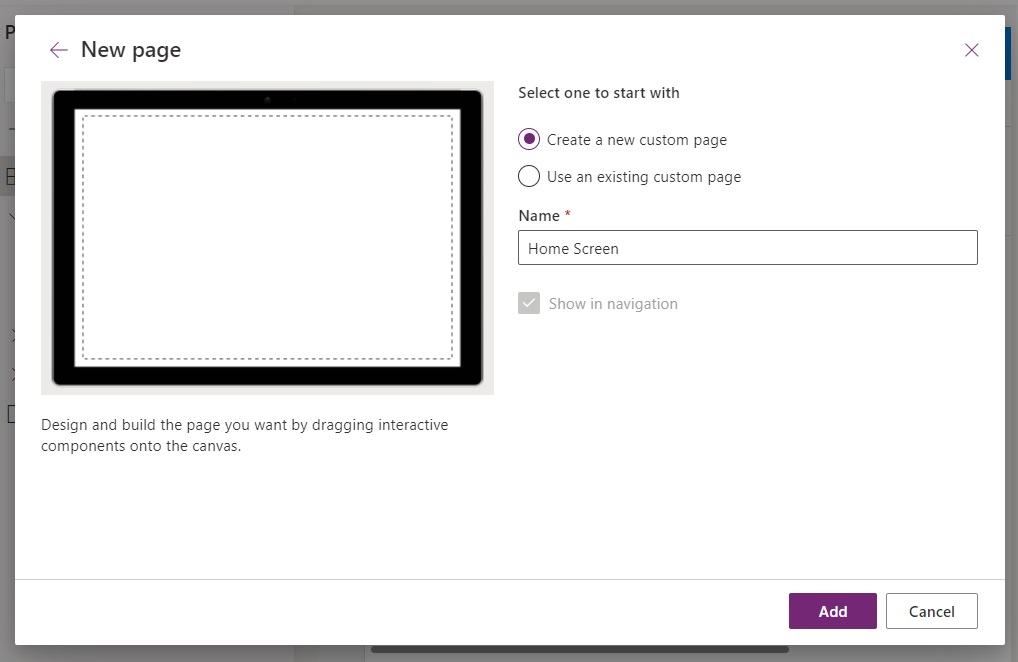
Choose Create a new custom page called Home Screen then click the Add button. This will open a new custom page in the canvas app designer.
Setup Responsive Containers In The Custom Page
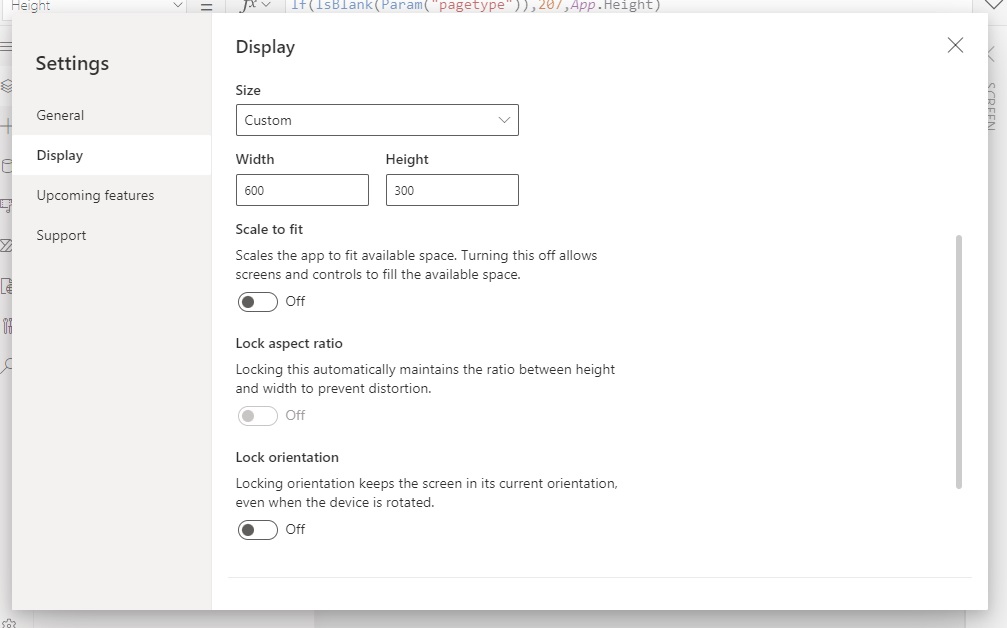
Power Apps model-driven apps use responsive-design to ensure they look good on all screen sizes. A custom page should also be responsive because it is a part of the model-driven app. Go to the Advanced Settings, navigate to the Display tab and toggle off Scale to fit.
Add a horizontal container to the custom page named con_Home_Main.
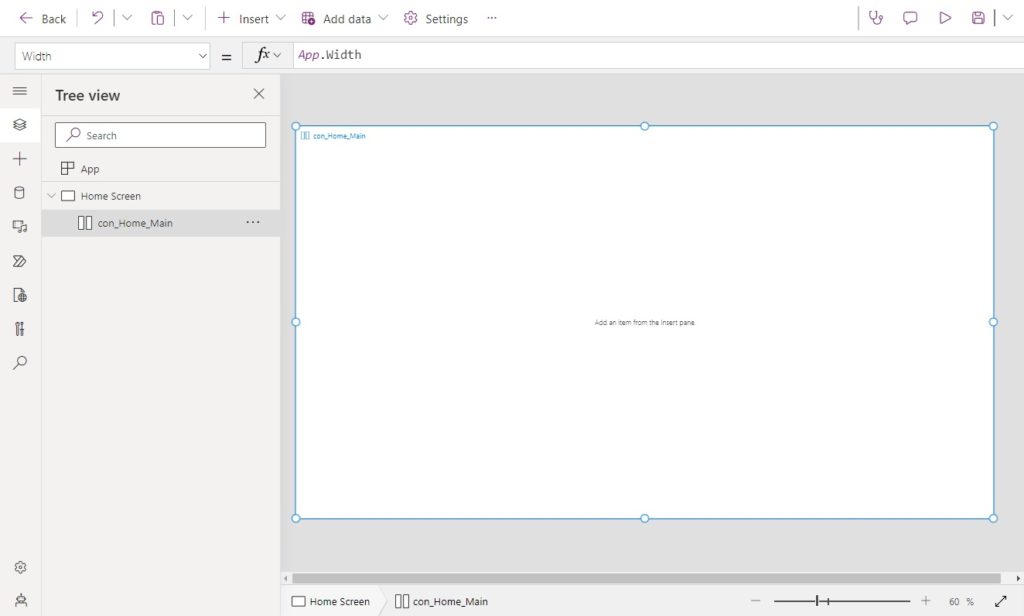
Give the horizontal container these properties. It will make the main container cover the the entire page and re-size itself as the page re-sizes.
Height: App.Height
Width: App.Width
Gap: 40
PaddingBottom: 40
PaddingLeft: 40
PaddingRight: 40
PaddingTop: 40Code language: HTTP (http)
Set the LayoutAlignItems property to Stretch. This will make objects placed inside the main container extend to fill-it horizontally (left-to-right).
LayoutAlignItems.StretchCode language: CSS (css)
Insert 3 vertical containers into the main container and name them as follows:
- con_Home_UpcomingReservations
- con_Home_RecentReviews
- con_Home_FilterByEquipment
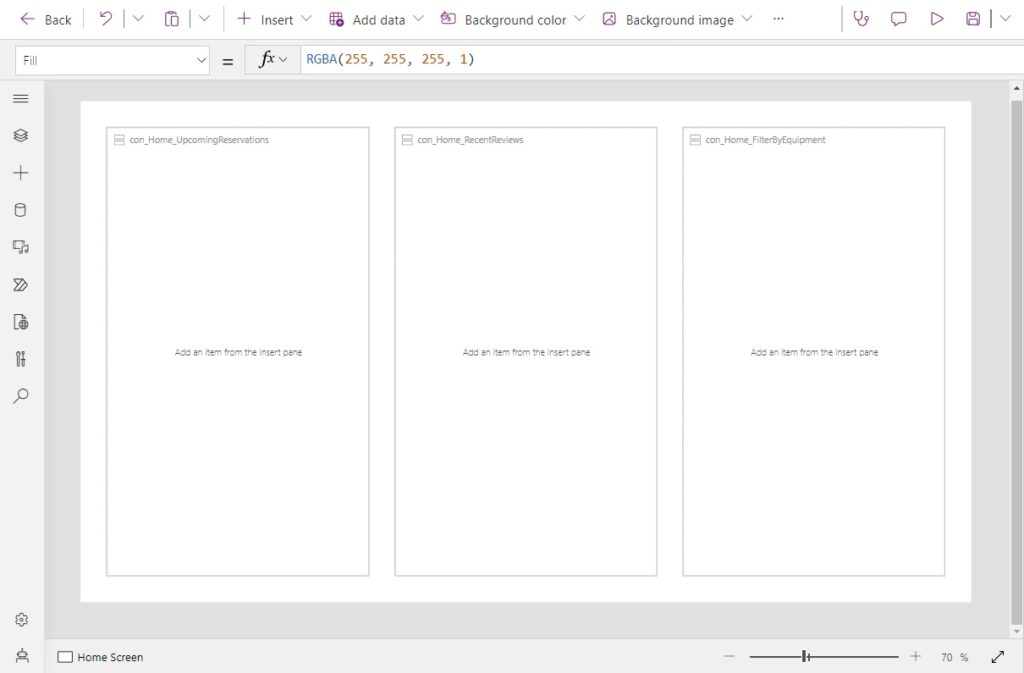
Set the flexible width property of all vertical containers to true with a minimum width of 360 pixels. Each container will take up 1/3 of the screen.
FlexibleWidth: true
LayoutMinWidth: 360
FillPortions: 1Code language: HTTP (http)
Then apply these properties to the vertical containers to give them a dark grey border.
BorderColor: DarkGray
BorderStyle: Solid
BorderThickness: 1Code language: HTTP (http)
Display Reservations In A Vertical Gallery
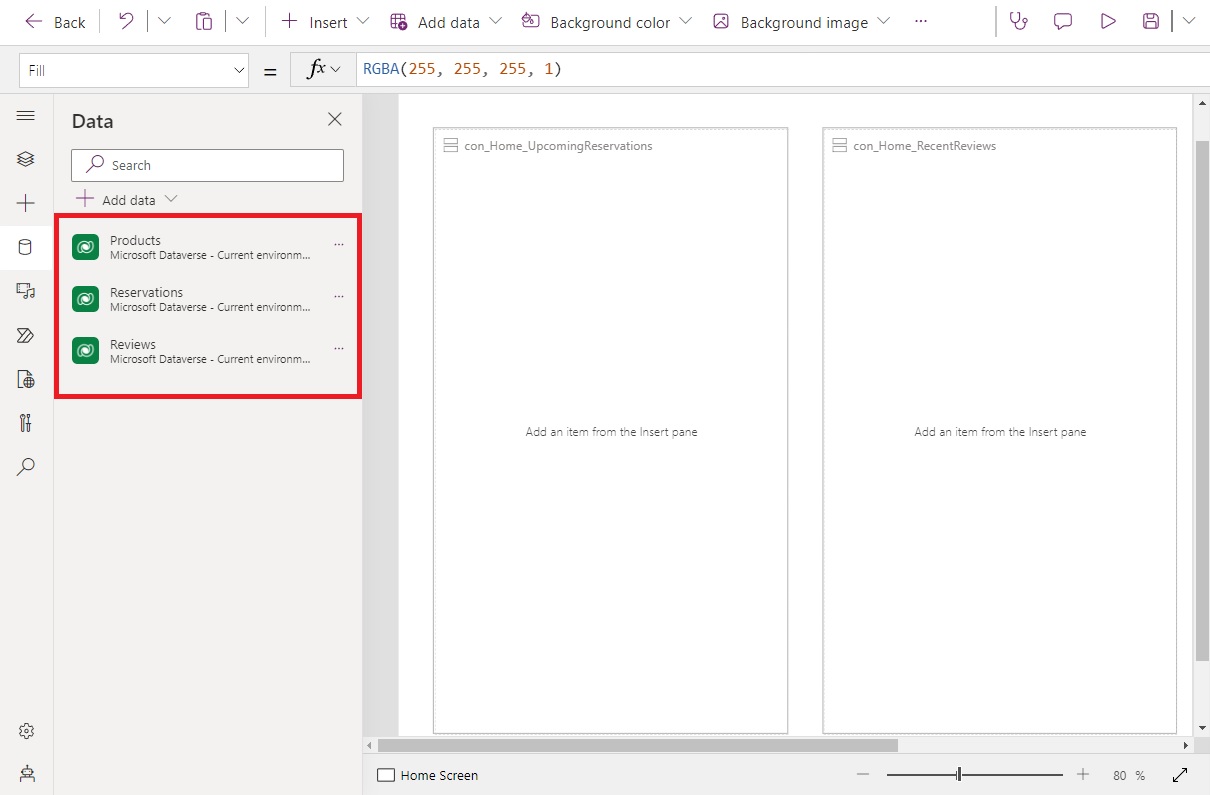
The left-most vertical container displays upcoming device reservations. Go to the Data menu and add these 3 Dataverse tables to the custom page.
- Products
- Reservations
- Reviews
Insert a label at the top of the gallery with the words “Upcoming Reservations”. Then add a vertical gallery to the container.
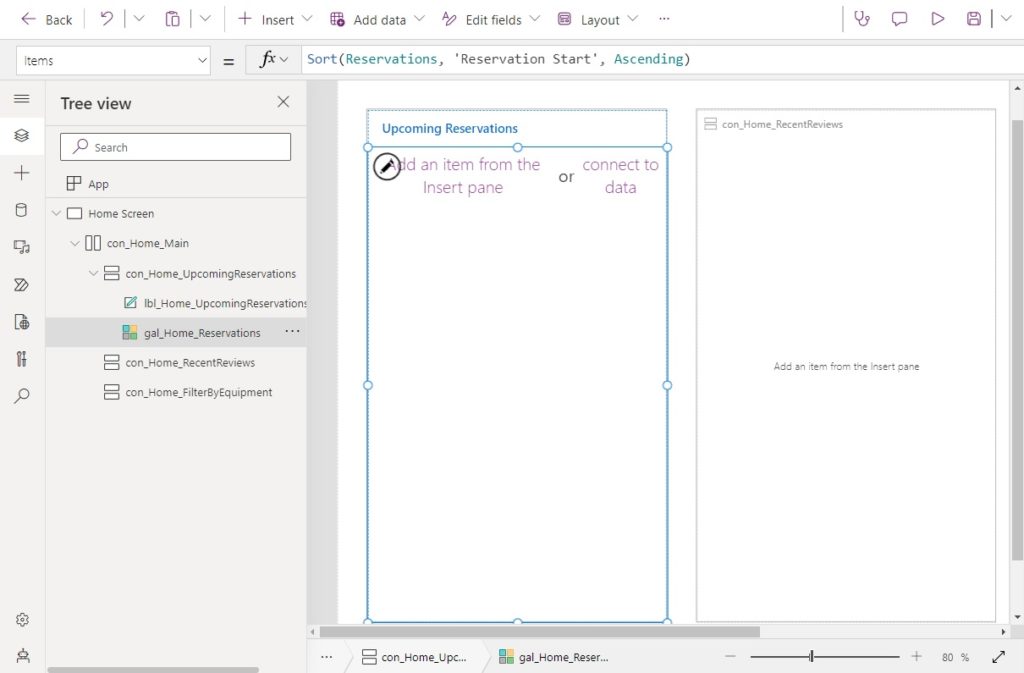
Stretch the gallery by using this code in the AlignInContainer property so it expands to fill all remaining space inside the vertical container.
AlignInContainer.StretchCode language: CSS (css)
Use this code to populate the gallery with Reservations from oldest-to-newest
Sort(Reservations, 'Reservation Start', Ascending)Code language: JavaScript (javascript)
Change the layout of the gallery to title, subtitle and body. This will create 3 new labels inside the gallery.

Write this code in the Text property of the title, subtitle & body labels of the gallery respectively.
ThisItem.NameCode language: CSS (css)Text(ThisItem.'Reservation Start', ShortDate)Code language: JavaScript (javascript)ThisItem.'Product Reservation'.NameCode language: JavaScript (javascript)
Insert an Image control to the left of the labels and use this code in the Image property to display the Product Image.
ThisItem.'Product Reservation'.'Product Image'Code language: JavaScript (javascript)
Navigate To A Model-Driven Form In Edit Mode
When a user selects the Edit button beside a reservation it opens up a model-driven form for that reservation. Insert a new button into the gallery with the word “Edit”.
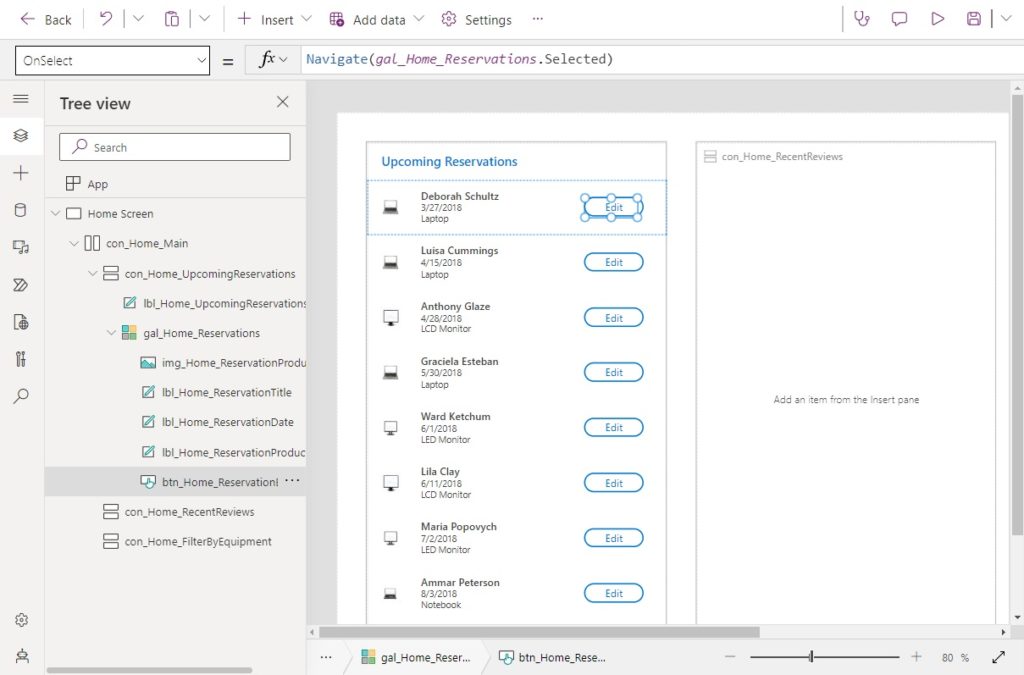
Write this code in the X & Y properties of the button to ensure it maintains its position as the custom page expands or shrinks in size.
X: (App.Width-Self.Width)-40
Y: (App.Height-Self.Height)/2Code language: PHP (php)
Use this code in the OnSelect property of the button. When the user presses the edit button it will navigate away from the custom page to the reservation’s model-driven form.
Navigate(gal_Home_Reservations.Selected)Code language: CSS (css)
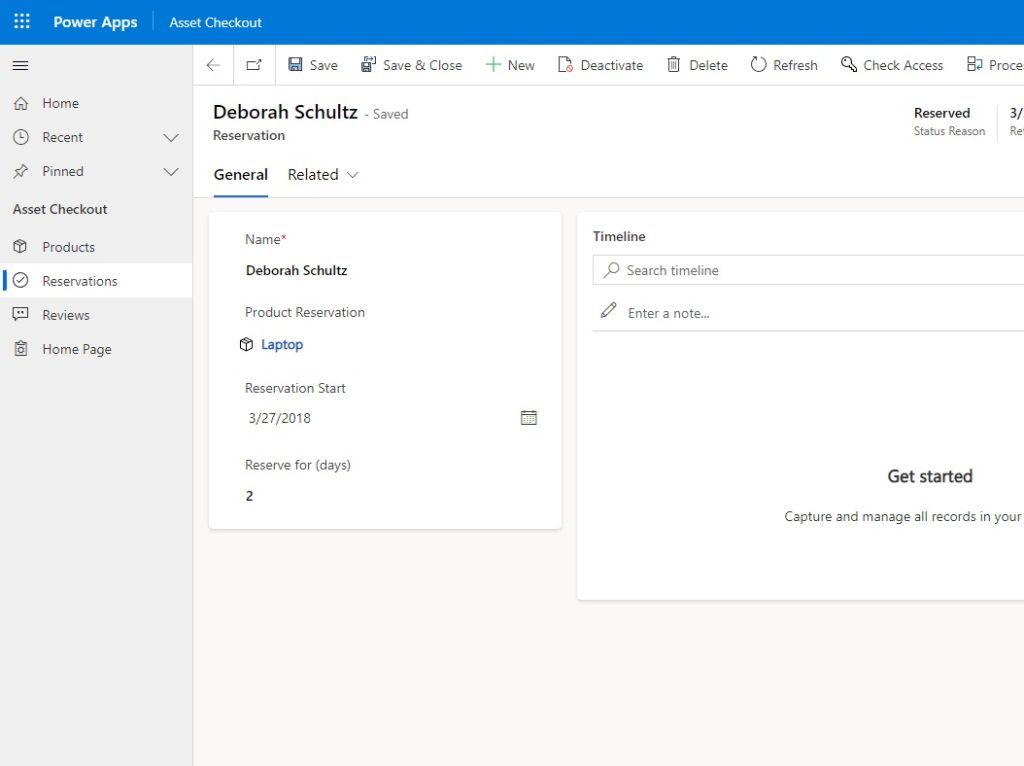
To test the Edit button, save and publish the canvas page. Then re-publish the model-driven app and press play on the Model-Driven App. When the Edit button is pressed that form that appears should look like this.
Navigate To A Blank Model-Driven Form In New Mode
User can also navigate to a blank form to create a new reservation from the custom page. Insert a horizontal container at the top of the gallery. Cut and paste the “Upcoming Reservations” label into the horizontal container and place a new button beside it with the text “+ Add”.
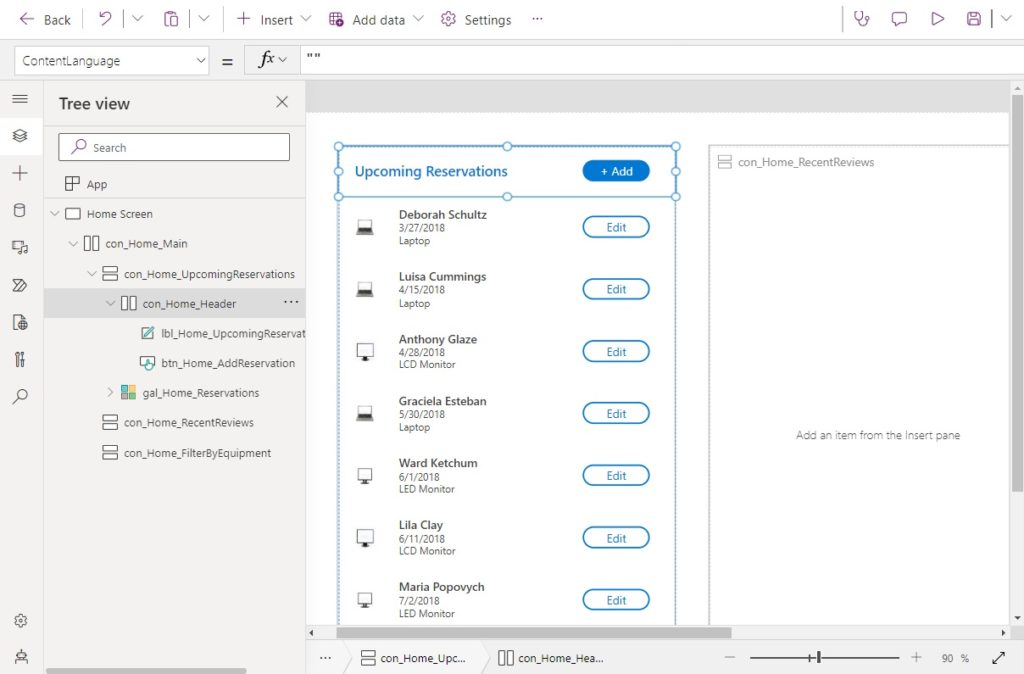
Give the horizontal container these properties. Apply padding to the right-side so the button will not be touching the edge of the container.
LayoutAlignItems (Vertical): Center
FlexibleHeight: false
Height: 60
PaddingRight: 40Code language: JavaScript (javascript)
Set the FlexibleWidth property of the horizontal container to true.
trueCode language: JavaScript (javascript)
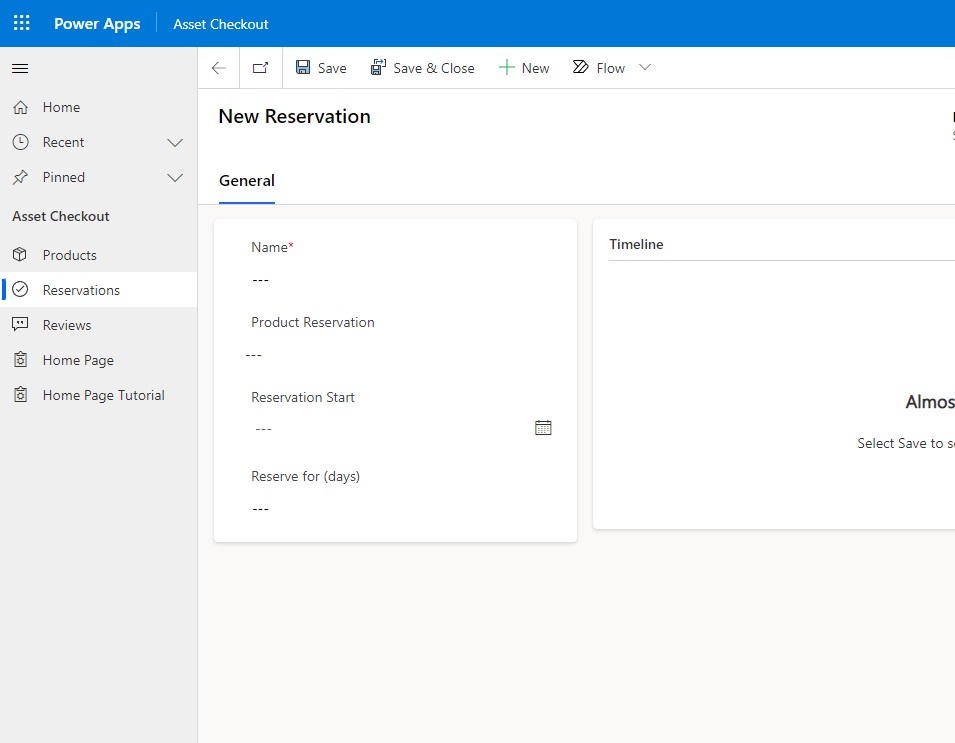
When a user clicks the Add button they are navigated to a blank model-driven form.
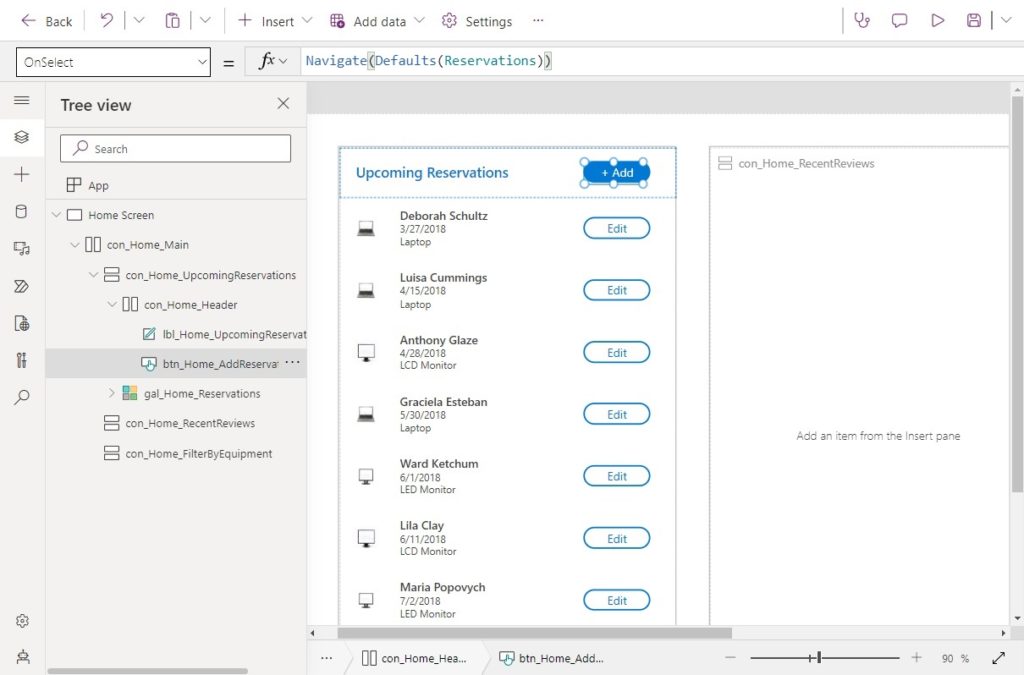
Use this code in the OnSelect property of the Add button.
Navigate(Defaults(Reservations))
To test the Add button, save and publish the canvas page. Then re-publish the model-driven app and press play on the Model-Driven App. When the Add button is pressed that form that appears should look like this.
Navigate To A Model-Driven App View
At the bottom of the Upcoming Reservations container the user can click on a button that says view all to see all of the active reservations. The app navigates away from the custom page and goes to the selected model-driven app view.
Add a horizontal container to the bottom of the Upcoming Reservations container. Place a button with the text “View All >>” inside it. Make the button fill transparent and format the text with an underline.
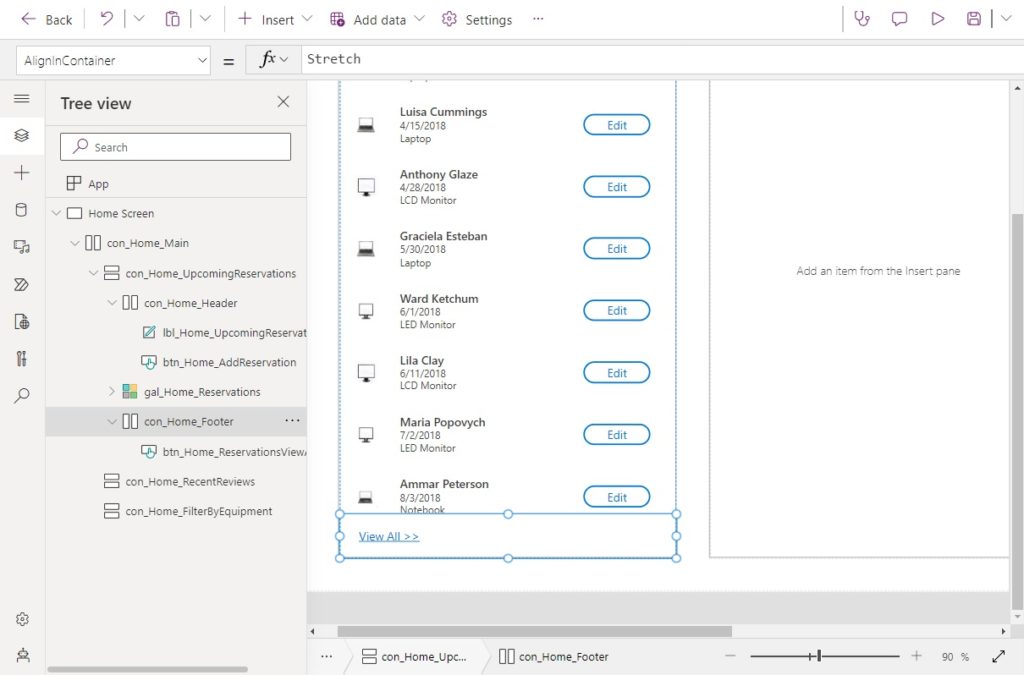
Give the horizontal container these properties. Apply padding to the right-side so the button will not be touching the edge of the container.
AlignInContainer (Vertical): Stretch
FlexibleHeight: false
Height: 60Code language: JavaScript (javascript)
When the user presses the “View All >>” button they navigate to the Active Reservations model-driven view.
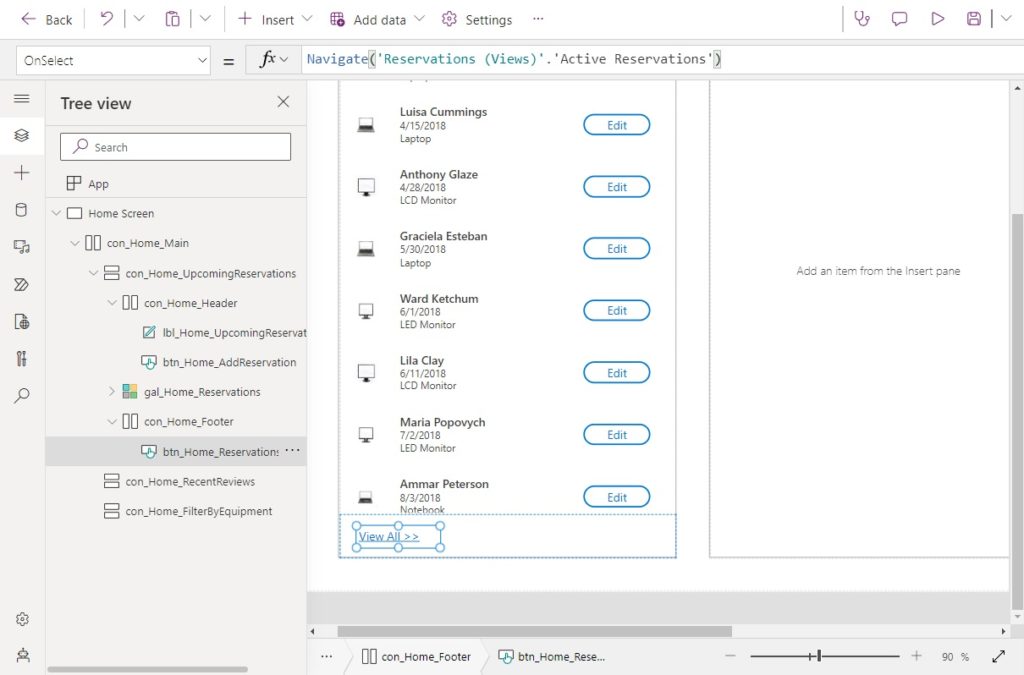
Use this code in the OnSelect property of the button.
Navigate('Reservations (Views)'.'Active Reservations')Code language: JavaScript (javascript)
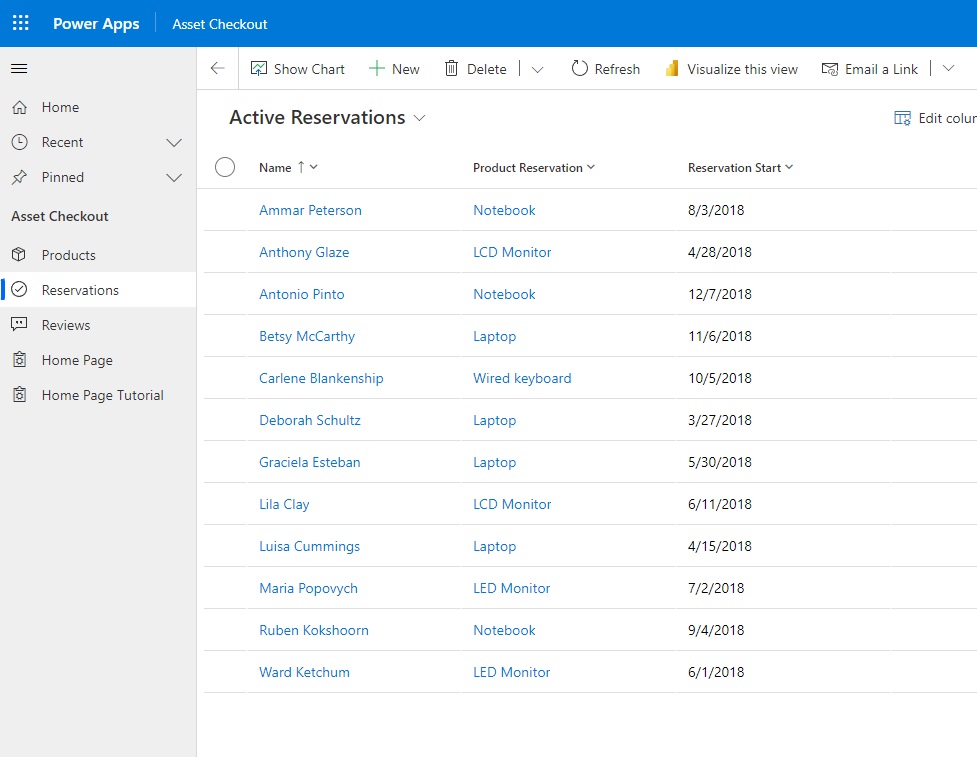
To test the View All button, save and publish the canvas page. Then re-publish the model-driven app and press play on the Model-Driven App. When the View All button is pressed the view that appears should look like this.
Complete the Model-Driven App Custom Page
The Recent Reviews and Filter By Equipment vertical containers are setup much in the same way as the Upcoming Reservations container.
Use this code in the Items properties of the Recent Review and Filter By Equipment containers respectively. Add all of the controls shown in the screenshot above.
Sort(
    Reviews,
    createdon,
    Ascending
)
Products
When a user clicks on an item in the filter by equipment gallery the upcoming reservations and recent reviews become filtered to only show data for the selected equipment.
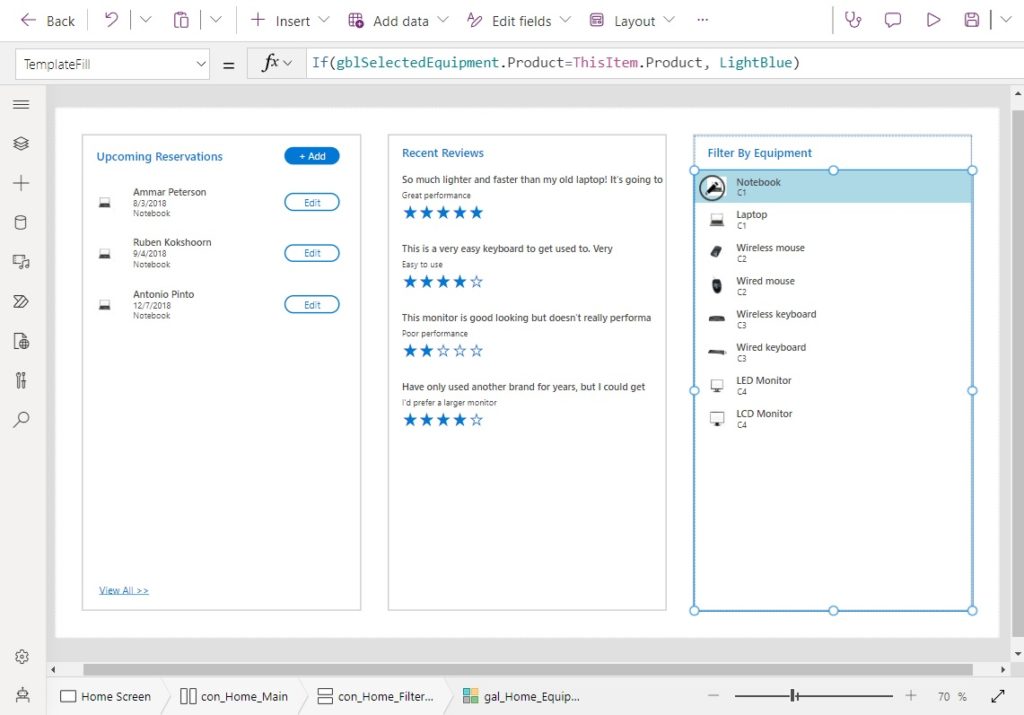
Use this code in the OnSelect property of the gallery to track which equipment is currently selected.
If(
    gblSelectedEquipment.Product=ThisItem.Product,
    Set(
        gblSelectedEquipment,
        Blank()
    ),
    Set(
        gblSelectedEquipment,
        ThisItem
    )
)Code language: JavaScript (javascript)
Write this code in the TemplateFill property of the gallery to highlight the selected equipment in light blue.
If(gblSelectedEquipment.Product=ThisItem.Product, LightBlue)
Finally, use this code in the Items property of the Upcoming Reservations gallery and the the Recent Reviews gallery to filter the records.
Sort(
    Filter(
        Reservations,
        'Product Reservation'.Product = gblSelectedEquipment.Product
        Or IsBlank(gblSelectedEquipment)
    ),
    'Reservation Start',
    Ascending
)Code language: JavaScript (javascript)
Sort(
Filter(
Reviews,
'Associated Product'.Product = gblSelectedEquipment.Product
Or IsBlank(gblSelectedEquipment)
),
createdon,
Ascending
)Code language: JavaScript (javascript)Did You Enjoy This Article? 😺
Subscribe to get new Copilot Studio articles sent to your inbox each week for FREE
Questions?
If you have any questions or feedback about How To Make A Power Apps Custom Page (Full Tutorial) please leave a message in the comments section below. You can post using your email address and are not required to create an account to join the discussion.


@matthew Great Share!
Great Share and Article Matthew.
As I started to build my first Model-Driven App, this is a great addidtion to my learning set.
May I allowed to ask you a question here about Model Driven App / Business Process Flow / Dataversetable
Ricco,
Yes, you can ask a question.
Wow. Has Navigation between Custom Pages and Views/Forms always been this straightforward?!
Great article Matt!
Cole,
Yes, it has been this easy to navigate since launch. I agree, the product team was very thoughtful about this feature.
Hi Matthew, is there a way we could get to a filtered MDA view with the navigation button?
Daniel,
Yes, like this:
Navigate( ‘Accounts (Views)’.’My Active Accounts’ )
Really useful article, and that does seem super simple.
I would like to have a Custom Page permanently in a side panel on the right but that doesn’t seem to be quite so simple. In fact I can’t find how to to add it there rather than a full page accessed via the navigation menu. Are you able to help?
Ryan,
I have not done any tutorial on a side panel but I do have one about modals. It’s a very similar process. Suggest you try this tutorial and then apply what you’ve learned to side panels.
https://www.matthewdevaney.com/power-apps-custom-page-modal-dialog-for-model-driven-apps/
NVM – just tripled the screen size.
Hey Matt. Thank you for everything you do. In this tutorial you set the custom page at a width of 600 and then put three flexible containers in each with a min width of 360. The math is not adding up. Obviously other people have out making it work. What am I missing?
Hi, thanks for the explanation. I’m facing a problem where I need to go from one custom page to another and pass a parameter. it seems the navigate function works only to go to the custom page, but I can’t pass a value. Do you have any advice?
Lorenzo,
Two ideas for you, I haven’t tested them yet:
1. Use the LAUNCH function to navigate to the other customer page and include a parameter in the URL you are passing. Extract it using the PARAM function.
2. Write data to some temporary table in Dataverse and pick it up on the next custom page OnVisible.
Thanks for the advice, so I just discovered that it is possible to use the Navigate function and pass a parameter, but it seems it works only with dataverse records. I discovered after many attempts that it only works with dataverse because I’m using a SQL DB and it was giving a generic error. So probably I will use the second piece of advice that you gave even because the first one will create a new page on the browser. (https://learn.microsoft.com/en-us/power-apps/maker/model-driven-apps/page-powerfx-in-model-app)
Hi Matthew, great article. I am assuming you can use a custom page in Power Pages. But as I don’t have access to that product to test this, I thought I would ask. If that is correct, I am assuming you bring them in using the Custom Layouts function in that product.
Heidi,
Custom page layouts appear to be something altogether different. You are creating your own template using the templating built-in language and deploying it.
https://learn.microsoft.com/en-us/power-pages/configure/custom-page-layouts
Thanks Matthew, for such a great tutorial.
I had a couple of things to changes. 1) I changed the Settings->Display screen size to 1200(W) x 900 (H), in order to fit the 3 containers. I also changed the “Edit button” properties to:
i already make a custom page working as dialogue for cancel case function. But how to retrieve only status code cancellation? currently it retrieves all cases with status code contains data. I attached an image so that you understand what I’m trying to say.
How to provide Dynamic Name to the Custom Page App [As we see it on browser Tab Label]?
Sachin,
I do not not understand what is meant by Dynamic Name.
Hi Matthew
How do I make the custom page the Home Page so that when I open the App that is the page that is shown first?
Thanks
Nigel
Not sure if you are still responding to old posts, but I will give it a shot. I have a model driven app with a custom canvas app for the home page. I have this formula for the OnSelect of the gallery: Navigate(ThisItem, {Page: ‘FW Main Projects (Forms)’.Information}). This all works like expected. The issue I am having though is when I navigate to the Information form from the canvas app I get an error on the Files tab (this is connected to a SharePoint site through the Document Location of the model driven app) of the form. It’s a long error, but essentially the necessary information is not being passed. If I click on the same project from the model driven app View page I don’t get the error and it works correctly. Have you ever run into this or know of a solution?
Hi Matthew,
A few years later I found this excellent tutorial.Great work!
I have created a custom page with a print button. When I press the print button the print process starts and I get a preview of the page, BUT the side bar is inluded in the priview and is also printed. (see attached image).
I wonder: is it possible to print ONLY the custom page (and NOT include the sidebar from the Model driven app).
Kind regards
Kim
Thanks for the guide! Do you know what the ‘Pass Parameter’ option is for in the advanced settings of a custom page that’s been added to the navigation of a model-driven app? I was hoping to use it to retrieve the app ID of the app that this page is currently in, but it doesn’t seem to be working.