How To Extract Tables From A PDF In Power Automate

Power Automate can extract tables from a PDF with the help of Azure AI Document Intelligence. Using the pre-built Layout model we can analyze any PDF document and get its information in a JSON. The output includes an array containing all of the tables in the PDF.
Introduction: The Extract Tables From A PDF Automation
An automation connected to Document Intelligence accepts a pdf file as input and extracts all tables found within in the document. No training of the AI model is needed in advance for new document types.
Tables can be extracted over multiple pages. There can be multiple tables on a single page.
The output is an array of values with a row number, a column number and the content of the table cell.

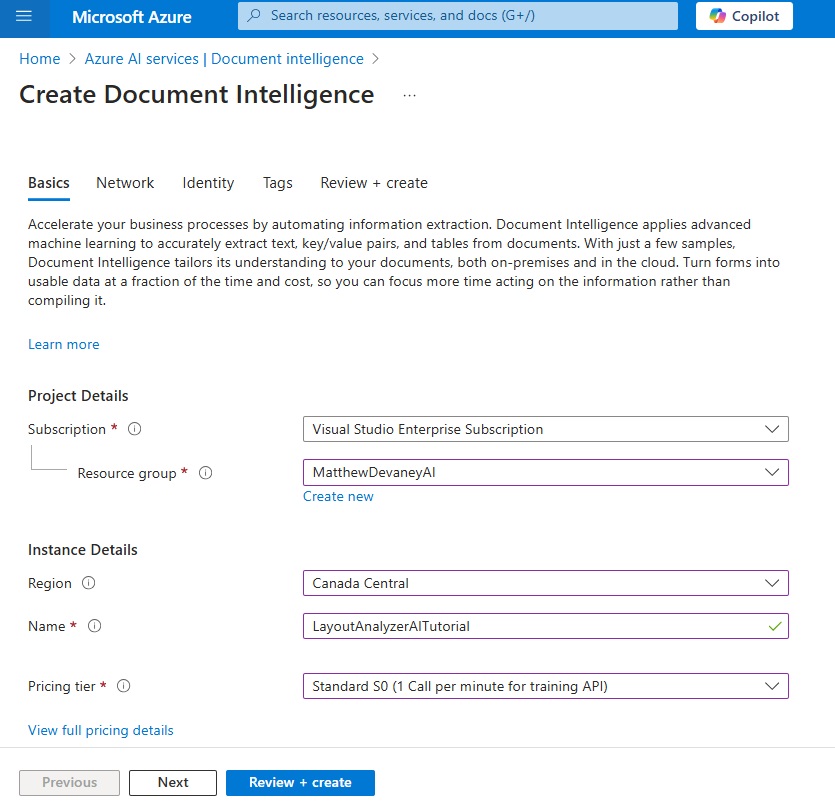
Create A New Document Intelligence Resource
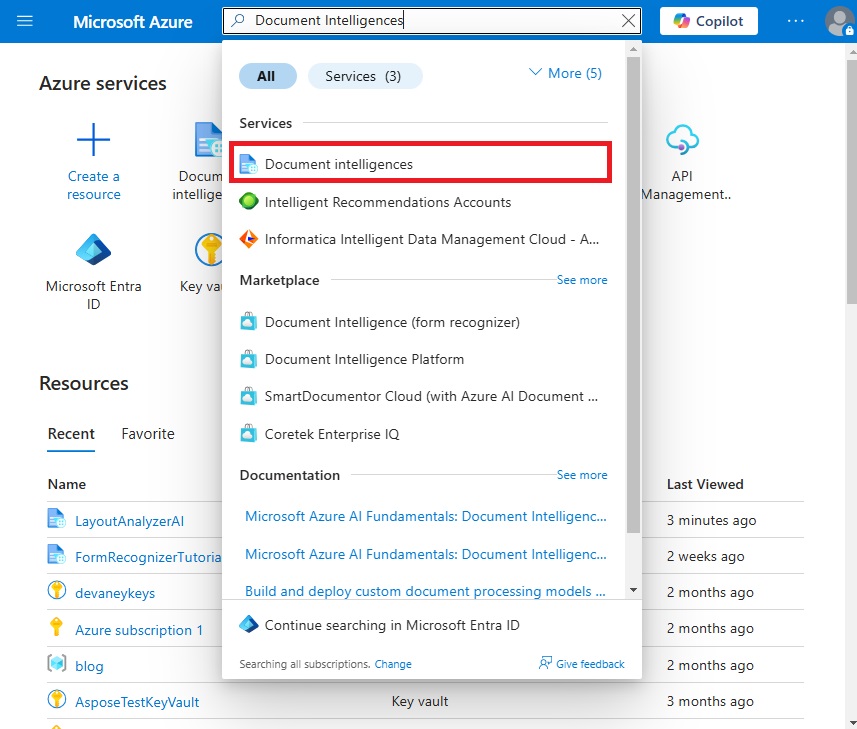
The first thing we must do is create a new document intelligence resource. Open the Azure Portal and search for Document Intelligences.
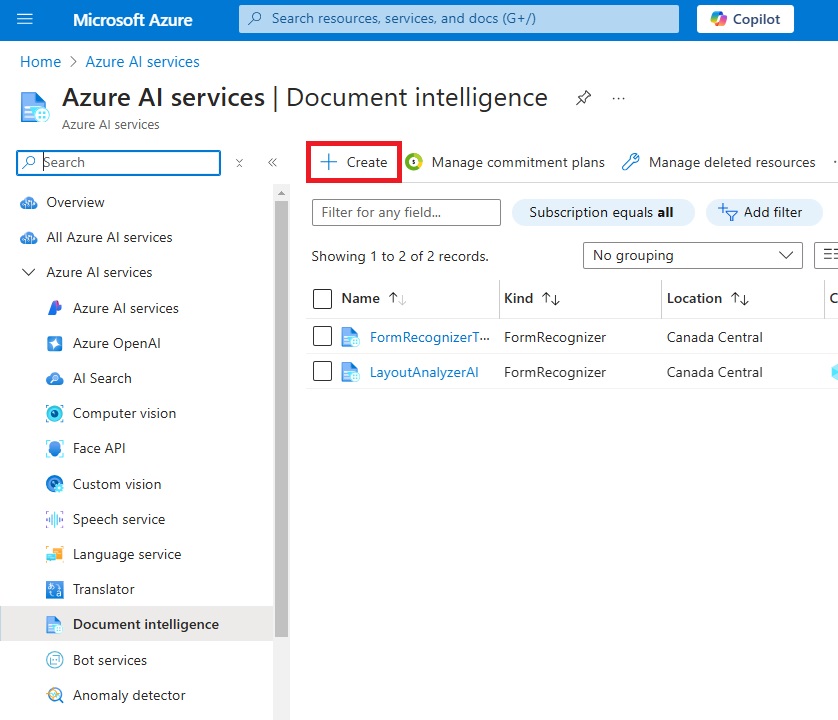
Press the Create button on the document intelligence menu.
Name the document intelligence resource LayoutAnalyzerAITutorial and select a pricing tier of Standard S0 or above. Then press the review + create button to complete the setup.
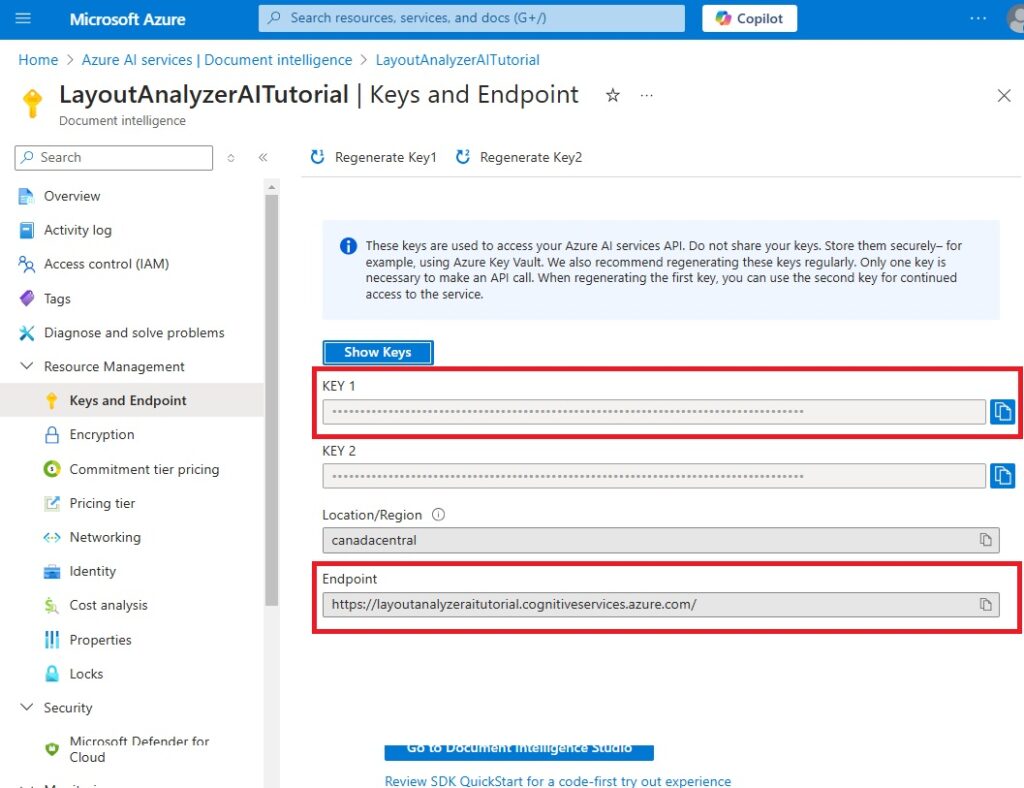
Locate The Document Intelligence Resource Keys and Endpoint
We will need the document intelligence resource’s keys and endpoint when building our automation. Navigate to the Keys and Endpoint menu item within the Resource Management grouping.
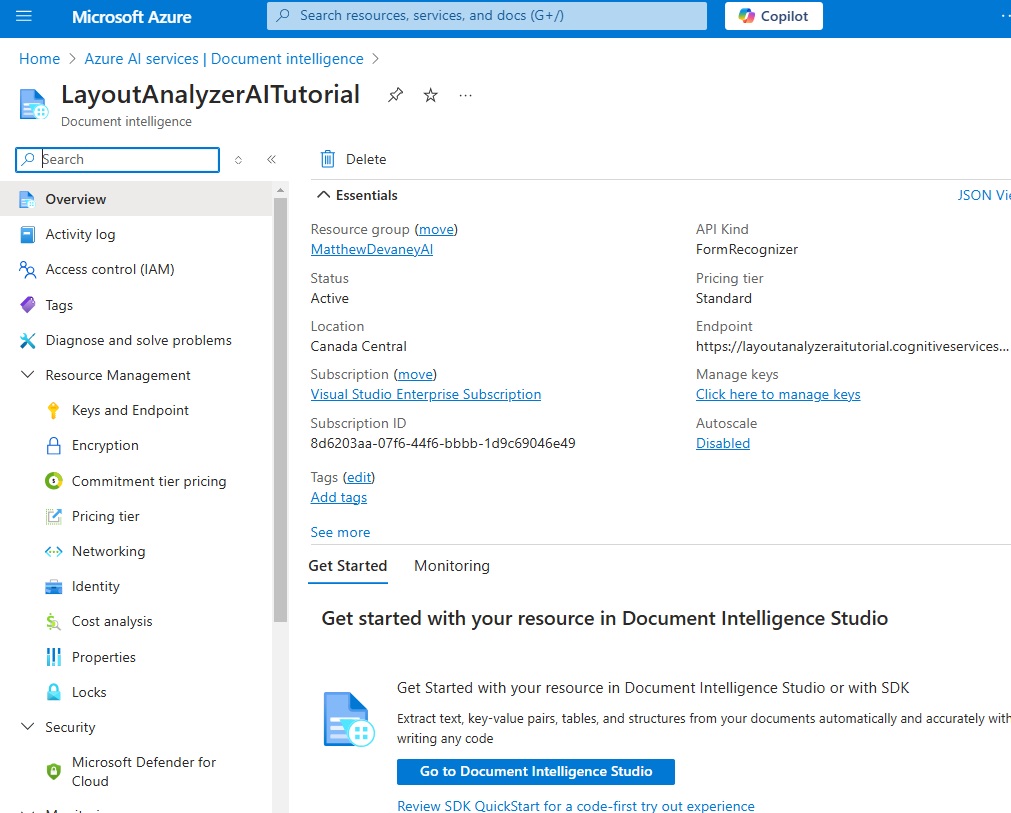
When we need the keys and endpoint later on come back to this menu to find them.
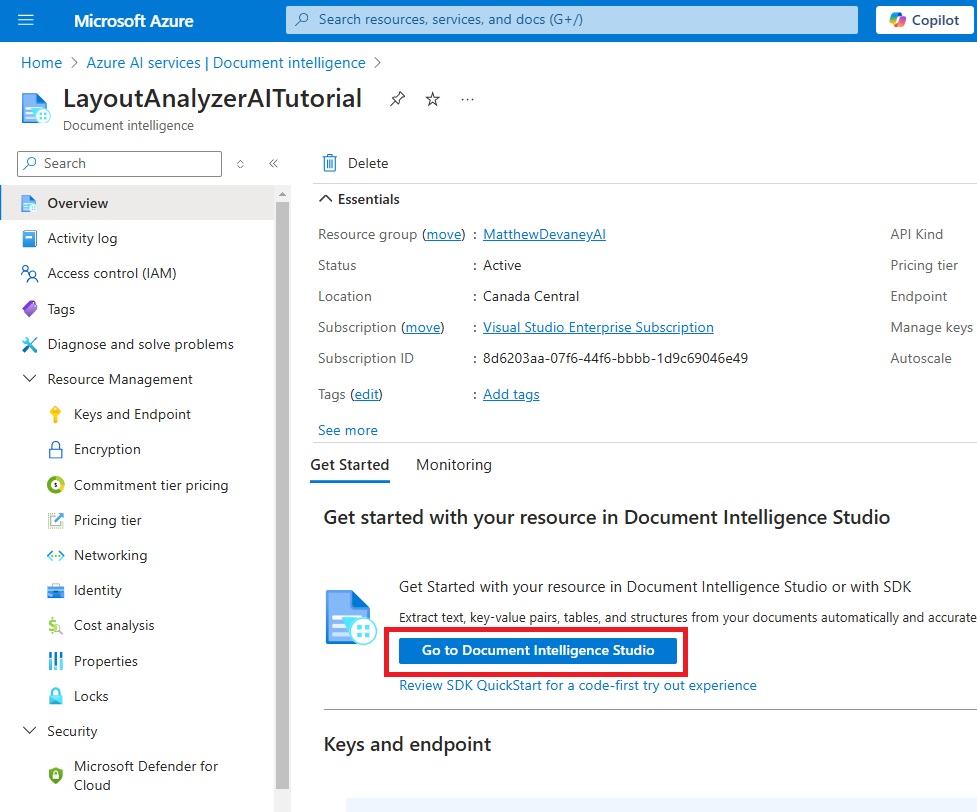
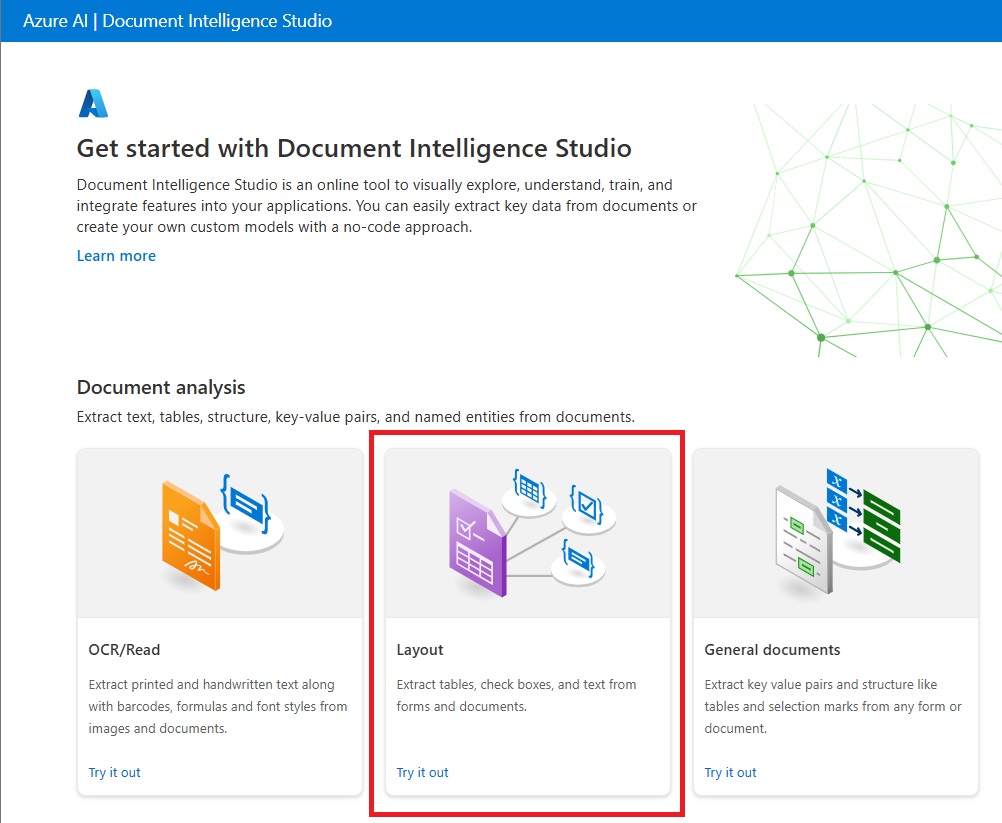
Try The Layout AI Model In Document Intelligence Studio
Before we build an automation to extract all tables from a PDF we can try out the AI model in Document Intelligence Studio. It allows us to manually upload a PDF document and see what the results will look like. Go to the Overview menu and press the Go To Document Intelligence Studio button.
Select the Layout model.
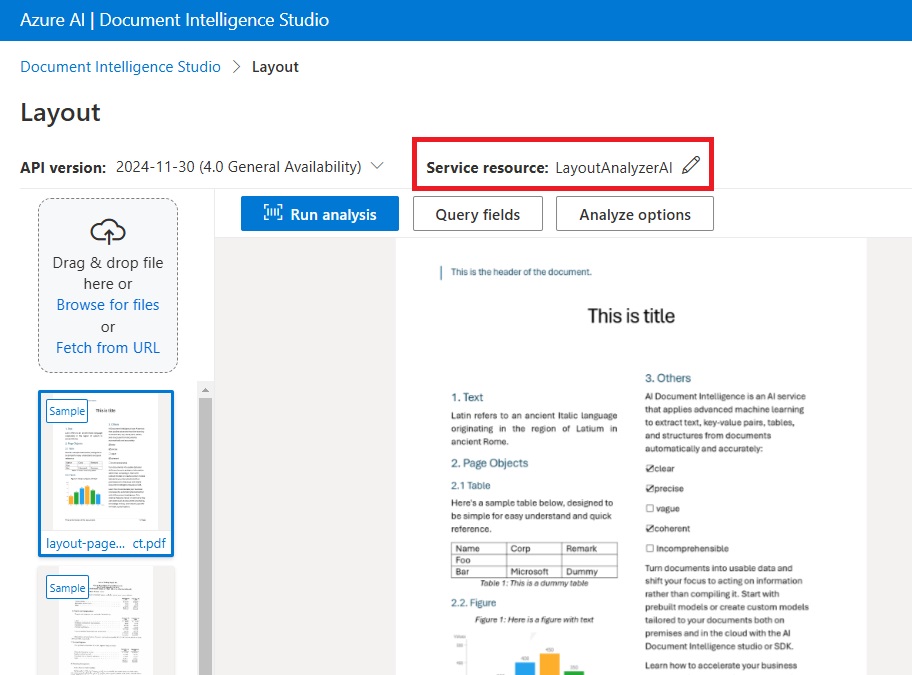
Update the service resource with your keys and endpoint for the document intelligence resource we just created.
Drag and drop a file into the upload area and select the Run Analysis button.
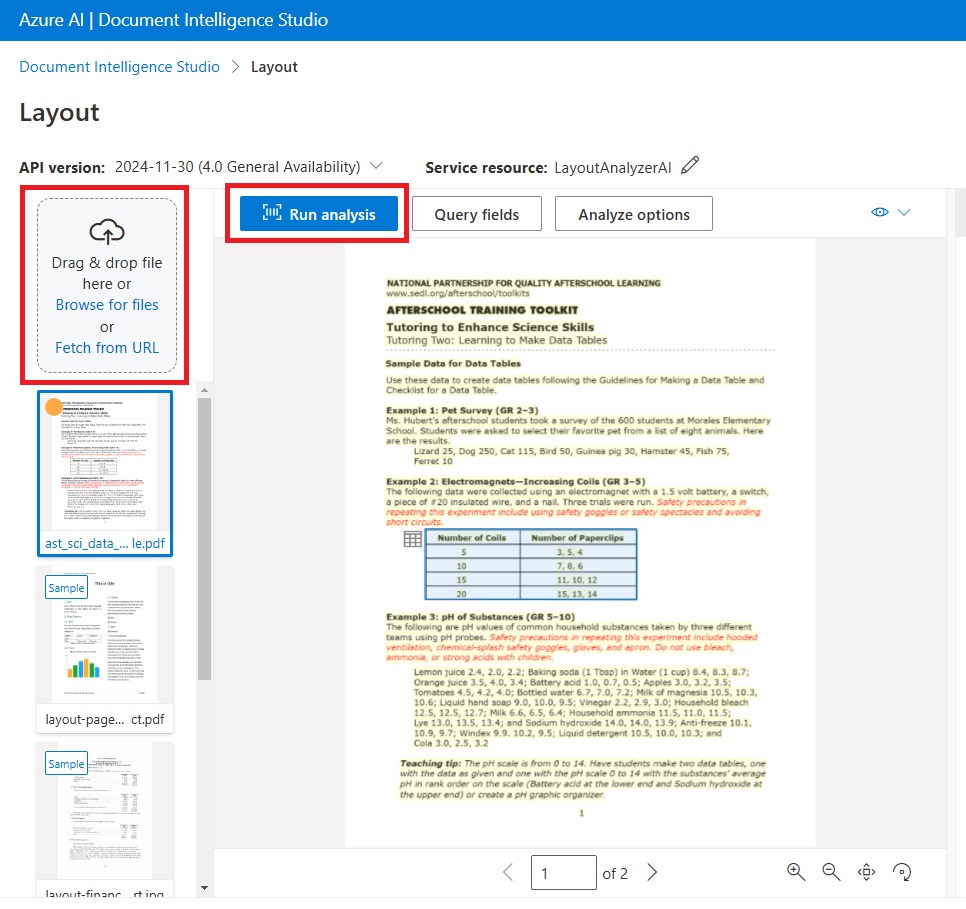
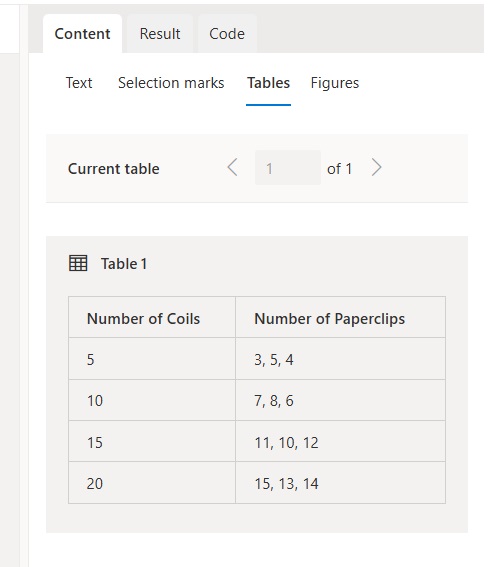
After the analysis is run we can see the tables that were extracted from the PDF by the AI model. The image below shows only 1 table for the first page. But if we navigate to page 2 of the document we will see 2 more tables.
Process The PDF Document With The Layout AI Model
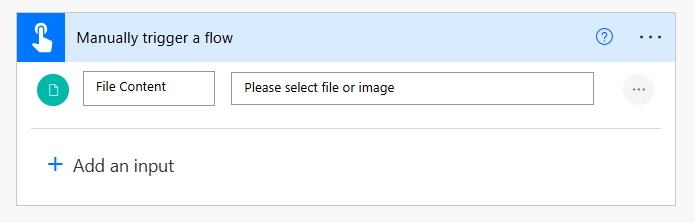
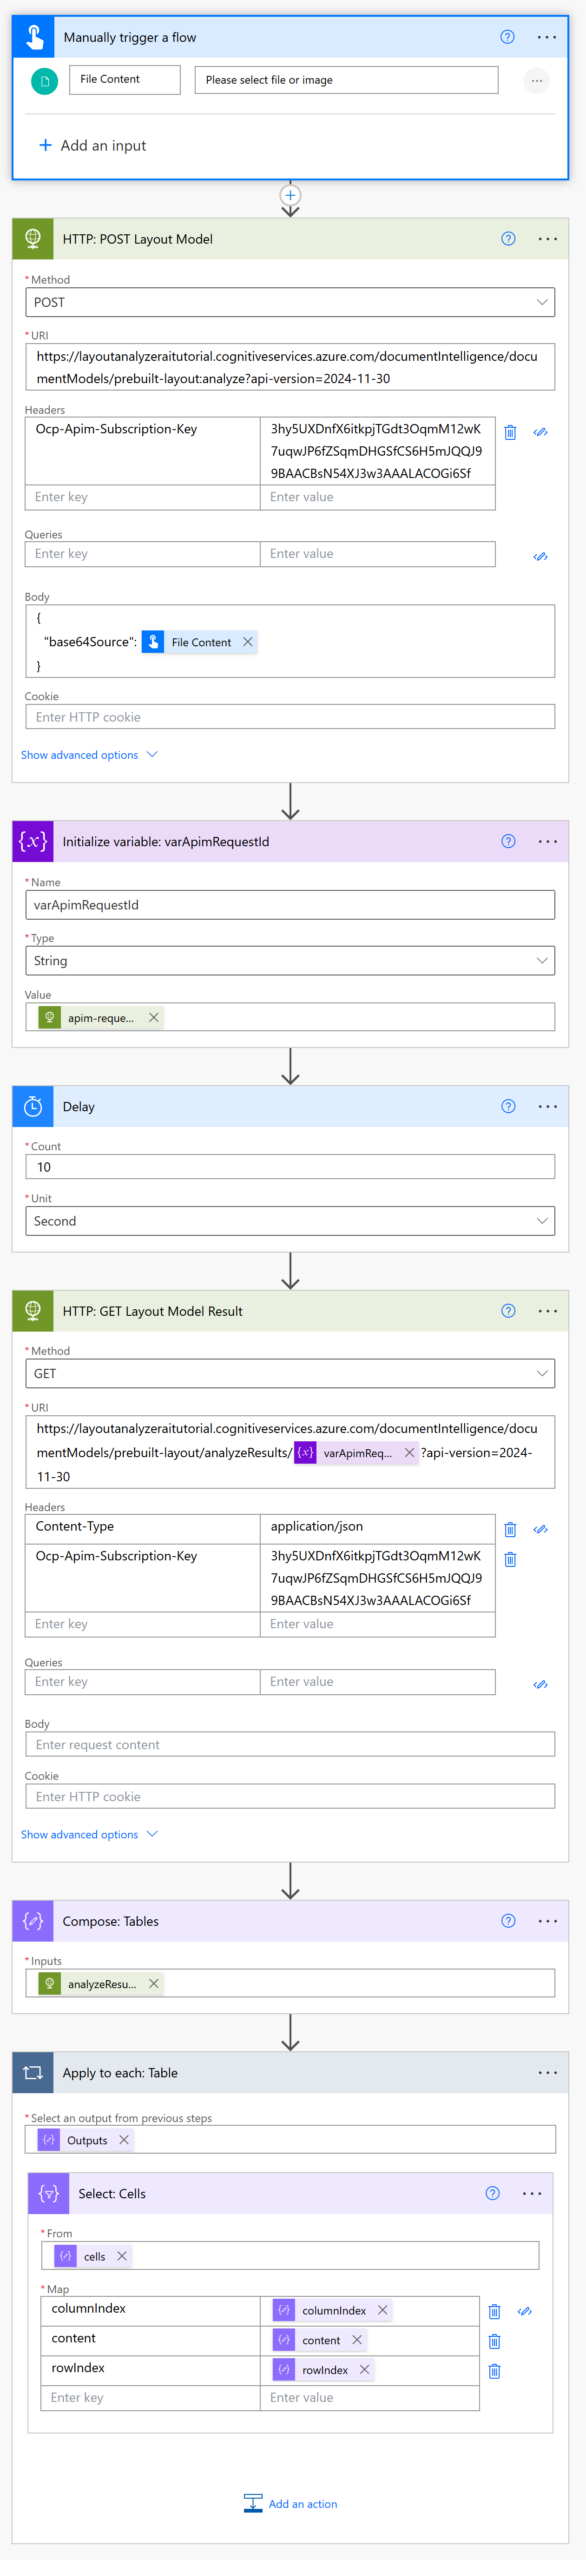
We are ready to build the Power Automate flow to call Document Intelligence Layout model. Open Power Automate and create a new instant flow named Extract Tables From Document.
Add a file input to the flow trigger named File Content.
Then insert and HTTP action into the flow to send the file to the Layout AI model.
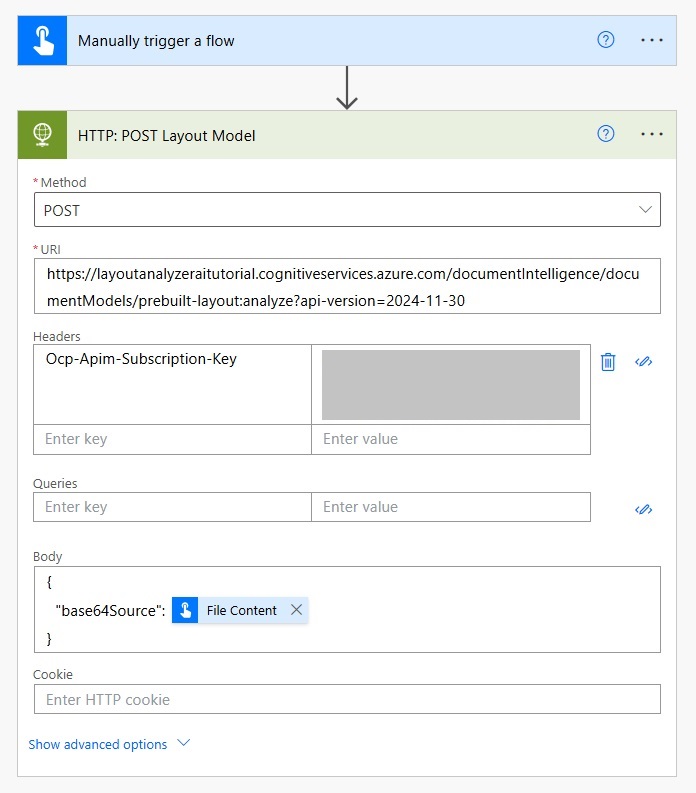
Use the POST method.
POST
Copy the endpoint from the Keys and Endpoint menu in Azure document intelligence. Then specify the prebuilt layout model and choose the api version.
https://layoutanalyzeraitutorial.cognitiveservices.azure.com/documentIntelligence/documentModels/prebuilt-layout:analyze?api-version=2024-11-30Code language: JavaScript (javascript)
Authorize the flow to use the Document Intelligence service by supplying the API key in the Headers.
| Header Key | Header Value |
| Ocp-Apim-Subscription-Key | <Document Intelligence Key> |
And pass the PDF file to Document Intelligence in the body of the HTTP action.
{
  "base64Source": @{triggerBody()?['file']?['contentBytes']}
}Code language: JavaScript (javascript)
When testing the HTTP Post action it will return a status code of 202. This is because it accepts the request to analyze the document asynchronously. It does not immediately return the AI processing results.

Get The Document Intelligence Layout AI Model Results
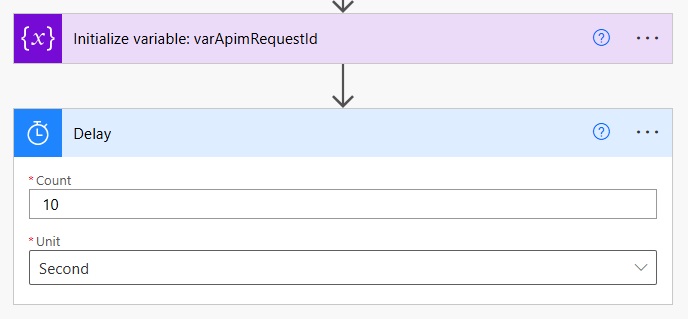
Now we must perform another set of actions to get the Layout AI model results. Initialize a variable named varApimRequestId and choose a string data type. The variable will store the unique identifier of the batch we want to get the results from.

Use this code in the Value property of the action.
outputs('HTTP:_POST_Layout_Model')['headers']?['apim-request-id']Code language: JavaScript (javascript)
Add a 10-second delay to the flow. If the AI processing is taking longer than 10 seconds we might need to increase the count.
Insert another HTTP action into the flow to get the results from the Document Intelligence Layout AI model.
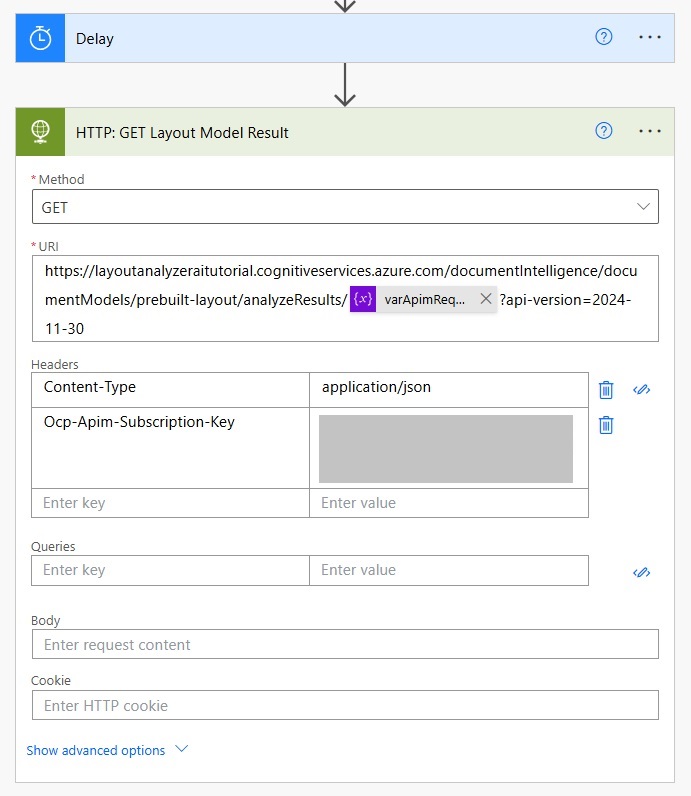
Make the HTTP request using the GET method.
GET
Start with the same endpoint as the HTTP Post action but modify it to include the varApimRequestId variable which specifies the batch.
https://layoutanalyzeraitutorial.cognitiveservices.azure.com/documentIntelligence/documentModels/prebuilt-layout/analyzeResults/@{variables('varApimRequestId')}?api-version=2024-11-30Code language: JavaScript (javascript)
Choose a the application/json Content-Type and include the API key once again.
| Header Key | Header Value |
| Content-Type | application/json |
| Ocp-Apim-Subscription-Key | <Document Intelligence Key> |
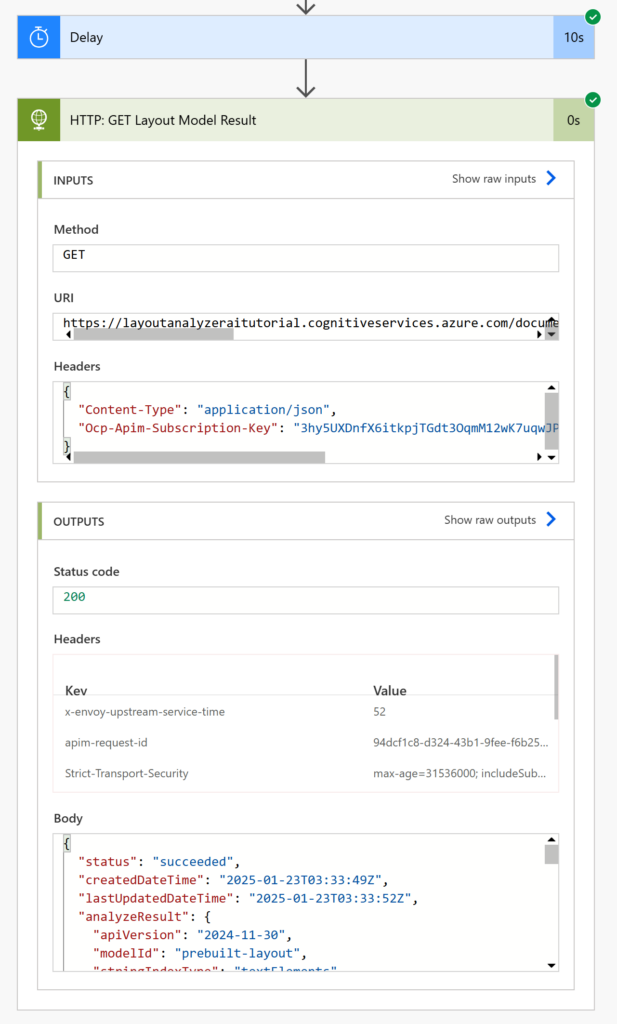
When we give the flow a test run it waits 10-seconds and then retrieves the AI processing results.
Extract The Table Cells From The Layout Model Results
The Document Intelligence layout model results contain more information than we need. We only want to get the tables from the document. Therefore, we must extract the tables from the AI model results.
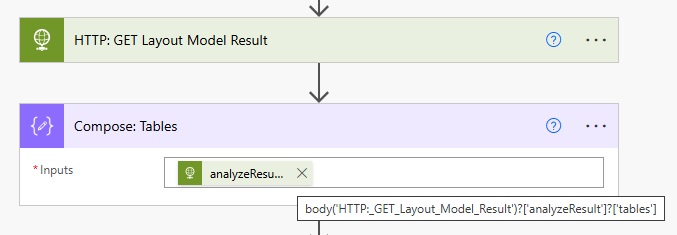
Add a Compose action to the flow and use this flow expression to get all of the tables in an array.
body('HTTP:_GET_Layout_Model_Result')?['analyzeResult']?['tables']Code language: JavaScript (javascript)
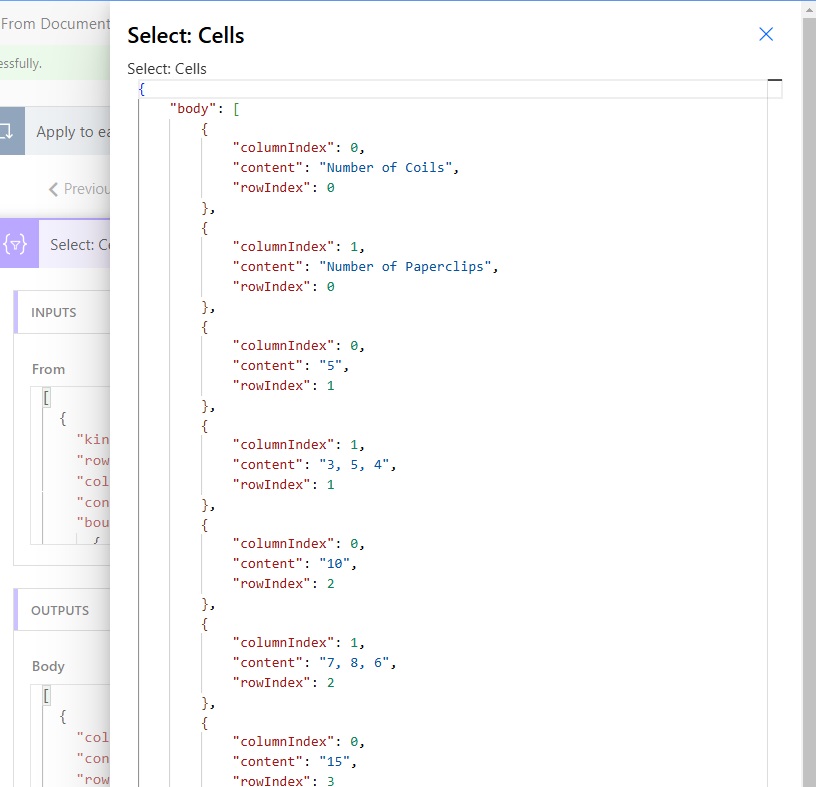
Each table in the array contains records with information about its cells: a row number, a column number and the cell contents. Add a Select action to the flow to get this information.
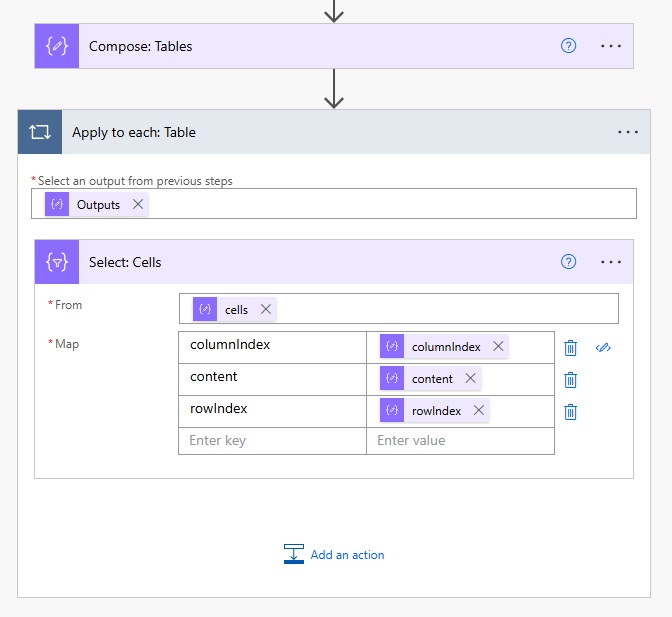
Use this code in the Select action to get the row number, the column number and the cell contents.
| Key | Value |
| columnIndex | item()?[‘columnIndex’] |
| content | item()?[‘content’] |
| rowIndex | item()?[‘rowIndex’] |
Run The Power Automate Flow To Extract Tables From A PDF
We are finished building the Power Automate flow. Run the flow to make sure it works.
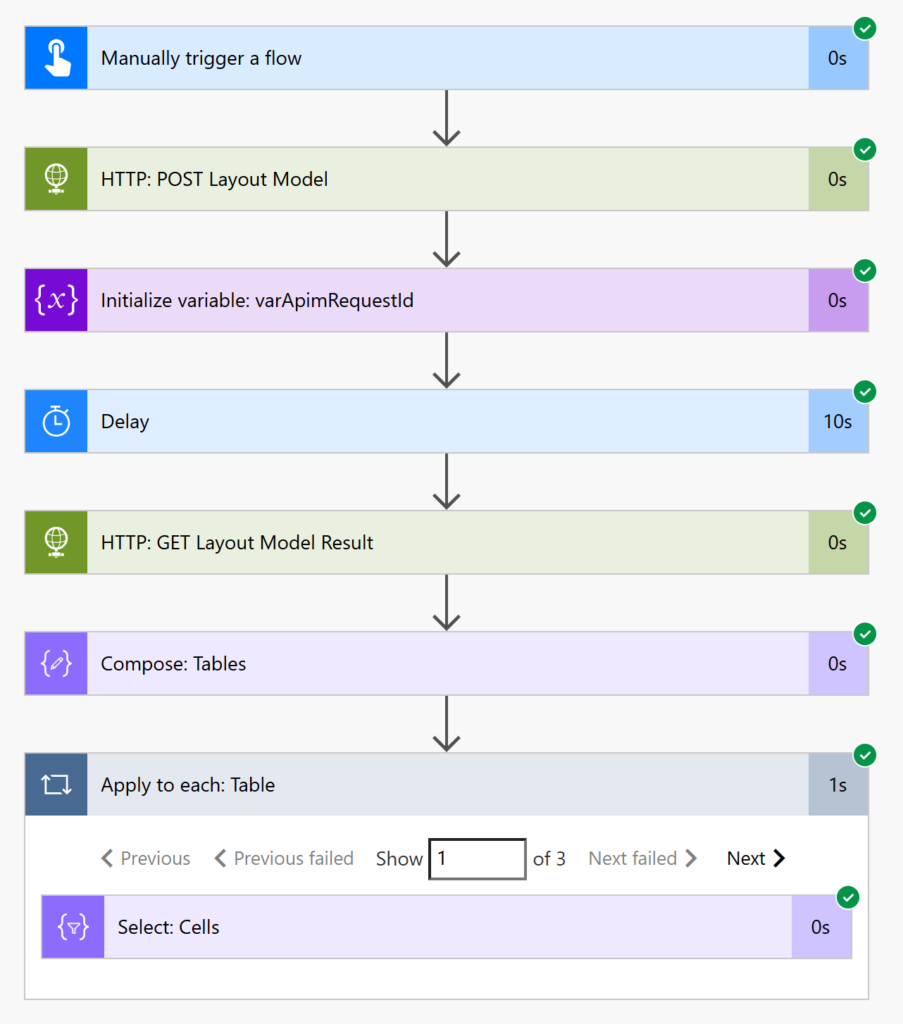
The flow outputs an array for each table with the row number, column number and contents of each cell.
View The Completed Power Automate Flow
Here is a screenshot of the full Power Automate flow.
Did You Enjoy This Article? 😺
Subscribe to get new Copilot Studio articles sent to your inbox each week for FREE
Questions?
If you have any questions or feedback about How To Extract Tables From A PDF In Power Automate please leave a message in the comments section below. You can post using your email address and are not required to create an account to join the discussion.


Hi Matthew, thanks for your great commitment to Power Auto and the Power Platform in general.
I enjoyed this article, however, is this not a very convoluted way of doing something Power BI does in a second (extracting all the tables from a PDF) ?
And a second question : does this method work when the PDF is actually an image saved as PDF ?
Thanks, Andre
Andre,
Excel can also get all of the tables from a PDF. However, for both Power BI and Excel what if you wanted to do some further automation after extracting the tables? You would need an automation platform such as Power Automate.
Yes, this method supports multiple file types including: JPEG/JPG, PNG, BMP, HEIF, PDF, TIFF, Word (DOCX), Excel (XLSX), PowerPoint (PPTX), HTML.
Thanks Matthew, got it 🙂
Hi Matthew…this timing of this great article was perfect…I am looking at extracting tables from PDFs so this could not be better…I am having a problem with the last actions…the Select inside the Apply to each is failing with BadRequest. The ‘from’ property value in the ‘select’ action inputs is of type ‘Object’. The value must be an array.
The From property in the article shows as cells but I can only select Current Item…am I missing something…
Thanks Gary
Hi Gary,
Add below expression instead of Current Item and try
items(‘Apply_to_each:_Table’)?[‘cells’]
Thanks
Pritam
Hi Matthew…I have added a Parse JSON action between the Compose and select and fixed it for me..
Hey Matthew,
Great Post. I only ran into one issue:
In my Flow I have the Select Action that is returning JSON formatted like the sample below. The issue is when I try to added it to a Create CSV Table the data returns in only 3 columns even though the full JSON has 11 Columns and 30 Rows. How would I get this JSON to create the CSV table properly?
Thanks you in advance for any and all assistance.
{
“columnIndex”: 0,
“content”: “Bay 1 – 0 ft 7.00 in wide Shelf 8 – 49.50 inches from Base Shelf”,
“rowIndex”: 0
},
{
“columnIndex”: 0,
“content”: “Bay”,
“rowIndex”: 1
},
{
“columnIndex”: 1,
“content”: “”,
“rowIndex”: 1
},
{
“columnIndex”: 2,
“content”: “Pos”,
“rowIndex”: 1
},
{
“columnIndex”: 3,
“content”: “UPC”,
“rowIndex”: 1
},
{
“columnIndex”: 4,
“content”: “Fac”,
“rowIndex”: 1
},