Document Classification With Power Automate And Azure AI

Power Automate can perform document classification with the help of Azure AI. Document classification is when AI reviews a document and determines what type of document it is. The result also includes a confidence score. Once a document is classified we can tag it with the correct document type in SharePoint. We could also use it to choose the correct data extraction AI model to get data from the invoice.
Introduction: The Document Library With Automated Document Classification
Workers at an insurance company receive several types of documents and upload them to a SharePoint library. Once the invoice is uploaded Azure AI Document Intelligence classifies the document and writes its document type and confidence score to the file’s metadata in SharePoint
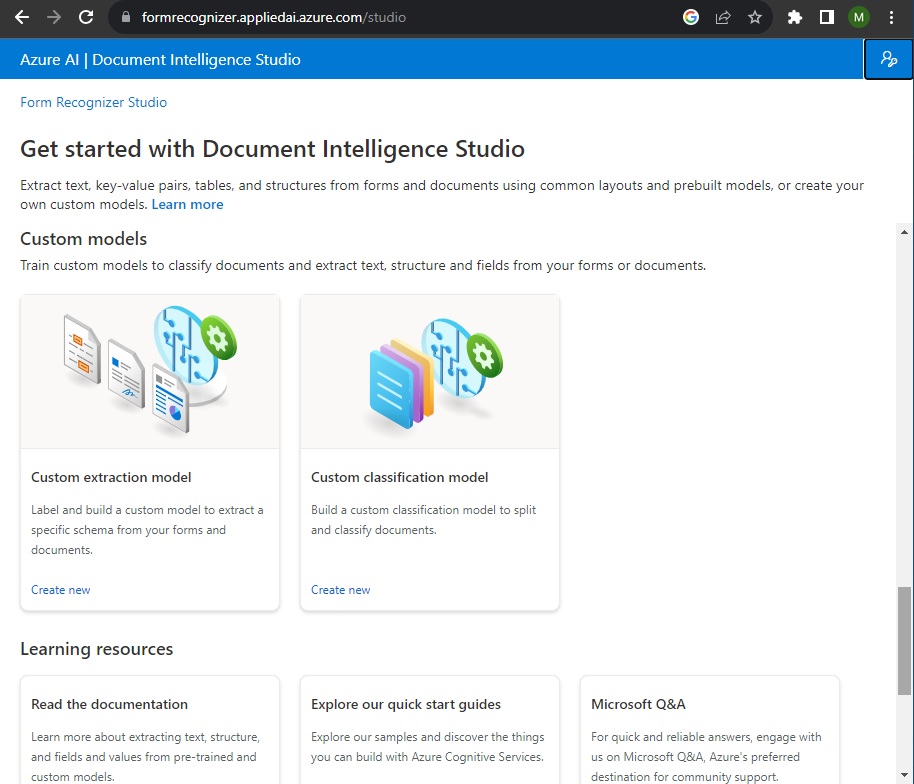
Open Azure AI Document Intelligence Studio
We will begin by training a custom classification model to identify document types. Go to Azure AI Document Intelligence Studio and choose custom classification model.
Then select Create a project.
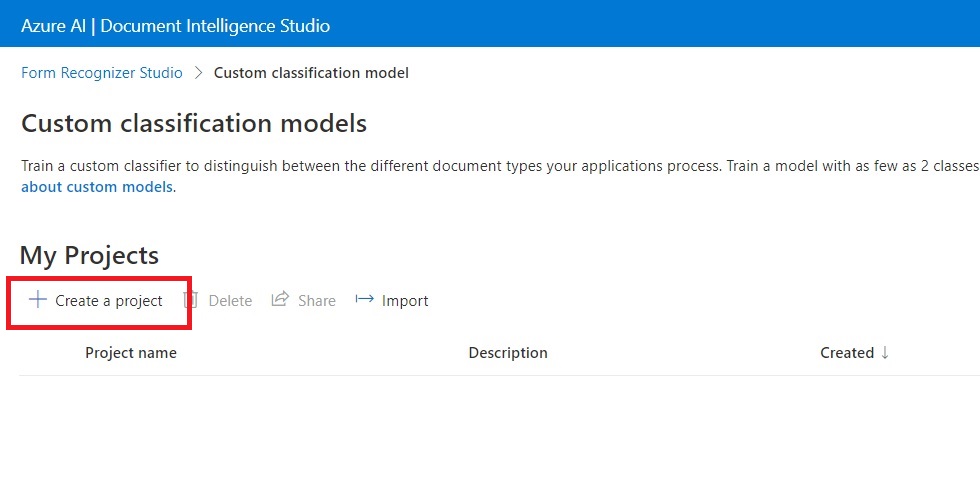
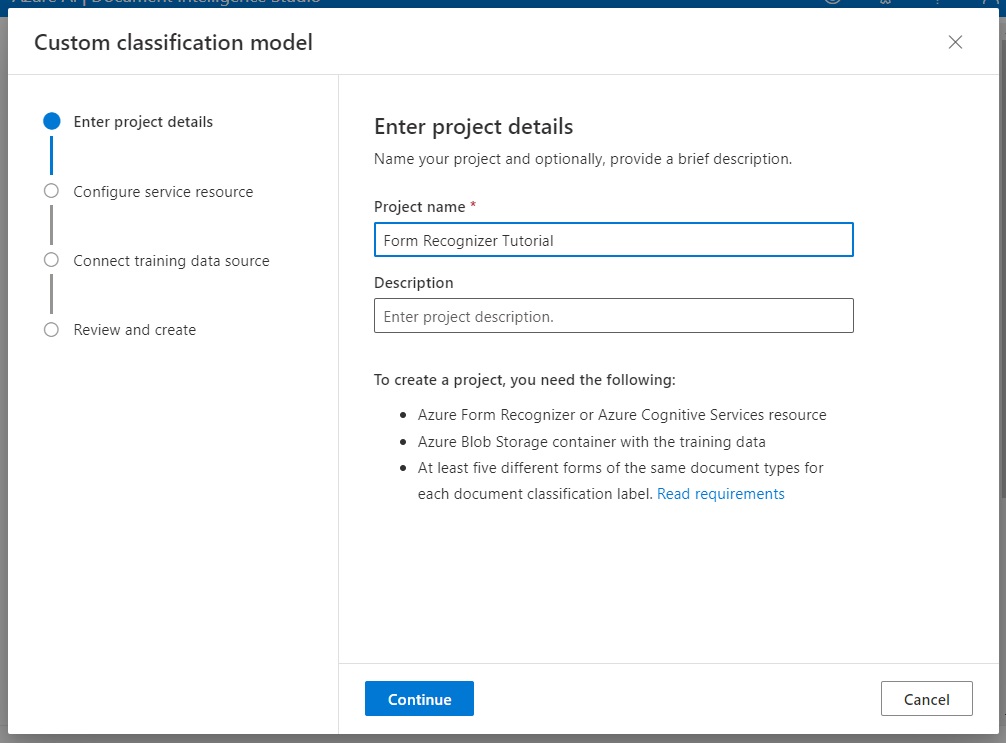
Setup A New Project For The Custom Classification Model
To start a new project we must enter several details into a project setup wizard. On the Enter project details screen name the project Form Recognizer Tutorial.
Choose an Azure subscription, resource group and Form Recognizer Resource. If none exist, create new ones. Select the API version 2023-07-31 (3.1 General Availability).
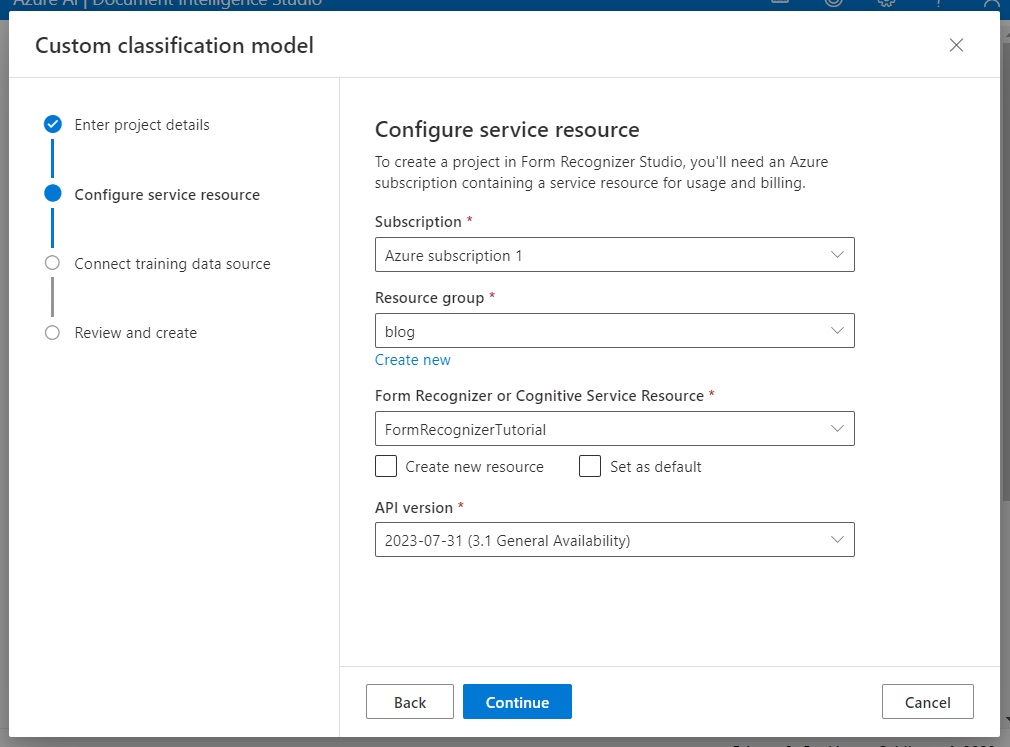
Pick an existing storage account and blob containers or create a new ones. Leave the folder path as blank.
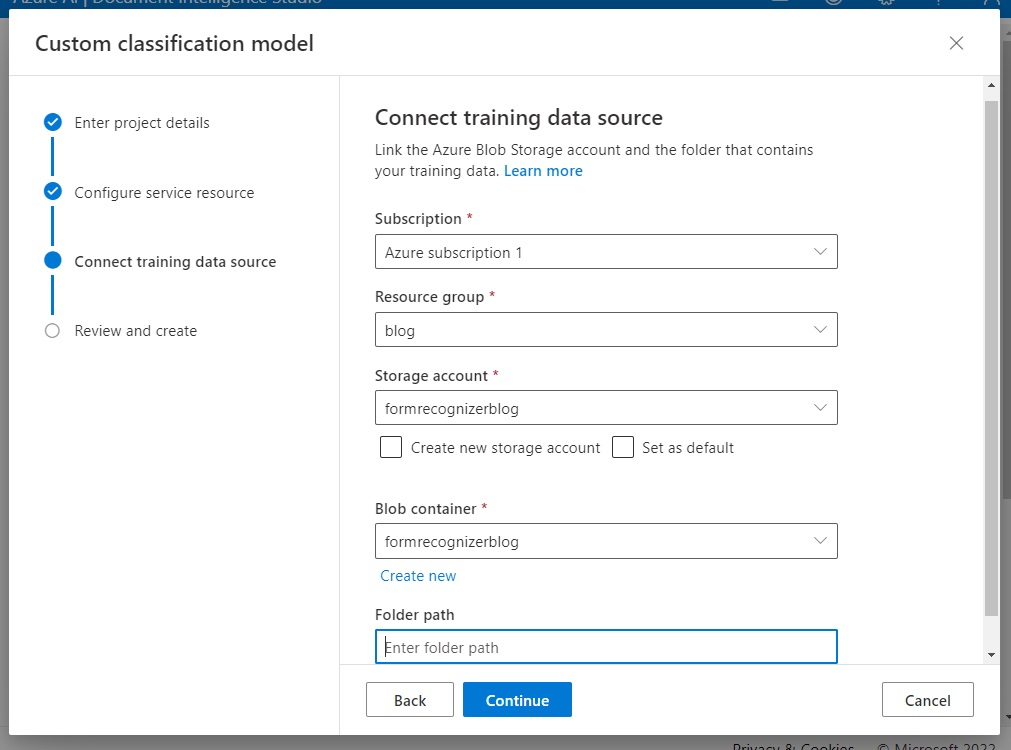
Press the Create Project button to exit the project setup wizard.

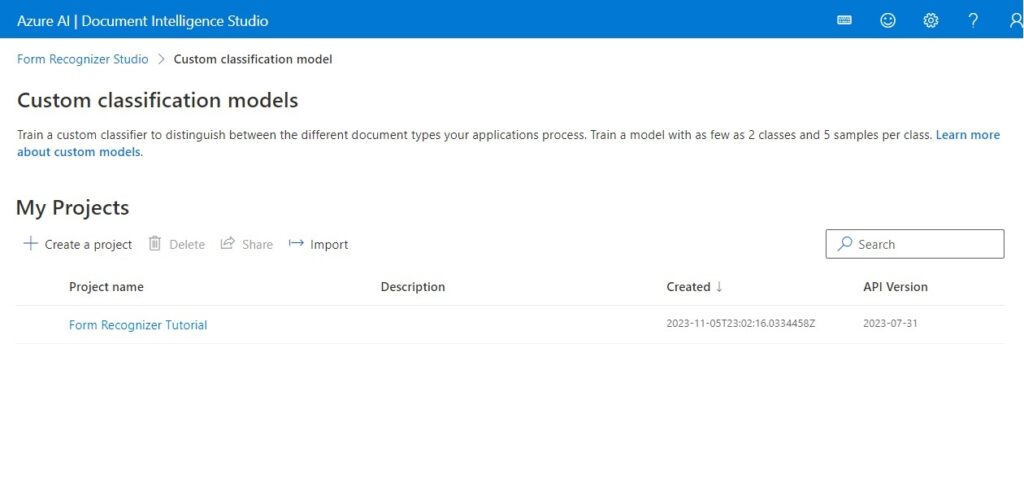
The new project will appear in the My Projects menu. Open the Form Recognizer Tutorial Project.
Label Sample Invoices With The Document Type
The Form Recognizer Tutorial project opens to the label data screen. On this screen we must upload a set of invoices. Download the invoices in this Github repository for use in this tutorial. Then drag and drop Contoso Invoices #1-5 into the file upload area.
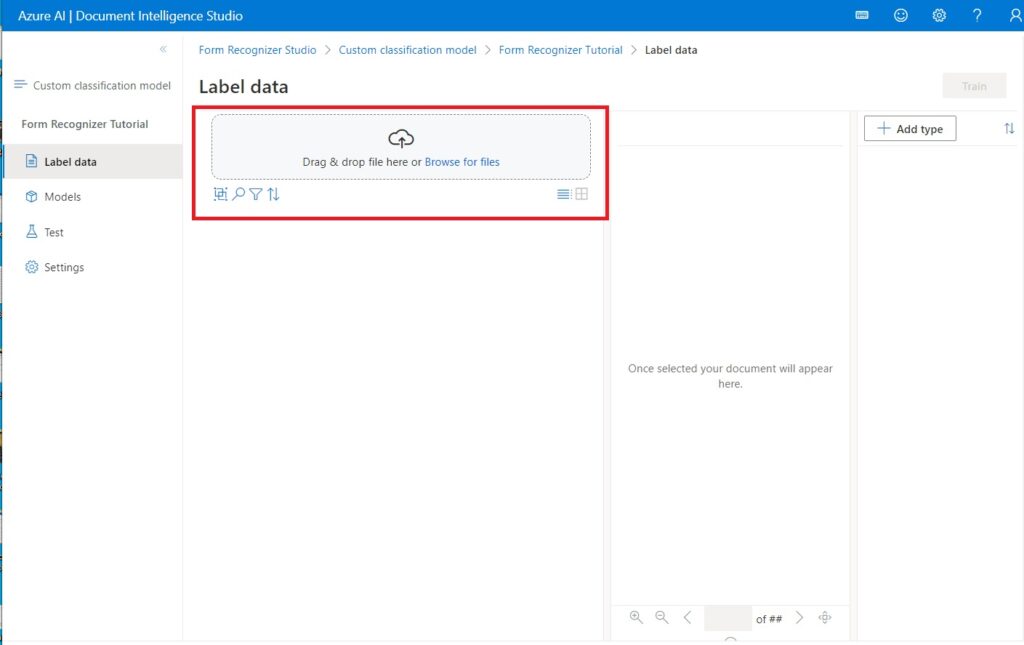
Add a new document type named Contoso Invoice.
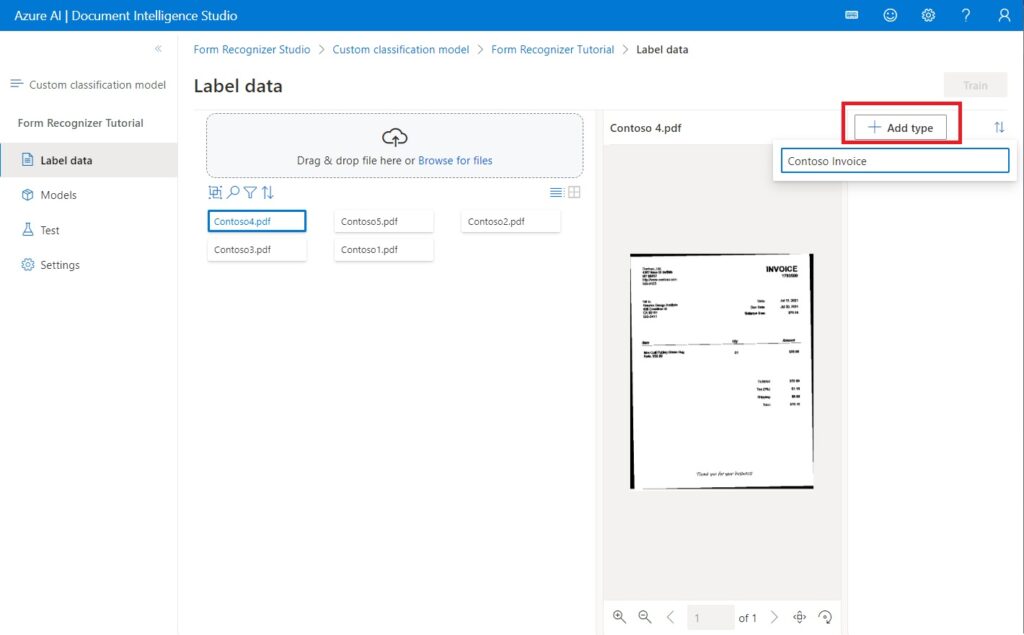
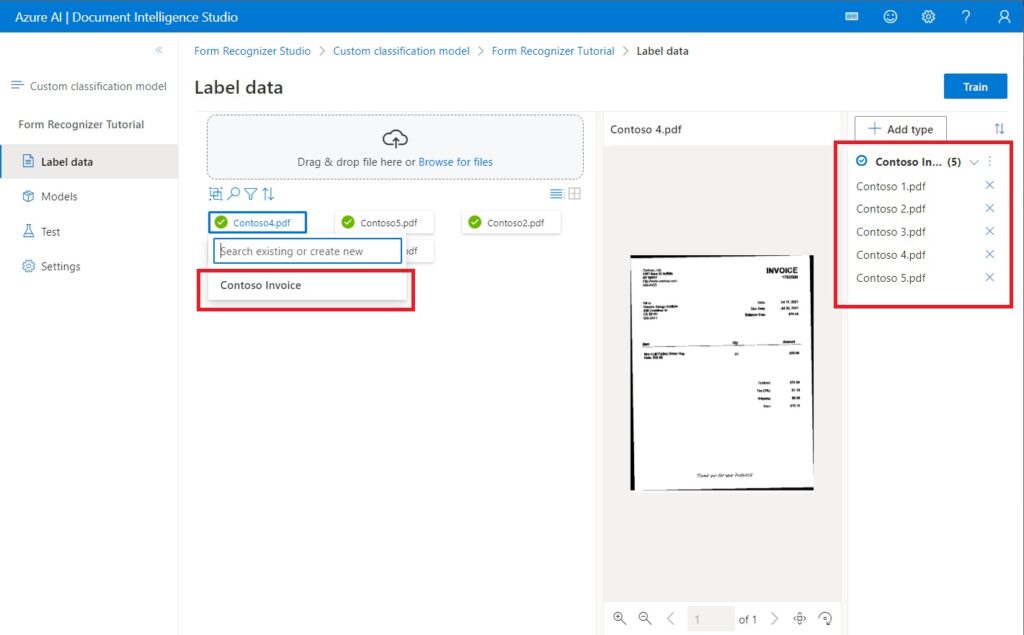
Then select each invoice one-by-one in the drag and drop area and select Contoso Invoice from the dropdown menu that appear. When we do this the invoice name appears under the document type on the right menu.
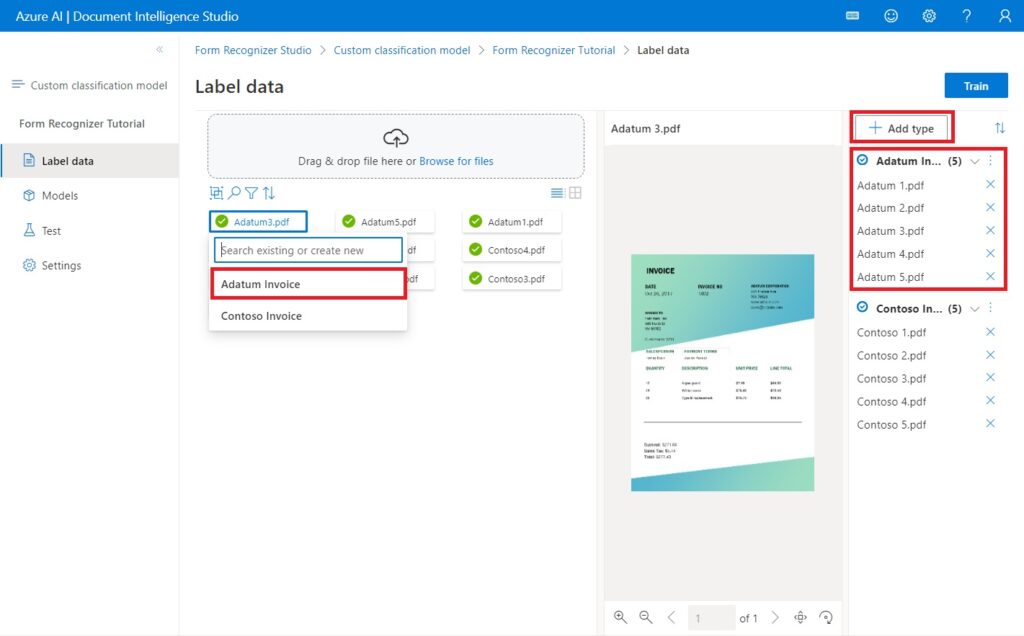
Also upload Adatum invoices #1-5, add a new type called Adatum Invoice, and label each document so it appears in the right side menu.
Train The Document Classification Model
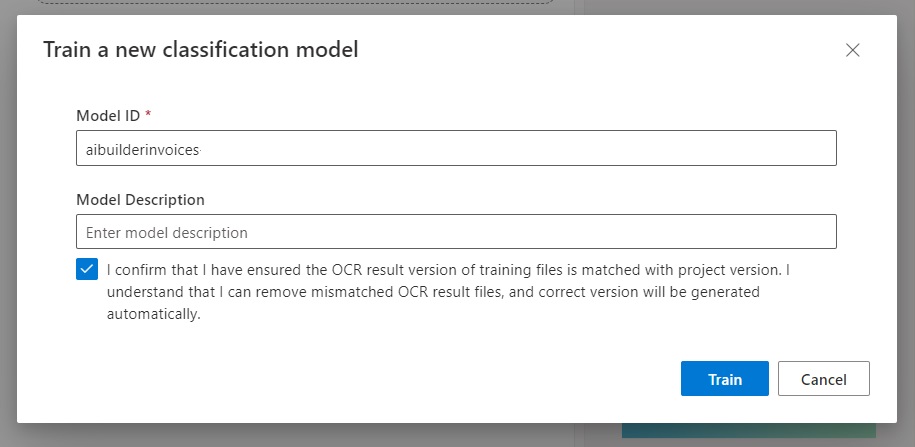
Now that we have labelled all of the invoices its time to time our document classification model. Select the Train button in the upper right corner of the Label data screen.

Assign the Model ID aibuilderinvoices to the classification model. Check the confirmation box and press the Train button.
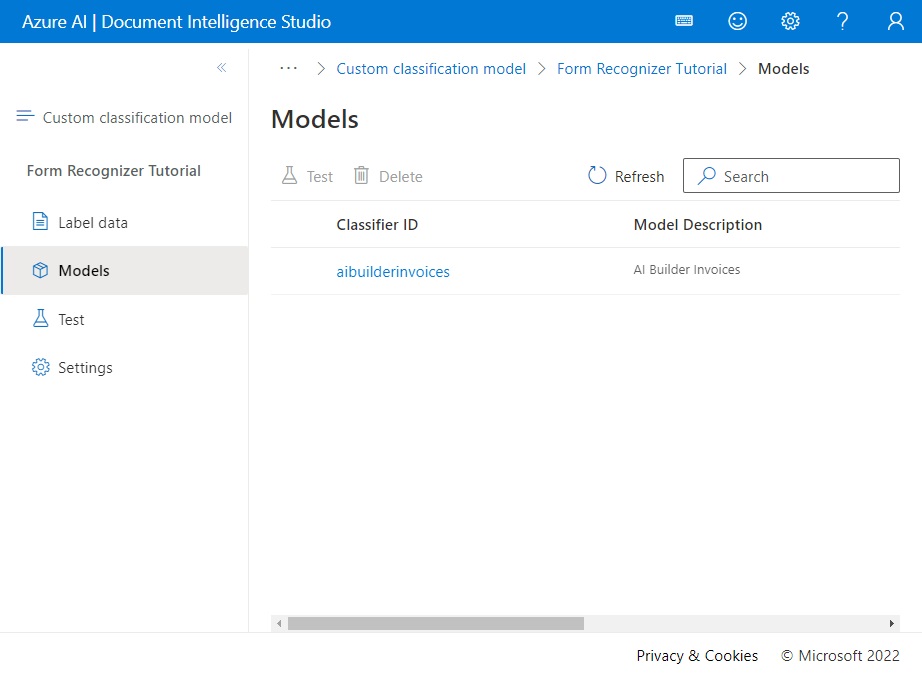
After a few moments the aibuilderinvoices model appears in the Models tab.
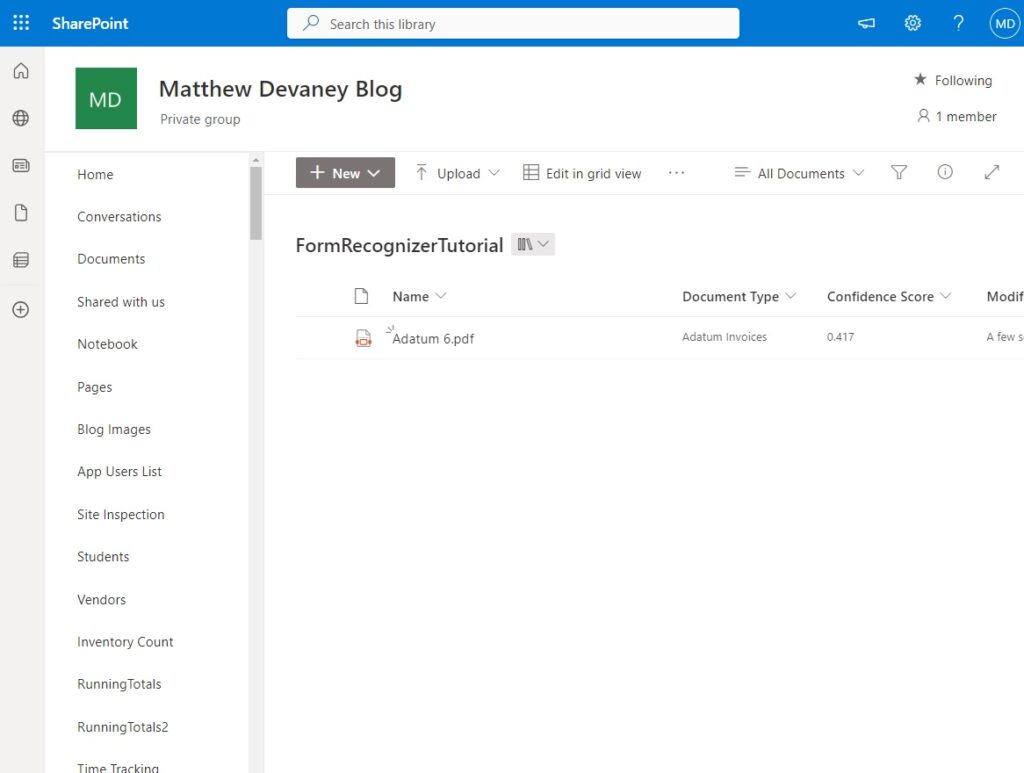
Test The Document Classification Model
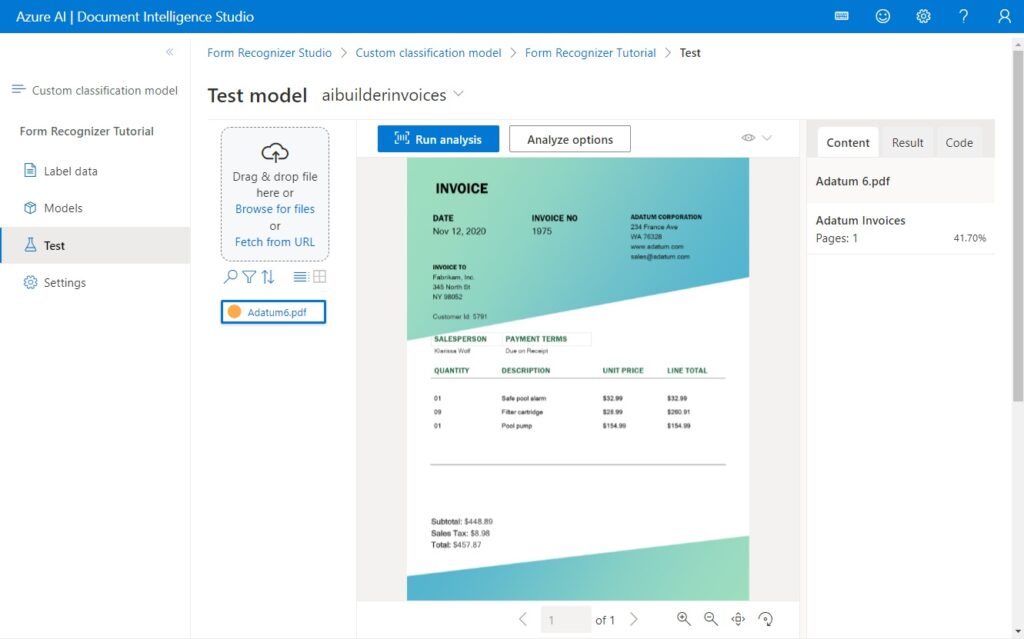
We can test the document model before we use it in Power Automate. Go to the Test tab and upload the invoice file named Adatum6.pdf. Press the Run analysis button. The document is correctly classified as an Adatum Invoice with a confidence score of 41.70%.
Create A SharePoint Document Library For Document Classification
The automation we will build requires a SharePoint document library. Create a new library named FormRecognizerTutorial with the following columns:
- Name (text)
- Document Type (text)
- Confidence Score (number)

Trigger A Power Automate Flow When A File Is Added
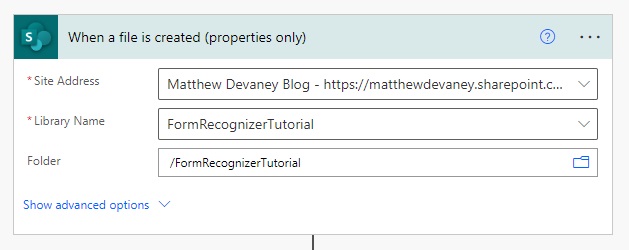
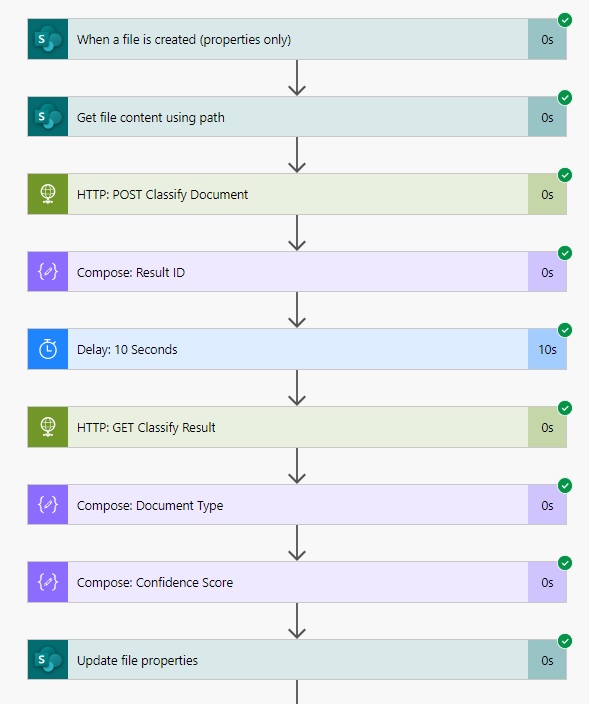
When an invoice is uploaded to a document library we want to start an automated flow to classify the document. Create a new Power Automate flow and select SharePoint – When a file is created (properties only) as the trigger.
Then add a SharePoint – Get file content using path action to get the file we will perform document classification on.

Classify A Document Using The HTTP Action
Document classification is not included as standard action Power Automate. To use the classification model we created in Document Intelligence Studio we will need to create a new HTTP action and choose the POST method.
| For reference, here is a link to the API documentation: https://westus.dev.cognitive.microsoft.com/docs/services/form-recognizer-api-2023-07-31/operations/ClassifyDocument |

Use the following URI. Input the modelName as aibuilderinvoices. We will learn how to find the proper value for endpoint in a moment. For now
https://{endpoint}/formrecognizer/documentClassifiers/{modelName}:analyze?api-version=2023-07-31Code language: JavaScript (javascript)
Apply the following Headers. We will also learn where to find the Key shortly.
| Key | Value |
| Content-Type | application/json |
| Ocp-Apim-Subscription-Key | {Key 1} |
Write this code in the Body of the HTTP request to send the file content in Base 64 format. Alternatively, we could supply a link to a document and replace base64Source with urlSource.
{
  "base64Source": @{base64(body('Get_file_content_using_path'))}
}Code language: JavaScript (javascript)
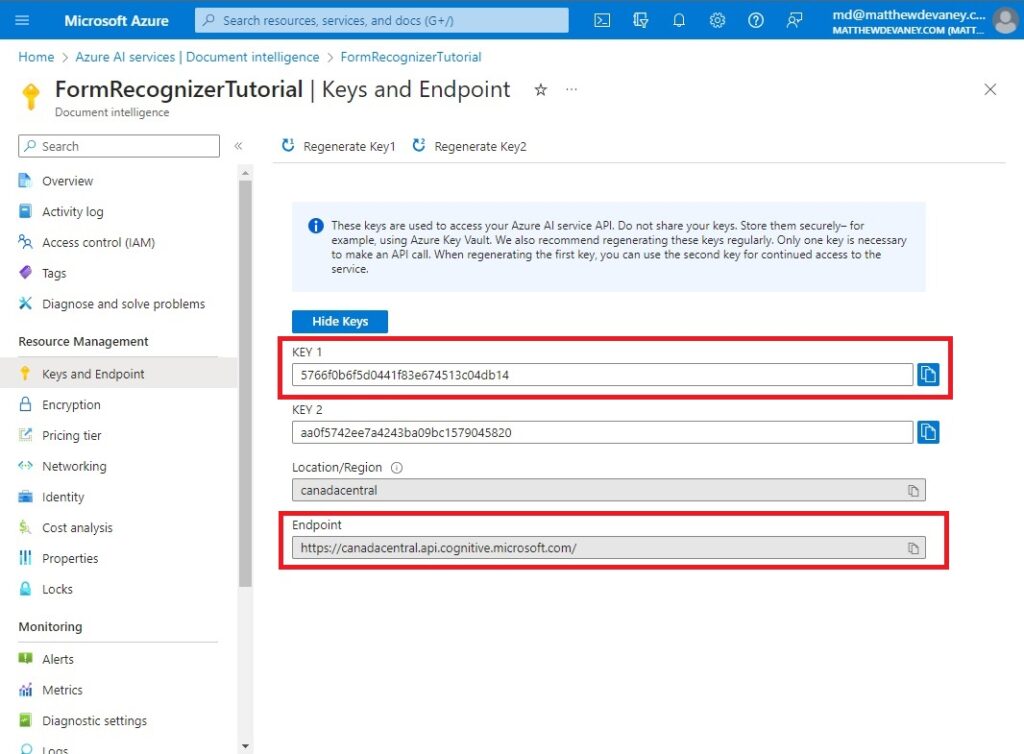
Obtain The Endpoint And The Subscription Key
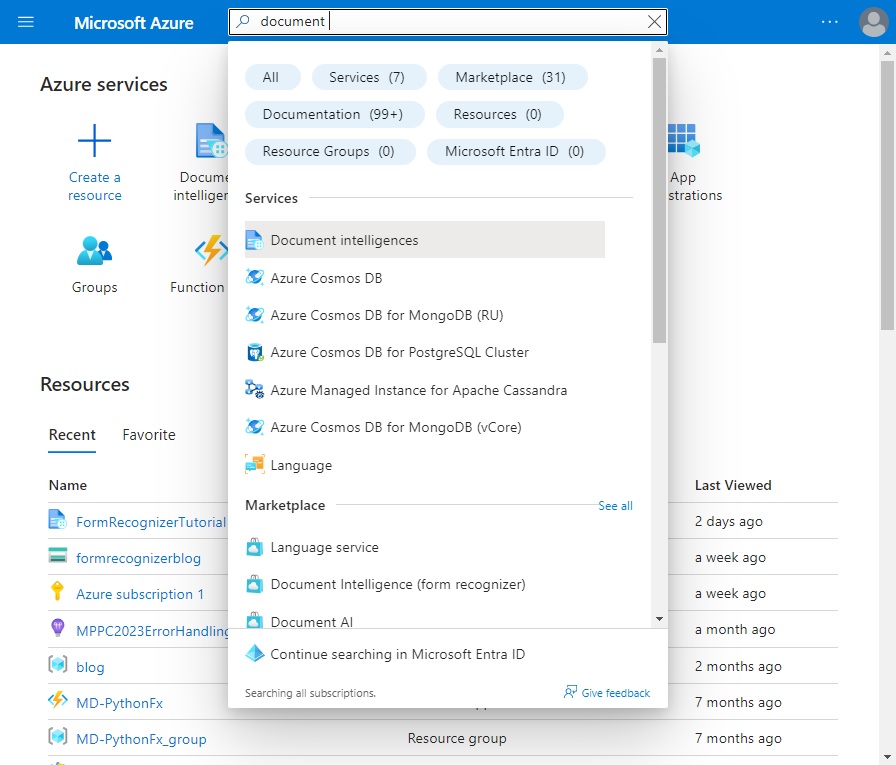
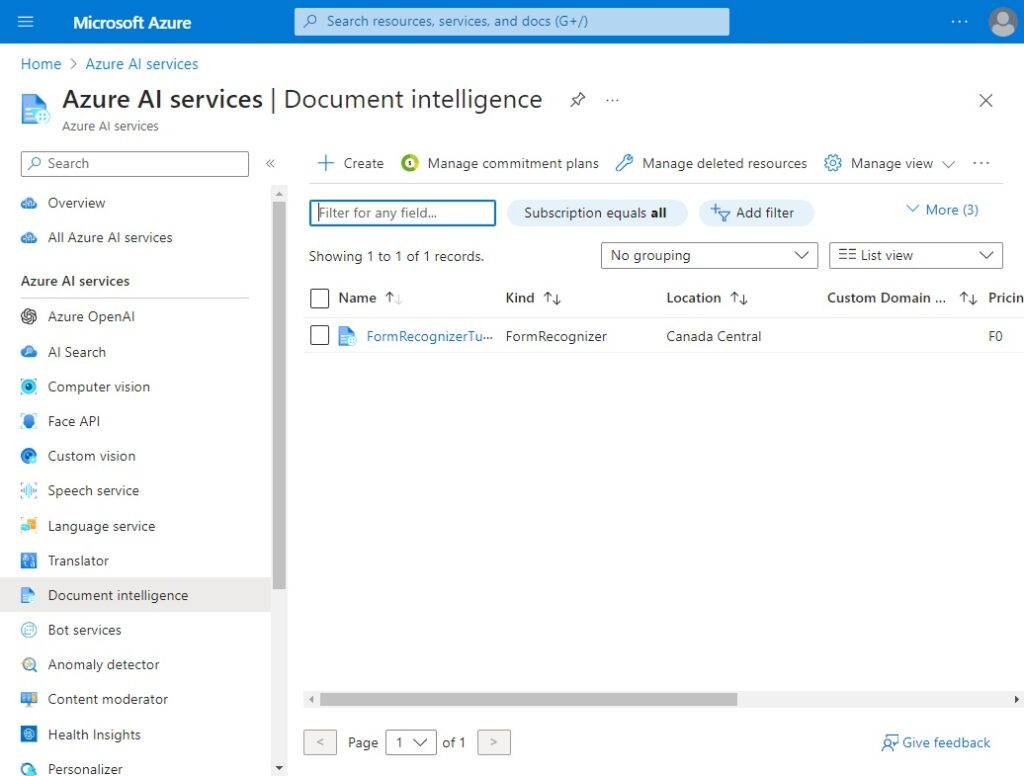
We need the endpoint and the subscription key for use in the HTTP action. Go to portal.azure.com and search for Document Intelligences.
Choose the FormRecognizerTutorial project we setup earlier in the tutorial.
Go to the Keys and Endpoint tab. Copy the highlighted values into the URI property HTTP action.
Get The Document Classification Result
When we run the HTTP POST action to classify the document it does not immediately return a response. Instead, it places the document into a processing queue. We must retrieve the result in another action by using the Result ID.
Create a new Data Operations – Compose action to store the Result ID.
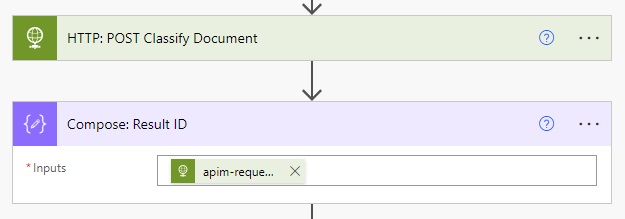
Use this code in the Compose action.
outputs('HTTP:_POST_Classify_Document')['headers']?['apim-request-id']Code language: JavaScript (javascript)
Add a Schedule – Delay action to the flow. Make the flow wait 10 seconds for the document to be processed.

Then add another HTTP action to the flow but this time make it a GET action to retrieve the result.
| For reference, here is a link to the API documentation: https://westus.dev.cognitive.microsoft.com/docs/services/form-recognizer-api-2023-07-31/operations/GetClassifyDocumentResult |
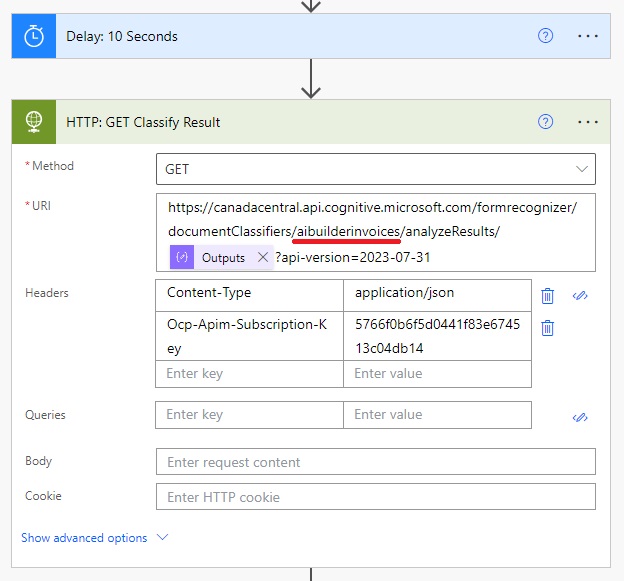
Use this following code in the URI field. Notice that the Result ID is supplied to the analyze results endpoint.
https://{endpoint}/formrecognizer/documentClassifiers/{modelName}/analyzeResults/@{outputs('Compose:_Result_ID')}?api-version=2023-07-31Code language: JavaScript (javascript)
Supply the same Headers as the HTTP POST action.
| Key | Value |
| Content-Type | application/json |
| Ocp-Apim-Subscription-Key | {Key 1} |
Update The Document Type And Confidence Score File Properties
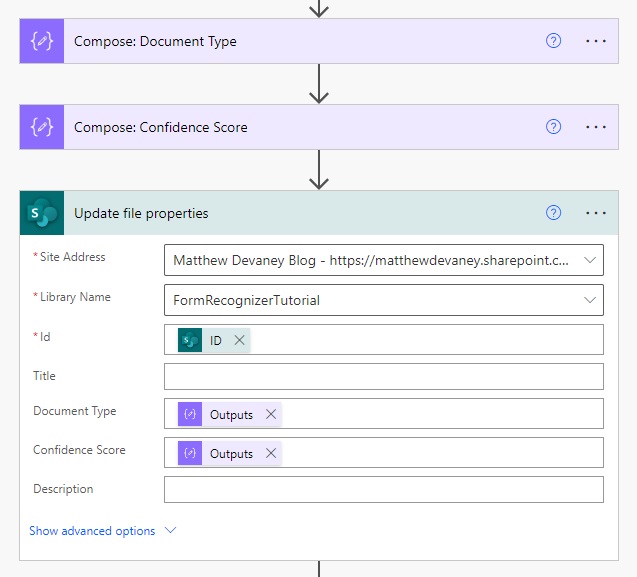
The HTTP GET action returns the document type, the confidence score and other useful information about the document. We want to write the document type and the confidence score to the file’s metadata in SharePoint.
Add two Data Operations – Compose actions to the flow.
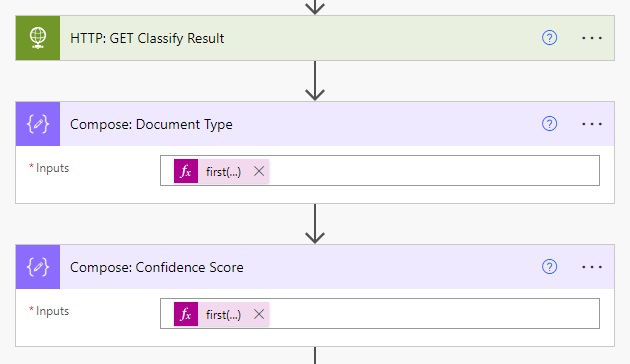
Use this code in the first action to get the Document Type.
first(body('HTTP:_GET_Classify_Result')?['analyzeResult']?['documents'])?['docType']Code language: JavaScript (javascript)
Write this code in the second action to get the Confidence Score.
first(body('HTTP:_GET_Classify_Result')?['analyzeResult']?['documents'])?['confidence']Code language: JavaScript (javascript)
Finally, add a SharePoint – Update file properties action to the flow and supply the document type and confidence score.
Run The Power Automate Flow To Classify A Document
We are now done building the flow. Perform a test run on the flow and place the document Adatum Invoice #6 in the document library.
After a few moments the document is updated with a document type and a confidence score.

Did You Enjoy This Article? 😺
Subscribe to get new Copilot Studio articles sent to your inbox each week for FREE
Questions?
If you have any questions or feedback about Document Classification With Power Automate And Azure AI please leave a message in the comments section below. You can post using your email address and are not required to create an account to join the discussion.


This is good stuff, man. Please always feel free to post links to your blog posts over in the Skool.com community. 👍👍
Darren,
I love your Power Apps community. Will do! ❤
Good evening from the Netherlands. I am very interested in this setup, thanks for this. Reason is that I am working for a municipality in the Netherlands and the use case is that records management and retention labeling is maybe too complex. So we are investigating the option of using power automate and AI to get document marked with retention when a project is final and we need assign the documents the correct retention labels. Question is if this scenario of power automate could be applied to retention labels as well?
Thanks!
Peter
Peter,
100% yes. You could train the AI on different document types, run the classification in Power Automate and apply the retention labels in a subsequent step. Or use trainable classifiers in Purview. Check this out:
https://learn.microsoft.com/en-us/purview/apply-retention-labels-automatically#auto-apply-labels-to-content-by-using-trainable-classifiers
Perfect, this help me to get this usecase worked out. We need to check the Trainable classifiers, but since the Archive Law is so complex we need to check this in detail. But we can at least start with this.
Peter,
Awesome. The reason I made this is because I knew it would be useful for reasons other than data extraction. Love your use case!
Great manual!
Thanks for all you work!
I’ve just test some other models and start them succesfully with Power Automate.
I’m wondering if it is possible to get all the fields that I define in my custom model back as a JSON message?
Now I have the feeling that I am getting a lot of data back, including the positions of the found data, but that this is not in accordance with the model I created.
Do you have an idea if this is possible? And if so how?2
FYI I am trying to get a fixed invoice format back in json in such a way that, for example, I have a fixed column containing the VAT value and, for example, also a column for the invoice amount incl. VAT
hi Matthew, I have developed flow with all the correct details and steps you mentioned here. Still HTTP action is giving result of “Resource Not Found” and “model not found” , though my model and resource is present in Azure with proper endpoint and key. What can be the reason of this error? Can you suggest? Thanks in Advance.
I am also facing same issue. now formrecognizer is document intelligence so that uri is making issues. please help
Hi! I am encountering the same error but only in the HTTP GET. I already tested it, and I am successfully getting a result ID from the POST but fails to find the resource in the GET… weird. Any suggestions?
Hi Matthew,
We have just had a good long training course with Julian Sharp and your blog came up a lot.. So thought I’d check it out. This article is great. My particular interest in this instance is with creating more of a guided approach whereby the user selects a batch of files to upload and process and a standard set of data is obtained; Where recognition fails they can use the Doc AI UI to select data that has not been correctly recognised. We could maybe even use the failures to causing an (eventual) feedback into later models to improve performance over time. Do you have any pointers?
Hi Matthew, do you know whether the https://westus.dev.cognitive.microsoft.com/ site has been deprecated? I received “HTTP Error 503. The service is unavailable” when I tried to browse there.
Thanks in advance.
James,
Here’s a link to the API Reference on MS Learn. I believe my article was using v3.1. Since then the world has moved onto v4.0
https://learn.microsoft.com/en-us/rest/api/aiservices/document-classifiers/classify-document?view=rest-aiservices-v3.1%20(2023-07-31)&tabs=HTTP
Thanks Matthew
Very good work Matt!
I was able to copy your work and do it in mine.
I only had to change the POST and GET urls, I copy them below:
POST:
https://{url}/documentintelligence/documentModels/{modelid}:analyze?api-version=2024-07-31-preview
GET:
https://{url}/documentintelligence/documentModels/{modelid}/analyzeResults/{output-cookie}?api-version=2024-07-31-preview
Hi this question is not 100% related to the app its self, but how can i restrict public access to my document intelligence service but still trigger it with a specific user from powerautomate?
Best Regards.
David,
A Client ID and Secret is required to access the Document Intelligence Service through Power Automate. You can hide the Client ID and Secret from flow makers with Azure Key Vault. Here’s my tutorial for the subject: https://www.matthewdevaney.com/hide-passwords-in-power-automate-flows-and-api-keys-secrets/
Great stuff!
Thanks for all you work!
One query I have…This works best when a new item added in a SharePoint library. But what about prediction in a existing SP library containing 1000s of documents already? How to get Type of those document.
Lets say we created a custom flow and in that flow the trigger point is “When a blob is added or modified (properties only)”. In that case what will be the form type in Extract information from forms action. Please suggest?
Hi there,
I’m wondering if you would be willing to answer some questions regarding a rather big setup of Automated document classification. Where I’m looking into the options available with Purview and Azure Document Intelligence/Azure Langauge for PII etc.
You can reach out on the mailadress provided, or if you prefer I could contact you on X for example.
Greetings