How To Create Copilot Custom UI Widgets In Power Apps

You can use Copilot to show custom UI widgets built-in Power Apps. UI widgets replace text-based replies with interactive apps in the chat window. Widgets can be read-only visuals like charts, maps and calendars or fully interactive apps. And using Power Apps you can easily create widgets that use your data stored in Dataverse.
Introduction: The Copilot Calendar UI Widget
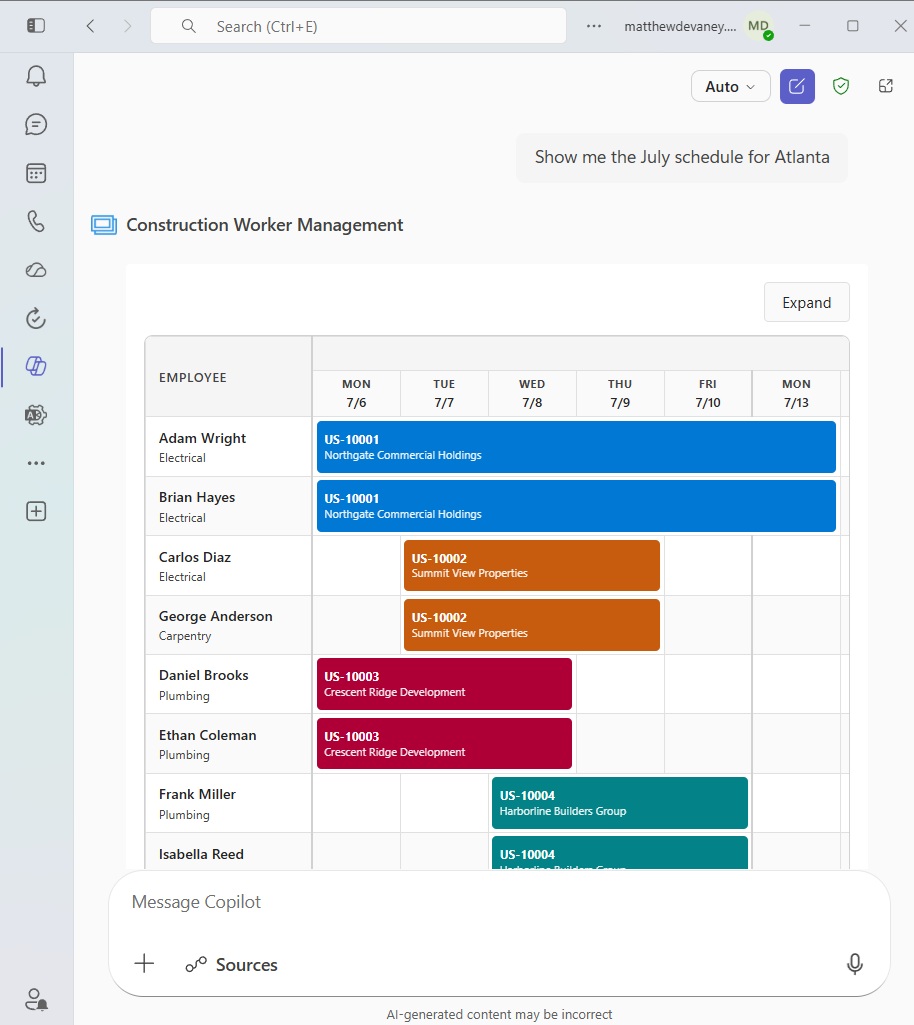
Managers at a construction firm use the Construction Worker Management agent to check the schedule for their crew. When they send a prompt such as “show me the July schedule for Atlanta” Copilot returns a UI widget to the chat which displays the work schedule in a calendar.
Create Dataverse Tables For Jobs, Workers And Job Assignments
The Construction Worker Management agent uses a data model with 3 tables:
- Construction Job: records each construction project with its location, customer, and scheduled start and end dates
- Construction Worker: stores the contact information and primary trade skill for each worker available for assignment
- Job Assignment: links workers to specific jobs, tracking the dates each individual worker is engaged on a given project
Note: you can download the data used to populate each table from my Github repository for this tutorial.

Create the Construction Jobs table by adding the following columns.
| Column | Type | Sample |
| Name | Primary Column | Steel Frame Retrofit |
| Job Number | Text | US-10001 |
| Customer | Text | Northgate Commercial Holdings |
| Start Date | Date Only | 7/6/2026 |
| End Date | Date Only | 7/13/2026 |
| Address | Text | 1450 West Peachtree St |
| City | Text | Atlanta |
| State | Text | GA |
Then add the Construction Workers table with these columns:
| Column | Type | Sample |
| Name | Primary Column | Adam Wright |
| Primary Skill | Choice (Electrical, Plumbing, Carpentry, Welder) | Electrical |
| [email protected] | ||
| Phone | Phone | 404-555-0101 |
And finally, make a Job Assignments table and include these columns. Then populate all 3 tables with data.
| Column | Type | Sample |
| Name | Primary Column | Adam Wright | Steel Frame Retrofit |
| Job | Lookup (Construction Job) | Adam Wright |
| Worker | Lookup (Construction Worker) | Steel Frame Retrofit |
| Start Date | 7/6/2026 | 7/6/2026 |
| End Date | 7/13/2026 | 7/13/2026 |
Start A New Model-Driven App
A Power Apps model-driven app is used to generate the Construction Worker Management agent including the calendar UI widget. Create a new model-driven app and name it Construction Worker Management.

Then add the 3 tables we created to the app:
- Construction Jobs
- Construction Workers
- Job Assignments

Once the tables are added their views and forms appear in the app’s navigation menu.

Setup An MCP Server For The Model-Driven App
Every model-driven app can now be turned into a Copilot agent that end users can interact with. To do this, go to the MCP menu and press the set up MCP button.

After a few moments, the MCP server setup is completed and the tools menu appears with built-in tools and the ability to create a custom tool.

Create A Custom Tool To Get Job Assignments
To display a calendar UI widget we must create a custom tool. The setup process has two parts: (1) creating a tool to get the schedule data and (2) designing the ui widget to display the data visually.
On the App MCP menu press the create custom tool button.
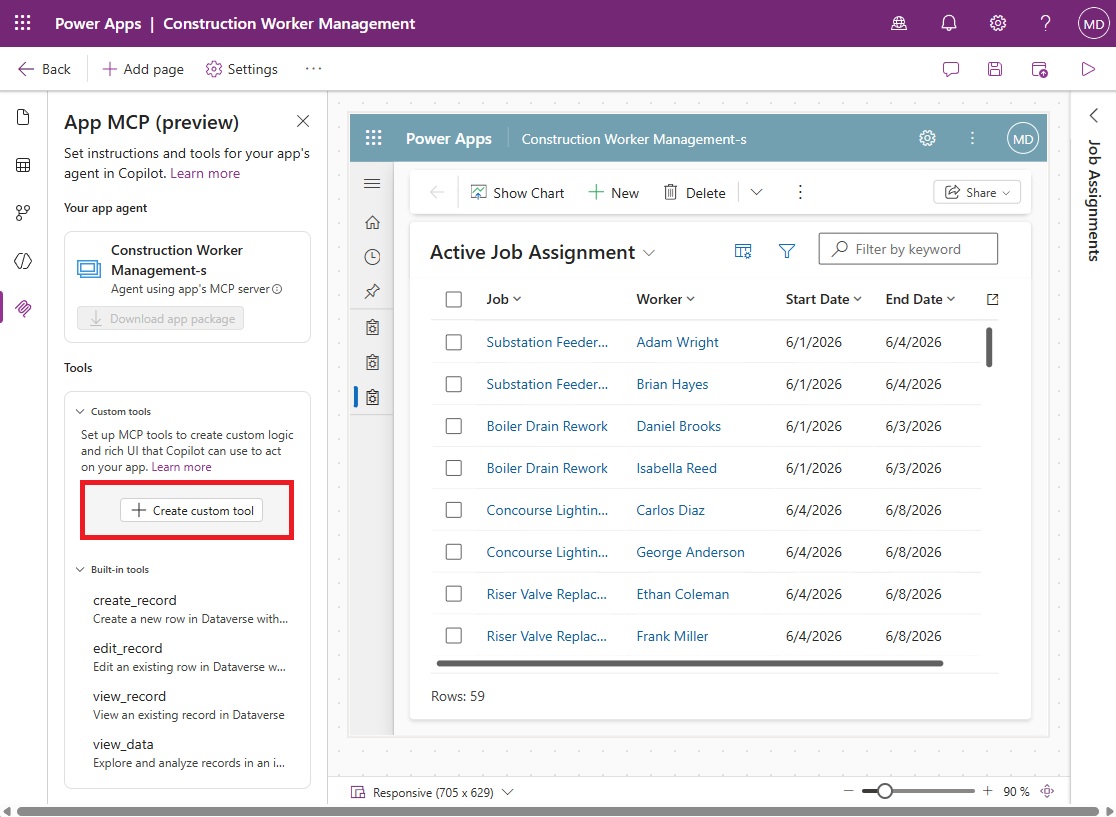
Name the tool View Daily Schedule By Employee and use the description “this tool displays employee job assignments in a calendar like visual to help managers understand the schedule.” Writing a good description is important because it tells the orchestrator when to call the tool.
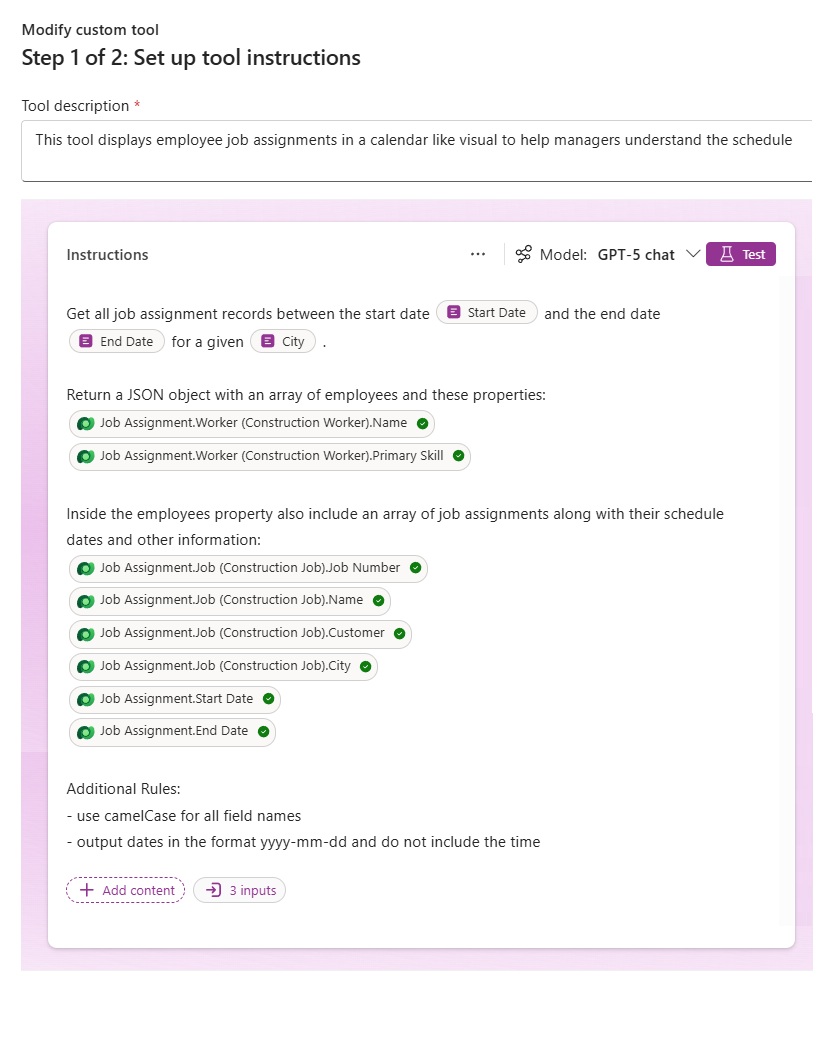
Use this prompt and sample data in the instructions menu as shown above:
- Start Date (sample date: 2026-07-01)
- End Date (sample data: 2026-07-31)
- City (sample data: Atlanta)
| Get all job assignment records between the start date [Start Date] and the end date [End Date] for a given [City]. Return a JSON object with an array of employees and these properties: [Construction Worker.Name] [Construction Worker.Primary Skill] Inside the employees property also include an array of job assignments along with their schedule dates and other information: [Construction Job.Job Number] [Construction Job.Name] [Construction Job.Customer] [Construction Job.City] [Job Assignment.Start Date] [Job Assignment.End Date] Additional Rules: – use camelCase for all field names – output dates in the format yyyy-mm-dd and do not include the time |
Apply the following settings then press the Test button:
- Model: GPT 5 Chat
- Record Retrieval: 1,000 records
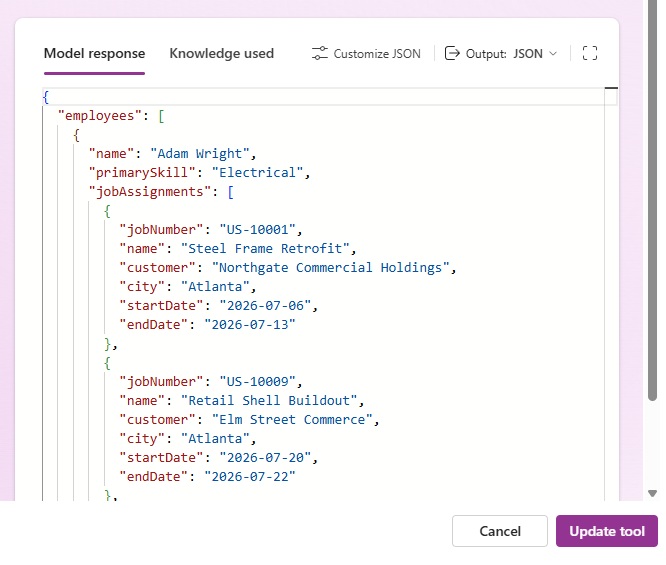
Review the model response and ensure the JSON includes the properties shown in the image below and then select the Update Tool button:
Install The Power Platform Skills In Github Copilot CLI
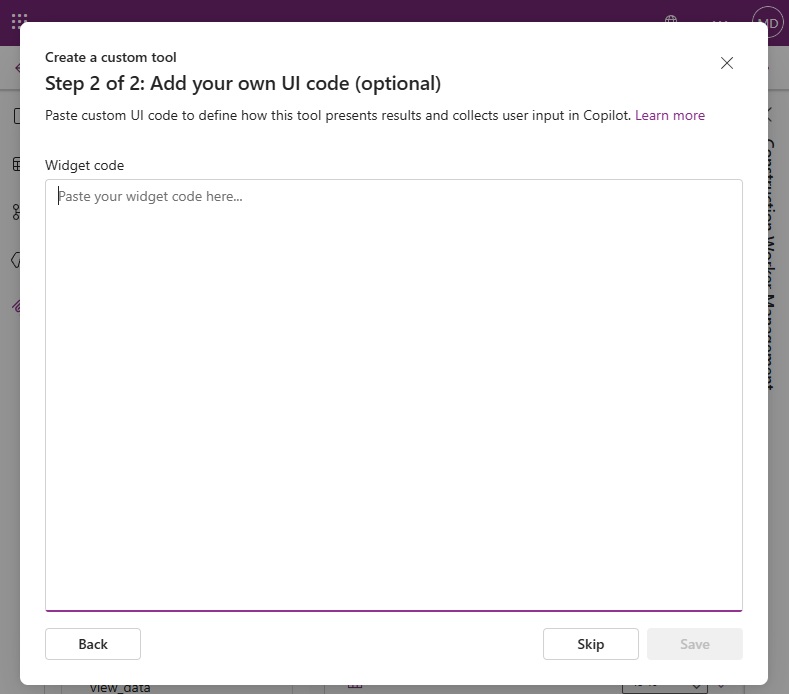
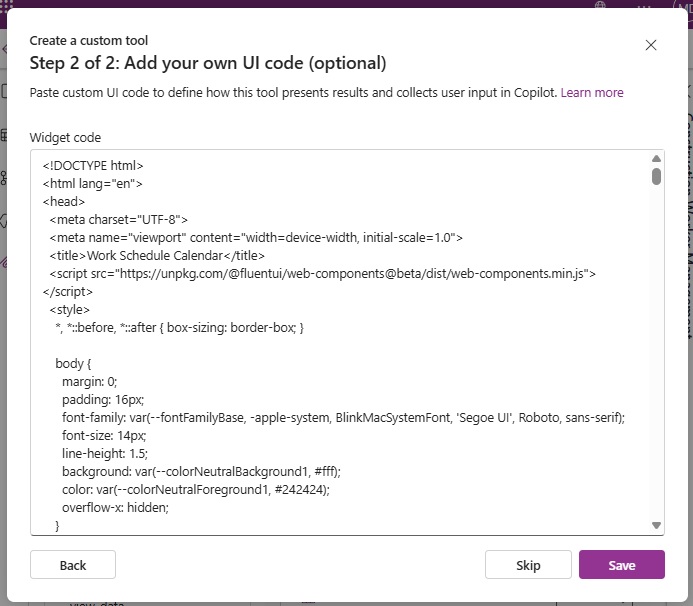
On the next screen, there is a blank text box where we are asked to paste the widget code. We must create the UI widget on our local machine using a coding agent. There is no way to generate the code directly in Power Apps.
Open VS Code, start a new terminal and launch the Github Copilot CLI.

The easiest way to create a UI widget is by using an agent skill. Microsoft provides the skill when you add the power-apps-skills plugin to your coding agent.
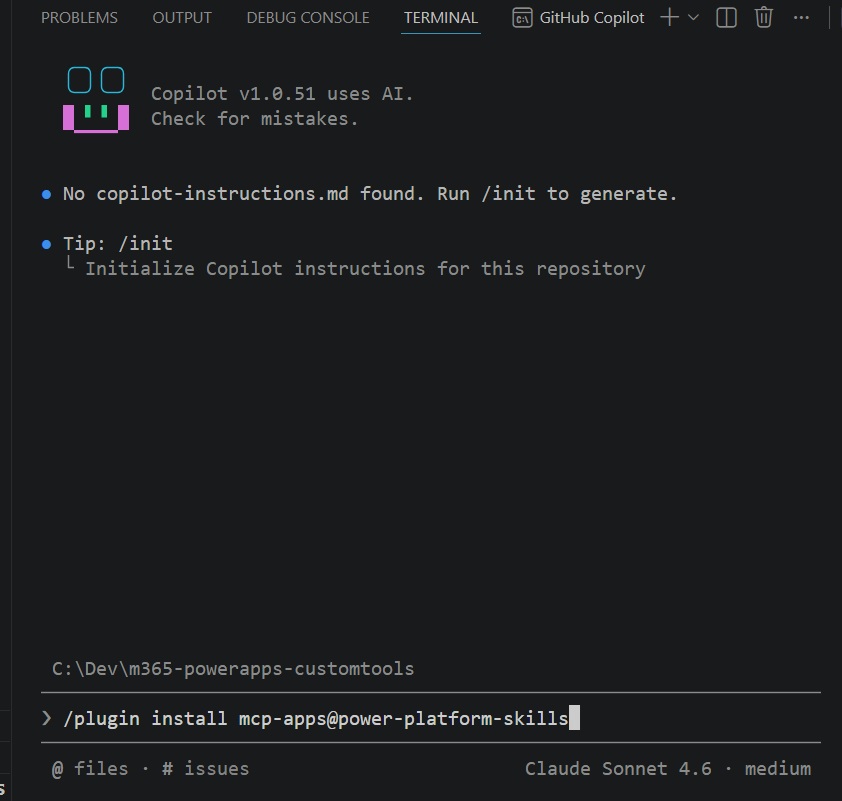
Use this command to install the plugin:
| /plugin install mcp-apps@power-platform-skills |
After the command is run the agent shows that the plugin “mcp-apps” installed successfully.
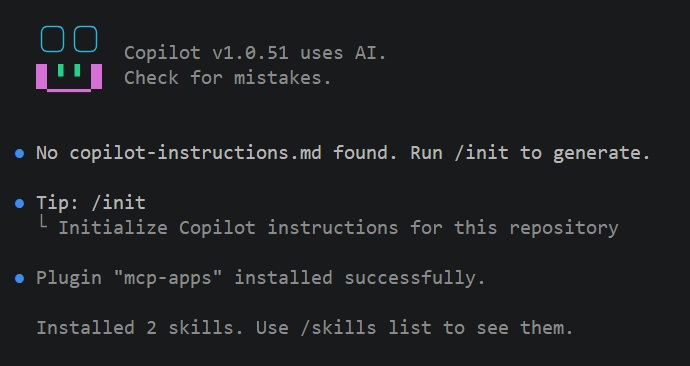
Generate The Calendar UI Widget Using Github Copilot CLI
To generate the calendar ui widget we must:
- Call the generate-mcp-app-ui agent skill included in the plugin
- Describe the UI widget we want the agent to build
- Provide a sample of the data to be used in the UI widget
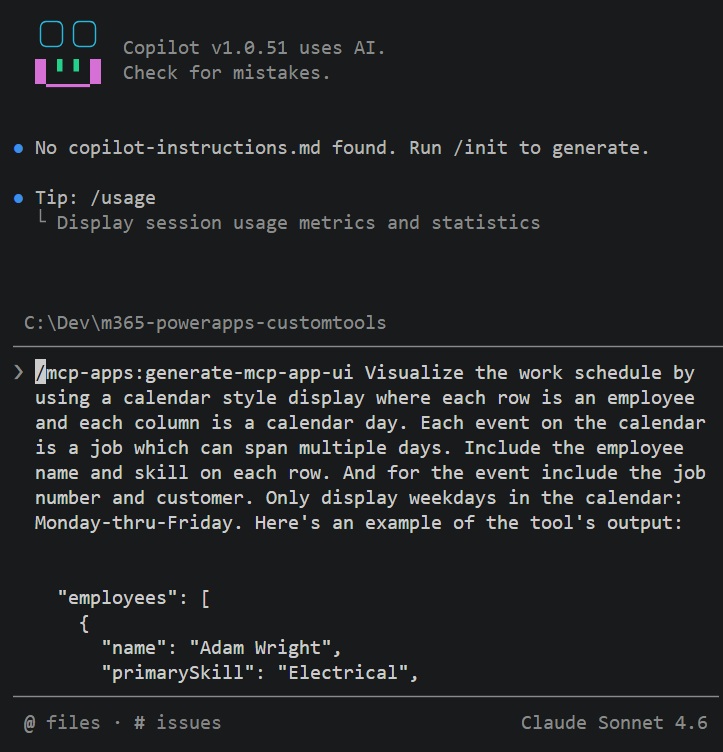
Copy and paste this command into Github Copilot CLI then press enter.
| /mcp-apps:generate-mcp-app-ui Visualize the work schedule by using a calendar style display where each row is an employee and each column is a calendar day. Each event on the calendar is a job which can span multiple days. Include the employee name and skill on each row. And for the event include the job number and customer. Only display weekdays in the calendar: Monday-thru-Friday. Here’s an example of the tool’s output: { “employees”: [ { “name”: “Adam Wright”, “primarySkill”: “Electrical”, “city”: “Atlanta”, “jobAssignments”: [ { “jobNumber”: “US-10001”, “customer”: “Northgate Commercial Holdings”, “name”: “Steel Frame Retrofit”, “startDate”: “2026-07-06”, “endDate”: “2026-07-08” }, { “jobNumber”: “US-10009”, “customer”: “Elm Street Commerce”, “name”: “Retail Shell Buildout”, “startDate”: “2026-07-20”, “endDate”: “2026-07-22” }, { “jobNumber”: “US-10013”, “customer”: “Harborview District Partners”, “name”: “Commercial Facade Repair”, “startDate”: “2026-07-27”, “endDate”: “2026-07-29” } ] }, { “name”: “Brian Hayes”, “primarySkill”: “Electrical”, “city”: “Atlanta”, “jobAssignments”: [ { “jobNumber”: “US-10001”, “customer”: “Northgate Commercial Holdings” } ] } ] } |
The coding agent outputs a new html file with the UI widget definition.

Preview The Calendar UI Widget On A Local Machine
We want to be able to preview the calendar UI widget on a local machine. This way we can easily make changes to the ui widget code or the sample data without having to deploy the app package.
To do this, start by creating a new file named work-schedule.json. Then copy and paste the View Daily Schedule By Employee tool JSON output into the file.

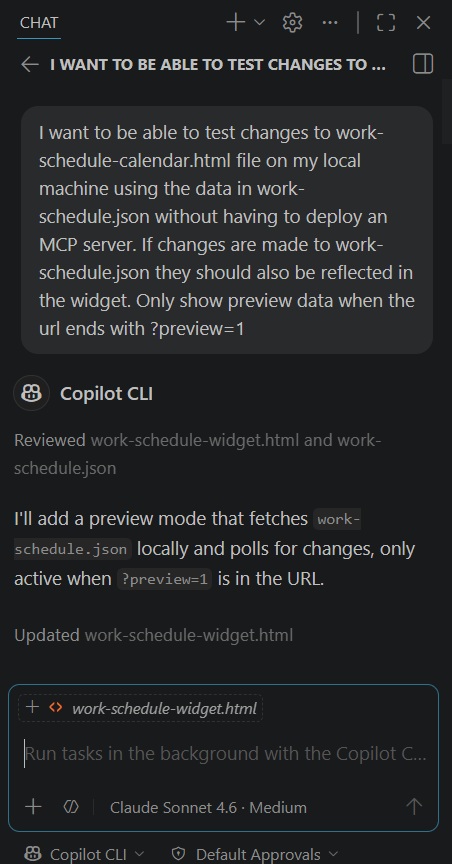
Then ask the coding agent to create a way to test work-schedule-widget.html by using this prompt. It is important to include that it only shows preview data url ends with ?preview=1.
Get The Live Server Extension To Preview The Calendar UI Widget
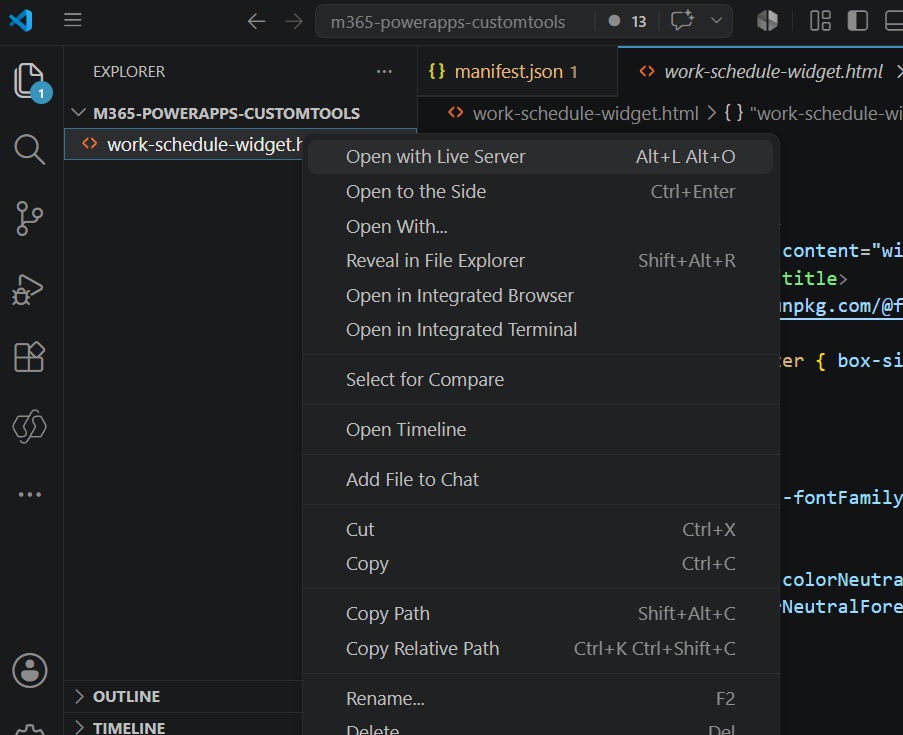
The work-schedule-widget.html file contains javascript so we must use a local server to preview the file. Go to the VS Code extensions marketplace and download the Live Server extension.

Right-click on the work-schedule-widget.html file and select open with Live Server.
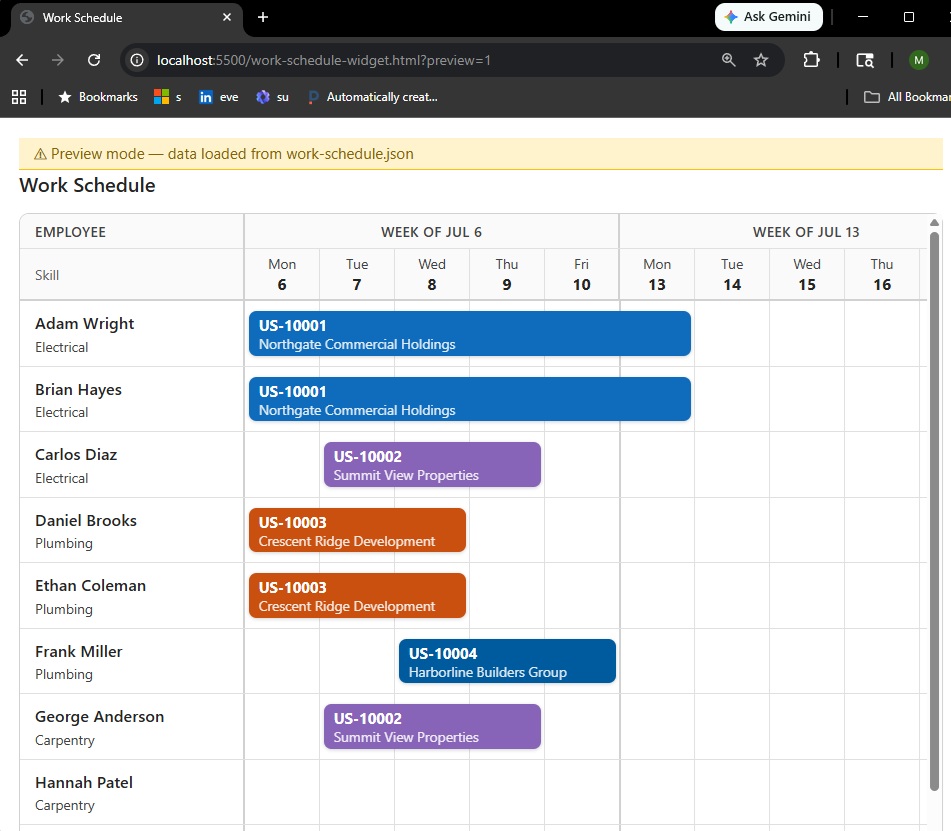
The calendar UI widget initially shows a loading screen. Type the text ?preview=1 at the end of the URL to show the calendar UI widget preview. Now the data from work-schedule.json is displayed in the calendar. If we make changes to work-schedule-widget.html or the data the changes are immediately reflected in the browser.
Paste The Custom UI Widget Code Into Power Apps
Once we are happy with the calendar UI widget, we can copy the entire code in the html file to the clipboard…
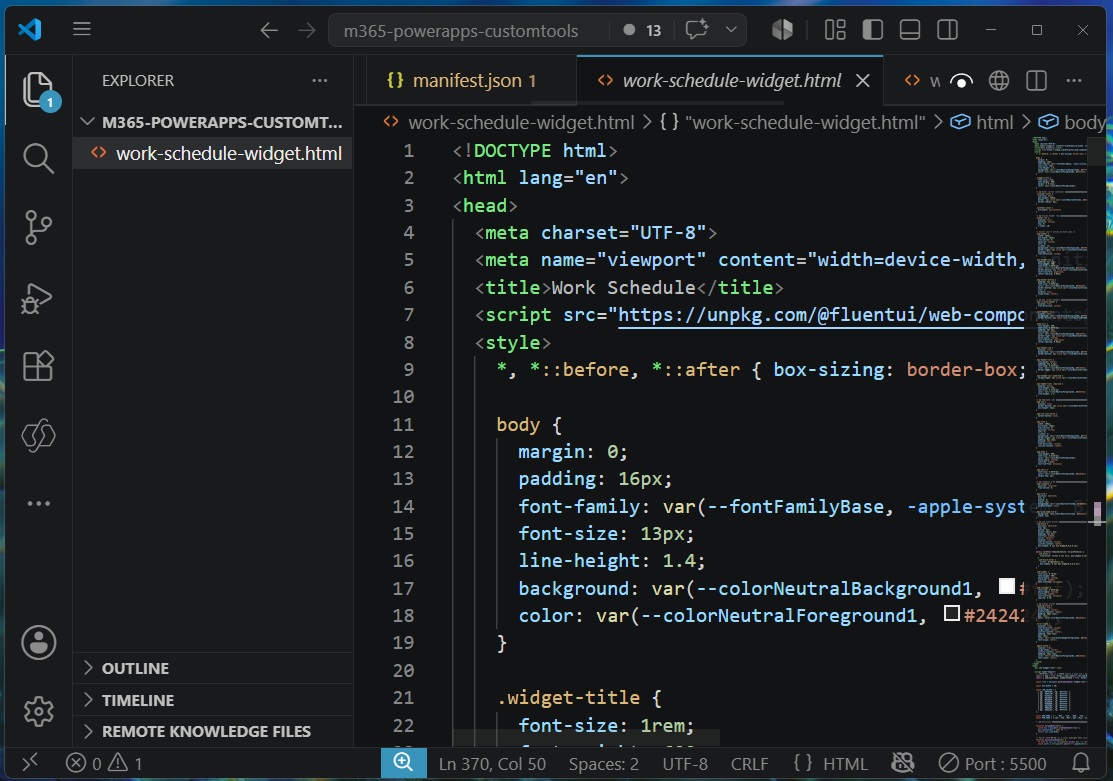
…and paste it into the custom tool menu in Power Apps. Press the Save button when done.
Download The App Package And Deploy The Agent
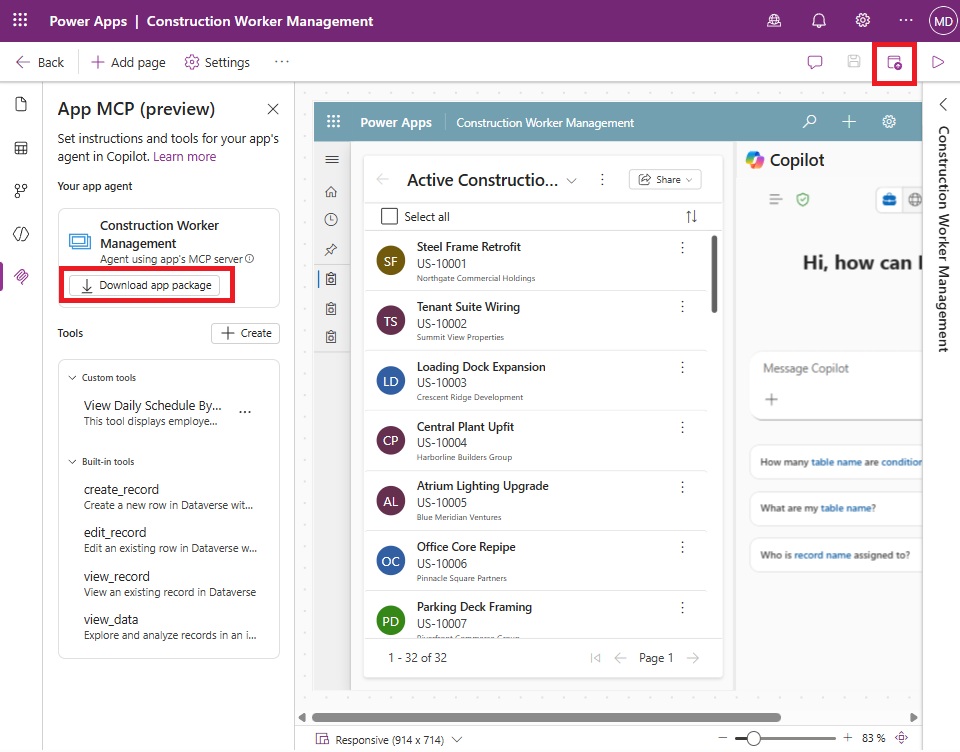
Now its time to deploy the agent. Publish the model-driven app and then press the download app package button. A zip file containing the declarative agent definition will download to the local machine.
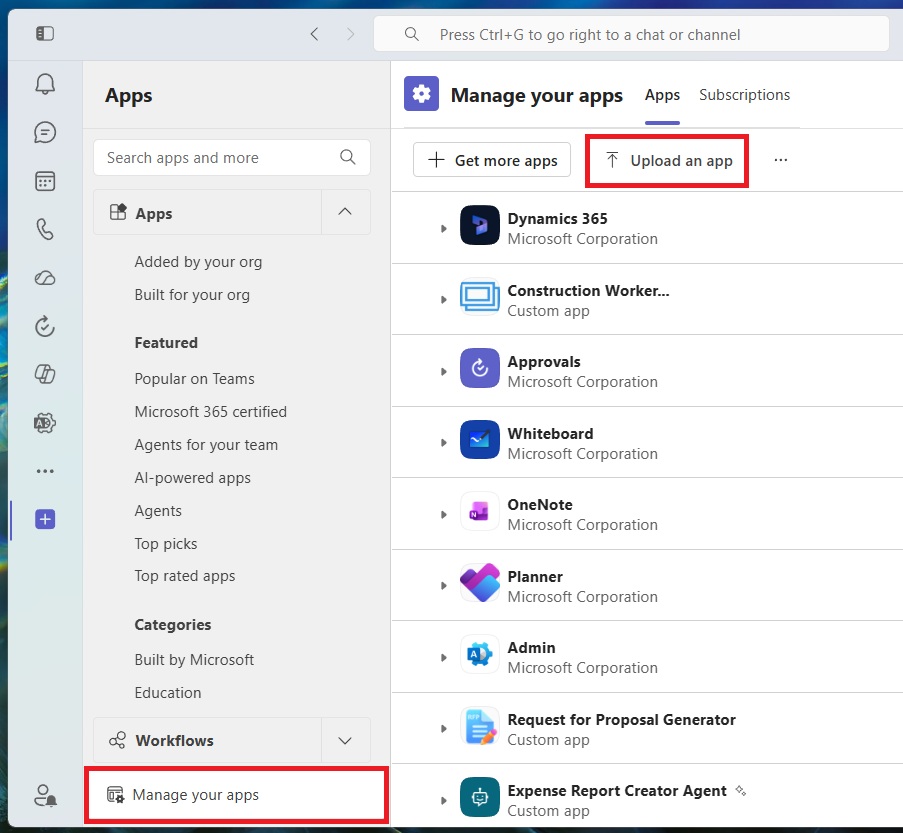
Open Microsoft Teams, go to the apps menu, then select upload an app.
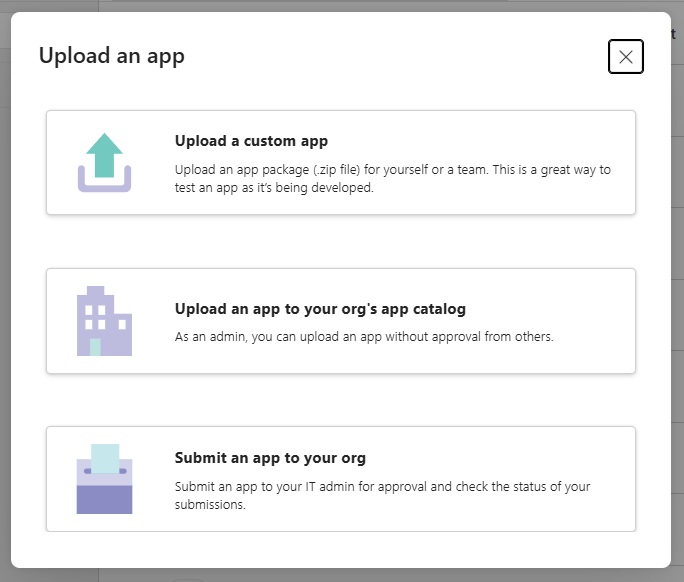
There are three options to choose from. For testing purposes, choose upload a custom app. Later when we want to deploy to the organization we can choose another option.
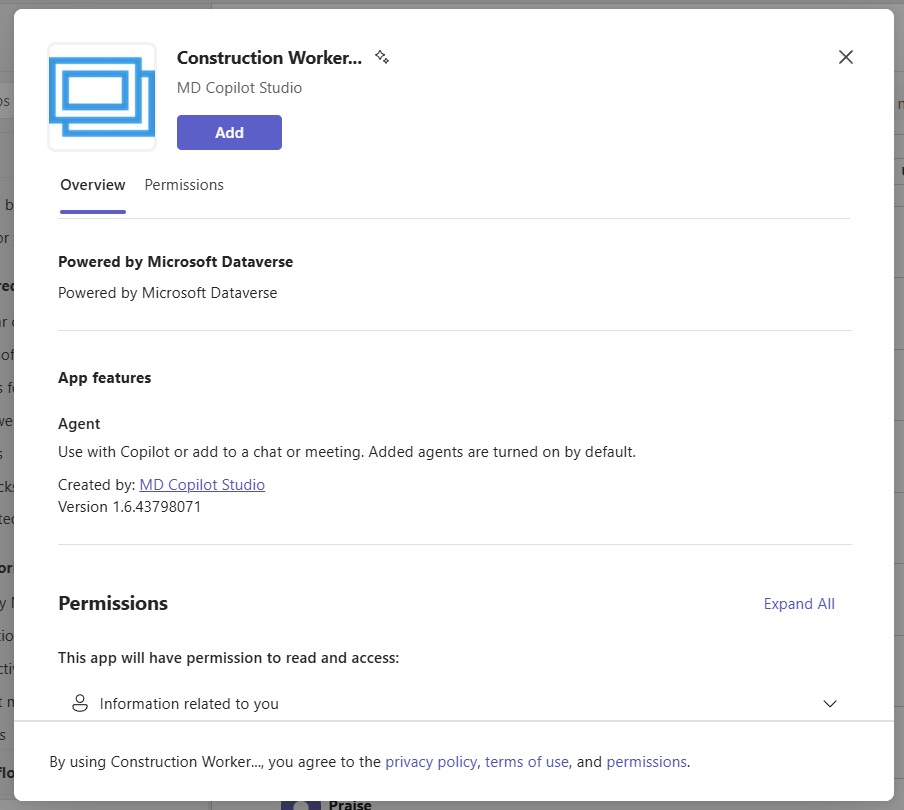
Add the app to Microsoft Teams and M365 Copilot.
Test The Custom Calendar UI Widget In Teams Or M365 Copilot
We’re done. Test the agent by typing the message “show me the July schedule for Atlanta.” Instead of a message, the agent returns the calendar UI widget to display the schedule visually.
Video: Transform Copilot With Custom UI Widgets From Power Apps
Watch this video for a full demonstration of how to build the calendar UI widget for Copilot
Did You Enjoy This Article? 😺
Subscribe to get new Copilot Studio articles sent to your inbox each week for FREE
Questions?
If you have any questions or feedback about How To Create Copilot Custom UI Widgets In Power Apps please leave a message in the comments section below. You can post using your email address and are not required to create an account to join the discussion.