Transform A Custom Connector Response With C# Code

Custom connectors make it possible to retrieve data from any REST API and use it in Power Automate and Power Apps. But sometimes the data from a custom connector comes in a format that makes it hard to work with. By using this newly announced feature we can write C# code to transform the custom connector response into any shape we want. If you haven’t written any C# code before don’t worry, I haven’t either, and I still successfully figured it out and now I will share my simple method for transforming a custom connector response with you!
Introduction: Transforming The Currency Conversion API Response
In my tutorial Make Your First Custom Connector For Power Automate and Power Apps we used the Currency Scoop API to convert a base currency for a foreign currency. The output of the custom connector is a JSON object that looks like this:
{
    "meta":{
        "code":200,
        "disclaimer":"Usage subject to terms: https://currencyscoop.com/terms"
    },
    "response":{
        "timestamp":1628942872,
        "date":"2021-08-14",
        "from":"USD",
        "to":"CAD",
        "amount":1,
        "value":1.25154843
    }
}Code language: JSON / JSON with Comments (json)
We want to transform the JSON into a different structure that removes the nesting and only shows the response information. By writing some C# code we tell the custom connector to make the JSON appear as shown below instead.
{
    "timestamp":1628942872,
    "date":"2021-08-14",
    "fromcurrency":"USD",
    "tocurrency":"CAD",
    "fromamount":1,
    "toamount":1.25154843
}Code language: JSON / JSON with Comments (json)
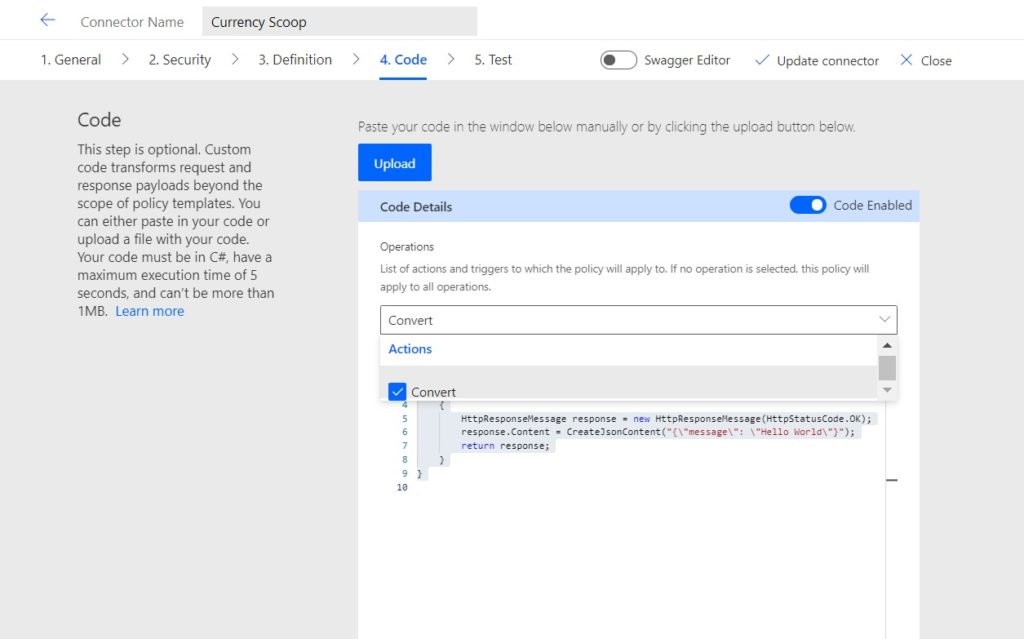
Enable Custom Code For A Connector
To change the JSON output we must enable custom code for our connector. Open the custom connector, go to the Code section and toggle Code Enabled “On”.
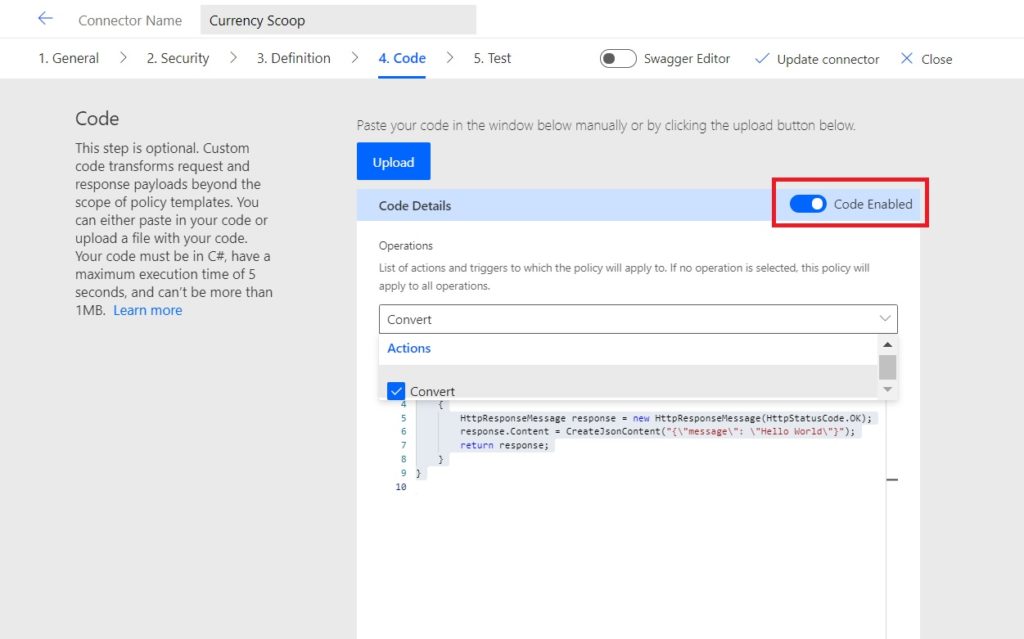
Then click on the dropdown and select the Convert action. The custom code will only run if the Convert action of the custom connector is used. This setting is useful when we have more than 1 action and want the connector to ignore custom code for some actions.
Sample Code: Forward and Transform Request
The custom connector documentation includes the following sample code. We can modify it to transform the JSON response into our desired structure. Copy and paste this code into a text editor so we can make changes.
public override async Task < HttpResponseMessage > ExecuteAsync()
{
    // Check which operation ID was used
    if (this.Context.OperationId == "ForwardAndTransformRequest")
    {
        return await this.HandleForwardAndTransformOperation().ConfigureAwait(false);
    }

    // Handle an invalid operation ID
    HttpResponseMessage response = new HttpResponseMessage(
        HttpStatusCode.BadRequest
    );
    response.Content = CreateJsonContent(
        $"Unknown operation ID '{this.Context.OperationId}'"
    );
    return response;
}

private async Task < HttpResponseMessage > HandleForwardAndTransformOperation()
{
    // Use the context to forward/send an HTTP request
    HttpResponseMessage response = await this.Context.SendAsync(
        this.Context.Request,
        this.CancellationToken
    ).ConfigureAwait(continueOnCapturedContext: false);

    // Do the transformation if the response was successful
    if (response.IsSuccessStatusCode)
    {
        var responseString = await response.Content.ReadAsStringAsync().ConfigureAwait(
        continueOnCapturedContext: false
        );

        // Example case: response string is some JSON object
        var result = JObject.Parse(responseString);

        // Wrap the original JSON object into a new JSON object
        var newResult = new JObject
        {
            ["wrapped"] = result,
        };
        response.Content = CreateJsonContent(newResult.ToString());
    }
     return response;
}Code language: JavaScript (javascript)
Handle The Convert Action
The first thing the sample code does is check which operation was used and describes how it should be handled. The operation in the sample code is called ForwardAndTransformRequest.
// Check which operation ID was used
if (this.Context.OperationId == "ForwardAndTransformRequest")
{
    return await this.HandleForwardAndTransformOperation().ConfigureAwait(false);
}Code language: JavaScript (javascript)
Our operation is called Convert. Replace ForwardAndTransform with Convert instead. Then change the function name HandleForwardAndTransformOperation into ConvertAndTransformOperation.
// Check which operation ID was used
if (this.Context.OperationId == "Convert")
{
    return await this.ConvertAndTransformOperation().ConfigureAwait(false);
}Code language: JavaScript (javascript)
Then scroll down to the HandleForwardAndTransformOperation function definition…
private async Task < HttpResponseMessage > HandleForwardAndTransformOperation()Code language: HTML, XML (xml)
…and replace it with the new name ConvertAndTransformOperation.
private async Task < HttpResponseMessage > ConvertAndTransformOperation()Code language: HTML, XML (xml)
Add A New Field To The JSON Response
Next we will change the structure of the JSON response for the Convert action. Locate the section of code that parses the original JSON object and wraps it into a new JSON object.
// Example case: response string is some JSON object
var result = JObject.Parse(responseString);


// Wrap the original JSON object into a new JSON object
var newResult = new JObject
{
    ["wrapped"] = result,
};Code language: JavaScript (javascript)
Recall that our original JSON object looks like this:
{
    "meta":{
        "code":200,
        "disclaimer":"Usage subject to terms: https://currencyscoop.com/terms"
    },
    "response":{
        "timestamp":1628942872,
        "date":"2021-08-14",
        "from":"USD",
        "to":"CAD",
        "amount":1,
        "value":1.25154843
    }
}Code language: JSON / JSON with Comments (json)
The first field we will define in our new JSON is the value field. We can access the value field in C# with this code.
result["response"]["value"]Code language: CSS (css)
Replace [“wrapped”] = result with the code below. It will tell the custom connector to store the value field inside a new field called toamount.
// Example case: response string is some JSON object
var result = JObject.Parse(responseString);


// Wrap the original JSON object into a new JSON object
var newResult = new JObject
{
    ["toamount"] = result["response"]["value"],
};Code language: JavaScript (javascript)
Append Remaining Fields To The JSON Response
The remaining response fields can be added to the new JSON object in a similar way. Review the code below to understand how it works then add the other fields.
// Example case: response string is some JSON object
var result = JObject.Parse(responseString);


// Wrap the original JSON object into a new JSON object
var newResult = new JObject
{
    ["timestamp"] = result["response"]["timestamp"],
    ["date"] = result["response"]["date"],
    ["fromcurrency"] = result["response"]["from"],
    ["tocurrency"] = result["response"]["to"],
    ["fromamount"] = result["response"]["amount"],
    ["toamount"] = result["response"]["value"],
};Code language: JavaScript (javascript)
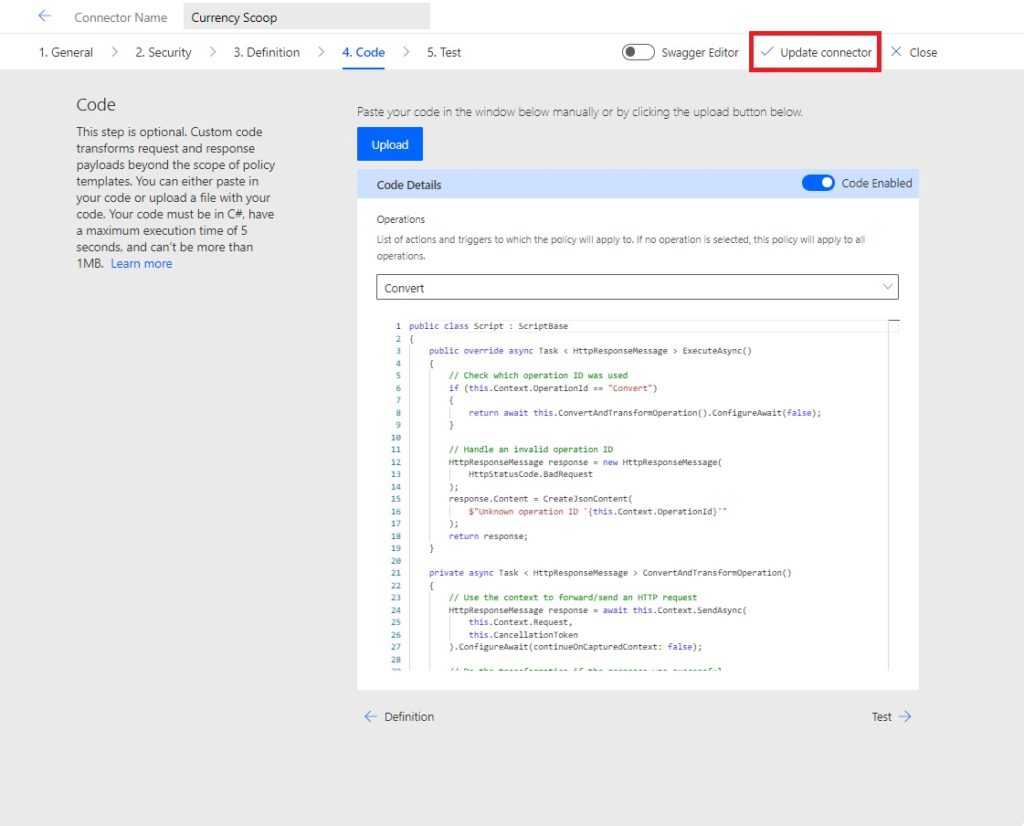
Copy C# Code Into The Custom Connector
Our C# code changes are now completed. Code and paste the C# code from your text editor into the custom connector code editor. Ensure the code we wrote is inserted within the the public class script: ScriptBase.
public class script: ScriptBase
{

public override async Task < HttpResponseMessage > ExecuteAsync()
{
    // Check which operation ID was used
    if (this.Context.OperationId == "Convert")
    {
        return await this.ConvertAndTransformOperation().ConfigureAwait(false);
    }

    // Handle an invalid operation ID
    HttpResponseMessage response = new HttpResponseMessage(
        HttpStatusCode.BadRequest
    );
    response.Content = CreateJsonContent(
        $"Unknown operation ID '{this.Context.OperationId}'"
    );
    return response;
}

private async Task < HttpResponseMessage > ConvertAndTransformOperation()
{
    // Use the context to forward/send an HTTP request
    HttpResponseMessage response = await this.Context.SendAsync(
        this.Context.Request,
        this.CancellationToken
    ).ConfigureAwait(continueOnCapturedContext: false);

    // Do the transformation if the response was successful
    if (response.IsSuccessStatusCode)
    {
        var responseString = await response.Content.ReadAsStringAsync().ConfigureAwait(
        continueOnCapturedContext: false
        );

        // Example case: response string is some JSON object
        var result = JObject.Parse(responseString);

        // Wrap the original JSON object into a new JSON object
        var newResult = new JObject
        {
            ["timestamp"] = result["response"]["timestamp"],
            ["date"] = result["response"]["date"],
            ["fromcurrency"] = result["response"]["from"],
            ["tocurrency"] = result["response"]["to"],
            ["fromamount"] = result["response"]["amount"],
            ["toamount"] = result["response"]["value"],
        };

        response.Content = CreateJsonContent(newResult.ToString());
    }
     return response;
}

}Code language: HTML, XML (xml)
Then select Update Connector to save the code changes.
Test The Custom Connector Response
As a final step we should run the custom connector and compare the response to our desired JSON response. Go to the Test section, input the Convert operation parameters and click Test Operation.
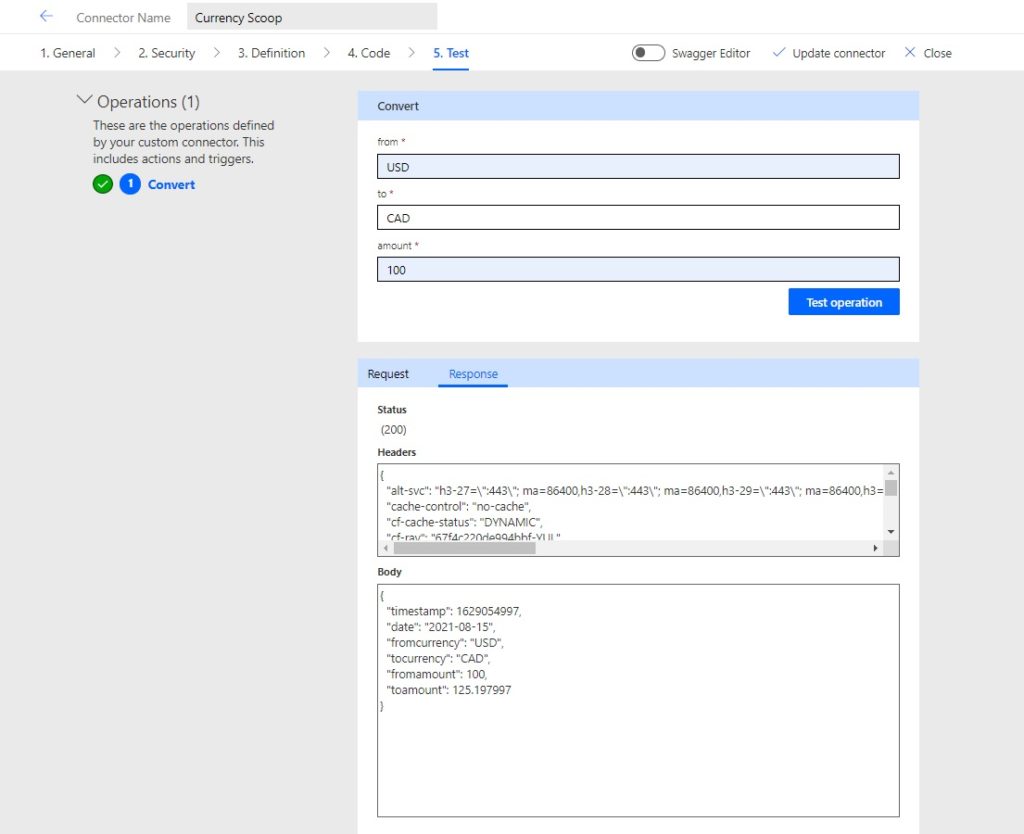
The custom connector will show a response that looks like this:
{
    "timestamp":1628942872,
    "date":"2021-08-14",
    "fromcurrency":"USD",
    "tocurrency":"CAD",
    "fromamount":1,
    "toamount":1.25154843
}Code language: JSON / JSON with Comments (json)
Did You Enjoy This Article? 😺
Subscribe to get new Copilot Studio articles sent to your inbox each week for FREE
Questions?
If you have any questions or feedback about Transform A Custom Connector Response With C# Code please leave a message in the comments section below. You can post using your email address and are not required to create an account to join the discussion.


Great article thanks Matthew – however when I use your code snippet I get an error 500, “request to the backend service timed out”. From what I’m seeing this relates to the 5 second runtime limit? I’m curious if you’ve hit this issue as well as I’m using your code almost verbatim with a different API endpoint though and a shorter/smaller JSON schema. Do we know if the 5 second limit includes time for the endpoint to respond?
Any insights are appreciated.
Hi, M. Devaney, thank you so much for this article, very useful. I’ve create a simple custom connector which connects to a private server (https://…) with a simple json.
All is working perfectly but I can’t have the status code. So I’m using your code, changing the operation ID and the response json. I can save but each time Im testing, I’ve got the status 500, (as Dean in the other comment); internal servor error. Do you know why? I will pay of course. Thank you, Sylvain
Hi, how about constructing JSON payload to be sent to the API server based on simple user inputs?
iBro,
What about it?
How do I declare namespaces that I need to use ?
I am trying to decode the JSON payload from API server’s XML response.
For example, will the code piece below work with custom connector?
The code below has several namespaces used (System, System.Xml.Linq, System.Linq, System.Text).
string str = @”0xxx”;
XDocument doc = XDocument.Parse(str);
var moo = from el in doc.Root.Descendants(“payload”) select el;
var zoo = moo.FirstOrDefault();
Console.WriteLine(Encoding.UTF8.GetString(Convert.FromBase64String(zoo.Value.ToString())));
Great article! Does custom connector also accept XML as the response body ? I have an API server which accepts JSON as request but responds with XML. I know that’s weird, but that is how it works and it’s unchangeable. I think I have to transform the XML response into JSON. Perhaps it is easier if I just pass it to Power Automate and let it transform for me, but that adds more delay.
Hi Matthew, how would return a JArray for use in a collection?