Power Apps Dynamic Forms – Generate Forms From Question List

Power Apps dynamic forms can be created once and reused across multiple applications. The questions it shows, and the type of inputs it takes, are controlled by a collection of form configuration values. No re-coding is necessary to redeploy it. Dynamic forms are not a control type that comes out-of the box with Power Apps. In this article I will show you how to Power Apps dynamic forms
Introduction: The Cheque Request Form
Managers at a construction company use the cheque request form to obtain a cheque from the accounting department. The form was developed to be reusable in other areas of the company with no additional coding. It shows different questions and response types based upon how it is configured.
Add A Blank Gallery To The Canvas App
Open Power Apps studio and create a new app from blank. Insert the following controls onto the screen:
- Text input
- Radio Buttons
- Combobox
- Date picker
- Button
Then add a blank flexible vertical gallery to the screen.

Copy and paste the follow code into the Items property of the gallery. This table contains the questions and to be displayed inside of the dynamic form. The form will take user input in different controls based upon the defined response type.
Table(
    {
        DisplayOrder: 1,
        Question: "Purpose of check",
        ResponseType: "Text"
    },
    {
        DisplayOrder: 2,
        Question: "Amount requested",
        ResponseType: "Number"
    },
    {
        DisplayOrder: 3,
        Question: "Currency",
        ResponseType: "Radio",
        Choices: [
            "USD",
            "CAD"
        ]
    },
    {
        DisplayOrder: 4,
        Question: "Company Name",
        ResponseType: "Combobox",
        Choices: [
            "Apple Company",
            "Banana Company",
            "Cherry Company",
            "Grape Company",
            "Orange Company"
        ]
    },
    {
        DisplayOrder: 5,
        Question: "Date required",
        ResponseType: "Date"
    }
)Code language: CSS (css)
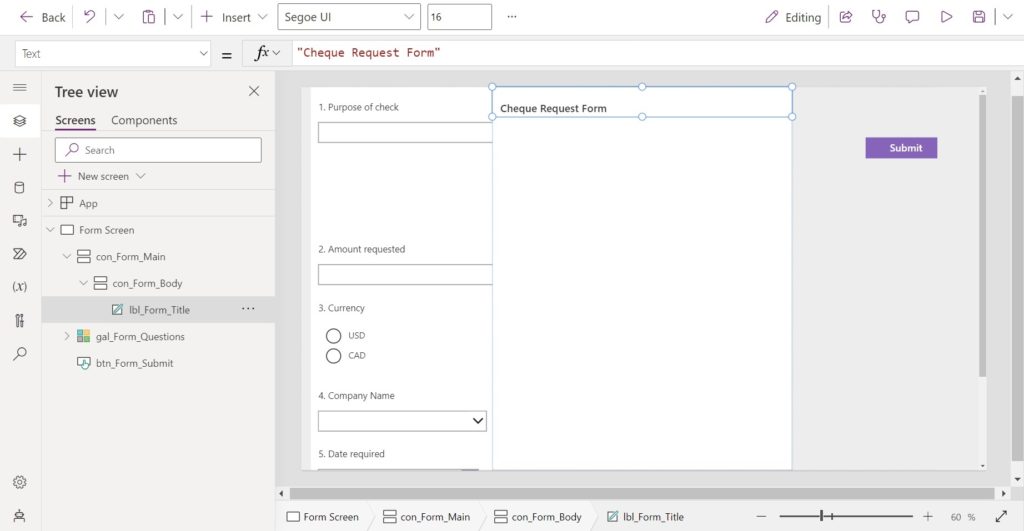
Display Questions In The Dynamic Form
Every gallery row will show a question the user needs to answer. Add a new label control to the gallery.
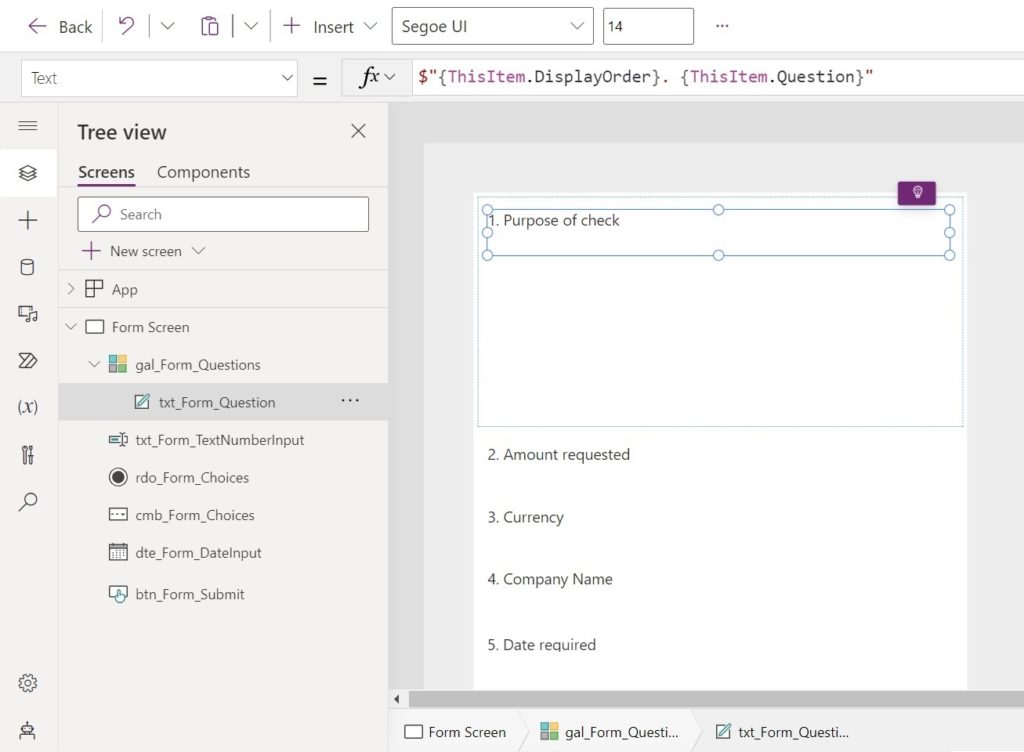
Then write this code in the Text property of the label to display the question number and the question.
$"{ThisItem.DisplayOrder}. {ThisItem.Question}"Code language: JavaScript (javascript)
Text Input Response Type
The first form question requires a text type response. Therefore, we to show a text input for that question. Insert a text input into the dynamic form.

We do not want to show a text input for other questions in the form.
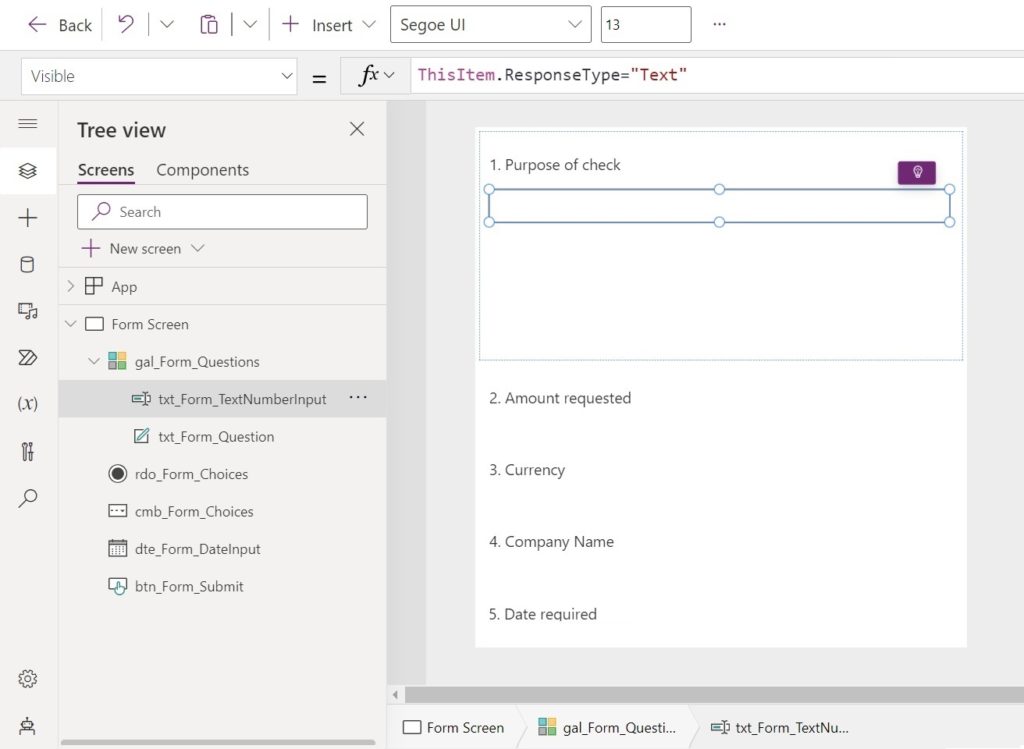
Use this code in the Visible property of the text input.
ThisItem.ResponseType="Text"Code language: JavaScript (javascript)
Number Input Response Type
The second form question is a number response type. We can repurpose the text input to capture numbers as well.
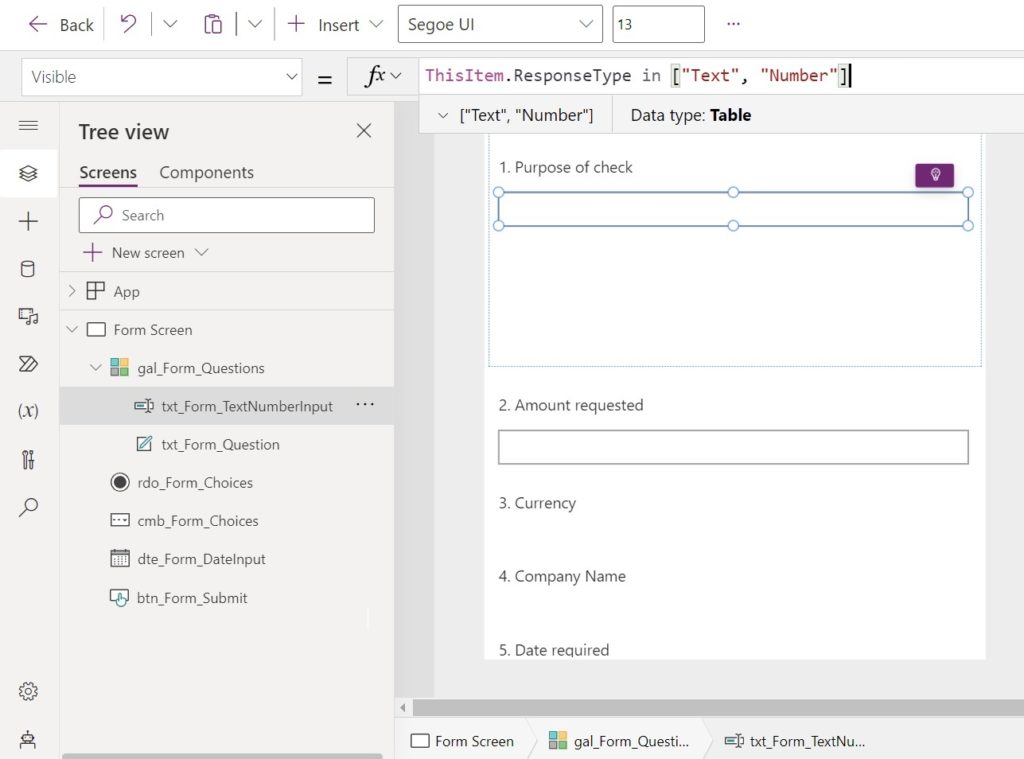
Update the Visible property of the text input so it shows for both text and number type questions.
ThisItem.ResponseType in ["Text", "Number"]Code language: CSS (css)
Then use this code in the Format property of the text input to control whether it accepts all text or only numbers.
If(ThisItem.ResponseType="Number", TextFormat.Number, TextFormat.Text)Code language: JavaScript (javascript)
Radio Input Response Type
The third question of the form requires the user to select a response form a short list of options. We want to show these options in a set of radio buttons.
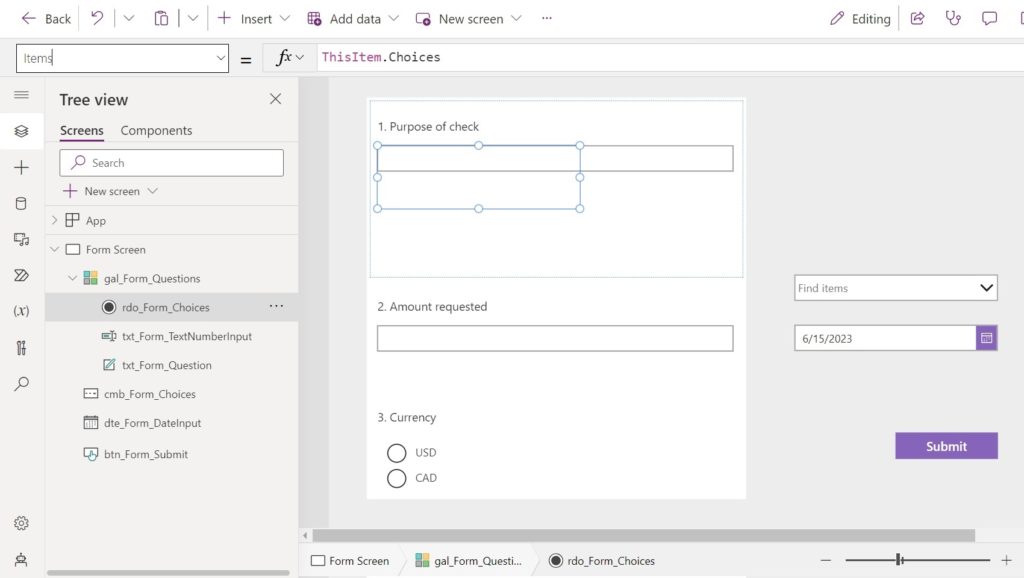
Add this code to the Items property of the radio buttons to display the values.
ThisItem.ChoicesCode language: CSS (css)
Use this code in the Visible property of the radio buttons to only show it for the radio response type.
ThisItem.ResponseType="Radio"Code language: JavaScript (javascript)
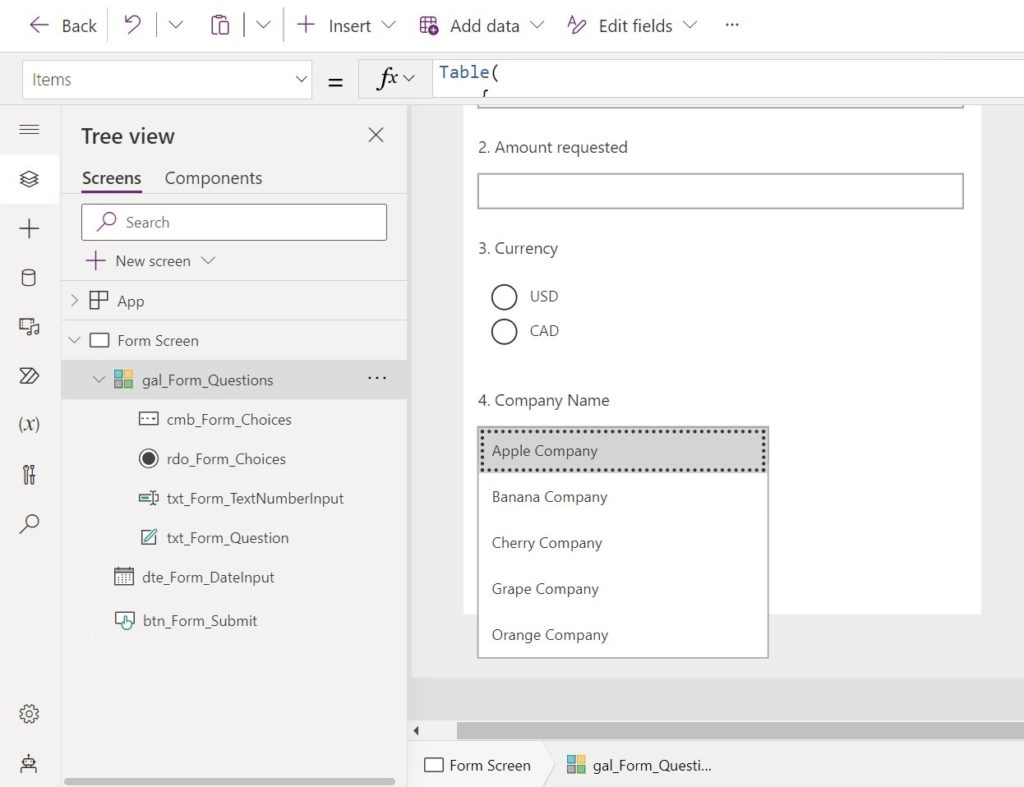
Combobox Response Type
The fourth question of the form also requires the user to select from a list of Choices. But it is a long list of choices so we will use a combobox as the input method.
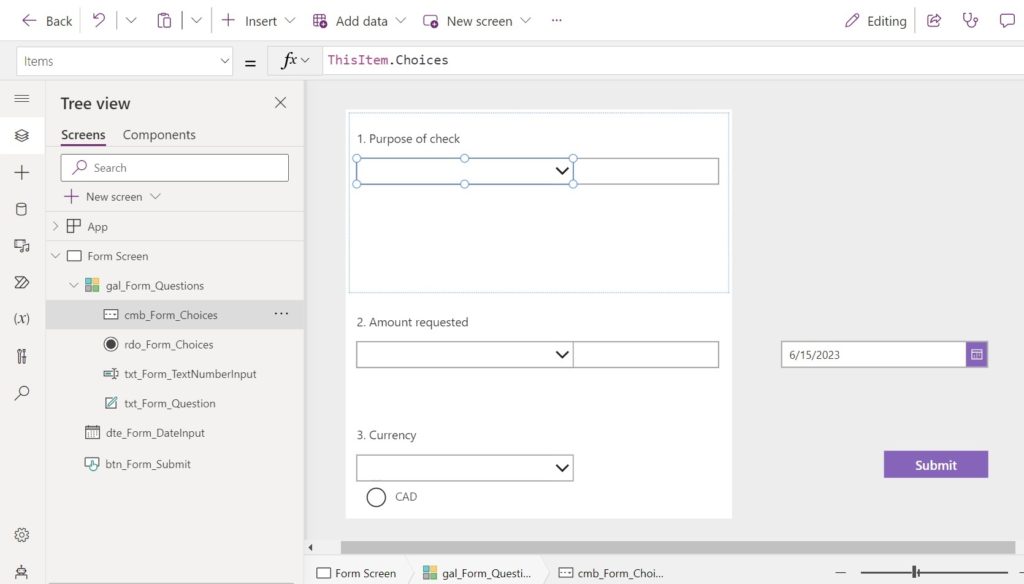
Use this code in the Items property of the combobox.
ThisItem.ChoicesCode language: CSS (css)
The list of choices should display in the combobox like this.
Use this code in both the DisplayFields and SearchFields properties of the combobox
["Value"]Code language: JSON / JSON with Comments (json)
Then write this code in the Visible property of the combobox to only show it for the appropriate response type.
ThisItem.ResponseType="Combobox"Code language: JavaScript (javascript)
Date Picker Response Type
The fifth and final question of the form requires a date response type. We will use a date picker to capture this value. Insert a date picker into the dynamic form.

We only want the date picker to show for date type questions.
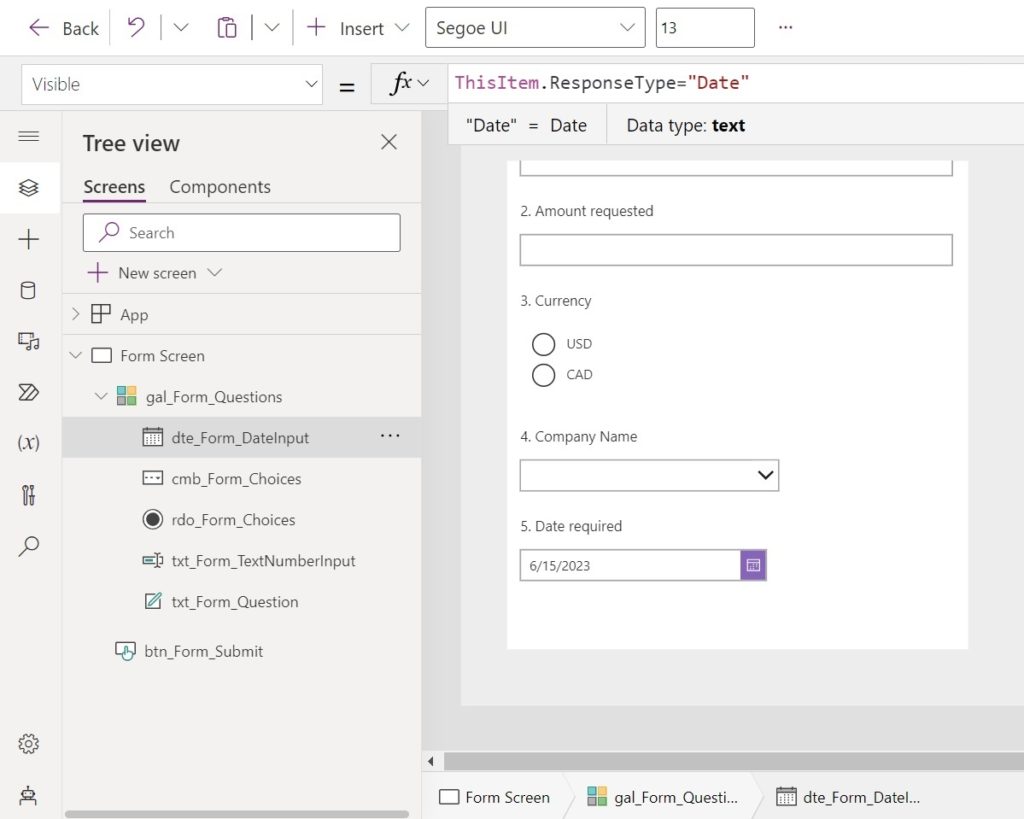
Use this code in the Visible property of the date picker to only show when a date is required to be input.
ThisItem.ResponseType="Date"Code language: JavaScript (javascript)
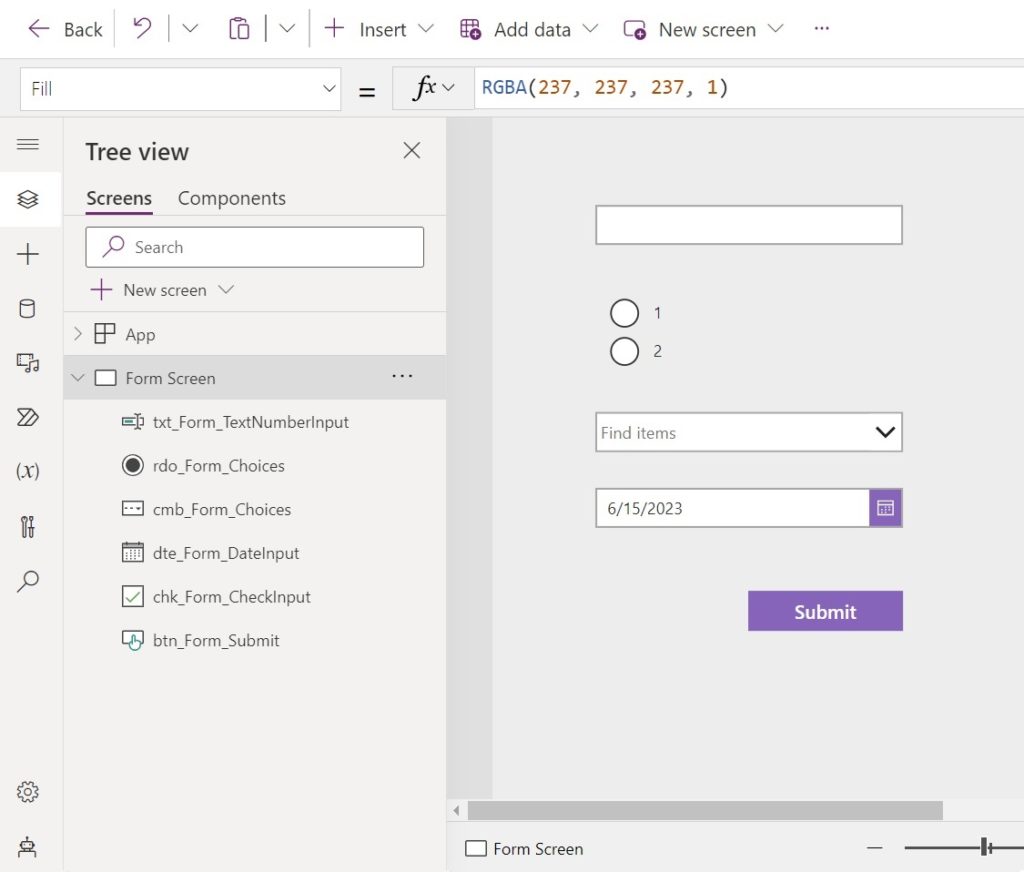
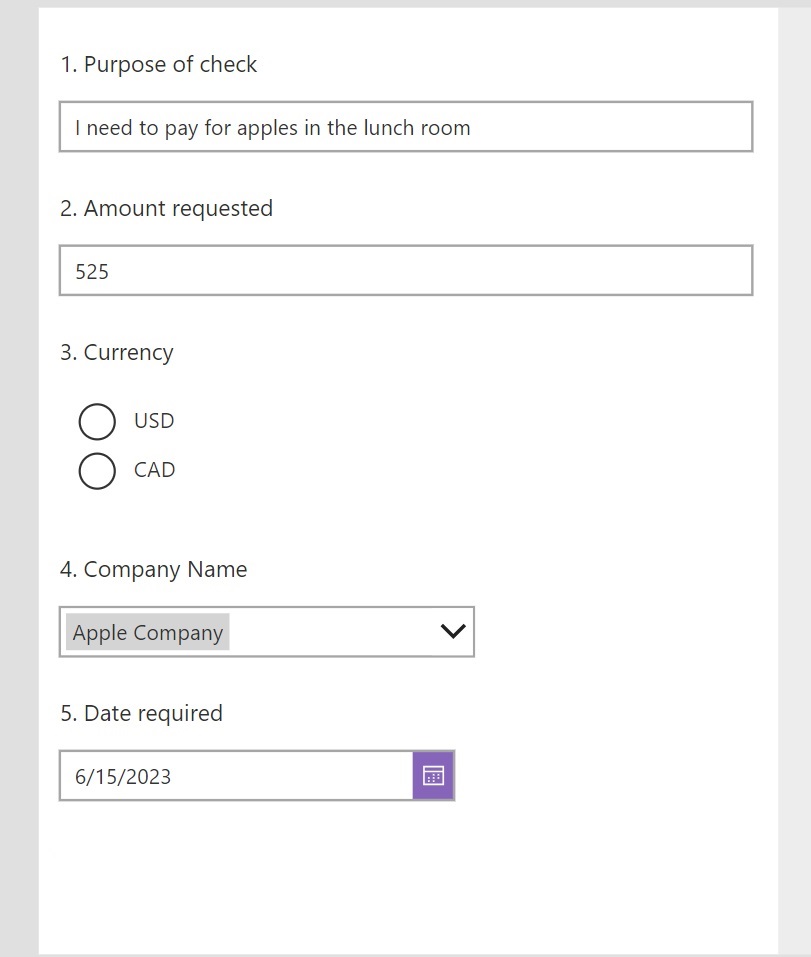
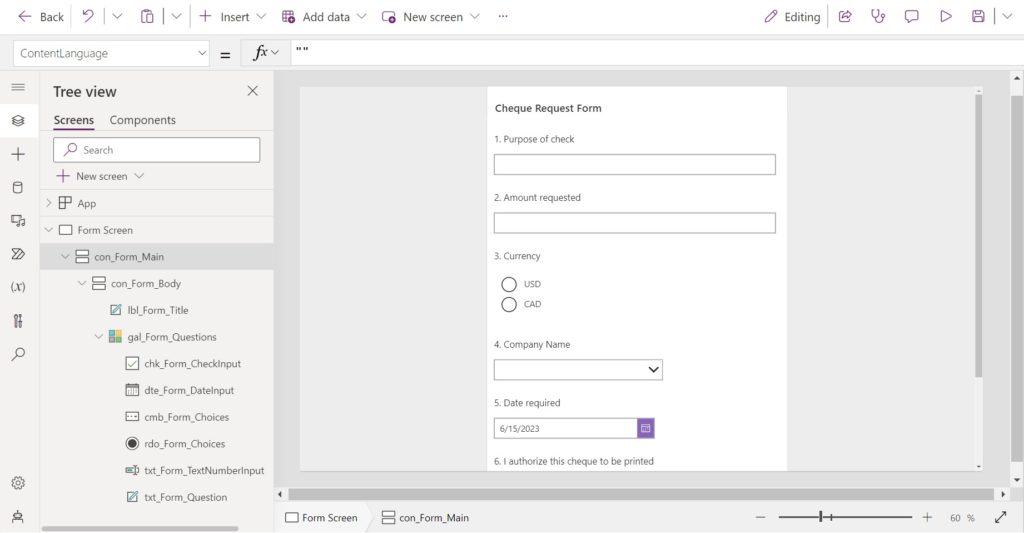
Preview The Power Apps Dynamic Form
Before we connect the dynamic form to a datasource we should make sure it is configured properly. Preview the dynamic form in Power Apps studio. It should look like the image below.
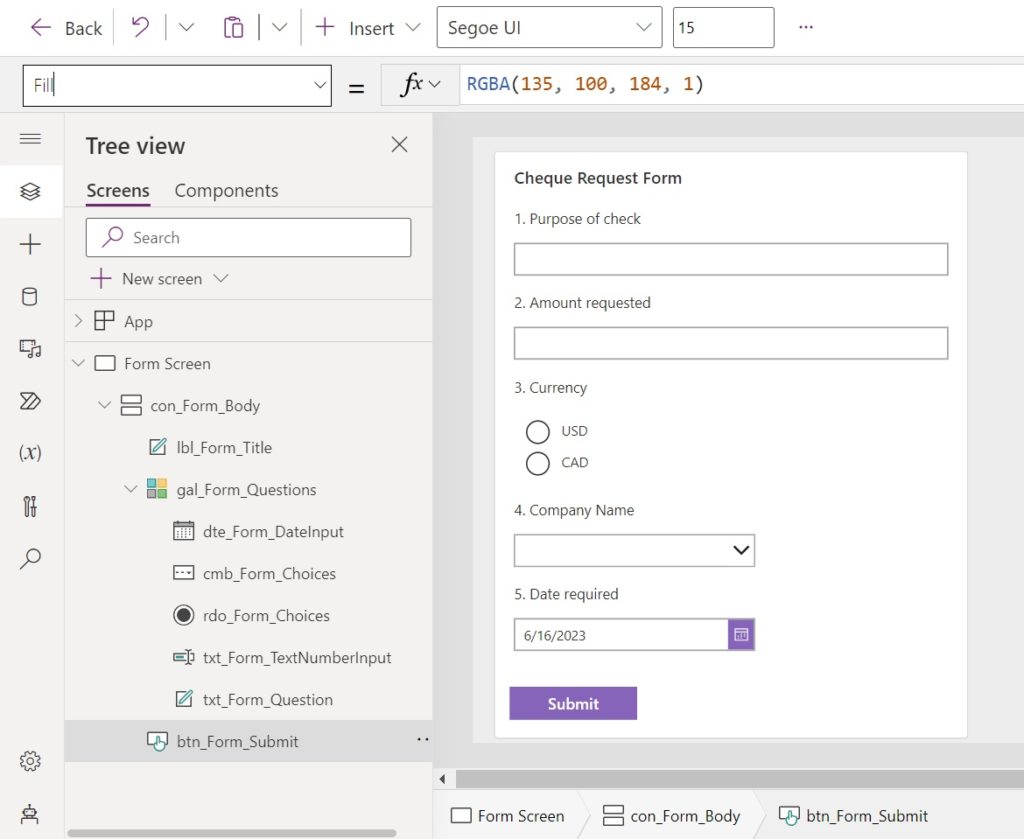
Move The Dynamic Form Components Into A Vertical Container
We want the form elements: title, form and submit button to be grouped inside of a single vertical container. Add a new vertical container to the screen.
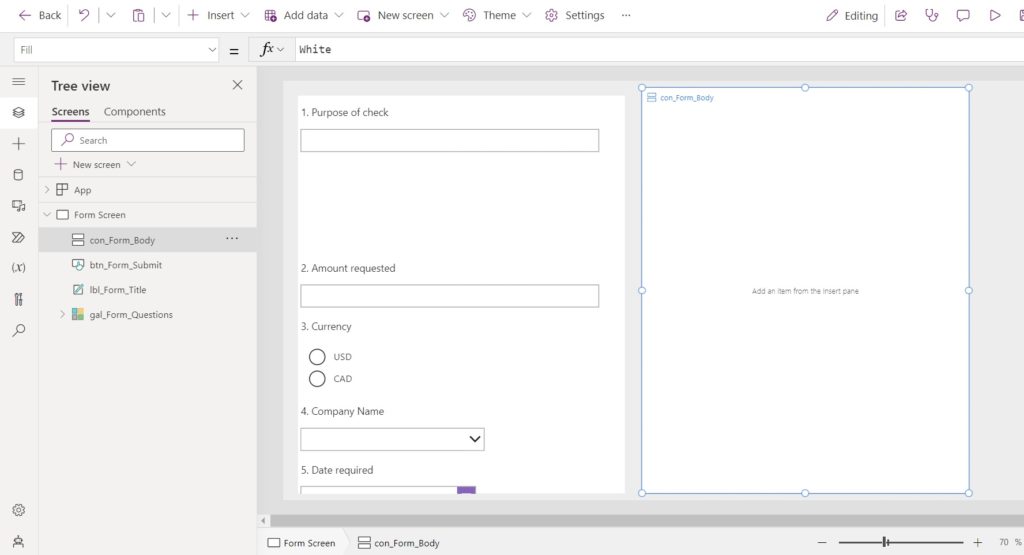
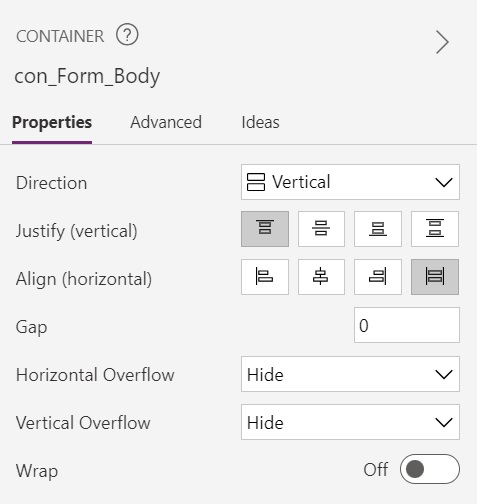
Configure the vertical container as shown below. We want controls inside the container to stretch across the screen.
Insert a new label into the vertical container with the words “Cheque Request Form.”
Then copy and paste the dynamic form (gallery) into the vertical container. Turn off the flexible height. property once pasted into the container.
Lastly, copy and paste the Submit button into the vertical container so it appears at the bottom of the dynamic form.
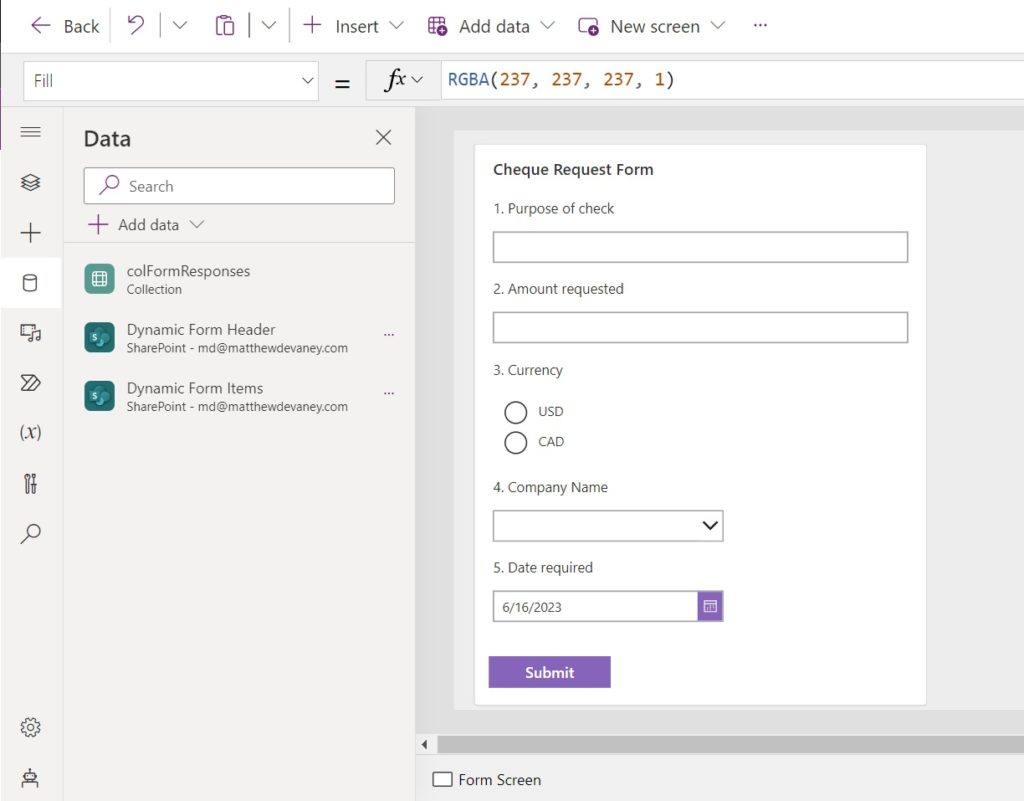
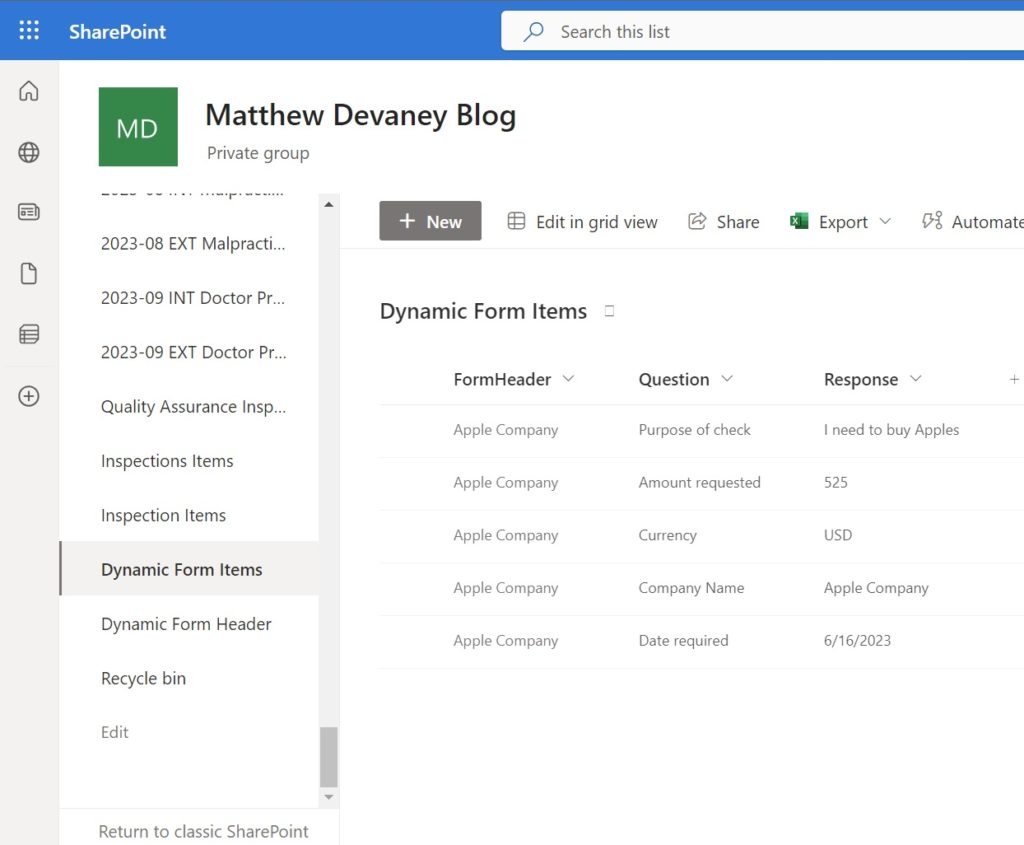
Setup The SharePoint Lists
The dynamic form will store the data it collects in two SharePoint lists. One table will store the individual responses to questions and the other will contain a header record that groups all of the questions together.
Create a new SharePoint list named Dynamic Form Header with the following columns:
- Title (single line text)
Then make another SharePoint list named Dynamic Form Items with these columns.
- FormHeader (lookup)
- Question (single line text)
- Response (single line text)
Add both SharePoint lists to the canvas app once they are created.
Submit The Power Apps Dynamic Form
Once the user fills-in the dynamic form they press the submit button to write the data to SharePoint.
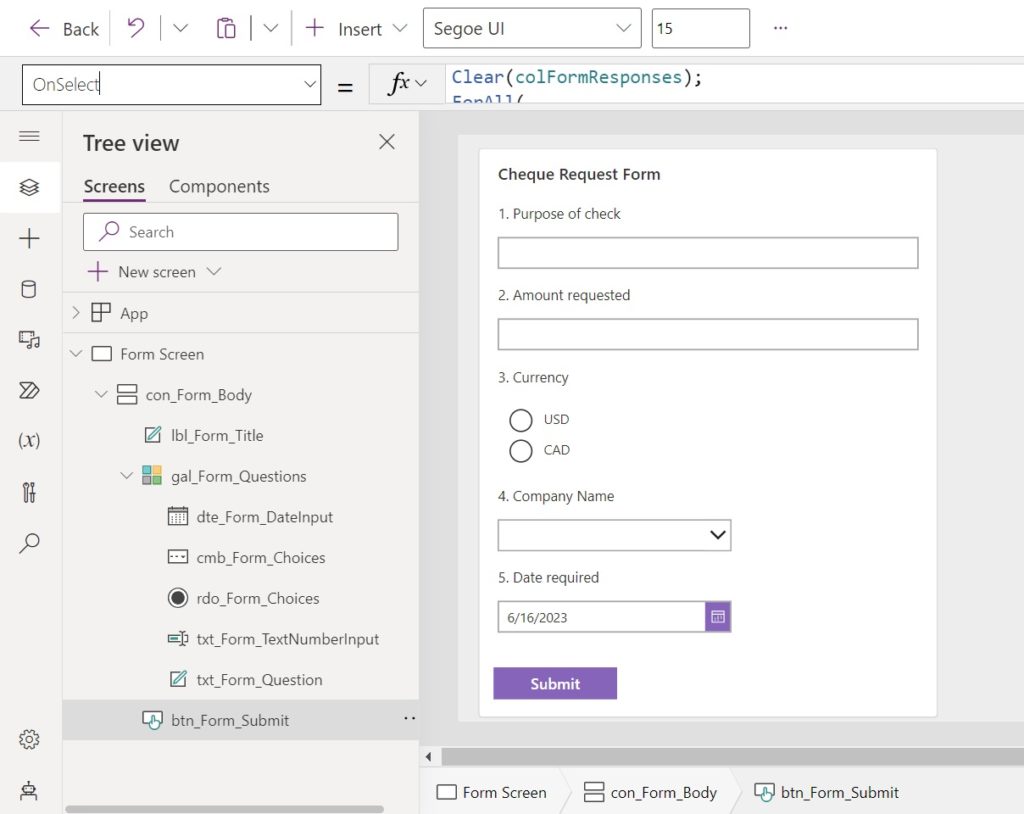
Use this code in the OnSelect property of the submit button. It stores values entered into the dynamic form in a collection. Then it creates the form header record and relates the form items to the header.
// Collect form responses
Clear(colFormResponses);
ForAll(
    gal_Form_Questions.AllItems,
    Collect(
        colFormResponses,
        {
            Question: ThisRecord.Question,
            Response: Switch(
                ThisRecord.ResponseType,
                "Text",
                txt_Form_TextNumberInput.Text,
                "Number",
                Text(txt_Form_TextNumberInput.Text),
                "Radio",
                rdo_Form_Choices.Selected.Value,
                "Combobox",
                cmb_Form_Choices.Selected.Value,
                "Date",
                Text(
                    dte_Form_DateInput.SelectedDate,
                    DateTimeFormat.ShortDate
                )
            )
        }
    )
);
// Create new header record
Set(
    varFormHeader,
    Patch(
        'Dynamic Form Header',
        Defaults('Dynamic Form Header'),
        {
            Title: Index(
                colFormResponses,
                4
            ).Response
        }
    )
);
// Submit form responses
ForAll(
    colFormResponses,
    Patch(
        'Dynamic Form Items',
        Defaults('Dynamic Form Items'),
        {
            FormHeader: {
                Id: varFormHeader.ID,
                Value: varFormHeader.Title
            },
            Question: ThisRecord.Question,
            Response: ThisRecord.Response
        }
    )
);
Code language: JavaScript (javascript)
Test The Power Apps Dynamic Form
Now we are done coding the Power Apps dynamic form. Open the form in preview mode and test it by inputting values and submitting the form.

After submitting a new header record will appear in the Dynamic Form Header SharePoint list.

The items will also appear in the Dynamic Form Items SharePoint list.
Did You Enjoy This Article? 😺
Subscribe to get new Copilot Studio articles sent to your inbox each week for FREE
Questions?
If you have any questions or feedback about Power Apps Dynamic Forms – Generate Forms From Question List please leave a message in the comments section below. You can post using your email address and are not required to create an account to join the discussion.


For simple unimportant lists, you can also store this as JSON in a multiline text column
I had one SharePoint list that acted as a context filter (for example, it might only ask question 2 if the user is a manager)
Now, when the app opens a new form it will populate the questions from your SharePoint list, then saves the answers as a single JSON record
When the app opens an existing record, it will use the saved JSON to populate the questions and answers so they stay the same, even if the question list has been updated for future forms
I only really recommend this method for simple task reminders like a checklist or storing something you won’t need to search or filter for later
Thanks for this Matt. I love these little bits of knowledge, and I’m working to get this going so I can better understand it. Oddly, the formula I pasted into the “OnSelect” property of my submit button is giving an error that I can’t figure out. I’ve attached a screenshot, hoping you might be able to spot the issue if you have a chance to look.
I double checked my list and the column “Question” DOES exist.
Doh! I had renamed the “Title” column. I got if figured out.
Turn off the flexible height. property once pasted into the container. Where property?
show a error “Network error when using Patch function: Field “Title” required
Nhan,
Go to the SharePoint list settings and make Title not required.
I have been trying to Patch the gallery in Items sharepoint list instead of putting Title in Header list, but I can patch Title column, is there something i need to do for the choices to patch to column?
Tyler,
I do not understand what question you asking. Could you please send another explanation of the problem? Examples do help if you have one.
sorry about the mix up. Instead of patching 2 columns, Question and Response, I have been trying to that the 5 questions on the table and patch them to 5 different tables on sharepoint. I can patch 2 columns but have trouble with choice columns. Collect(
colFormResponses,
{
Question: ThisRecord.Question,
Response: Switch(
ThisRecord.ResponseType,
“Text”,
txt_form_textnumberInput.Text,
“Combobox”,
cmb_form_choices.Selected.Value,
“”
),
Choices:If(
ThisRecord.ResponseType = “Combobox”,
ThisRecord.Choices,[]
)
}
)
);
//Create New header record
Set(
varFormResponses,
Patch(
‘Form Response’, Defaults(‘Form Response’),
{
Title: Index(
colFormResponses,
1
).Response,
Description: Index(
colFormResponses,
2
).Response
}
)
);
Is there a way to add the choice columns with Index or Lookup to patch to Form Response?
Hi! Thank you for the information.
Could you please let me know if you have any plans to review the new components feature? I’m interested in reading your article about them.
https://learn.microsoft.com/en-us/power-apps/maker/canvas-apps/component-properties
m
How can we perform error checking and show error messages in the form ?
Hi great tutorial I learnt a lot. The only issue I’m having is getting the lookup column in Dynamic Form Items list to work. The question and response columns are patching but the FormHeader column which I have set to look up to the Title column in DynamicFormHeader list is not pulling through the company names that are being stored in it. Thx so much again.
Rebecca,
Can you see the title in colFormResponses?
What about gal_Form_Questions.AllItems. Can you see it in there?
Hi Matthew late response but I’ve just gone in and I checked those things and they are working now. I think it may have was the way I set the look up column in sharepoint.
Matthew,
I went through and completed this tutorial, but it seems the end results is that the data gets posted to the SharePoint List as an inspection, with each question being answered on a new line of the SP List.
I’m working on an inspection app that uses many inspection types, and how I’ve started designing the app is that each inspection type has its own SP List with columns that are the question and they are answered in the row, and each inspection is saved as a new line item.
I posted about it in this Power Users forum.
https://powerusers.microsoft.com/t5/Building-Power-Apps/Inspection-App-with-many-inspection-types/m-p/2300531#M575428
Would you please be able to provide some feedback out whether I’m understanding the functionality of what you’ve described in this tutorial, and whether I’m going about it the best way?
Thanks,
Clay
Can we generate a URL with this form and share it with the external people for collecting there responses in SharePoint list and individual client will assigned with different question
Subh,
No, you must use Microsoft Forms for this purpose instead. Power Apps requires a license and an M365 login.
Hello Dear, Is it possible to receive table type responses in these forms?
thank you so much
Yefer,
Yes, if you are willing to take the time to program it. There is no out-of-the-box table control.
how to add question control in the form?
e.g. if answer of question 1 is
a -> go to question 2
b -> go to question 3
Thanks for this, I learned something new, which is fun to me. What I need help with now is figuring out how to display the answers later.
I set up the gallery so the questions displayed are based on a combo box selection. I figured out how to display the right questions from the questions table and have the answers saved in the correct columns in the answers table.
The questions table maps each question to the applicable field name in the answers table and I have a collection that provides the field names from the answers table. I tried to come up with a method for getting the default values for the gallery controls to display the value from the answers table for the applicable question, to no avail.
Any guidance is appreciated. Thanks.
How should I use Checkbox?
Im following along with the above using Dataverse. In the submit button code you provided I get the following error message: ” Missing Column. Your formula is missing a column ‘Owner’ with a type of polymorphic.” Do you have any idea why I’m getting this or what this means in regards to this build when using Dataverse rather than SharePoint? Thanks.
David G,
Can you please share your code?
Making an assumption here… if you have included the “Owner” field in your Patch function it’s not necessary. The Owner will auto-populate as the current user upon creation.
Hi Matt,
Thank you for this very informational article. I was trying this for a dynamic form use case and found it to be very helpful.
I see that you have used a single instance of a control type (for e.g. text / number / radio / etc..) in the form. What would happen if we have multiple controls for the same type on the form (for e.g. multiple radio buttons for instance)?
I tried this scenario on my own, but found that on submit, it wasn’t able to get the radio button selected values. Any insights into this would be highly appreciated.
Below is the code snippet I was trying:
Clear(colFormResponses);
ForAll(
gal_Survey_Questions.AllItems,
Collect(
colFormResponses,
{
Question: ThisRecord.Question,
Response: Switch(
ThisRecord.QuestionType,
“Text”,
Text(txt_Survey_Text.Text),
“Number”,
Text(txt_Survey_Number.Text),
“Radio”,
Text(rdo_Survey_Options.Selected.Value)
)
}
)
);
NOTE: My radio control Items are like – [“Yes”,”No”] type.