Power Apps Deep Links: Email Direct Link To A Specific Record

Deep links are a type of hyperlink that send an app user to a specific record or screen. In Power Apps deep links are most useful when sent in an email. The recipient can click on a deep link to open an app and immediately navigate to the information they need with no extra effort. In this article I will show you how to send an email with deep links that immediately open Power Apps to a specific record or screen.
Introduction: The Create A Support Ticket App
The Create A Support Ticket app is used by employees at a manufacturing company to ask the I/T department for help with technology related issues. After a support ticket is submitted, the employee receives and email with a link that allows them to go back and review the support ticket they created in the system.
Setup The SharePoint List
Create a new SharePoint list called Support Tickets with the following columns:
- ID (whole number column)
- Title (single-line text)
- IssueType (choice) [Options: Desktop/Laptop, Business Application, Internet, Virus]
- Description (multiple line text)
- Created (person column)
- Created By (date & time column)
It is not necessary to create the columns ID, Created and Created By since they are included by default in any SharePoint list. However, we we must unhide them by going the the Show/Hide Columns menu and checking the box beside their columns names.
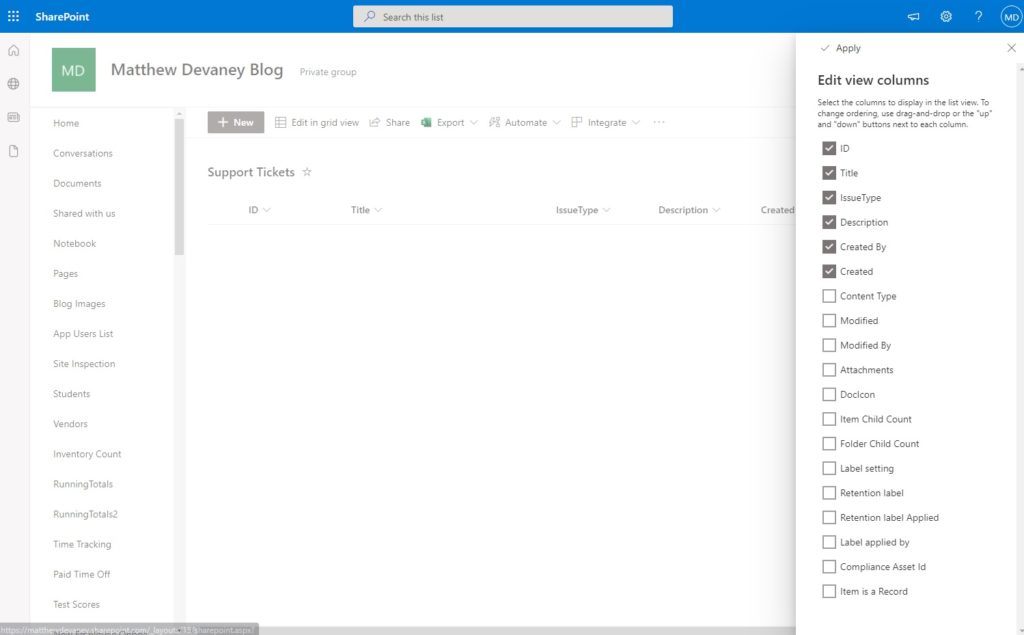
Once created the Support Tickets SharePoint list does not require any data to be loaded. We will make some new support tickets while building the app.
| ID | Title | IssueType | Description | Created | CreatedBy |
Create An Edit Form
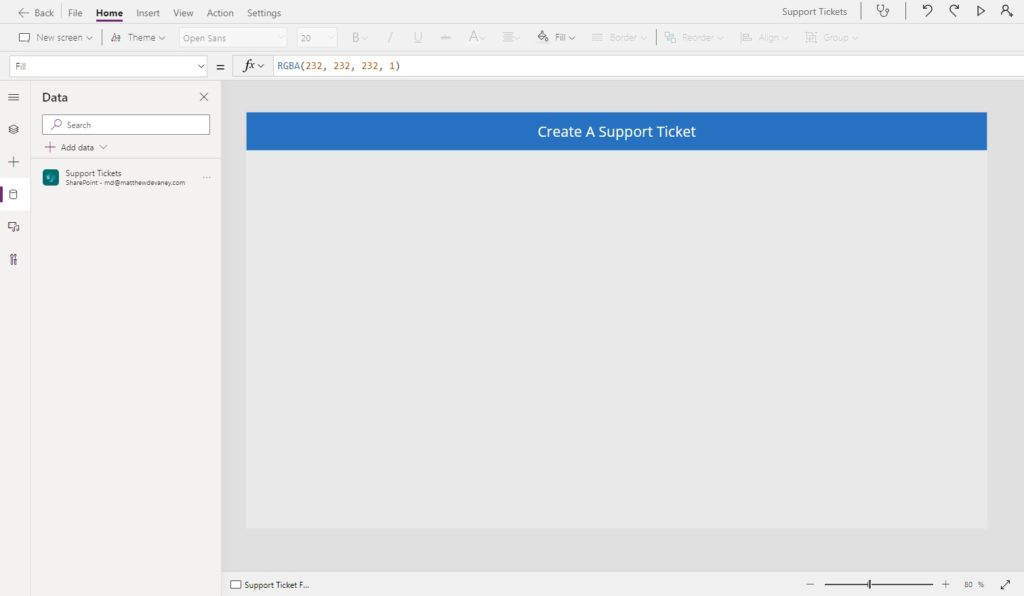
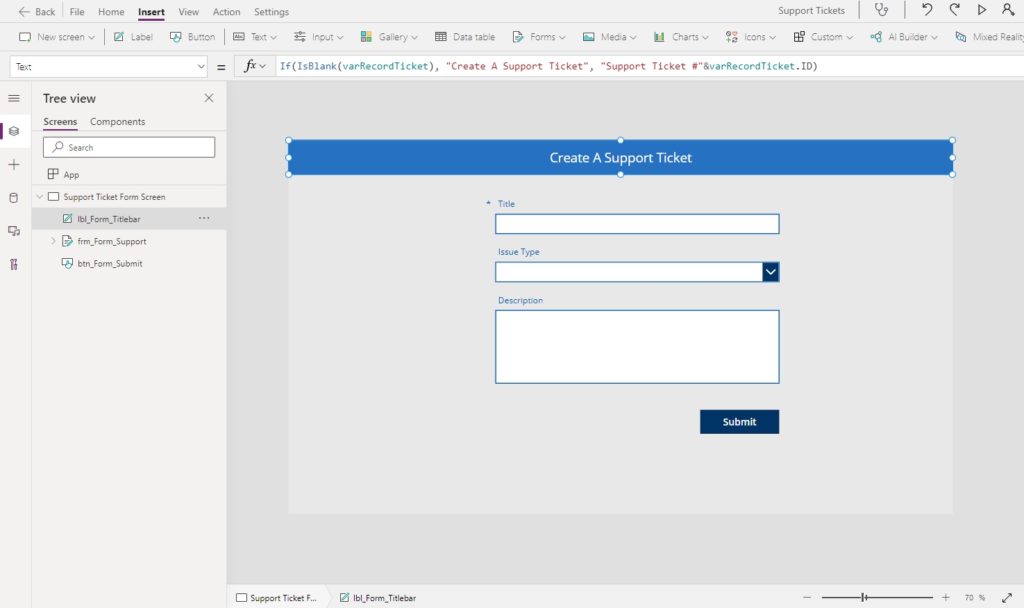
When an employee opens the Create A Support Ticket app they fill-in a form with details about their technology issue and submit the form to the I/T department. Open a Power Apps Studio and make a new canvas app from blank. Then add a label to the top to act as a titlebar.

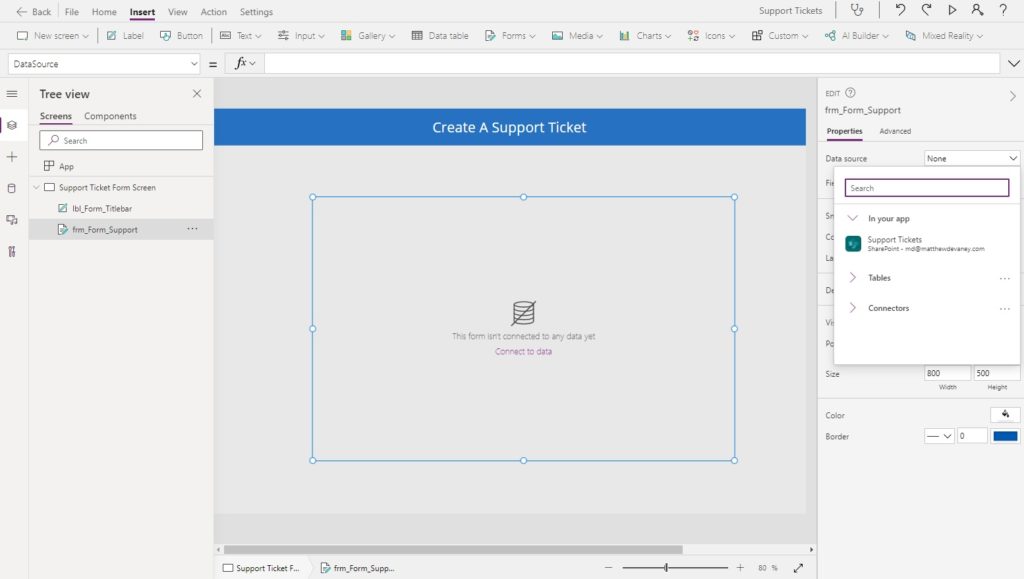
Connect the Support Tickets SharePoint list to the app.
Then insert an Edit Form and select Support Tickets as the datasource for the the form.
Include only the Title, Issue Type and Description fields in the form. The fields ID, Created and Created By will be automatically generated when a new support ticket is created.
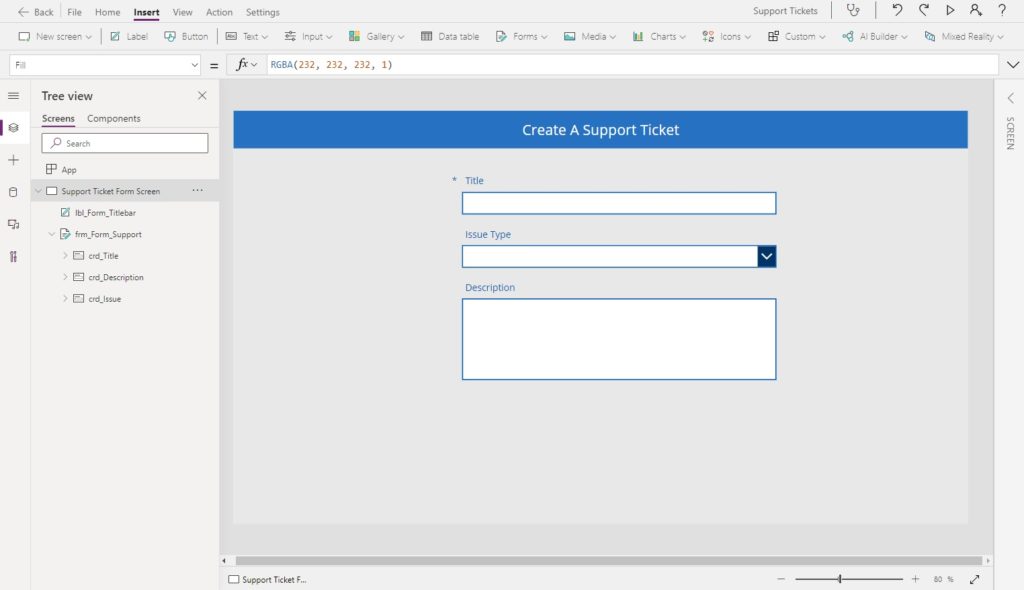
Also, change the DefaultMode property of the app to this code to specify that a new record should be added to the SharePoint list when the form is submitted.
FormMode.NewCode language: CSS (css)
Make A Submit Button For The Edit Form
Now that the form is finished we need to add a submit button. Insert a new button below the form with the text “Submit”.
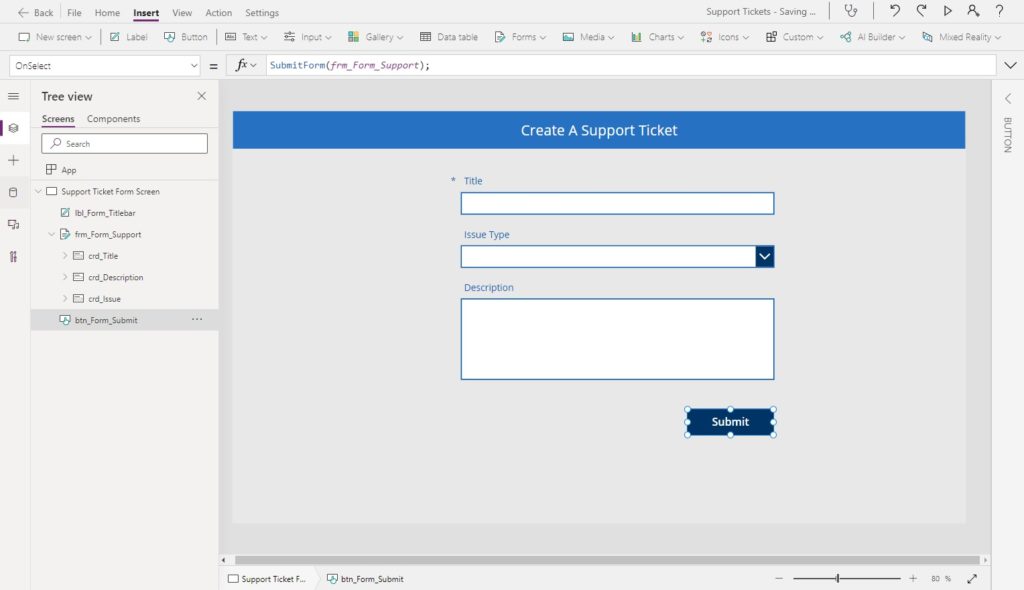
Use this code in the OnSelect property of the form to submit the form details to the SharePoint list.
SubmitForm(frm_Form_Support)
Then add this code to the OnSuccess property of the form to define what happens after the new ticket is successfully created. We want to capture the ticket details in a variable called varRecordTicket, change the form to view-mode and then show a banner at the top of the screen to let the employee know their ticket was saved.
Set(varRecordTicket, frm_Form_Support.LastSubmit);
ViewForm(frm_Form_Support);
Notify("Success: Your support ticket was submitted", NotificationType.Success);Code language: JavaScript (javascript)
Put this code in the Item property of the form so it knows which record to display while in view-mode…
varRecordTicket
…and finally, use this code in the Visible property of the submit button to hide it after the ticket is submitted.
frm_Form_Support.Mode<>FormMode.ViewCode language: CSS (css)
Get the Canvas App Web Link
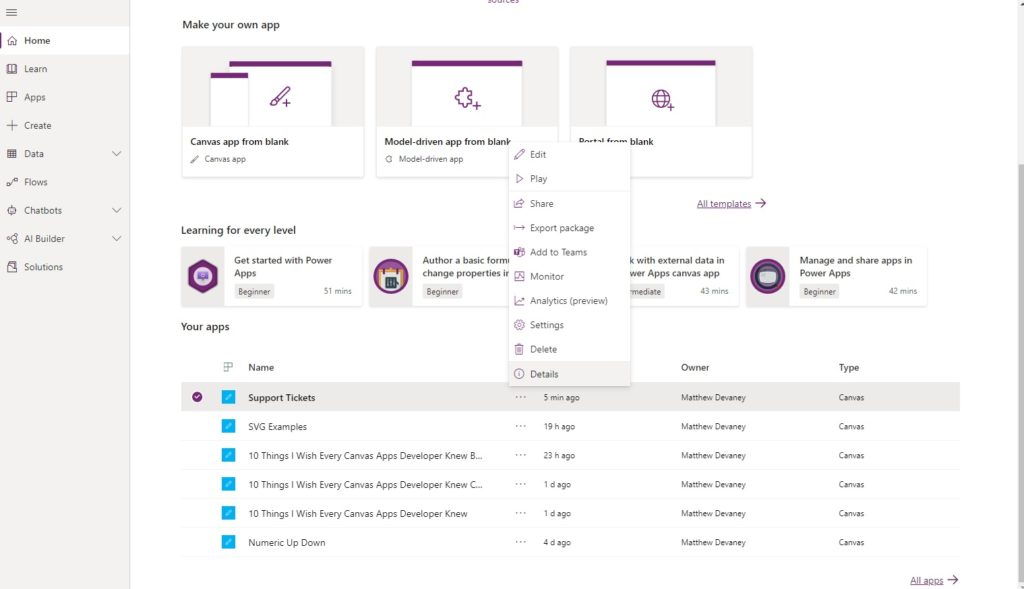
To generate a direct link to the submitted ticket we must first obtain the app’s web link. Save and publish the Create A Support Ticket app then open the make.powerapps.com and click the three dots beside the app’s name. Select the details menu item.
The web link can be found on the details tab.
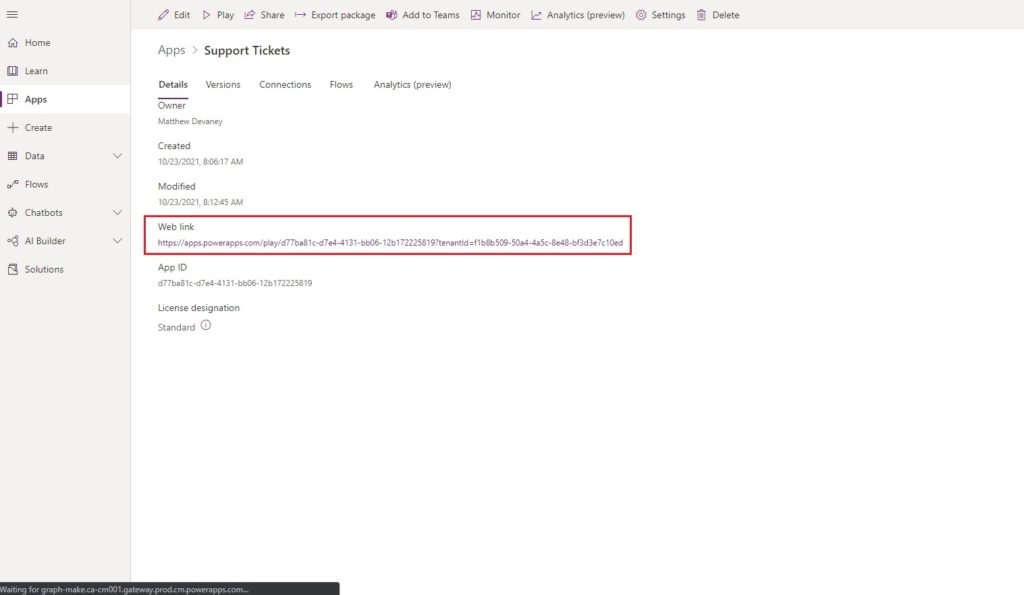
Copy the web link into windows notepad or some other note taking app. We will need it in just a moment.
https://apps.powerapps.com/play/d77ba81c-d7e4-4131-bb06-12b172225819?tenantId=f1b8b509-50a4-4a5c-8e48-bf3d3e7c10edCode language: JavaScript (javascript)
Send An Email With A Direct Link To A Specific Record
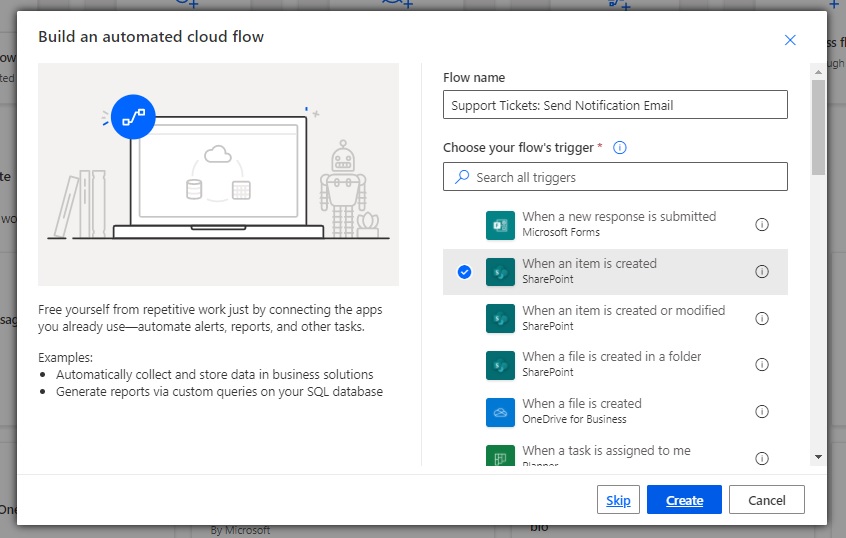
After a support ticket is submitted employees will receive an email with a direct link to the support ticket in Power Apps. Go to Power Automate and build a new automated cloud flow called Support Tickets: Send Notification Email. Choose When an item is created for the trigger.
Add two actions to the flow: Compose (Data Operations) and Send An Email V2 (Outlook). Fill-in the actions as shown in the image below.
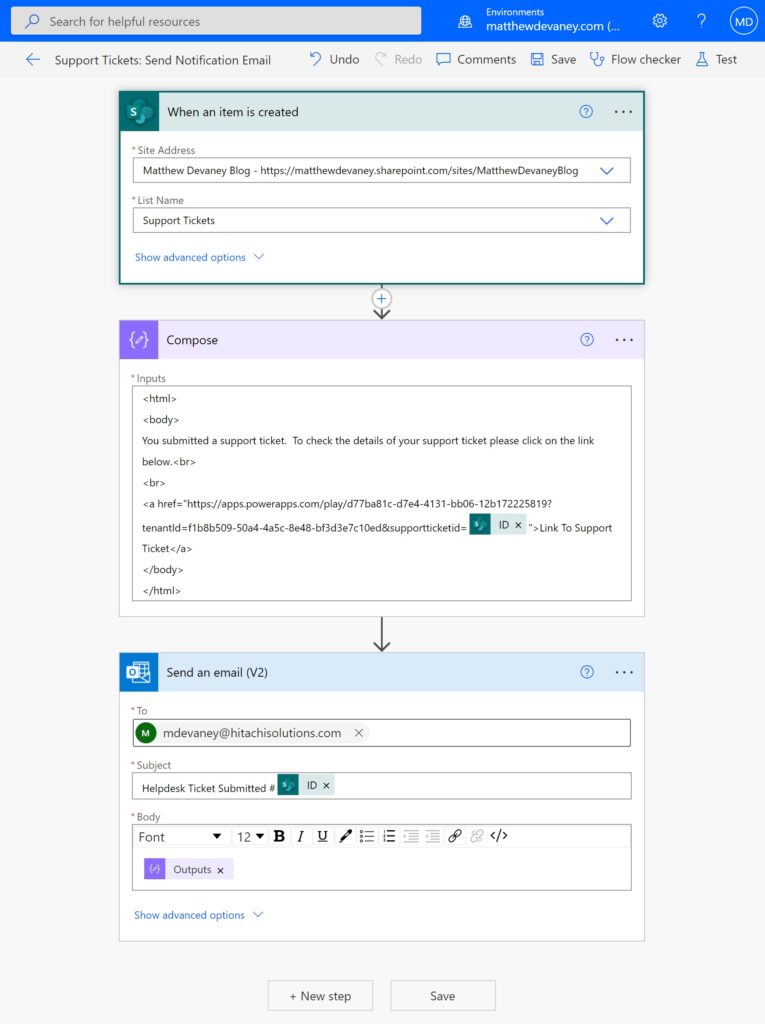
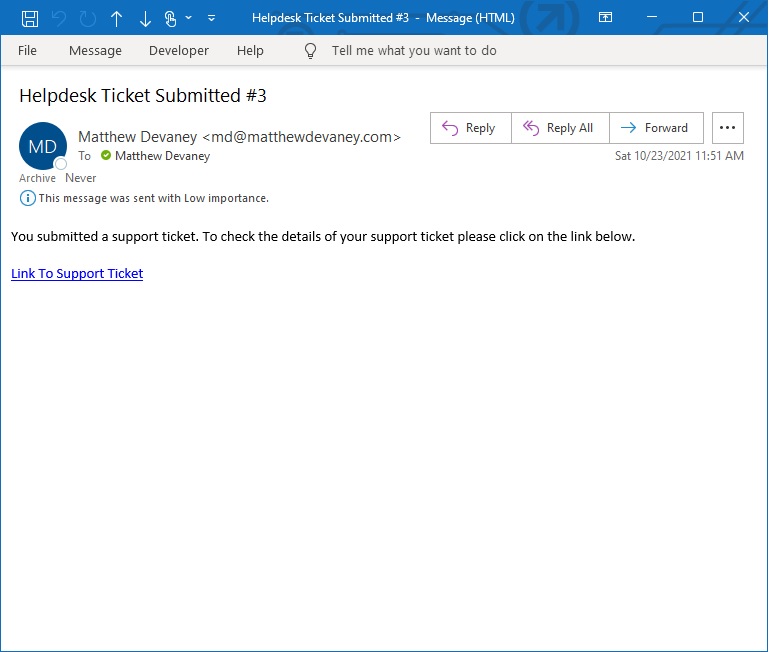
In the compose step of the flow we are writing HTML code to insert into the body of the notification email. The direct link to a specific record can be found inside the <a> tags. We take the web link for the app and add a URL parameter called supportticketid. This parameter is filled with the unique ID number from the Support Tickets SharePoint list.
<html>
<body>
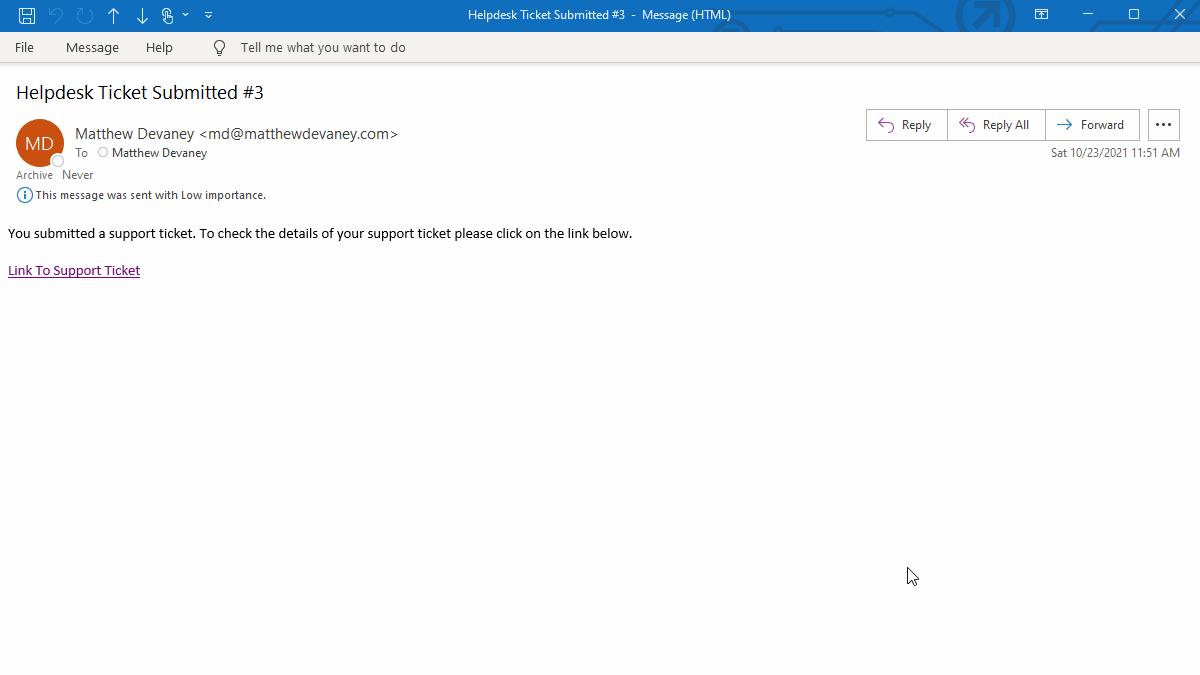
You submitted a support ticket. To check the details of your support ticket please click on the link below.<br>
<br>
<a href="https://apps.powerapps.com/play/d77ba81c-d7e4-4131-bb06-12b172225819?tenantId=f1b8b509-50a4-4a5c-8e48-bf3d3e7c10ed&supportticketid=@{triggerOutputs()?['body/ID']}">Link To Support Ticket</a>
</body>
</html>
Code language: HTML, XML (xml)
Save and close the flow. We will test the deep link soon, but first, we must make some more changes to the app.
Obtain A Record ID From The App OnStart Property
When the app opens it must check whether a record ID was supplied inside the supportticketid URL parameter. If supportticketid has a value, the form should display that record, otherwise, it will appear blank.

Use this code in the OnStart property of the app. It performs a lookup on the supportticketid URL parameter and stores the result in the varRecordTicket variable. If a record was found it changes the form to view mode (instead of new mode which is the default we setup earlier).
Set(
    varRecordTicket,
    LookUp(
        'Support Tickets',
        ID = Value(Param("supportticketid"))
    )
);
If(
    !IsBlank(varRecordTicket),
    ViewForm(frm_Form_Support)
)Code language: JavaScript (javascript)
We will also make another small modification to the titlebar’s text.
When the form is in new mode the titlebar will show the text “Create A Support Ticket”, otherwise, it will display the ticket ID number. Use this code in the Text property of the titlebar.
If(
    frm_Form_Support.Mode=FormMode.New,
    "Create A Support Ticket",
    "Support Ticket #"&varRecordTicket.ID
)Code language: PHP (php)
Submit A Support Ticket To Generate An Email
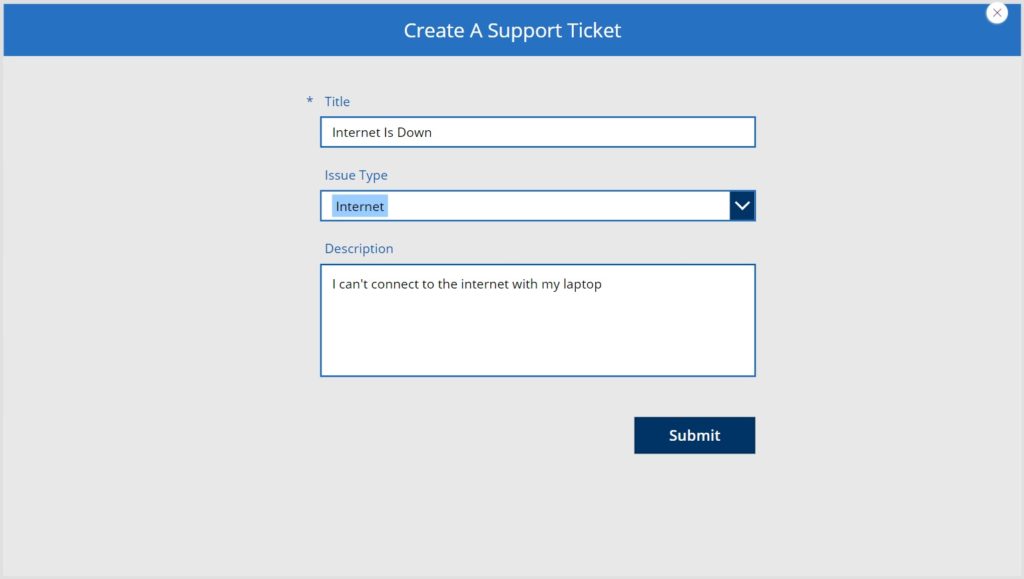
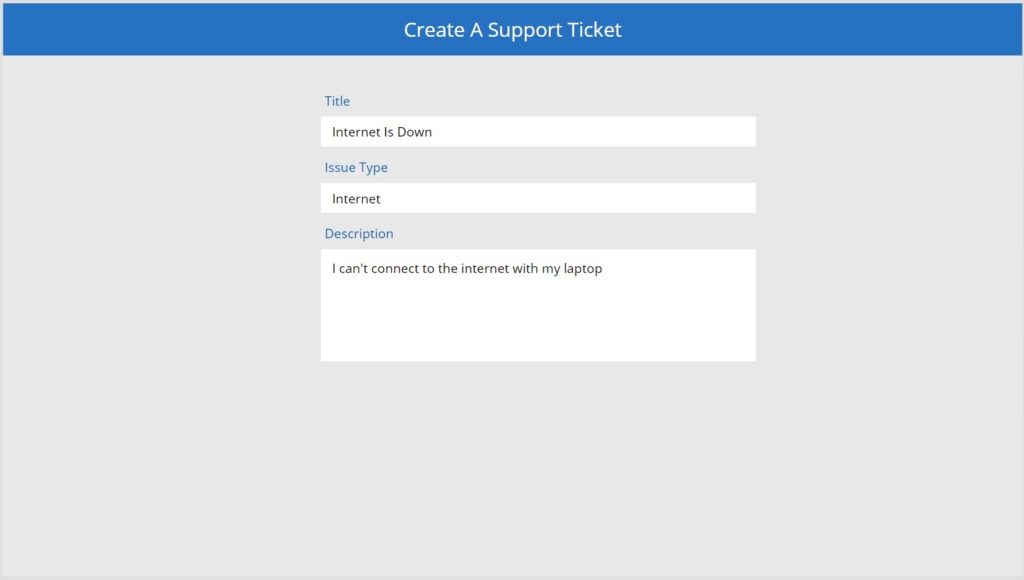
We can now test our app to confirm it generates and email with a direct link to the submitted record. Fill-in the support ticket form with the data shown below.
Then wait a few moments and an email will appear with a direct link to the support ticket record. Click on the link.
When we click on the link the app opens with the form in view-mode and displays the support ticket details.
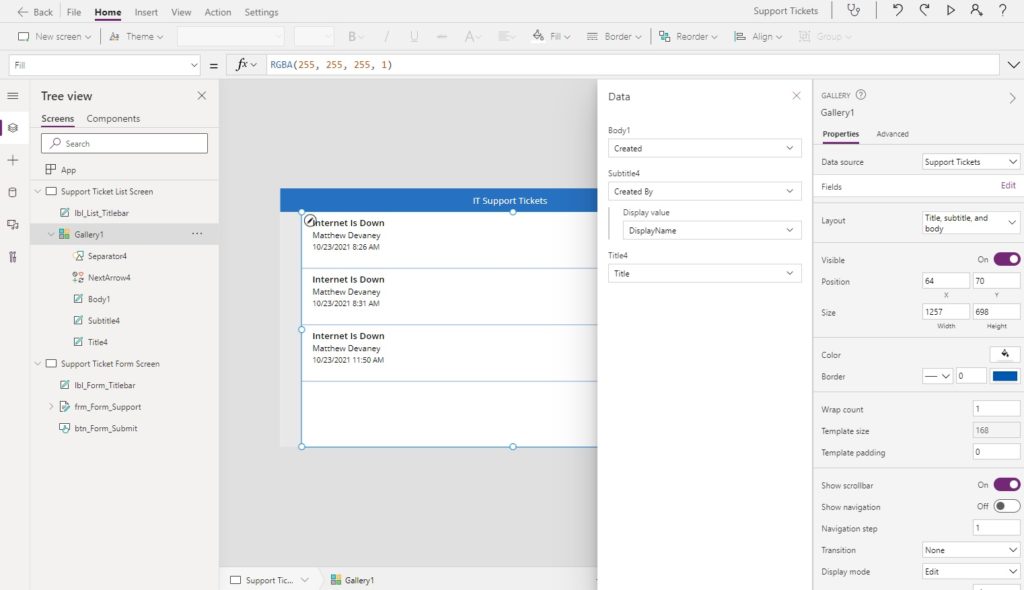
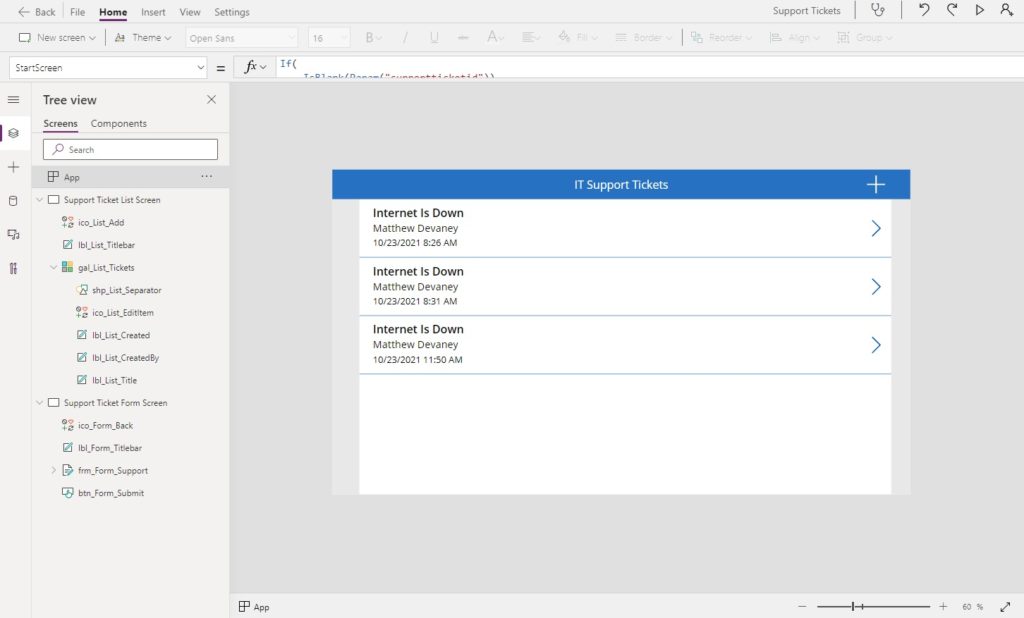
Build A Gallery Showing All Support Tickets
The Create A Support Ticket app also has another screen where an employee can see all of the support tickets they have submitted. After making this new screen we will tell our app which screen it should open to: the Support Ticket List Screen or the Support Ticket Form screen.
Add a new blank screen to the app and insert a gallery. Connect the gallery to the Support Tickets SharePoint list.
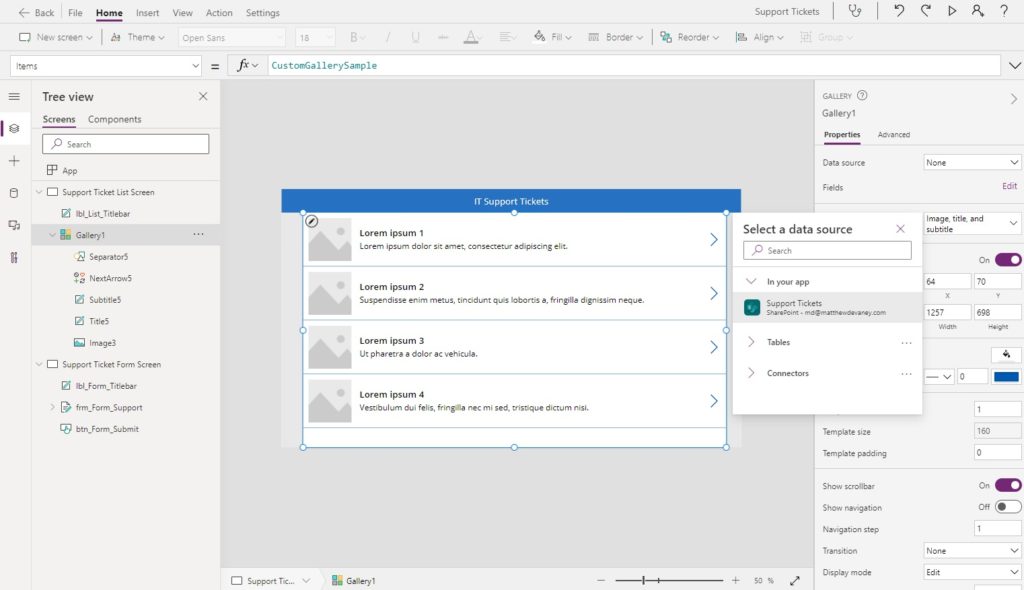
Change the gallery layout to Title, subtitle and body.
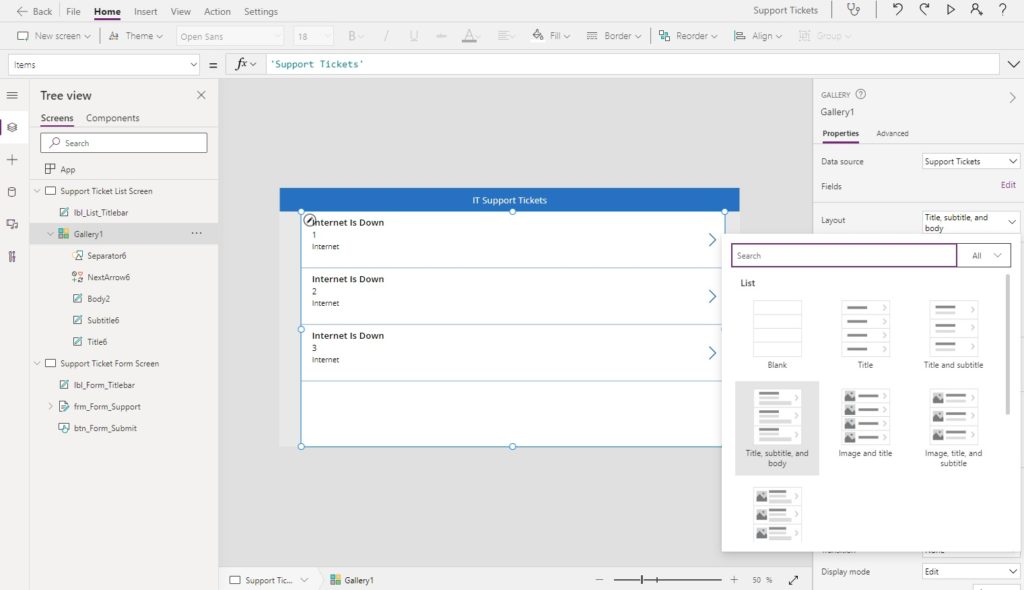
Then update the gallery data fields to the values shown in the image below.
When an employee clicks on a support ticket they should be able to view its details and perform edits.
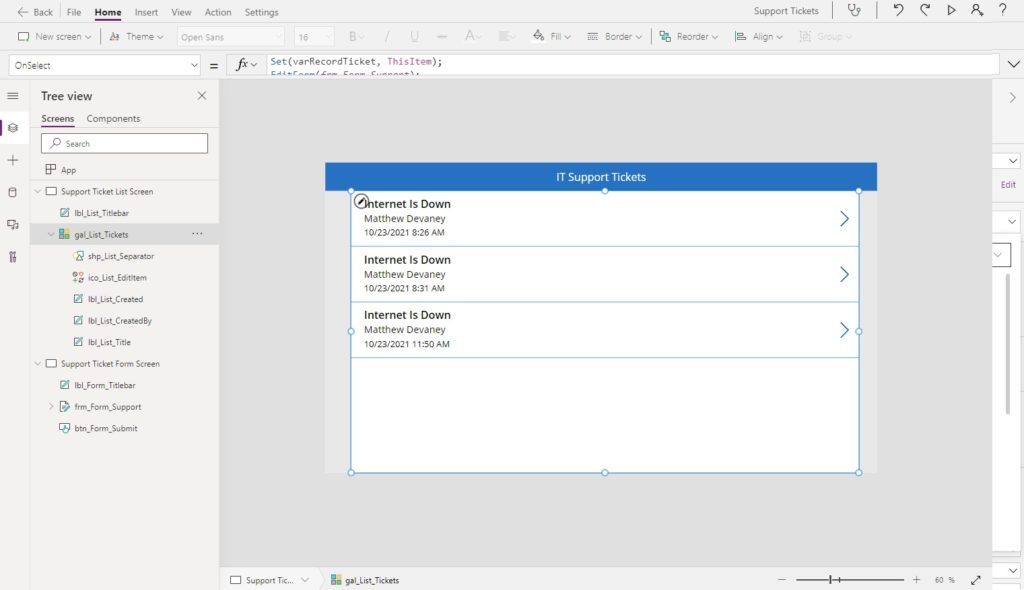
Put this code in the OnSelect property of the gallery.
Set(varRecordTicket, ThisItem);
EditForm(frm_Form_Support);
Navigate('Support Ticket Form Screen', Fade);Code language: JavaScript (javascript)
We also need a way for employees to add new tickets. Insert an add icon at the top of the screen…
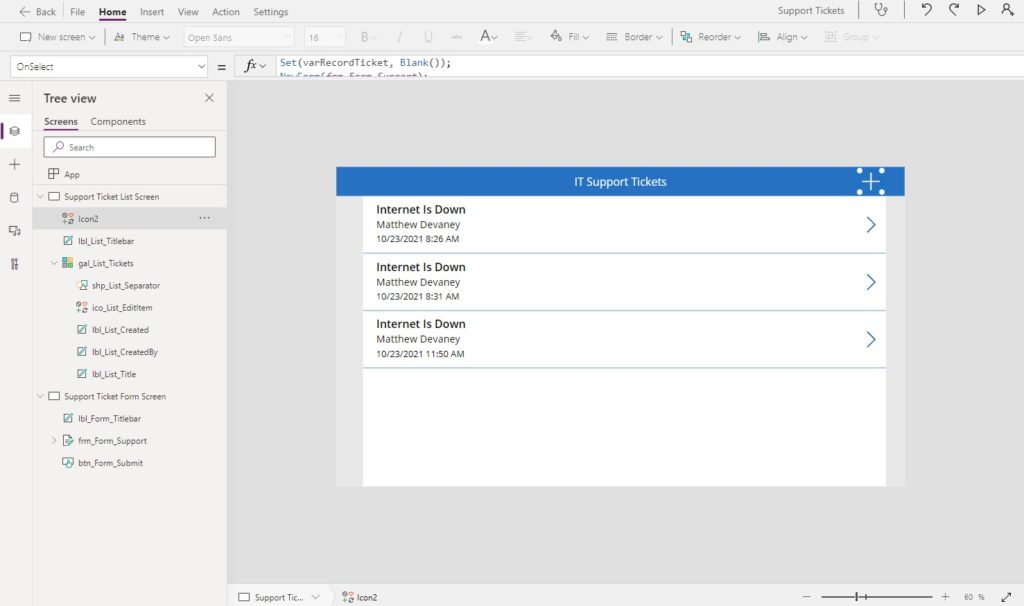
…then use this code in the OnSelect property of the icon.
Set(varRecordTicket, Blank());
NewForm(frm_Form_Support);
Navigate('Support Ticket Form Screen', Fade);Code language: JavaScript (javascript)
One more thing. Once the employee arrives at the form screen they need a way to get back to the list screen. Place a left arrow icon in the top left corner of the form screen.
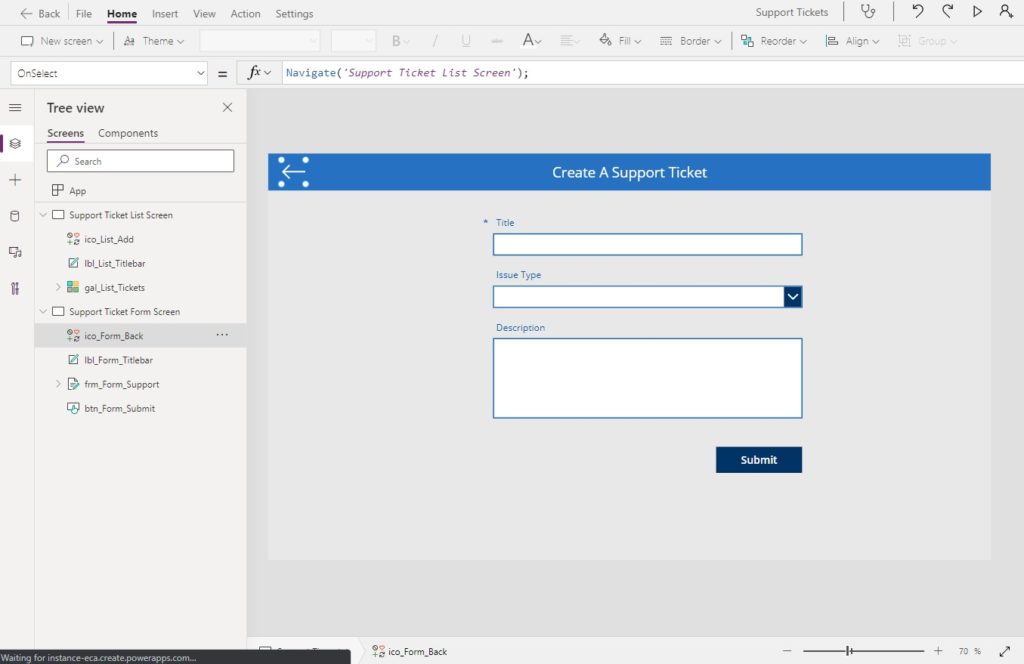
Then write this code in the OnSelect property of the icon.
Navigate('Support Ticket List Screen')Code language: JavaScript (javascript)
Define The App StartScreen Property
Once the app is opened it must determine which screen to load: the support ticket list screen or the support ticket form screen.
We do this by writing an if statement in the the StartScreen property of the app. If the supportticketid URL parameter is blank the app opens to the list screen. But if supportticketid does have a value then the app opens to the form screen.
If(
    IsBlank(Param("supportticketid")),
    'Support Ticket List Screen',
    'Support Ticket Form Screen'
)Code language: JavaScript (javascript)
Did You Enjoy This Article? 😺
Subscribe to get new Copilot Studio articles sent to your inbox each week for FREE
Questions?
If you have any questions or feedback about Power Apps Deep Links: Email Direct Link To A Specific Record please leave a message in the comments section below. You can post using your email address and are not required to create an account to join the discussion.


Thank you! this needs to be tested. a very, very necessary feature! ?
it will work if there is a screen if there is a screen form and there is a gallery next to it?
Aydar,
Yes, this approach will still work if you have the gallery and form on the same screen 🙂
Thank you! is this possible due to the release of the new App.StartScreen feature?
Sitdikov,
No, it was possible before but now the approach to build deep links is different because of App.StartScreen. It seemed like the perfect time to post this article 🙂
Thanks a lot for the article. How could we secure the URL link? Anyone could change the Item ID and could open other requests.
Inderjeet,
This is an important question – thank you for asking it! We should always combine deep links with role-based security. When the app opens there should be some code in the StartScreen property that determines who the user or what their role is (basic user, manager, admin, etc.). Then if the user has the appropriate permissions they are directed to the form screen, otherwise, they are redirected to another screen that says “you do not have permissions!”.
Here’s a simple idea of how the code might look:
With(
{hasPermission: User().Email = LookUp(‘Support Tickets’, ID=Value(Param(“id”)), ‘Created By’.Email)},
If(
hasPermission,
Navigate(‘Form Screen’),
Navigate(‘No Permission Screen’)
)
)
A user may be allowed to see all the records, but we don’t want them to be able to change the ID to see them.
Is there a way to add additional parameters so that the ID and other data values need to match before showing the page? For instance, for your example, the ticket title in addition to the ID. Thanks.
Luke,
I suggest you check out this article about how to setup up item-level permissions in SharePoint. It is the only way to truly prevent curious users from seeing records that they should not be:
https://www.matthewdevaney.com/3-ways-to-filter-a-power-apps-gallery-by-the-current-user/
My method can handle simple scenarios but my friend Reza Dorrani also published a video for more advanced cases:
https://www.youtube.com/watch?v=EJyZfYMi4n0
I think there are some little mistakes
for me it’s (frm_Form_Support)
Set(varRecordTicket, frm_Form_Support.LastSubmit);
ViewForm(frm_Form_Support);
Notify(“Success: Your support ticket was submitted”, NotificationType.Success);
No ; at the end of the formula.
To be continued 😉
Anthony,
I’m all for getting a little-bit of help editing my articles 🙂
I agree with you about my SubmitForm function. I’ve gone ahead and made the correction. Thank you for reporting it!
In my opinion, The semi-colon at the end of the formula is fine. Semi-colons meant to terminate a line. Its not necessary to put one there, but that’s how I like to do it.
An another question : what is the interest to use compose action in this case ?
is it possible to make this link if the application is embedded in a tab in teams?
Thanks Matthew!
Great post, I could easily apply this with multiple parameters and also link to Power BI.
Question- could you share on- ways to mask the Weblink to an app by a valid name ( instead of alphanumeric URL) which is unique to each app ?
Thank you.
Priya,
Could you please help me understand what web link masking is? I’m not familiar with this term.
HI Matthew,
It could be replacing a Weblink that looks like –
https://apps.powerapps.com/play/d77ba81c-d7e4-4131-bb06-12b172225819?tenantId=f1b8b509-50a4-4a5c-8e48-bf3d3e7c10ed
By something meaningful (masking) –
https://apps.powerapps.com/MyappCatalyst
Thanks,
Priya
Thank you very much for the detailed example. It took me a bit to wrap my head around it and adopt this for my scenario. It works great…..
Kyle,
Yes, I agree it is not simple to implement the first-time but I’m glad you were able to use it inside of your own app!
Hey Matthew. First of all, thanks for all your articles and information.
For some reason, whenever, I click the link in my email it ALWAYS opens the form in NEW mode and never the actual VIEW mode.
Any ideas as to what I am doing wrong?
Marc,
Did you remember to include this code in the OnStart property? A few things I’d like you to verify are:
1. supportticketid is in the link you click in the email
2. varRecordTicket is loaded with the parameter
3. confirm you have the correct form name in the ViewForm code.
If those 3 conditions are met the ViewForm code should execute properly
Set(
varRecordTicket,
LookUp(
‘Support Tickets’,
ID = Value(Param(“supportticketid”))
)
);
If(
!IsBlank(varRecordTicket),
ViewForm(frm_Form_Support)
)
Hi Matthew,
Thanks for sharing your article 🙂
However, when I clicked URL in my email it ALWAYS opened a NEW form in Edit mode even though on the web browser’s URL, it specified the correct item number(
https://….&supportticketid=7) Please advise. Thanks
Ngoc,
Did you remember to include this code in the OnStart property? A few things I’d like you to verify are:
1. varRecordTicket is loaded with the parameter
2. confirm you have the correct form name in the ViewForm code.
If those 2 conditions are met the ViewForm code should execute properly
Set(
varRecordTicket,
LookUp(
‘Support Tickets’,
ID = Value(Param(“supportticketid”))
)
);
If(
!IsBlank(varRecordTicket),
ViewForm(frm_Form_Support)
)
Hi Matthew,
Your instruction worked now.. THANKS
However, when I applied your instruction to mine… After clicking on the email’s URL, It only opened the main screen and I got “Getting your data” msg stuck even thought the URL browser listed the correct record ID number.
https://apps…..&hidenavbar=true&RCSID=780
My gallery’s selected item
If(NewForm(EditForm),ViewForm(EditForm);Set(varRCS, ThisItem),ViewForm(EditForm))
After the users click on the gallery’s selected item, they can view the selected item’s info and they can click on “Pencil” icon / “trash” icon for editing / deleting the selected item. Note that Gallery and ViewForm(EditForm) are on the same screen
My OnStart
Set(varRCSID,LookUp(‘RCS Requests’, ID = Value(Param(“RCSID”))));
If(!IsBlank(varRCSID),ViewForm(EditForm))
Ngoc,
Getting your data means the form is in Edit Mode but no record was supplied in its item property. If you did supply a record that record is blank.
Hi Matthew,
Thanks.
Does your instruction work for SharePoint TASK list ?
Does it also work for updating ? (I had a Power Automate flow to send a msg when SharePoint TASK item is created or modified)
THANKS so much for your support 🙂
There is another link syntax to use for emails/notifications/etc. which will open a PowerApp in the native container app:
ms-apps:////providers/Microsoft.PowerApps/apps/<appID>
Reference
Matthew,
When I use a deep link in an email it brings up the form properly but the attachments are incorrect. Whatever item is reference by the deep link, the attachment from the first record in the gallery is displayed. Have you seen this behavior from deep linking before?
Nice post Matthew.
Everything is working in my canvas apps but I have a special app that is a Model driven app with Custom Pages (with multiple screens).
Is it possible to implement deep linking for this case of custom pages? because I’m not being able to pass parameters to custom pages like in this example
https://XXXXX.com/main.aspx?appid=1359be2c-9ae4-ec11-bb3c-000d3ab03817&pagetype=custom&name=new_components_a54be&id=309
the id parameter is my added parameter to try to open the desired screen with the record that I want but the problem is that is not allowed. Is there a way to implement that I want?
Thanks in advance
Ricardo,
I don’t have any guidance for Model-Driven Apps but I’ll approve this question so others can potentially help.
Hi Matthew, did you have any updates on this implementation for custom pages in modal-driven apps? Thank you!!
Hi Matthew, it works well for powers apps on the browser. My user need to stay in Teams (Explicitly embedded in a Tab within the general Channel) I can get the link to the Tab. How can I manipulate the Tab-url with the Param “supportticketid” , so that the StartScreen Function direct the user to the corresponding Pages/Forms?
Hi,
I could use some assistance with the Send An Email With A Direct Link To A Specific Record. In my app, I have a dashboard Screen that then takes me to specific records for Edit or View. I have been unable to adjust link syntax to move to the specific record.
Randy,
What have you tried to fix the problem so far?
I have tried to adjust the link to reference the record in the detail screen; however, I continue to return to the Main Dashboard screen.
The detail screen is…
https://make.powerapps.com/e/Default-4130bd39-7c53-419c-b1e5-8758d6d63f21/canvas/?action=edit&app-id=%2Fproviders%2FMicrosoft.PowerApps%2Fapps%2F1e2df5e6-18fe-4c2f-b95b-a9616216807d
Hello Matthew,
Thanks for your tutorial.
I have tested your procedure, everything works except when I click on the link in the email.
This redirects me to the ticket but the form does not display.
Do you have a solution please?
Tony,
Are you receiving any error?
Also, can you check to confirm the parameter is being successfully passed to Power Apps and see if the record was retrieved?
Great article Matthew.
Is there a way to deep link to a patch form?
A form that uses Patch instead of EditForm.
Thien,
Yes, the method is pretty much the same as an EditForm.
Hi Matthew,
Do you know how I would use deep linking in a Power App with “Send push notification V2” I have a app and flow that sends a notification each day but when I tap the notification I want to open the specific page of the app but it’s just opening the main page
I see there is Parameters after Open app but I can’t get it to work
Any help would be amazing
Thanks
Steven
Steven,
Sorry, that’s unknown to me. Can’t say I’ve used the push notification feature before.
Always the best guides on the internet from you, worked like a charm to load an item from email link and display it in a gallery.
Since I had the gallery on a different screen in the app (not the main loading screen) I used the below to get to it. Make sure to change the variable and screen names for your environment.
App.StartScreen = If(!IsBlank(Value(Param(“currentid”))),’View Forms’,Dashboard)
On the gallery I used the below.
If(
!IsBlank(Value(Param(“currentid”))),Filter(‘Liquidation Form’,ID=currentrecordID),Sort(‘Liquidation Form’,ID,SortOrder.Descending)
)
Hope this is useful for anyone with the same scenario.
I am getting the following error message:
Network error when using the Patch function: The specified column is generated by the server and can’t be specified.
Donna,
There’s no Patch function in this tutorial… are you sure you posted on the correct one?
hey Matt, thanks for such a beautiful content and crystal clear explanation. Its been of great help
there is an email contains power apps link ,, need when user access this link the Email subject save automatically to power apps
Please note that the subject is dynamic
(it means it will change every time, but it has two parts, the first part is static and the second part will be changed)