Make A Power Apps Timesheets App – Part 1

Timesheets are a popular app to make in Power Apps. In this step-by-step tutorial, I’ll show you how to build your own timesheets app. We will begin by creating timesheet lines with ability to add, edit, delete them. Then we will add the ability to create new timesheets and submit them for approval. I know it’s possible to download a pre-made timesheets template. But I believe the best way to learn Power Apps is to build apps for yourself.
Introduction: The Timesheets App
Employees at a company enter their weekly worked hours into a Power Apps Timesheets app. Each timesheet has one or more timesheet lines with a specific paycode (regular, overtime, sick, etc.). When the timesheet is completed the employee submits it to their manager for review.
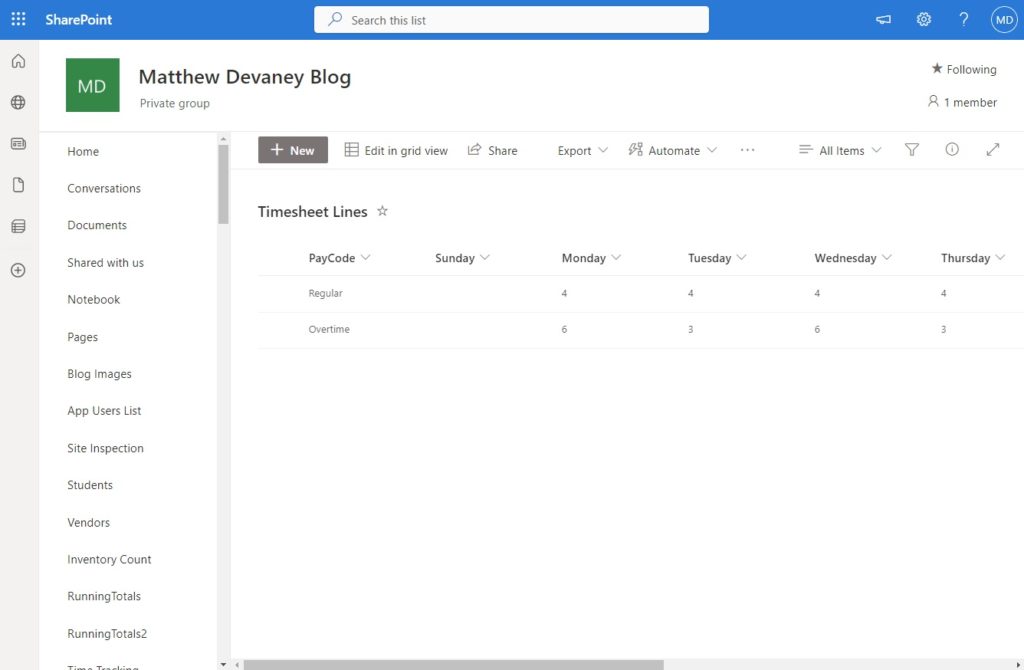
Setup The Timesheet Lines SharePoint List
Create a new SharePoint list named Timesheet Lines with the following columns:
- PayCode (single-line text)
- Sunday (number)
- Monday (number)
- Tuesday (number)
- Wednesday (number)
- Thursday (number)
- Friday (number)
- Saturday (number)
- TotalHours (calculated number)
Go to the SharePoint list settings and edit the TotalHours column.
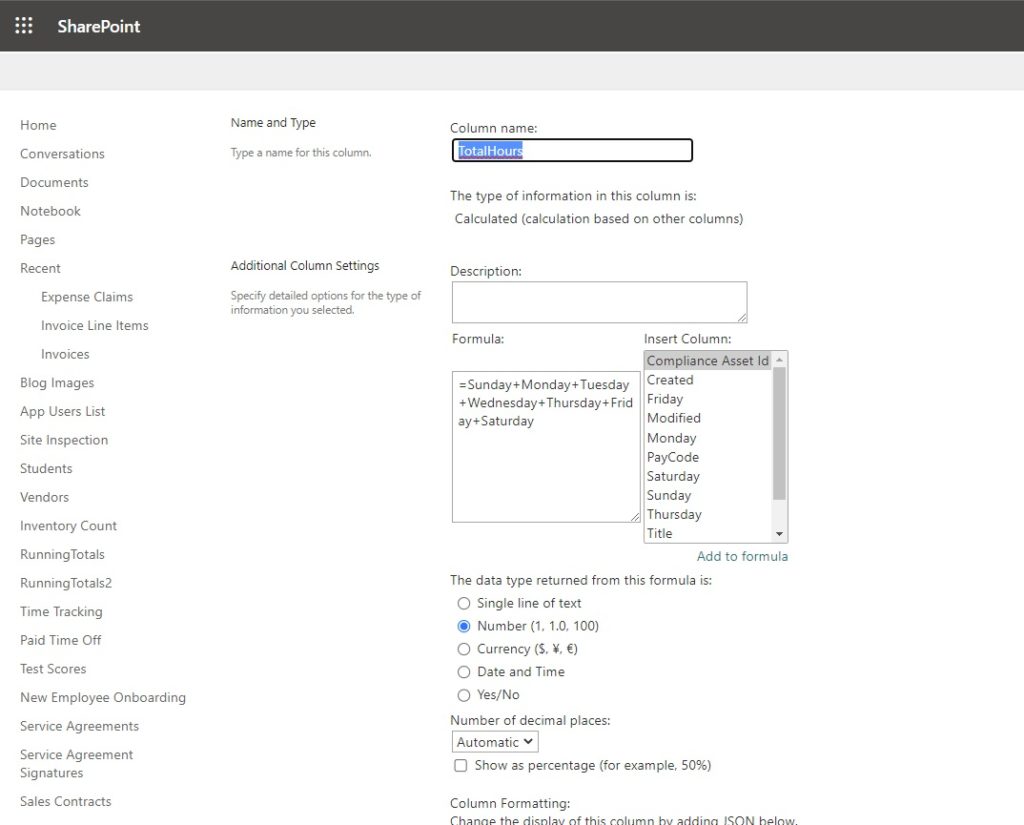
Change the calculated field formula to this formula.
=Sunday+Monday+Tuesday+Wednesday+Thursday+Friday+Saturday
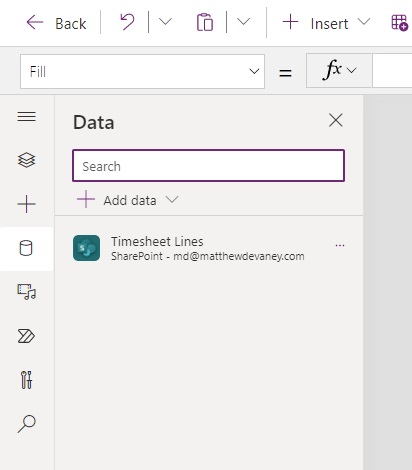
Then open Power Apps Studio and create a new app from blank. Add the Timesheet Lines SharePoint list to the app using the Data menu.
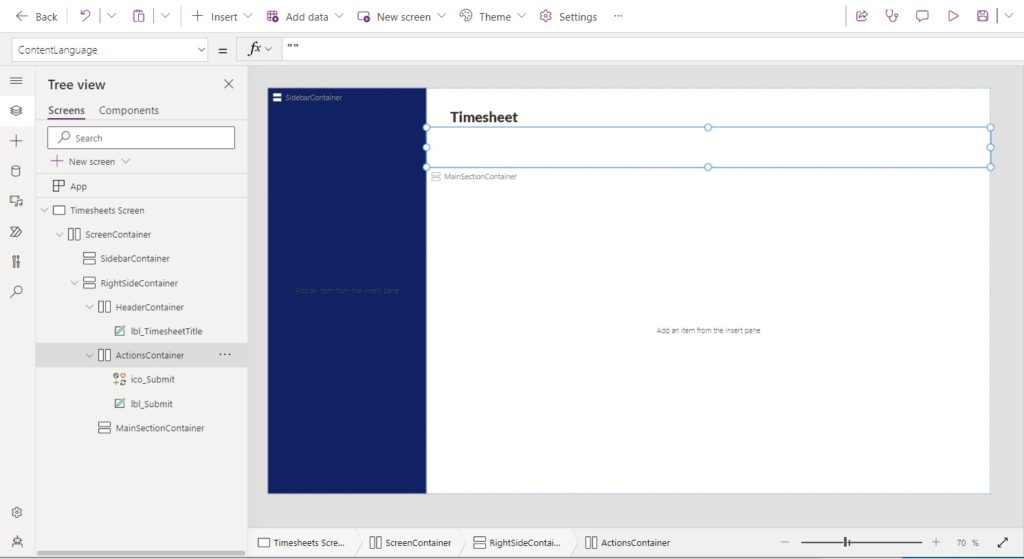
Add A New Screen With The Sidebar Layout
In Power Apps Studio add a new screen to the app. Choose the sidebar layout.
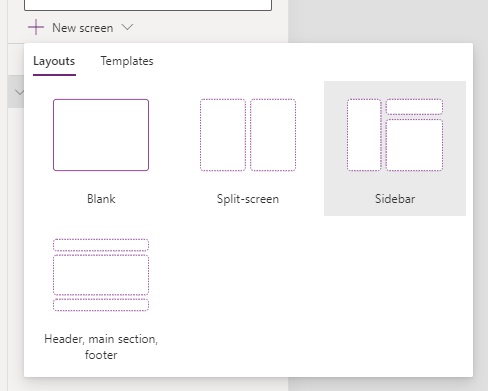
The new screen will appear with several layout containers
- ScreenContainer
- SidebarContainer
- RightSideContainer
- HeaderContainer
- MainSectionContainer
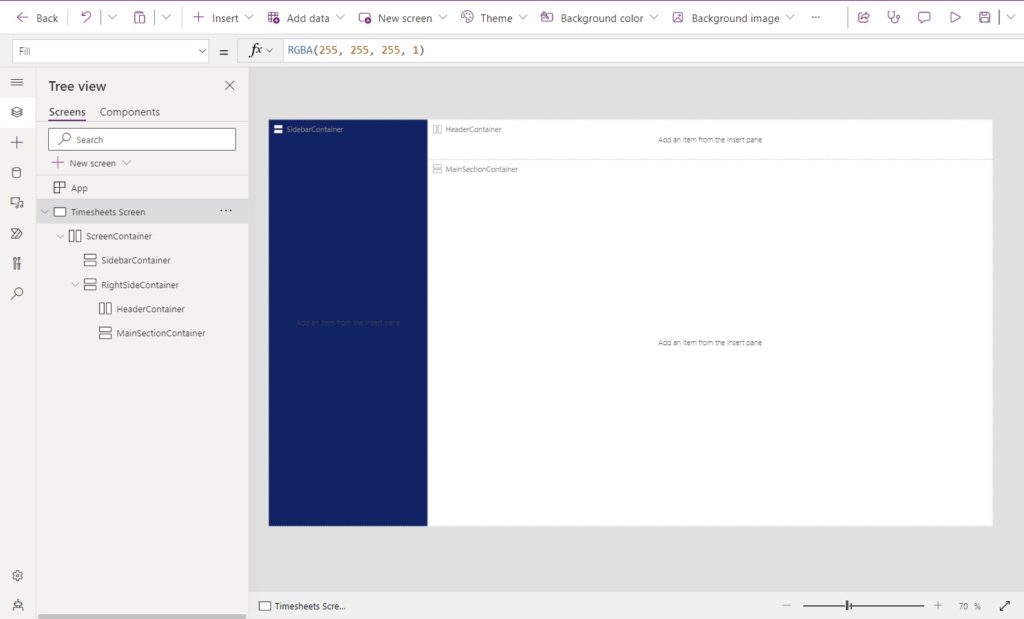
Change the Fill property of the SidebarContainer container to dark blue.
RGBA(9, 33, 98, 1)
Insert An App Title Label
Create a new label in the the HeaderContainer with the word “Timesheet.”
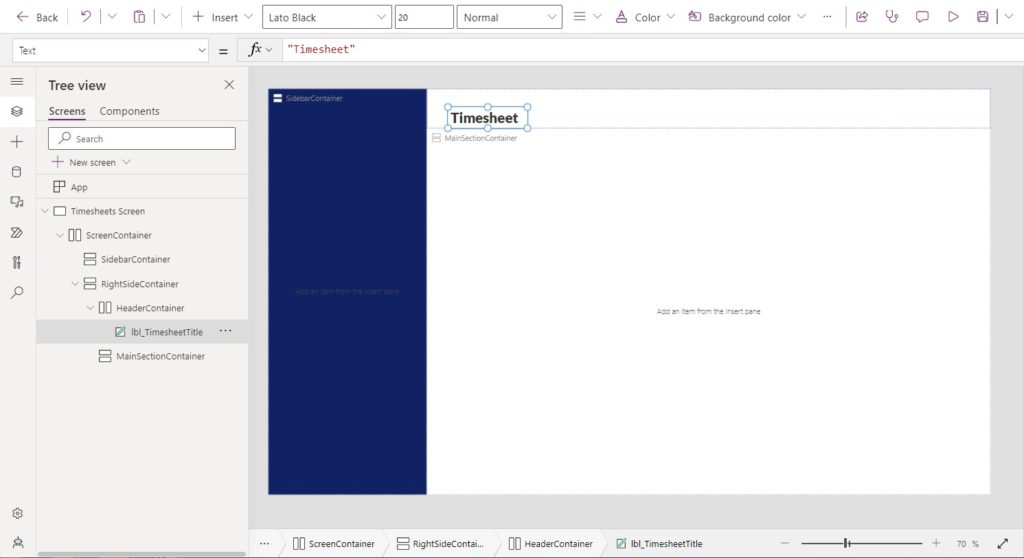
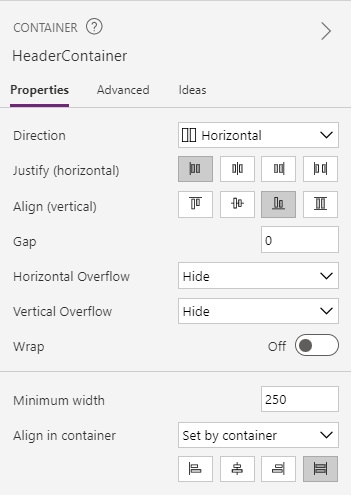
Configure the HeaderContainer to have a bottom vertical alignment. This will cause the title label to also become bottom-aligned.
Then update the following properties in the title label.
Font: Font.'Lato Black'
Height: 40
PaddingLeft: 40
Size: 20Code language: HTTP (http)
Create An Actions Bar
Underneath the HeaderContainer we will make an actions bar. The actions bar will give a user the ability to create new timesheet lines and save the timesheet. Later we will add more actions to submit the timesheet and delete the timesheet.
Copy and paste the HeaderContainer into the RightSideContainer. Delete the title label inside the container. Rename the new container ActionsContainer.
Change the vertical alignment of the Actions Container to middle.
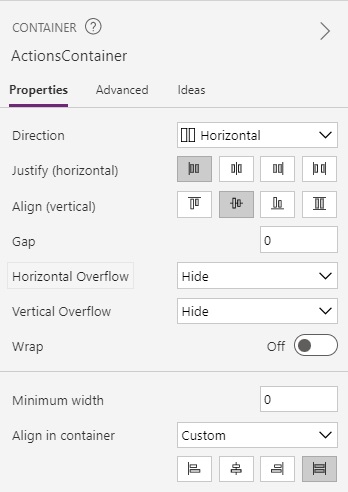
Add an icon and a label the to the ActionsContainer for purpose of adding a new timesheet line.
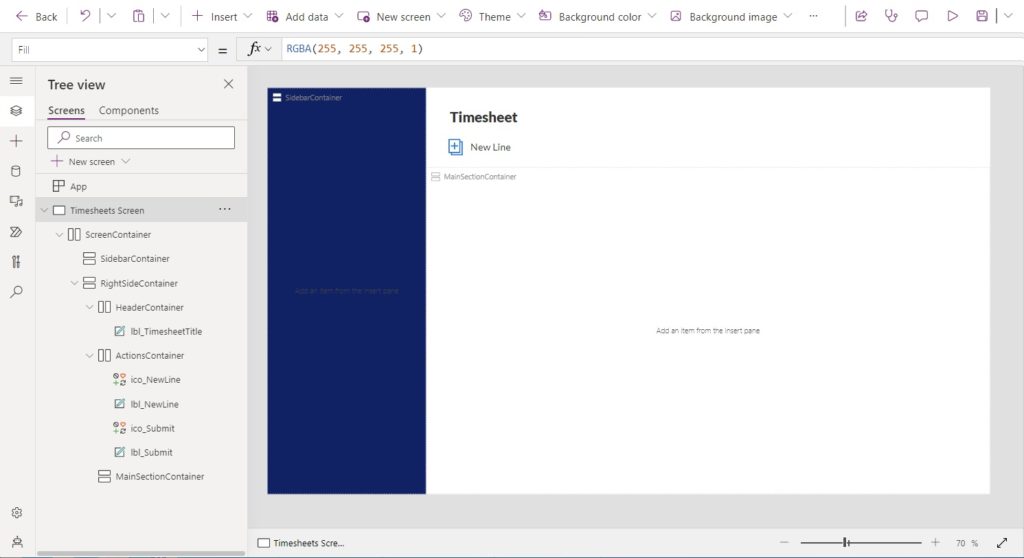
Set the Icon property of the Icon to AddLibrary.
Icon.AddLibraryCode language: CSS (css)
Style the AddLibrary icon using this code.
Color: RGBA(0, 120, 212, 1)
Height: 32
Width: 32Code language: HTTP (http)
Write this code in the OnSelect property of the icon to create a blank new timesheet line.
Collect(
    colTimesheetLines,
    Defaults('Timesheet Lines')
)Code language: JavaScript (javascript)
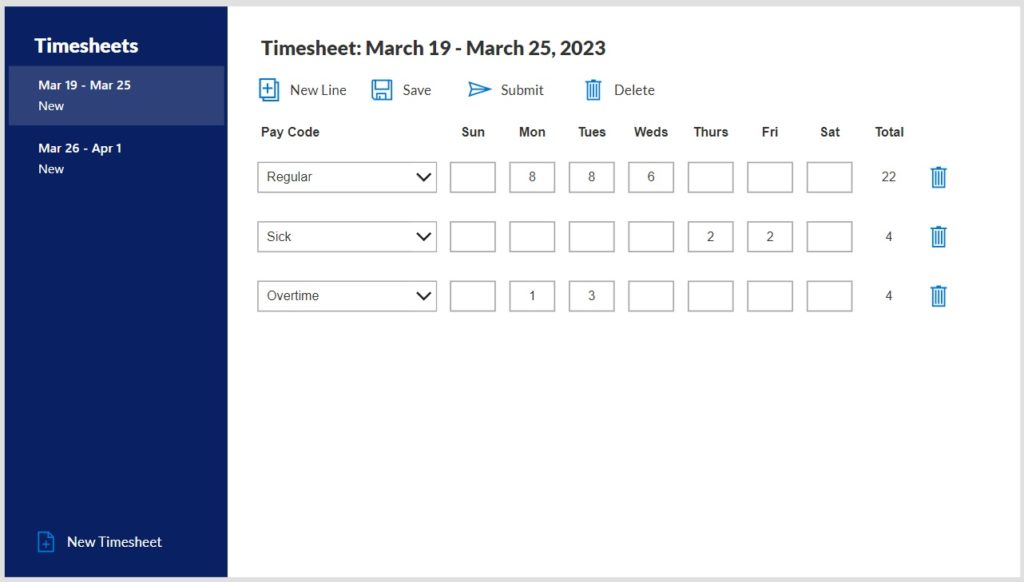
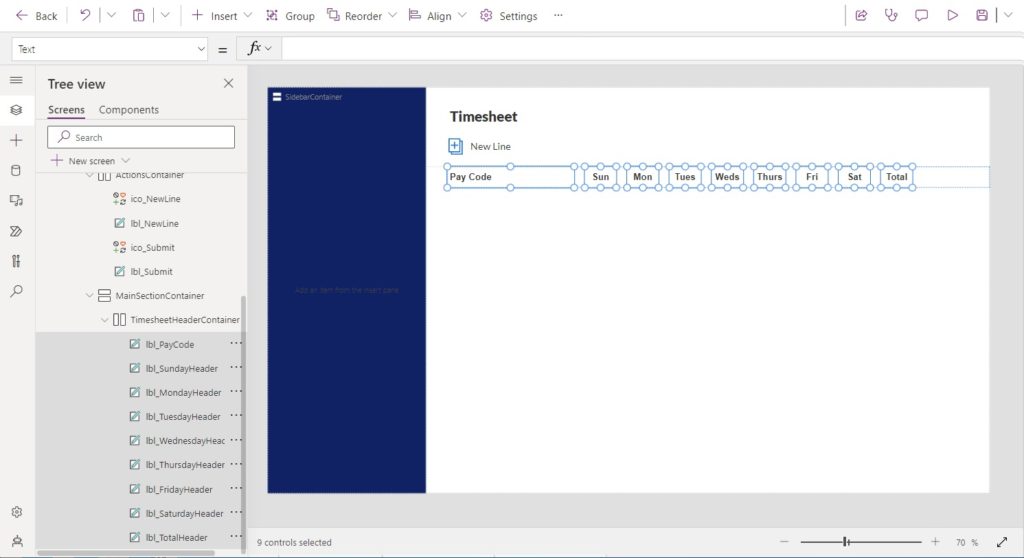
Layout The Timesheet Lines Table Headings
The timesheet lines will appear in a table-like format with the days Sunday to Saturday arranged from left to write. We need to create the table header. Insert a new horizontal container in the MainSectionContainer called TimesheetHeaderContainer.
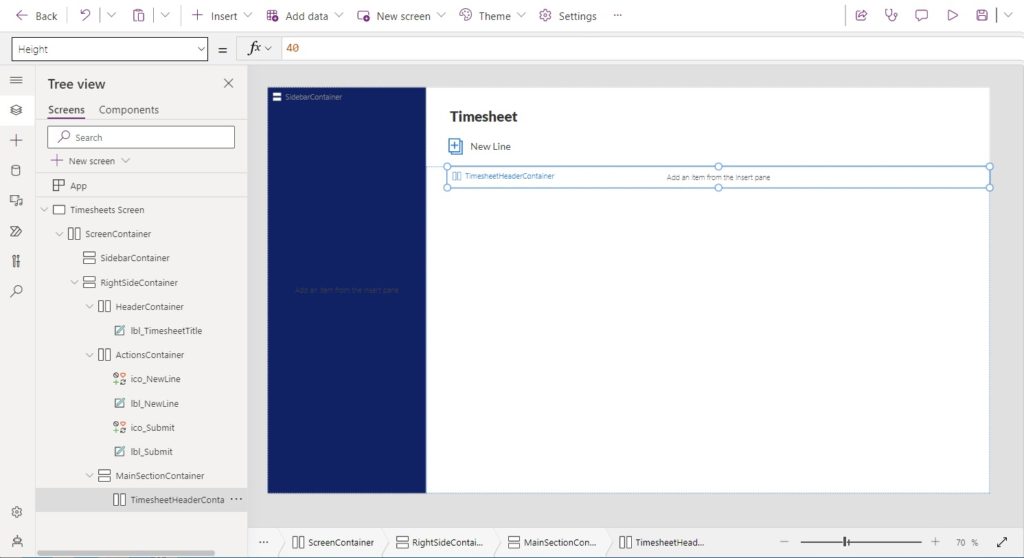
Setup the TimesheetHeaderContainer properties with the following values.
Height: 40
LayoutGap: 20Code language: HTTP (http)
Insert 9 new labels into the TimesheetHeaderContainer with the following text.
- PayCode
- Sun
- Mon
- Tues
- Weds
- Thurs
- Fri
- Sat
- Total
Configure The Pay Code Dropdown Menu
We want the app to allow multiple lines per timesheet for pay codes such as: regular, overtime, vacation, sick, etc. Insert a new vertical gallery into the app.
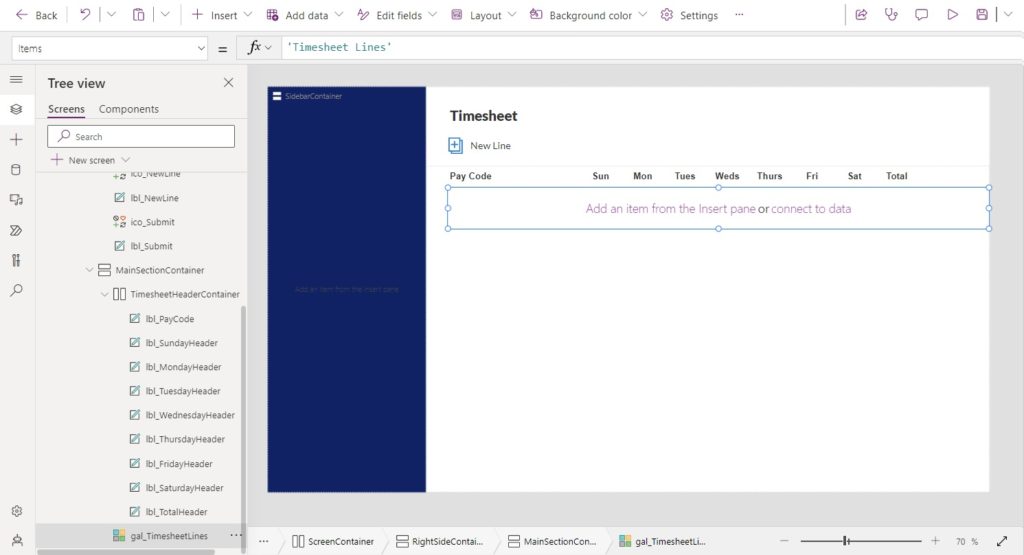
Use the Timesheet Lines collection in the Items property of the gallery.
colTimesheetLines
Make the gallery rows shorter by using these values in the TemplatePadding and TemplateSize properties.
TemplatePadding: 0
TemplateSize: 80Code language: HTTP (http)
Place a new dropdown menu named drp_PayCode at left-side of the gallery.
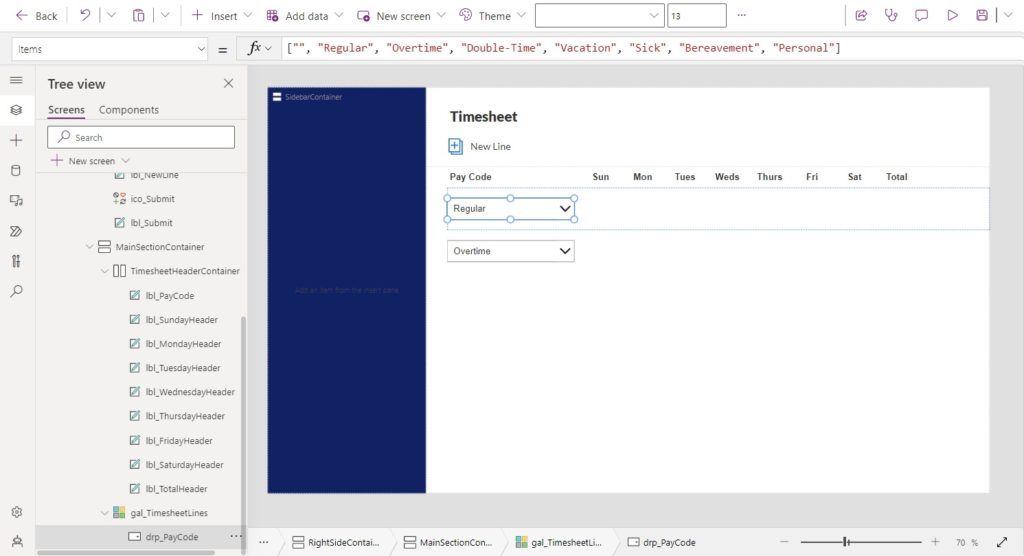
Load the Items property of the dropdown menu with the following values.
["Regular", "Overtime", "Double-Time", "Vacation", "Sick", "Bereavement", "Personal"]Code language: JSON / JSON with Comments (json)
Use this value in the Default property of the dropdown. Once we build a feature to save the timesheet line values to SharePoint it will display the saved pay code.
ThisItem.PayCodeCode language: CSS (css)
Arrange The Time Entry Fields For Sunday To Saturday
The app user will enter their time for each day into a text input. Create 7 new text inputs and place them inside the the gallery.
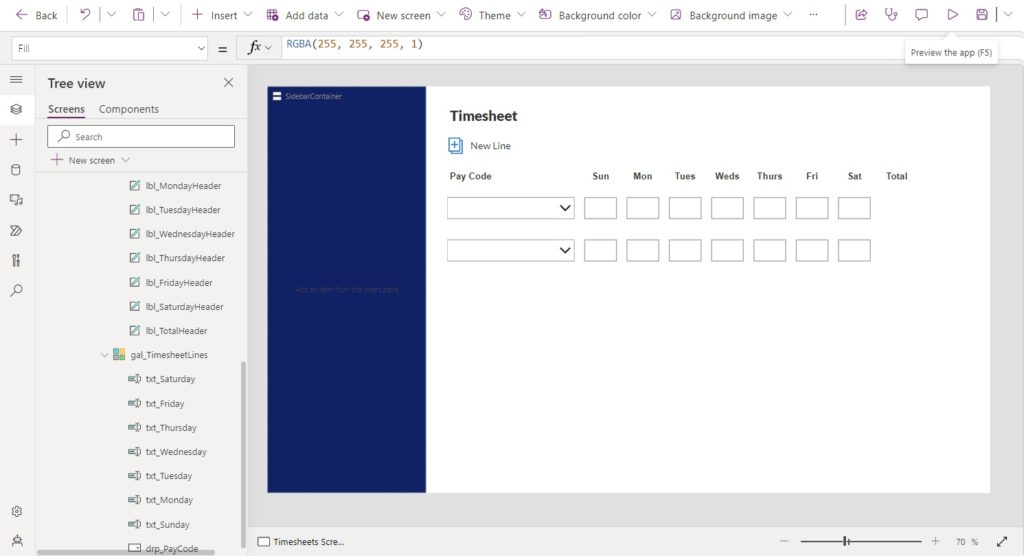
We want to ensure the text input fields stay aligned with the table headers. Use the following code inside the X property of the respective text input fields.
lbl_SundayHeader.X
lbl_MondayHeader.X
lbl_TuesdayHeader.X
lbl_WednesdayHeader.X
lbl_ThursdayHeader.X
lbl_FridayHeader.X
lbl_SaturdayHeader.XCode language: CSS (css)
And use these values in the text inputs Width property to make them the same width as the table headers.
lbl_SundayHeader.Width
lbl_MondayHeader.Width
lbl_TuesdayHeader.Width
lbl_WednesdayHeader.Width
lbl_ThursdayHeader.Width
lbl_FridayHeader.Width
lbl_SaturdayHeader.WidthCode language: CSS (css)
The user should only be able to write a number into the text input. Update the TextFormat property of all text inputs to the number type.
TextFormat.NumberCode language: CSS (css)
To show the saved number of hours for each day use this value in the Default property of the respective text input.
ThisItem.Sunday
ThisItem.Monday
ThisItem.Tuesday
ThisItem.Wednesday
ThisItem.Thursday
ThisItem.Friday
Thistem.SaturdayCode language: CSS (css)
Calculate The Total Hours For Each Timesheet Line
The SharePoint list uses a calculated field to determine the total number of hours on a timesheet line. But we also need to calculate this value in the app for unsaved timesheet lines.
Add a new label to the gallery.

Set the X position of the label and the Width to the same position as the TotalHours header.
Width: lbl_TotalHoursHeader.Width
X: lbl_TotalHoursHeader.XCode language: CSS (css)
Calculate the total of the timesheet line as the sum of the text inputs for Sunday to Saturday and show 0 when they are all blank. Write this code in the text property of the label.
Coalesce(
    Sum(
        Value(txt_Sunday.Text),
        Value(txt_Monday.Text),
        Value(txt_Tuesday.Text),
        Value(txt_Wednesday.Text),
        Value(txt_Thursday.Text),
        Value(txt_Friday.Text),
        Value(txt_Saturday.Text)
    ),
    0
)Code language: CSS (css)
Delete A Timesheet Line
A user has the ability to remove a timesheet line from the timesheet. Insert a Trash icon into the gallery after the total hours label.

Use this code in the OnSelect property of the Trash icon to remove the timesheet line from the colTimsheetLines collection. If the timesheet line ID is not blank, it means the timesheet line exists in the SharePoint list and must be deleted there as well.
Remove(
    colTimesheetLines,
    ThisItem
);
If(
    !IsBlank(ThisItem.ID),
    Collect(
        colDeleteTimesheetLines,
        ThisItem
    );
)Code language: CSS (css)
Save The Timesheet Lines
Once the timesheet is completed the user saves the updated timesheet lines. Insert a Save icon into the ActionsContainer.
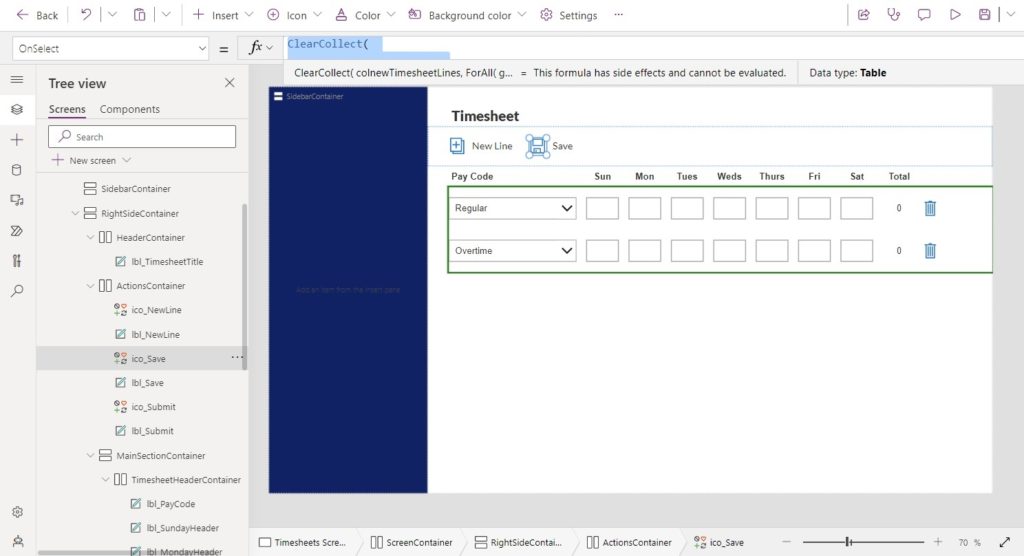
Write this code in the OnSelect property of the gallery to store all of the timesheet lines in collection and patch them to the SharePoint list with new values.
// collection to update timesheet lines
ClearCollect(
    colUpdateTimesheetLines,
    ForAll(
        gal_TimesheetLines.AllItems,
        'Timesheet Lines'@{
            ID: ID,
            PayCode: drp_PayCode.Selected.Value,
            Sunday: Value(txt_Sunday.Text),
            Monday: Value(txt_Monday.Text),
            Tuesday: Value(txt_Tuesday.Text),
            Wednesday: Value(txt_Wednesday.Text),
            Thursday: Value(txt_Thursday.Text),
            Friday: Value(txt_Friday.Text),
            Saturday: Value(txt_Saturday.Text)
        }
    )
);

// update timesheet lines and store the results
ClearCollect(
    colTimesheetLines,
    Patch(
        'Timesheet Lines',
        gal_TimesheetLines.AllItems,
        colUpdateTimesheetLines
    )
);

// delete timesheet lines
ForAll(
    colDeleteTimesheetLines,
    Remove(
        'Timesheet Lines',
        ThisRecord
    )
);
Clear(colDeleteTimesheetLines);Code language: JavaScript (javascript)
Ready For Part 2 Of This Tutorial?
In Make A Power Apps Timesheets App – Part 2 we will add the ability to create new timesheets and submit them for approval. Click here to continue the tutorial.
Did You Enjoy This Article? 😺
Subscribe to get new Copilot Studio articles sent to your inbox each week for FREE
Questions?
If you have any questions or feedback about Make A Power Apps Timesheets App – Part 1 please leave a message in the comments section below. You can post using your email address and are not required to create an account to join the discussion.


Hello,I’m a newcomer who only recently started learning, and I’d like to ask where the @{TimesheetID: gblTimesheetCurrent.ID} is defined in the new line, and I hope to answer it and get the next issue out as soon as possible, thanks very much!
Hengyuan,
I’ve removed this line from the tutorial now. It is not needed until Part 2 🙂
Great Tutorial! But one questions how to insert different work break down structure based on the time allocated below screen shout for for monthly base
Hello Berihun,
I do not understand your question. What specific feature do you require that is not already included in the tutorial?
Please note, part 2 of this tutorial will be published next week. It shows how to add, edit and remove timesheets.
Can you please explain what the @ symbol is used for? For example, in this formula:
Collect(
colTimesheetLines,
‘Timesheet Lines’@{TimesheetID: gblTimesheetCurrent.ID}
)
By the way, your collections cookbook is great. I would love if the examples could also reference SharePoint list data sources instead of (or in addition to) the collections of hardcoded values. Thanks for all that you do to share your knowledge with others, your posts are extremely helpful!
Nic,
Great question. By writing ‘Timesheet Lines’@ I am telling Power Apps that it is a “Timesheet Lines” record. The new record being created will have the same fields & types as other Timesheet Lines records. The reason I do this is to ensure the record will successfully be inserted into SharePoint and not rejected because it has a different structure.
Thank you!
(Oh and your Part 2 note at the bottom of the post says it’ll be posted April 3 which is today; sounds like you meant for it to say April 10 from your response to Berihun?)
Nic,
You are correct about this. I will publish Part 2 on April 10th. Thanks for the correction notice 🙂
Hi Matthew, thanks again for your post. You really keep up the good work 😁
What I don’t really understand is how you use the ‘colTimesheetLines’ collection.
– You use it in the OnSelect property of the icon to create new timesheet lines.
– You bind it to the Items property of the gallery.
– And you use this collection to update the timesheet lines and store the results in SharePoint.
But where do you initially fill the collection from the records stored in SharePoint when opening the form?
Also; where does the ‘gblTimesheetCurrent’ variable come from in the formula in the OnSelect property of the icon to create new timesheet lines?
Collect(
colTimesheetLines,
‘Timesheet Lines’@{TimesheetID: gblTimesheetCurrent.ID}
)
Or is this part of Part 2 Of This Tutorial?
Thanx!
Geert,
You are correct. gblTimesheetCurrent is related to Part 2 of the tutorial. Oops!
I have made this change to the tutorial. Remove this code in the Items property of the gallery.
Collect(colTimesheetLines, ‘Timesheet Lines’@{TimesheetID: gblTimesheetCurrent.ID})
And insert this code instead:
Collect(colTimesheetLines, Defaults(‘Timesheet Lines’))
Hi Mathew, I cant find the colnewtimesheet collection in the save icon onselect property
Priya,
Please use the code which sets the collection “colUpdateTimesheetLines” instead.
I can see the screenshot where colnewtimesheet is suggested. I’ll edit that photo. But no code is suggested for it in my article.
Nice information. Waiting for 2nd part.
Thanks Matthew Devaney
Hello Matthew, very interesting app. Eagerly looking for part 2. Thank you.
Kudos for the tutorial.
Please, can you explain how the syntax in the curly braces works, because I think the TimesheetID is a column on the sharepoint list but it was not included on the list of columns to be created.
Collect(
colTimesheetLines,
‘Timesheet Lines’@{TimesheetID: gblTimesheetCurrent.ID}
)
Kindly explain, Thanks.
Abdul,
Suggest you check out my website for an updated code block. My original post used the code above. But it’s actually related to part 2. So I changed it.
Hi Matthew, thanks again for your great post. I learned a lot from you and really appreciate your contributions to Power Apps community.
OnSelect action of Trash icon, should we also include the following line “Remove(colTimesheetLines, ThisItem);”? Without it, delete item is still showing in the gal_TimesheetLines whose items property binds to colTimesheetLines.
Thank you,
Vu
Vu,
I’ve made an update to the tutorial in the section about deleting a timesheet line. Check it out for the suggested changes.
Nice! I’m going to build this as described but add a business unit field and work order field as additional options. Thanks again!
Thomas,
Perfect! That’s exactly what I intended for this article. Give the basic pattern to follow. And then let people customize it.
Hi. I am a complete dummy with Power Apps and did my utmost to follow the instructions to the letter. It seems to me either my version of PA is different ot there are steps missing (or perhaps that’s just my knowledge). I got completely stuck at drp_PayCode and could not,for the life of me, figure out how to align left. My version of the app looks like a dogs breakfast. A total mess. Anyhow, if was fun trying and I guess I will have to hire an expert.
Mike,
Don’t hire anyone just yet 😉
I’ll send you a copy of the app.
Hi Matthew, I can’t align gallery to Timesheet header, I am not sure what I am doing wrong? thank you
Imran,
What does does your app currently look like?
Hi Matthew, I am adding the screenshot of my app, where have issue with Container and Gallery, I have highlighted, thank you
Hi Imran,
I too got stuck at the same point, and then realized that we should be adding the dropdown by selecting the single row in the gallery not on the entire gallery.
Select on one item in the gallery and insert the drop-down, It should add under gallery rather than floating outside the gallery. Have a try.
Check the lesson learned video link here
Hope it helps.
Thanks
Anupama
Hi Anupama, thank you for your helpful suggestion, but my issue was not the dropdown, it was TimesheetHeaderContainer, which’s height was causing the issue, and of course Gallery underneath; was not aligning properly as well, it worked out when I turned off the Flexible height option, I appreciate it!! Thanks
I wasted 2 hours finding the solution. Seems this article is not for beginners. Author should have mentioned that. Lot of flaw and confusion.
Sumit,
Hi there. I’m looking for some feedback. What solution did you find and what was giving you problems in this tutorial?
I went back and did the tutorial for myself from the start today to try and decide this for myself. But I would like to hear your answer.
Hello, when will you be giving away the msapp file for the timesheet?
Joe,
I would like to do this. I know how to export the msapp file but I also wanted to include the SharePoint list templates as well. I tried last Sunday but for some reason I can’t find the menu to do it. Once I figure it out creating the SP List templates I’d like to share it.
Hello,
I followed the directions through part 1. No matter what I do I get the following error: ‘the value:ThisItem.Sunday” cannot be converted to a number’ (screen shot attached)
In the textinput field txt_Sunday, the format is set to Number.
Help?
Robert,
Strange error. When you hover over the code Value(txt_Sunday.Text) as shown in my picture below does it show as Blank like mine? I wonder if there’s some hidden text value in yours.
Morning Matt,
It was a typo error on my part. Another question. In part 2 you say to add a lookup column but then say to add a TimesheetID field to the Time Sheet Lines list. Where/how do you set up the lookup?
When will you be sending out the msapp for this?
Thanks!!
Robert
Hey Matt, thanks for the great tutorial – it has been fun to follow, although I need some help please!
I got to the final step, and I’ve added the large chunk of code to the save icon, however for some reason I’m getting an error with ‘Wednesday’ (see screenshot). If I hover overt the code, the error is: “A field named ‘Wednesday’ was specified more than once in this record”.
I can’t for the life of me find another reference to ‘Wednesday’. Any idea where I might be going wrong or where to look?
Thanks in advance!
Dan.
Dan,
This one baffles me too. The error message says we added a column named Wednesday to the record twice. But as you can see we are literally creating the record inside the ForAll loop. Is there a 2nd place in your code the error appears? I assume it would have to show the error in two spots?
Another thought is maybe the Power Apps code interpreter is broken. Try changing the authoring version in Settings and see if you get a new result.
Hi, when I add this line of code to the TimesheetLines Gallery
Filter(colTimesheetLines, Not(ID in colDeleteTimesheetLines.ID))
and then I try to preview the app, the gallery went blank, the Add New Line button also didn’t work anymore.
Is there something wrong with the code or it is just me doing it wrong?
Tien,
I made an error in the delete timesheet lines code and republished my article. Check for revisions in the following places:
* Delete icon OnSelect
* Gallery Items property
Hi Matthew, I have two issues, first issue when I add New Line, sometimes I see one entry and sometime two, second issue, when I try to delete, it delete all the entries, I have followed all your steps but seems its not working, please let me know where is the issue? thank you
Ryan,
This was my mistake. I didn’t realize the trash can OnSelect code would remove multiple lines from the gallery if they had not yet been saved to SharePoint. The ID field of a timesheet is blank before saving to SharePoint. Therefore, many lines could be blank!
I’ve updated my tutorial in two places.
#1. OnSelect propery of the trash can
Remove(
colTimesheetLines,
ThisItem
);
If(
!IsBlank(ThisItem.ID),
Collect(
colDeleteTimesheetLines,
ThisItem
);
)
#2 Items property of the gallery
colTimesheetLines
Great, thank you Matthew, its working, appreciate your knowledge sharing😀
When will you be releasing the msapp file for this timesheet?
hi Matthew,
Remove(colTimesheetLines;ThisItem;If(!IsBlank(ThisItem.ID);Collect(colDeleteTimsheetLines;ThisItem);)
can u help me please with this issue?? is not working
Qais,
You’ll need to use this syntax.
Remove(
colTimesheetLines,
ThisItem
);
If(
!IsBlank(ThisItem.ID),
Collect(
colDeleteTimesheetLines,
ThisItem
);
)
Morning Matt
To create a list template, go into List Setting and there is a link to create a template.
Hope this helps
Robert,
I finally figured it out. I had to go to my SharePoint admin page and enable custom scripting. Then I ran some PowerShell to make the export list feature appear immediately instead of waiting up to 24 hours.