Group The Items In A Power Apps Gallery

Organizing a list of items into groups makes their meaning easier to understand. The simplest example of this is a calendar. First we see the date (group) and then we see all of the events on that day (items). But in a Power Apps gallery we can only show a list. So how can we accomplish making groups in a gallery instead?
In this article I will show how to group the items in a Power Apps gallery.
Introduction: The Daily Appointments App
Estimators at a home renovations company use the daily appointments app to keep track of all their meetings with customers. Appointments are displayed in ascending order and are grouped by the appointment date.

Setup the SharePoint List
Create a SharePoint list called Daily Appointments to hold all of the meetings with the following columns:
- StartDateOnly (date only)
- StartDateTime (date & time)
- FullName (single-line text)
- StreetAddress (single-line text)
Load the SharePoint list with this data:
| StartDateOnly | StartDateTime | FullName | StreetAddress |
| 8/16/2021 | 8/16/2021 8:00 AM | Dannel Shaddick | 1 Waxwing Junction |
| 8/16/2021 | 8/16/2021 10:00 AM | Alan Byron | 0121 Miller Avenue |
| 8/16/2021 | 8/16/2021 1:00 PM | Deeanne Rosel | 6608 Farwell Pass |
| 8/16/2021 | 8/16/2021 2:00 PM | Fabiano Corran | 49321 Sage Place |
| 8/17/2021 | 8/17/2021 12:00 PM | Hal Johnson | 77692 Upham Road |
| 8/17/2021 | 8/17/2021 3:00 PM | Ervin Toor | 38223 Dryden Junction |
| 8/18/2021 | 8/18/2021 10:00 AM | Barnebas Werendell | 3 Fieldstone Crossing |
| 8/18/2021 | 8/18/2021 12:00 PM | Gunner Mitchelson | 2 Tennyson Street |
| 8/18/2021 | 8/18/2021 2:00 PM | Jennifer Kepling | 8 Oak Center |
| 8/19/2021 | 8/19/2021 9:00 PM | Harriet Crutchfield | 100 Little Fleur Drive |
| 8/19/2021 | 8/19/2021 11:00 PM | Annie Olson | 625 North Pass |
| 8/19/2021 | 8/19/2021 1:00 PM | Robinetta Crole | 529 Johnson Crossing |
| 8/19/2021 | 8/19/2021 4:00 PM | Penelopa Bresland | 8 Wayridge Terrace |
| 8/20/2021 | 8/20/2021 1:00 PM | Darcy Ashdown | 6 Sachs Avenue |
| 8/20/2021 | 8/20/2021 3:00 PM | Anton Paulmann | 696 Park Meadow Street |
| 8/21/2021 | 8/21/2021 9:00 AM | Jason Hardy | 1321 Longview Circle |
| 8/21/2021 | 8/21/2021 11:00 AM | Griffin Assandri | 91 Hoffman Street |
| 8/21/2021 | 8/21/2021 2:00 PM | Roseanna Dessaur | 4 Nelson Avenue |
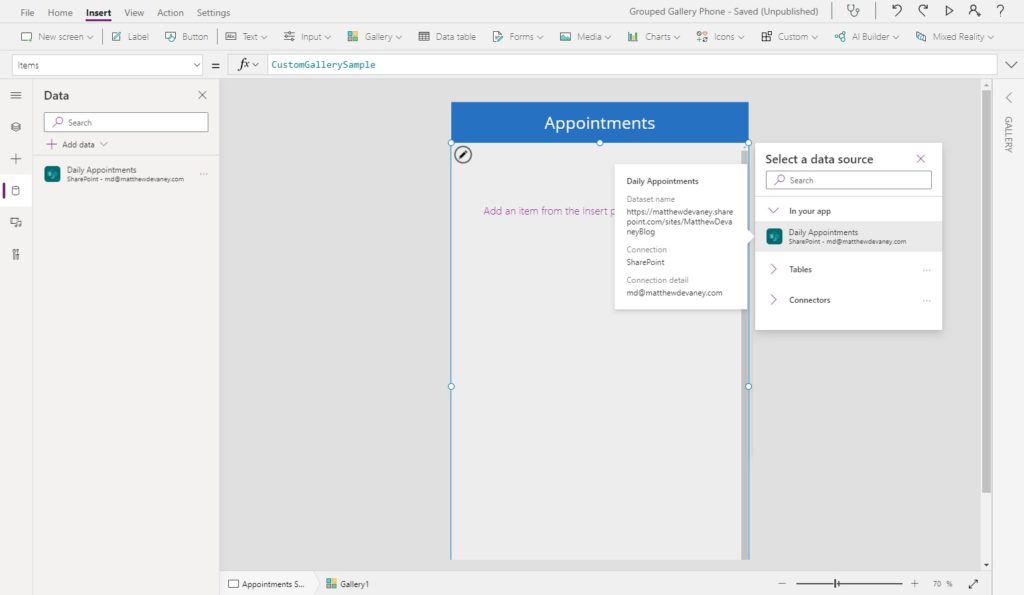
Show The List Of Appointments Inside A Gallery
We will begin by adding a list of appointments to the app. Open Power Apps Studio and create a new mobile app from blank. Add a connection to the Daily Appointments SharePoint list. Then insert a gallery into the screen and select Daily Appointments as the datasource.
Change the Fill property of the Appointments Screen to gray. This step defines the fill of the group headings.
RGBA(237, 237, 237, 1)
Then update the following properties of the gallery to these values.
TemplatePadding: 0
TemplateSize: 90Code language: HTTP (http)
To show appointment data in the gallery make 3 new labels, position them as shown below…
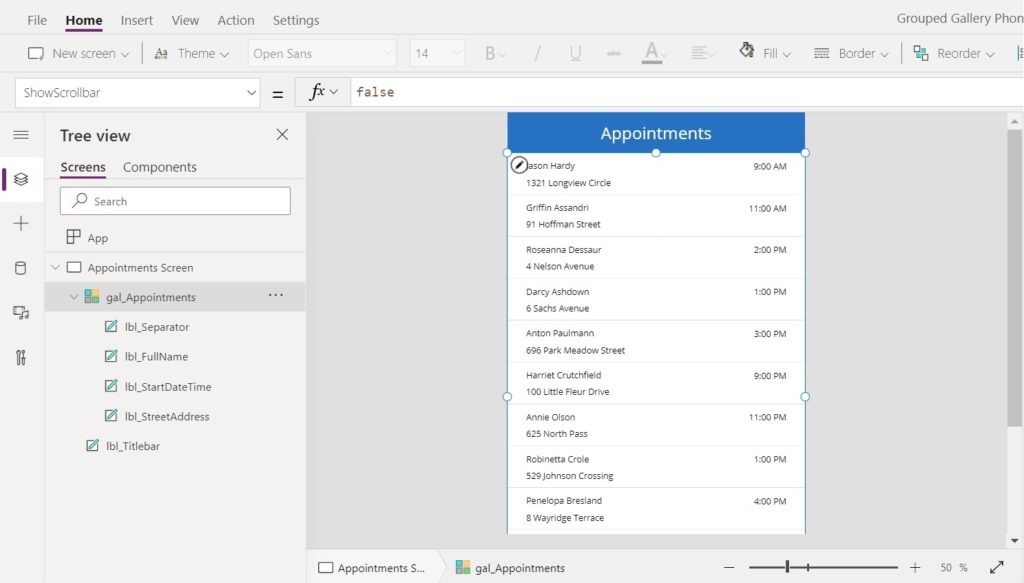
…and use this code in the text property of the name, address and time labels respectively.
ThisItem.FullNameCode language: CSS (css)ThisItem.StreetAddressCode language: CSS (css)Text(ThisItem.StartDateTime, ShortTime)Code language: CSS (css)
Finally, create a separator by placing a label on the screen and give it these properties.
Height: 1
X: 0
Y: Parent.TemplateHeight-Self.Height
Width: 1Code language: HTTP (http)
Create A Collection Of Daily Appointments (Group Items)
We will group the gallery items by loading the Daily Appointments list into a collection and performing several data transformation techniques. The code to do this is quite lengthy so we will look at each code block one-by-one to understand what it is doing.
Create a new button and position it on top of the titlebar. This temporary button will be used to test the code we are writing and will be deleted before we publish the app.
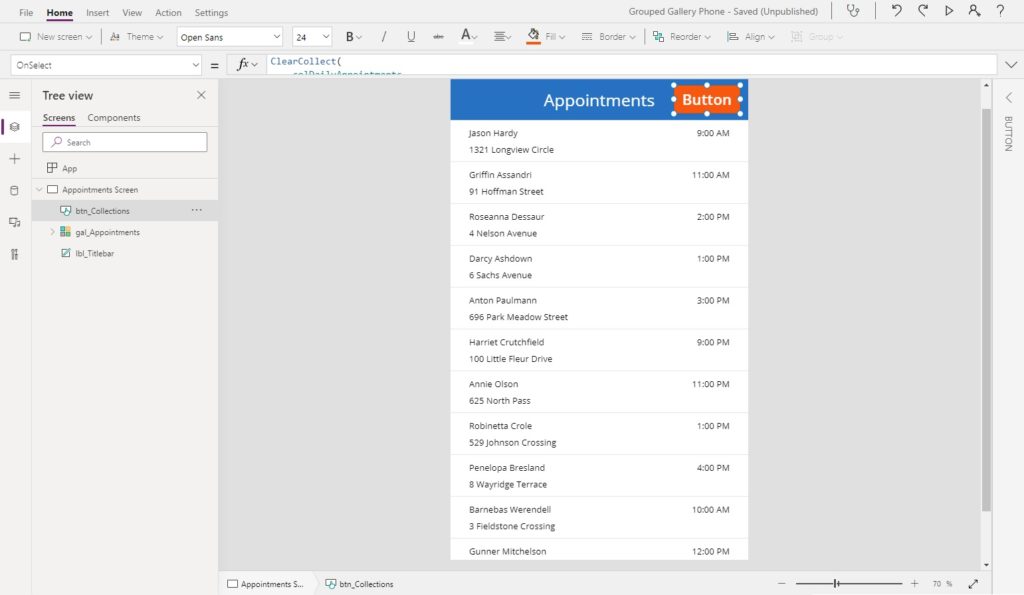
Write this code inside the OnSelect property of the button.
// Create a collection with all daily appointments
ClearCollect(
    colDailyAppointments,
    AddColumns(
        ShowColumns(
           'Daily Appointments',
            "FullName",
            "StartDateOnly",
            "StartDateTime",
            "StreetAddress"
        ),
        "Level",
        2
    )
);Code language: JavaScript (javascript)
When we click the button it generates a collection of daily appointments in ascending order. The level column is added to track whether the row is a gallery heading [1] or a gallery item [2]. Its purpose will become more apparent soon.
| Level | StartDateOnly | StartDateTime | FullName | StreetAddress |
| 2 | 8/16/2021 | 8/16/2021 8:00 AM | Dannel Shaddick | 1 Waxwing Junction |
| 2 | 8/16/2021 | 8/16/2021 10:00 AM | Alan Byron | 0121 Miller Avenue |
| 2 | 8/16/2021 | 8/16/2021 1:00 PM | Deeanne Rosel | 6608 Farwell Pass |
| 2 | 8/16/2021 | 8/16/2021 2:00 PM | Fabiano Corran | 49321 Sage Place |
| 2 | … | … | … | … |
| 2 | 8/21/2021 | 8/21/2021 2:00 AM | Roseanna Dessaur | 4 Nelson Avenue |
Make A List Of Unique Appointment Dates (Group Headers)
Next we will determine the list of unique appointment dates to create our grouped gallery’s headers. Add the following code to the OnSelect property of the button. We use the DISTINCT function to remove any duplicate dates from StartDateOnly. The output of DISTINCT is always a single-column table with the column name “Result”. We rename this column back to StartDateOnly add a new column called “Level” to define each date as a gallery grouping header.
// Create a collection of all daily appointments
ClearCollect(
    colDailyAppointments,
    AddColumns(
        ShowColumns(
           'Daily Appointments',
            "FullName",
            "StartDateOnly",
            "StartDateTime",
            "StreetAddress"
        ),
        "Level",
        2
    )
);
//// *** NEW CODE ****
// Create a collection of all unique startdateonly values
 ClearCollect(
     colUniqueDates,
     AddColumns(
         RenameColumns(
             Distinct(
                 'Daily Appointments',
                 StartDateOnly
             ),
             "Value",
             "StartDateOnly"
         ).StartDateOnly,
         "Level",
         1
     )
 );Code language: JavaScript (javascript)
When we click the button the resulting collection for colUniqueDate looks like this.
| Level | StartDateOnly |
| 1 | 8/16/2021 |
| 1 | 8/17/2021 |
| 1 | 8/18/2021 |
| 1 | 8/19/2021 |
| 1 | 8/20/2021 |
| 1 | 8/21/2021 |
Combine Group Headers And Group Items Into A Single Collection
The next section of code is quite simple. We create a single collection called colCombinedAppointments to combine the group headers and group items into one table
// Create a collection of all daily appointments
ClearCollect(
    colDailyAppointments,
    AddColumns(
        ShowColumns(
           'Daily Appointments',
            "FullName",
            "StartDateOnly",
            "StartDateTime",
            "StreetAddress"
        ),
        "Level",
        2
    )
);
// Create a collection of all unique startdateonly values
 ClearCollect(
     colUniqueDates,
     AddColumns(
         RenameColumns(
             Distinct(
                 'Daily Appointments',
                 StartDateOnly
             ),
             "Value",
             "StartDateOnly"
         ).StartDateOnly,
         "Level",
         1
     )
 );
//// *** NEW CODE ****
// Combine both collections into a single collection
ClearCollect(
    colCombinedAppointments,
    colDailyAppointments,
    colUniqueDates
);Code language: JavaScript (javascript)
Press the button to preview colCombinedAppointments.
| Level | StartDateOnly | StartDateTime | FullName | StreetAddress |
| 2 | 8/16/2021 | 8/16/2021 8:00 AM | Dannel Shaddick | 1 Waxwing Junction |
| 2 | 8/16/2021 | 8/16/2021 10:00 AM | Alan Byron | 0121 Miller Avenue |
| 2 | 8/16/2021 | 8/16/2021 1:00 PM | Deeanne Rosel | 6608 Farwell Pass |
| 2 | 8/16/2021 | 8/16/2021 2:00 PM | Fabiano Corran | 49321 Sage Place |
| 2 | 8/17/2021 | 8/17/2021 12:00 PM | Hal Johnson | 77692 Upham Road |
| … | … | … | … | |
| 1 | 8/18/2021 | |||
| 1 | 8/19/2021 | |||
| 1 | 8/20/2021 | |||
| 1 | 8/21/2021 |
Sort The Combined Collection Into Groups
The last step is to sort the combined collection so that group headers appear above group items. We can accomplish this with help from the “Level” column we’ve been adding to each collection. Recall that a grouping heading has a value of 1 and a group item has a value of 2.
// Create a collection of all daily appointments
ClearCollect(
    colDailyAppointments,
    AddColumns(
        ShowColumns(
           'Daily Appointments',
            "FullName",
            "StartDateOnly",
            "StartDateTime",
            "StreetAddress"
        ),
        "Level",
        2
    )
);
// Create a collection of all unique startdateonly values
 ClearCollect(
     colUniqueDates,
     AddColumns(
         RenameColumns(
             Distinct(
                 'Daily Appointments',
                 StartDateOnly
             ),
             "Value",
             "StartDateOnly"
         ).StartDateOnly,
         "Level",
         1
     )
 );
// Combine both collections into a single collection
ClearCollect(
    colCombinedAppointments,
    colDailyAppointments,
    colUniqueDates
);
//// *** NEW CODE ****
// Sort the combined collection
ClearCollect(
    colSortedAppointments,
    SortByColumns(
        colCombinedAppointments,
        "StartDateOnly",
        "StartDateTime",
        "Level"
    )
);Code language: JavaScript (javascript)
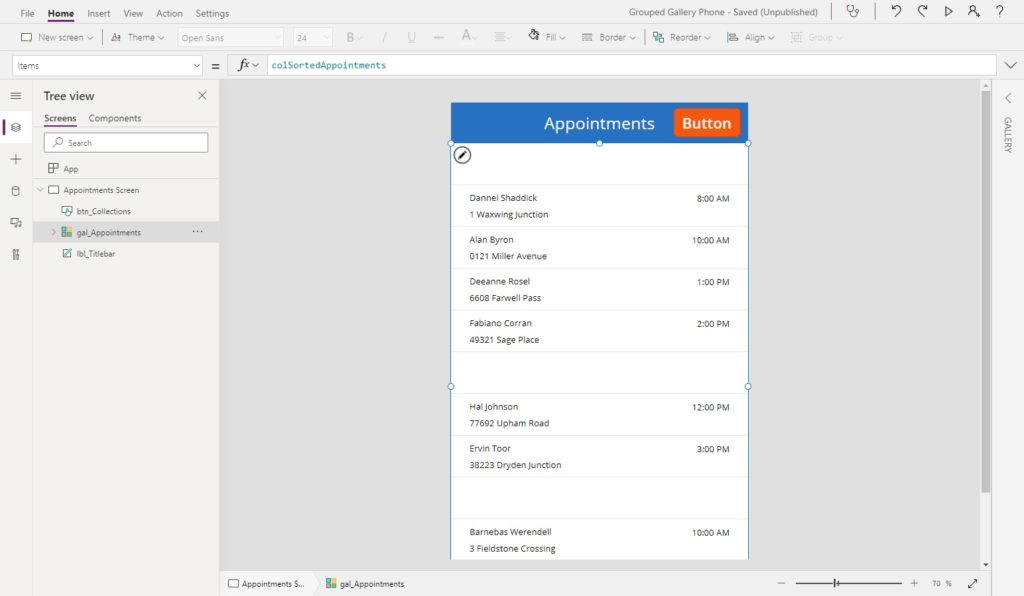
Click the button to review colSortedAppointments. Our gallery data is now grouped by the appointment date!
| StartDateOnly | StartDateTime | FullName | StreetAddress |
| 8/16/2021 | |||
| 8/16/2021 | 8/16/2021 8:00 AM | Dannel Shaddick | 1 Waxwing Junction |
| 8/16/2021 | 8/16/2021 10:00 AM | Alan Byron | 0121 Miller Avenue |
| 8/16/2021 | 8/16/2021 1:00 PM | Deeanne Rosel | 6608 Farwell Pass |
| 8/16/2021 | 8/16/2021 2:00 PM | Fabiano Corran | 49321 Sage Place |
| 8/17/2021 | |||
| 8/17/2021 | 8/17/2021 12:00 PM | Hal Johnson | 77692 Upham Road |
| 8/17/2021 | 8/17/2021 3:00 PM | Ervin Toor | 38223 Dryden Junction |
| … | … | … | … |
| 8/21/2021 | 8/21/2021 2:00 PM | Roseanna Dessaur | 4 Nelson Avenue |
Change The Gallery Datasource To The Grouped Collection
Now that the data is prepared we will load the colSortedAppointments collection into the gallery
Use this code in the Items property of the gallery
colSortedAppointments
Update Gallery Formatting To Display Groups
We must update the gallery’s formatting to make it appear as though the appointments are grouped.
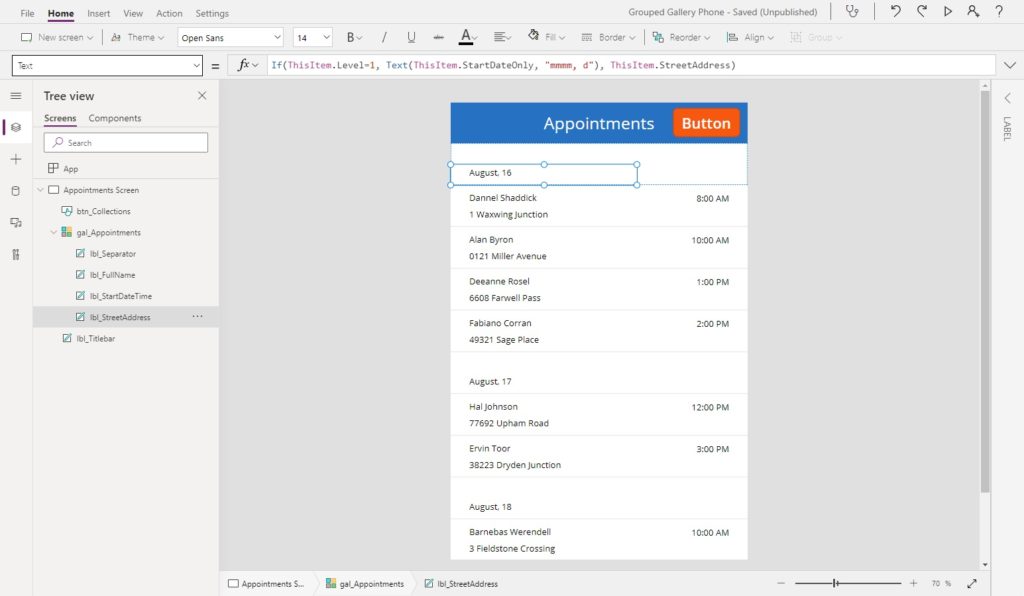
Select the Street Address label and apply this code to the Text property. It will now show the date for any gallery rows that are a group header and it will display the Street Address for any rows that are a group item.
If(
    ThisItem.Level=1,
    Text(ThisItem.StartDateOnly, "mmmm d"),
    ThisItem.StreetAddress
)Code language: JavaScript (javascript)
Group headers text should be larger than group items text to create a visual hierarchy.
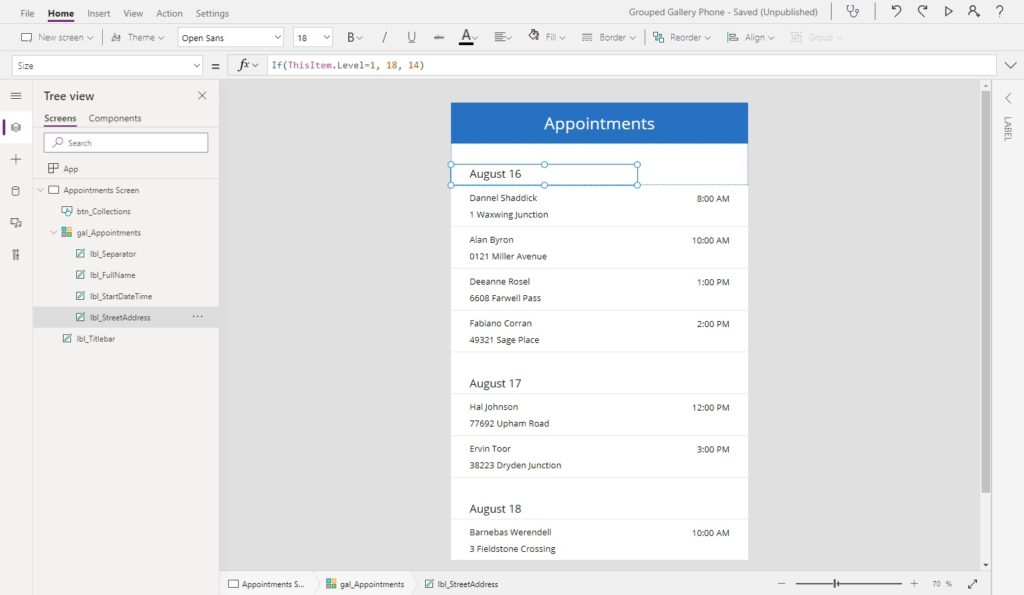
Use this code in the Size property of the Street Address label to update the text size.
If(ThisItem.Level=1, 18, 14)
Then we will change the background color of the group headings to make the hierarchy even more clear.
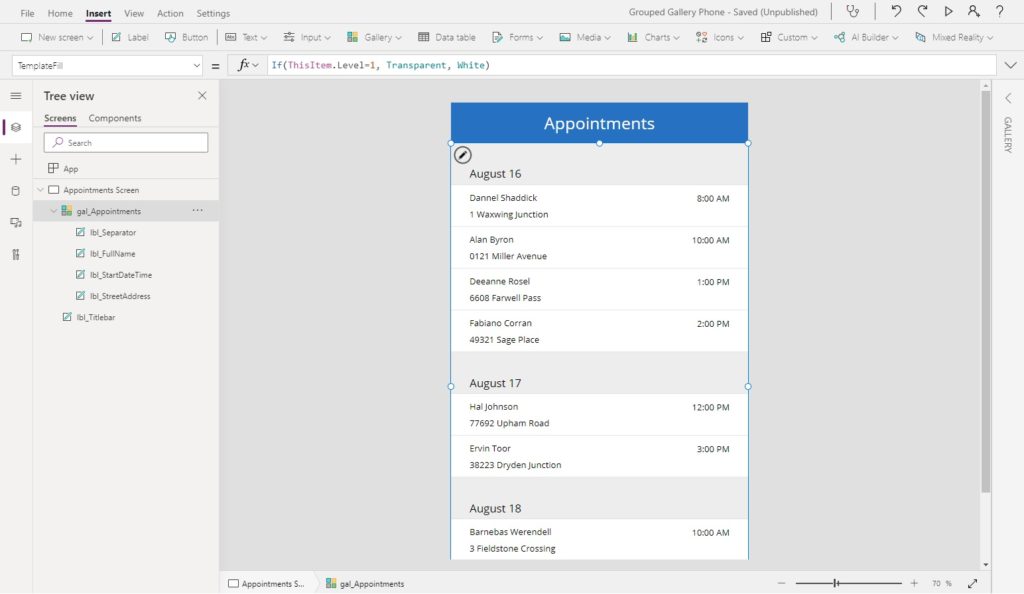
Write this code in the TemplateFill property of the gallery to change the fill for group headings to Transparent and the fill for group items to white.
If(ThisItem.Level=1, Transparent, White)
The final step is to remove the orange button which we used for testing and move its code into the OnVisible property of the screen. That’s it, we’re done creating our grouped gallery in Power Apps!
Did You Enjoy This Article? 😺
Subscribe to get new Copilot Studio articles sent to your inbox each week for FREE
Questions?
If you have any questions or feedback about Group The Items In A Power Apps Gallery please leave a message in the comments section below. You can post using your email address and are not required to create an account to join the discussion.


Thank you!
Thanks Matthew, great post!
I’ve managed to create a similar effect using nested galleries (following this guide: https://www.youtube.com/watch?v=ZzQ1t2sQvj8).
Can you tell me the advantages of using your method over this one?
Hello Elliot,
Thank you for sending the video link. I was not able to watch the whole thing but I am familiar with the nested galleries technique.
I think this largely comes down to preference. I found using a single collection had a longer load time but also had better performance when I scrolled through the gallery. When using nested galleries I would sometimes see the items expand as they were loaded in or get strange flicker. This is what led me to discovering a new method.
If it works for you, I say continue with the nested galleries. At the very least, I would study the pattern I used to create collection as I believe it could have value beyond this one example.
Cheers!
Hi Matthew, can we use AddColumns without ShowColumns ?
AddColumns(
‘Daily Appointments’,
“Level”,
2
)
How would you turn this into a weekly scheduling report ?
This will requires group by full name and weekly date range. For example Fabiano can have multiple appointments per day (9:00-11:30, 12:00-14:00, 14:15-17:00,…)
Wow, this is interesting and complexicating 😀 (Worth a try)
Could something like this be created using a gallery within a gallery?
the main gallery uses only the date field, using distinct so that it shows only distinct dates.
Then, the sub gallery would show all those related?
….Just a thought. What do you think❓
Jason,
Yes, nested galleries are also a valid approach. It’s a case where there is more than one way to solve the problem and I prefer to do it this way.
Hi Matthew, sorry I didn’t realize someone had mentioned this already. Thanks for replying anyway. Your writings on collections have helped me greatly in the past and I’m sure this one will too.
Thanks again for your work and sorry about that!
Jason,
No problem at all. I was happy to answer your question.
Thank You!
Great article and very well described.
Worked for me for my own list.
Volker,
Thanks for letting me know! I like hearing when my methods are used by others because then I know it was clearly described.
Best of luck building your apps 🙂
Great article, very well written and easy to follow. Thanks
Phil,
Thanks for writing me to say this 🙂
Thank you, very helpful! Do you know of a way to have comboboxes or dropdowns filter the gallery with the group header still displaying?
Robyn,
Sorry, I don’t have a solution for you at this time.
Hi Matthew,
Thank you for this solution. It works like a dream.
Could you describe how to add another column in the Level 1 header?
For example, if the appointment date fell on a holiday, I’d like to display that holiday from my “Holidays” list column as part of the header, below the appointment date.
Many thanks once again.
Stephen,
You would need to use an ADDCOLUMNS function to concatenate the date and holiday name (if there is one) and do the grouping on that new column instead.
Followed step by step, at no time did the button display anything nor does the completed code produce the example shown. I did everything exactly as shown here and this does not work.
DG,
Others have reported the tutorial is working for them so I think its possible you could have missed a step. Did you load the gallery’s Items property with the collection ‘colSortedAppointments’?
Matt, this is a super helpful article! I’m wondering if it’s possible to create a filter on one of the columns at the start in the first collection.
I need to filter the ‘screens’ column:
ClearCollect(
colQuestions,
AddColumns(
ShowColumns(
Questions,
“cr6ce_subsection”,
“cr6ce_screens”,
“cr6ce_questionname”,
“cr6ce_questiontype”,
“cr6ce_ordernum”
),
“Level”,
2
)
);
Thanks Matt!
Cindy,
Would this example work?
ClearCollect(
colQuestions,
AddColumns(
ShowColumns(
Filter(
Questions,
cr6ce_questiontype=”somevalue”
),
“cr6ce_subsection”,
“cr6ce_screens”,
“cr6ce_questionname”,
“cr6ce_questiontype”,
“cr6ce_ordernum”
),
“Level”,
2
)
);
Thanks Matt,
When I try this, nothing shows up in the colQuestions collection. It can’t find any data. I’m using Dataverse and I’m not sure if that has something to do with it.
Matt, I managed to figure it out! I created a view in Dataverse and then added the filter to the first two collections:
// Create a collection of all Questions
ClearCollect(
colQuestions,
AddColumns(
ShowColumns(
SortByColumns(Filter(Questions, ‘Questions (Views)’.’PTM:Safety’),”cr6ce_ordernum”,Ascending),
“cr6ce_subsection”,
“cr6ce_questionname”,
“cr6ce_questiontype”,
“cr6ce_ordernum”
),
“Level”,
2
)
);
// Create a collection of all unique SubSections
ClearCollect(
colUniqueSubsections,
AddColumns(
RenameColumns(
Distinct(
Filter(Questions, ‘Questions (Views)’.’PTM:Safety’),
SubSection
),
“Result”,
“cr6ce_subsection”
).cr6ce_subsection,
“Level”,
1
)
);
Thanks for this article!!! It was exactly what I was looking for!
Cindy,
You nailed it! Thanks for sharing 🙂
Hello Matthew, Thank you for your great post !
Im using your method to create booking reports for a day surgery clinic. However for some reason the records are not sorting according to time although i followed your method to the T and rechecked it many times.
In your description, under “Change The Gallery Datasource To The Grouped Collection”, the screenshot is showing a correct ascending sequence but my table is being sorted in the same way the table picture below this line “Click the button to review colSortedAppointments. Our gallery data is now grouped by the appointment date!”.
Is there some code missing?
Thanks again
Ryan
Ryan,
I reviewed my app but I didn’t notice any differences in the code between it and the article. However, I did notice that all of the tables in my article were showing the wrong order. Oops! This is now corrected.
Is there any way you could show me what you mean with a screenshot? I’m not understanding clearly where your issue is.
hello,
sorry about the late reply.
As I pointed out in the image for some reason the times are not coming in order. just jumbled.
another issue which I’ve just encountered is that the resulting gallery is not being filtered correctly…..for example im filtering by date with 2 date pickers, from and to date. I have a record that is supposed to show up on the 1st of June but doesn’t show up when I select 1st of June in the date picker.
if I select 2nd June, it shows up. the issue is that all other records falling on the date picker selecting the TO date, are corrrectly showing up.
HELP!
If( Toggle2.Value = true, ClearCollect( colPreFileredappointments, Filter( ‘Surgery Enquiry Sharepoint’, DueDate_Dateonly >= DatePickerReportFROM.SelectedDate && DueDate_Dateonly <= DatePickerReportTO.SelectedDate && Surgeon=DropDownSurgeonReport.SelectedText.Value) ), ClearCollect( colPreFileredappointments, Filter( ‘Surgery Enquiry Sharepoint’, DueDate_Dateonly >= DatePickerReportFROM.SelectedDate && DueDate_Dateonly <= DatePickerReportTO.SelectedDate ) ) ); ClearCollect( colDailyAppointments, AddColumns( ShowColumns( colPreFileredappointments, “DueDate_Dateonly”, “field_3”, “Surname”, “field_4”, “field_6”, “field_7”, “ID” ), “Level”, 2 ) ); ClearCollect( colUniqueDates, AddColumns( RenameColumns( Distinct( colPreFileredappointments, DueDate_Dateonly ), “Result”, “DueDate_Dateonly” ).DueDate_Dateonly, “Level”, 1 ) ); ClearCollect( colCombinedAppointments, colDailyAppointments, colUniqueDates ); ClearCollect( colSortedAppointments, SortByColumns( colCombinedAppointments, “DueDate_Dateonly”, “field_6”, “Level” ) )
Great article! Did have one question for you, Matthew. Do you have any ideas around how to handle sorting/delegation with this scenario?
As an example, you are collecting from an SP list, but let’s say:
How would you suggest sorting the original collection in line with #4 before collecting the records so as to make sure all of the relevant events come in.
ArPost,
I think delegation would be a problem here even without the grouped gallery. Category is the problem. It’s stored in a different list and is causing the delegation issue, right? You’ll have to store it as text on the Calendar Events list. You could restrict the user inputs in this column by making a dropdown list with the Category values. But then actually save it as text.
Does that part of my explanation make sense?
After that, you can’t collect 5,000 rows onto the device without using some tricky coding. But don’t worry, I’ve got you covered:
https://www.matthewdevaney.com/create-power-apps-collections-over-2000-rows-with-these-4-tricks/.
Is it possible in Azure on a Power Apps apps to display all Ressource group with all their subscription with all their ressource group and with all their ressource with this method?
Hi Matthew,
I hope this finds you well. I’m a big user and fun of your blog and collection cookbook.
Recently, I started using your grouping and sum for a collection like the one below :
ClearCollect(
mySolution6,
DropColumns(
AddColumns(
GroupBy(myTravelExpenses6,”Item”,”GroupedItems”),
“Sum of Value”,Sum(GroupedItems,Value)
),
“GroupedItems”
)
);
My question is, can we do this grouping at two levels in the same collection? I want to group by category (3 in total) and sum each category and under each category, I have different programs, so I want to sum each program as each has different projects underneath.
Thank you for your help
Kerim,
You can do grouping at 2 different levels… I just don’t have the code for it. You’d have to extend what I’ve written to get the solution.
Love this topic! I am building a new gallery and with Distinct and Group By I cannot get the “blank” values filtered out. For example, I want to only have 5 gallery rows, so I tried distinct on the data source and would give me 6 rows with the 6th one being all the blank values. The same thing happens with Group By.
In my case the blank values need to exist as this is an assessment app that will eventually replace the blank ones with one of the 5 values I described.
How would you handle grouping values, but excluding blank values?
Kurt,
Can you filter out the blank values with some formula like this?
Filter(collectionName, !IsBlank(fieldName))
I wasn’t able to report back in time, but I figured out about an hour after I posted (of course, right?). I ended up modifying it slightly with group by and !IsBlank. There was an issue with one of the fields that I corrected with a rename (go figure). However, thank you for the blog and all of the great topics…especially all of the new Excel topics as I have been using a lot more excel data sources for custom things.
Hi Matthew. Thanks a lot for the post.
The second collection I’m trying to create is giving me error saying that Group (the last one) is not recognized. I think it might be because it’s a lookup column in dataverse table. Is there any way I cant correct this?
ClearCollect(
colUniqueGroups,
AddColumns(
RenameColumns(
Distinct(
colDailyReport,
Group
),
“Result”,
“Group”
).Group,
“Level”,
1
)
);
Really awesome content!
Igor,
I appreciate you taking the time to leave me a nice comment.
Hi Matthew, thank you for the great content, largely appreciated! 🤩
I used the nested galleries before and decided to try out your optimized approach.
In my case I had one catch – I had to put the unique items first in the combined list otherwise they always got at the end of the sorting:
Another catch was, that my grouping column was a choice field, so had to use the .Value and generate a new plain field:
In my use case, however, I have a specific requirement – the headers should be interactive with expand and collapse arrows (▲, ▼) accordingly displayed and resulting at expanding and collapsing the grouped items. Is there a way to add this graphical representation and interactivity with your approach? (for the interactivity I suggest I filter the collection at OnSelect considering the group value?)
Thank you for this! I had the same issue and you got me sorted out with putting the unique items first in my combined list.
Thank you Matt for this awesome tutorial, I love your content.
One thing I can’t seem to find an answer to is how to send an email with a grouped gallery, do you have any existing instruction on that or would you consider making something for that? I am currently using nested galleries to group but I’m going to try this article’s method next to see if that works better.
I’m able to send an email with tables but that doesn’t group, I also tried using the PDF function but that only grabs the content visible on the screen. Seems like I might be missing something obvious!