Fill-In An Excel Template With Power Automate

Power Automate can be used to populate a reusable Excel template with values. To do this, you’ll need to know two techniques: how to write a value to a single cell and how to add multiple rows to a table. In this article I’ll show you how to do both. Then you can convert the Excel file into a PDF or send it as an email attachment in Outlook
Introduction: The Purrfect Pet Shop Invoice Template
The owners of a pet shop use Power Automate to create invoices for their customers. An Excel template gets filled-in with the following information: Bill To, Invoice #, Invoice Date, Due Date and Invoice Lines.

Create An Excel Invoice Template
Setup a new SharePoint Document Library named Purrfect Pet Stores and insert a blank Excel file named Purrfect Invoice Template.xlsx.

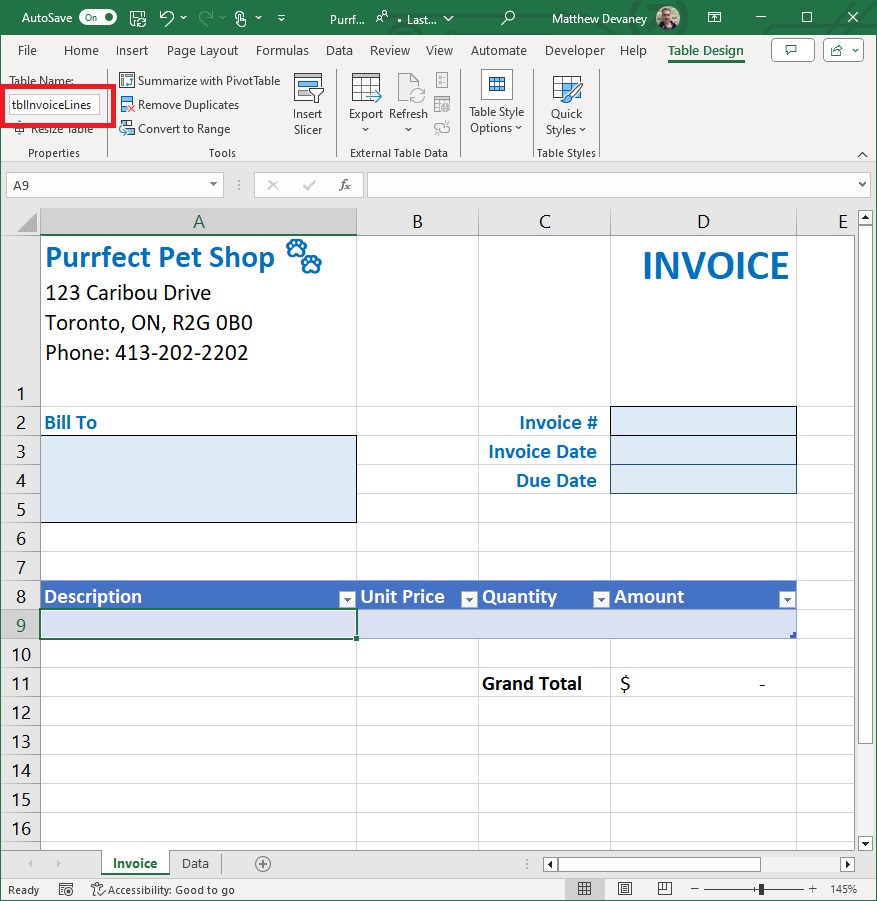
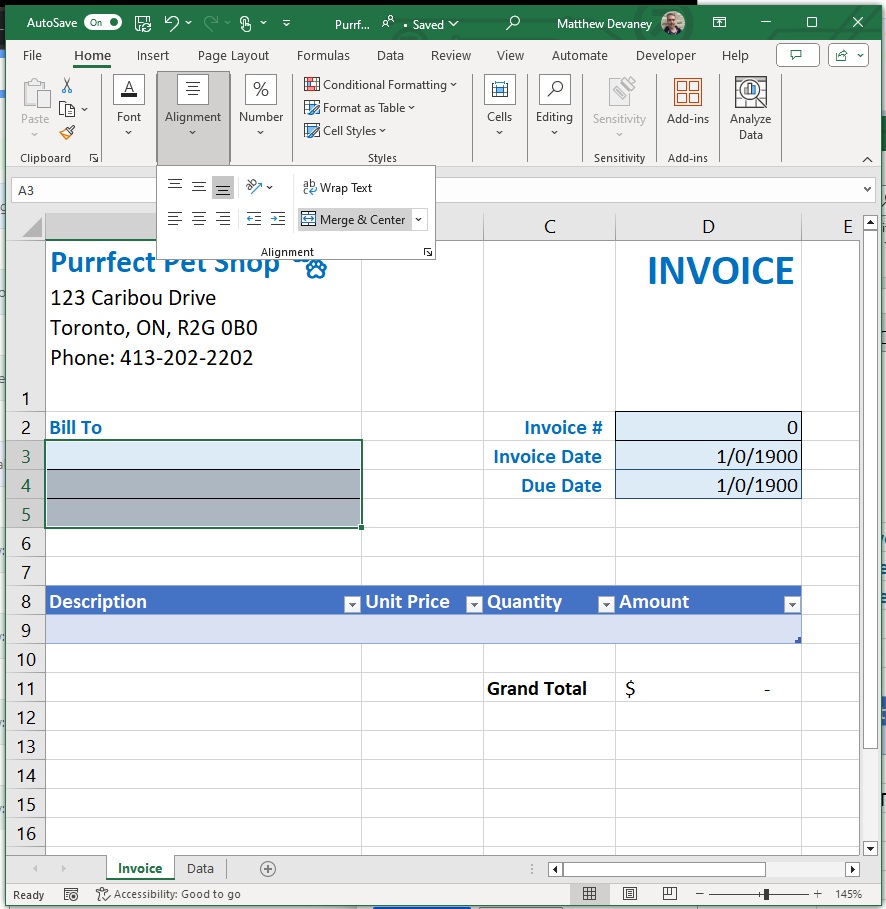
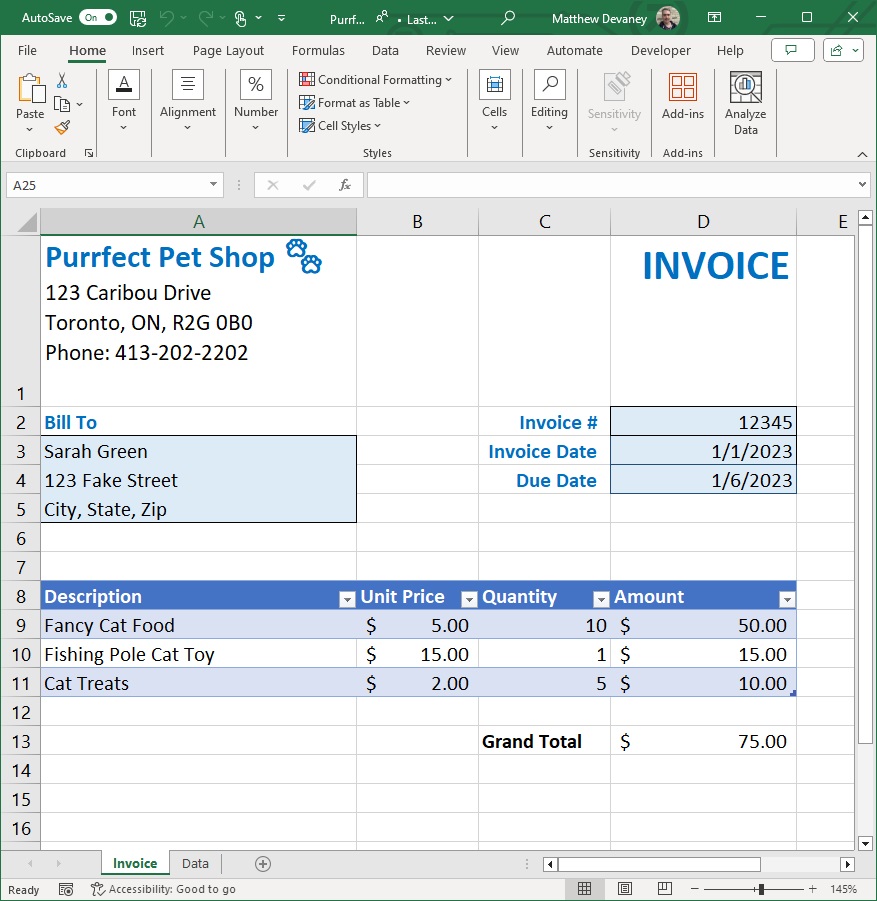
Rename Sheet1 to Invoice and make the spreadsheet look like the image below. Insert a new Excel table named tblInvoiceLines. Add the columns: Description, Unit Price, Quantity & Amount.
Insert An Invoice Headers Table Into The Excel File
The Power Automate Excel connector cannot write a value to a single cell. But it can update a specific row in an Excel table. We will do a workaround to make Power Automate update the Excel table and have the desired cell reference it.
Create a new sheet in the Excel workbook named Data. Insert a new table named tblInvoiceHeaders with the columns Field and Value.

Populate tblInvoiceHeaders with the following values in the field column. Leave the Value column blank.
| Field | Value |
| Invoice # | |
| Invoice Date | |
| Due Date | |
| Bill To |
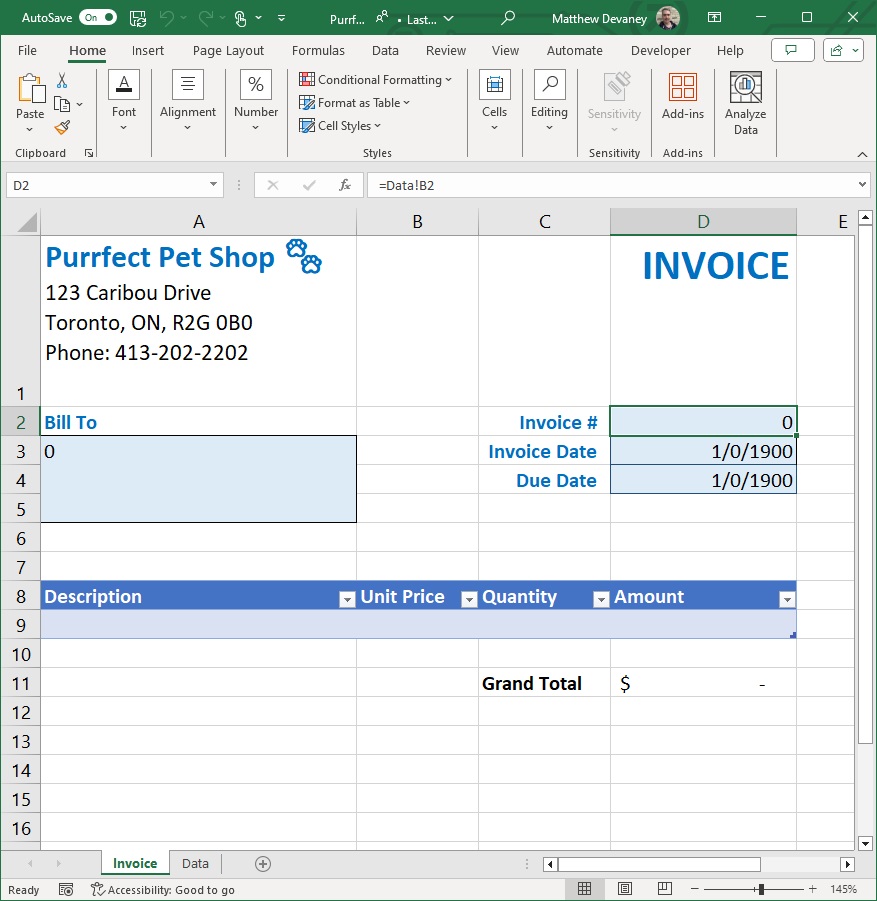
Then go to the Invoice sheet and create cell references to the Value column of Excel table.
- Invoice # – Data!B2
- Invoice Date – Data!B3
- Due Date – Data!B4
Update A Single Cell In An Excel Spreadsheet
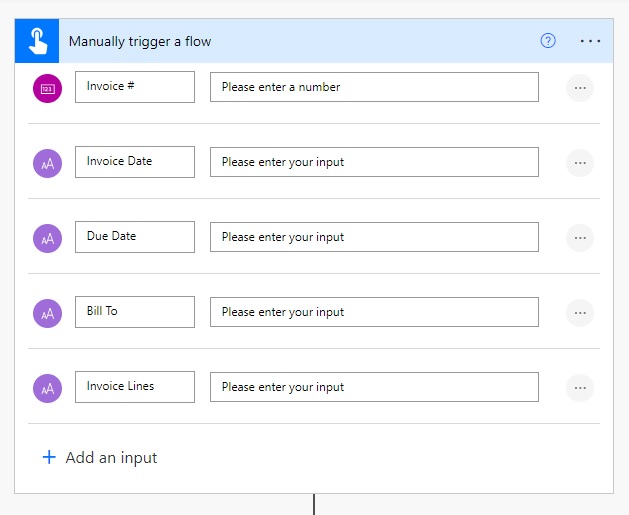
Now we will create the Power Automate flow actions to update a single cell in Excel for Invoice #, Invoice Date and Due Date. Create a new flow with an instant trigger named Populate Excel Invoice Template. Then add the following inputs:
- Invoice # – number
- Invoice Date – text
- Due Date – text
- Bill To – text
- Invoice Lines – text
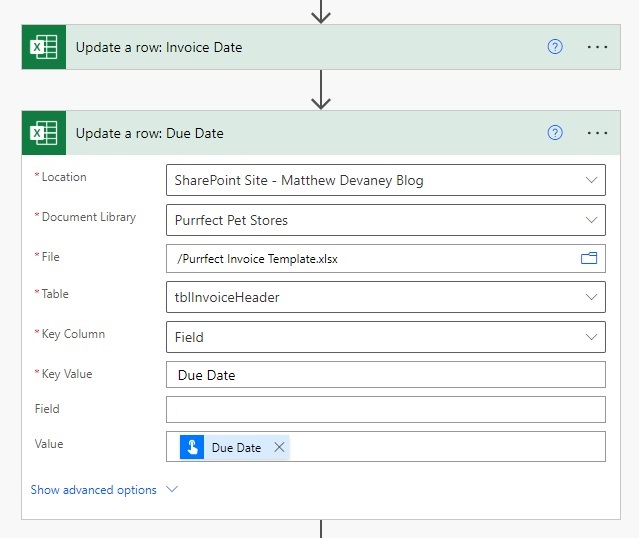
Then add an Excel – Update A Row action to the flow. Select the tblInvoiceHeader table. Designate the table column Field as the Key Column and Invoice # as the Key Value. This tells the flow to update the matching row in Excel. Insert the Invoice # input into the value field.

Insert a 2nd Excel – Update A Row action for the Invoice Date…
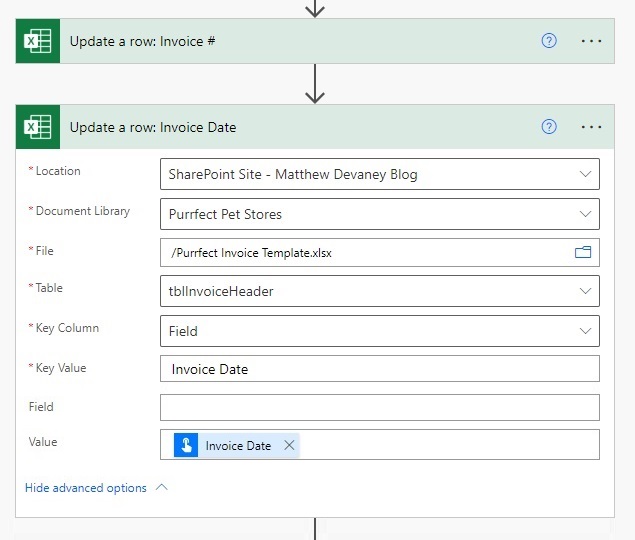
And a 3rd Excel – Update A Row action for the Due Date. When these actions are run it will update the tblInvoiceHeader table but the cell references will make them also appear in the a single cell located on the Invoice sheet.
Display Multiple Lines Of Text In A Cell
The Bill To field on the invoice will show three lines of information
- Company Name
- Street Address
- City, State, ZIP
To properly display multiple lines of text we need to format the spreadsheet. Select the cells in the Bill To range and perform a Merge & Center action. Doing this makes 3 cells become 1cell.
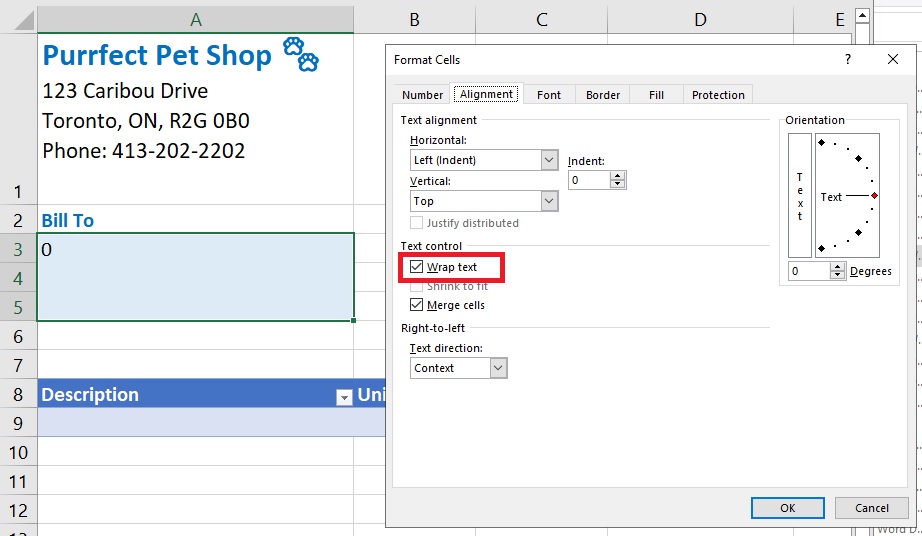
Then right-click the cell and choose Format Cells. Check Wrap Text to make the text show on multiple lines. If we do not do this, the text will display as a single line.
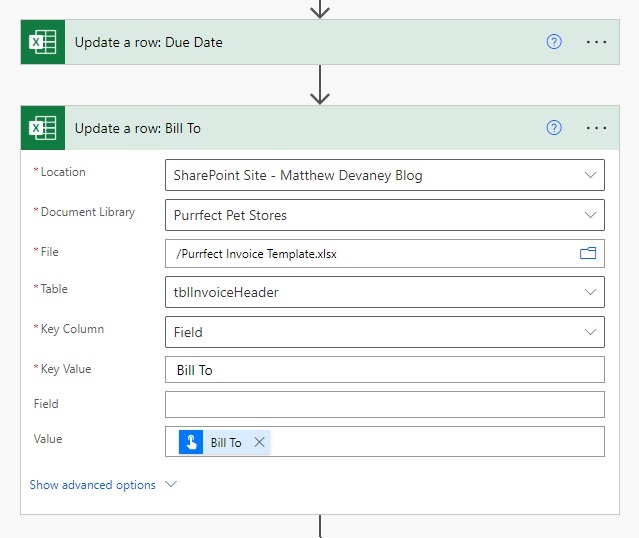
Back in Power Automate add another Excel – Update A Row action as use the Bill To input for the Value field.
Add Multiple Rows To An Excel Table
The final section of the invoice we must create are the Invoice Lines. Just like all of the other invoice fields we will get the Invoice Lines from the flow trigger. But since the Invoice Lines have a data type of text we must convert it to an array using the Parse JSON Action
Insert a Data Operations – Parse JSON action into the flow. Add the Invoice Lines trigger input to the Content field.
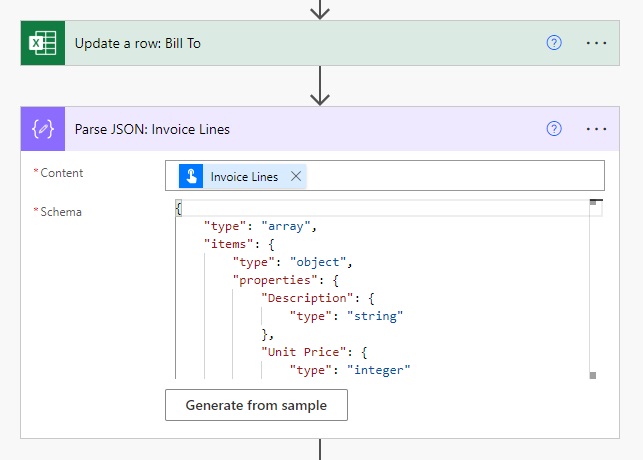
Generate the JSON schema from a sample.
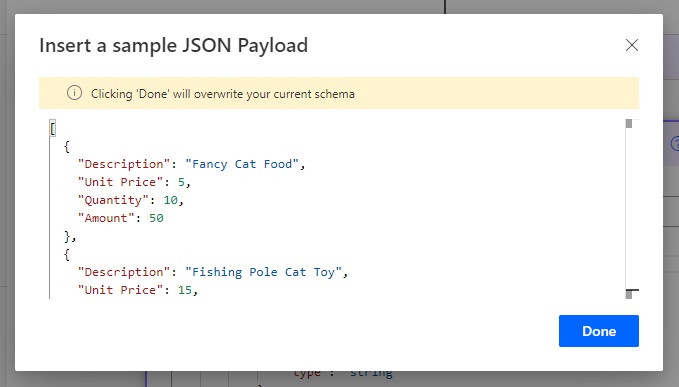
Use this JSON as the sample. Notice that the column names for tblInvoiceLines in the Excel invoice and field names of this JSON are the same.
[
  {
    "Description": "Fancy Cat Food",
    "Unit Price": 5,
    "Quantity": 10,
    "Amount": 50
  },
  {
    "Description": "Fishing Pole Cat Toy",
    "Unit Price": 15,
    "Quantity": 1,
    "Amount": 15
  },
  {
    "Description": "Cat Treats",
    "Unit Price": 2,
    "Quantity": 5,
    "Amount": 10
  }
]Code language: JSON / JSON with Comments (json)
To insert the array of rows into the Excel invoice add an Apply To Each action to the flow and place an Excel – Add A Row Into A Table action inside of it. Loop over the body of the Parse JSON action.
Target the tblInvoiceLines table in the add a row action. And supply the corresponding dynamic values for Description, Unit Price, Quantity and Amount from the Parse JSON action.

Run The Flow To Fill-In The Excel Invoice Template
We are done building the Power Automate flow. Test run the flow and supply the following values to the flow trigger:
| Invoice # | 12345 |
| Invoice Date | 1/1/2023 |
| Due Date | 1/6/2023 |
| Bill To | Sarah Green 123 Fake Street City, State, ZIP |
| Invoice Lines | [ { “Description”: “Fancy Cat Food”, “Unit Price”: 5, “Quantity”: 10, “Amount”: 50 }, { “Description”: “Fishing Pole Cat Toy”, “Unit Price”: 15, “Quantity”: 1, “Amount”: 15 }, { “Description”: “Cat Treats”, “Unit Price”: 2, “Quantity”: 5, “Amount”: 10 } ] |

After the flow run completes the Excel invoice template looks like this. The data tab can be hidden so the customer will not see it.
Did You Enjoy This Article? 😺
Subscribe to get new Copilot Studio articles sent to your inbox each week for FREE
Questions?
If you have any questions or feedback about Fill-In A Excel Template With Power Automate please leave a message in the comments section below. You can post using your email address and are not required to create an account to join the discussion.


Great stuff. THX for shareing!
Daniel,
You are welcome. I’m glad you liked it 😊
So with this guide you’ve so kindly given us (thank you!), someone would set up their “parent” list to collect the invoice #/dates/bill to information, and set up a “child” list collecting the Invoice Lines data that is tied to the “parent” list. Then a flow could get the data from both lists and merge it together using the method you have explained above…right? (Because the employees creating these invoices aren’t going to understand how to enter invoice lines as an array!)
Wonderful, Thanks
Please , apply to be the responsible for the documentation of the power platform !!!
Leonardo,
Hahaha. I love it. Thank you for the message 🙂
Really interesting article and really clearl to follow.
Can you please elaborate on how this can reusable like you refer to in the beginning of the article.
I guess the header data of the invoice is fine as it will simply update those lines but what about the invoice lines which uses the add a row action rather than update?
Thanks do another really useful article
Mark,
It is reusable because you start with a blank invoice template and fill-in these fields:
– Bill To
– Invoice Number
– Invoice Date
– Due Date
– Invoice Lines
In the article I teach both how to add rows to a table and update a single cell
I guess the flow would need to have some steps to convert to PDF, and or send email and attach the invoice and / or take a copy and save it somewhere else then importantly “RESET” the template by deleting the invoice lines from the table so it is blank so it can be reused for another invoice.
Otherwise the next person to use the template will find it is not blank and will inadvertently add their invoice lines to the already existing invoice lines that were populated by the previous run of the flow.
Mark,
Yes, correct. You would want to copy the blank Excel template to another location first. I wanted to focus the article on how to fill the fields so a beginner could understand. After copying there are some advanced steps you will need to do to get the Drive ID and Item ID which require the SharePoint Rest API.
This is where I get stuck! I can fill in a template, but when I save the body of the template as a new file I loose the ability to map to the fields in the new file.
You can use a compose action to create a json like:
{
“Field”: “Bill To”,
“Value”: @{outputs(‘Get_item’)?[‘body/Baureihe’]}
}
and in the update row action use the output see picture.
will this work for adding multiple rows to a table?
I am not having any luck. Also should I just type in the name of the table. The file hasn’t been created yet so there is no way to select it from a drop down
I cleared the tables in the template by creating two Office365 scripts that can be run from Power Automate.
Clears the repeating table in the template (mine is called Inventory)
function main(workbook: ExcelScript.Workbook) {
// Get reference to the active worksheet
let worksheet = workbook.getActiveWorksheet();
// Get reference to the table named ‘Inventory’
let inventoryTable = worksheet.getTable(‘Inventory’);
// Get the range of the data (excluding headers)
let dataRange = inventoryTable.getRangeBetweenHeaderAndTotal();
// Delete the rows in the data range
dataRange.delete(ExcelScript.DeleteShiftDirection.up);
}
This script clears the values from the value column from the table in the ‘Data’ sheet.
function main(workbook: ExcelScript.Workbook) {
// Get the “Data” worksheet.
let dataSheet = workbook.getWorksheet(“Data”);
// Define the range of the “Value” column in the “Data” table.
let dataTableRange = dataSheet.getRange(“B2:B5”);
// Clear the contents of the “Value” column in the “Data” table.
dataTableRange.clear(ExcelScript.ClearApplyTo.contents);
}
I did all this then wondered why I didn’t just create a HTML template that gets converted to PDF!
I have a different kind of excel file but the end result is somewhat similar to your example. However, sometimes I find it easier to follow instructions if I view all the steps in a video. Did you by any chance upload a youtube video tutorial with the exact same steps? I am so eager to make this work because I need to update +100 contracts.
Mi,
I do not have any YouTube videos on this subject. I prefer to write and have complete control over my own works.
Thanks Matthew, I am stuck on creating the excel, is there a way to share the Purrfect Invoice Template.xlsx please?
Hi Matthew,
great actricle.
One question how can i insert formatted text to the excel row?
For example: in the Description column, the last name should be in bold.
For me it looks like this:
Thomas Beimel,
Formatted text cannot be inserted unless you’re using the Microsoft Graph API, as far as I know.
I am running into a similar issue. The workaround is to use office scripts to update the format of text from Power Automate.
Yes, if you need formatted text in the Excel row you can’t use the MS Graph API
Hi Matthew, for the Bill To cell I set to merge and set wrap but because my cell is slightly wider it isn’t wrapping at the correct place. Is there a way to force wrapping after each address line?
Got that sorted. Please disregard.
Hi Matthew,
Is there any way to populate a print area or name box from an excel file without a column headers?
Example: In power apps, there’s a text input field and whatever you put in that field, and when a button is clicked, it will will trigger and populate to a specific name box or form in the excel file.
See attached screenshot of the form in the excel.
Welgin,
Yes, you can specify an exact cell coordinate or a named range with the Graph API. It’s premium functionality.
https://learn.microsoft.com/en-us/graph/api/range-update?view=graph-rest-1.0&tabs=http
Thank you for this guide !
To go further : is it possible to convert an excel file to PDF ?
Ray,
Yes. It is possible to do this in Power Automate.
Thx for the reply.
How do you do this ? I don’t found any guide about this.
Ray,
There appear to be many guides on this. They all use premium connectors. I assume you will also need a premium connector. But I haven’t researched it. It’s beyond the scope of this article.
Good morning,
I’m kinda new to this and I have a question. for the description of the product, is the only option an array? I have to make a lot of invoices every day, woudn’t it be better to have a sort of “form” instead?
Anyway thank you the amazing tutorial
Hi Mat,
I found converting an excel to PDF has its flaws. Let’s say I want to fit all columns inside the PDF page, but it doesn’t work. I even tried setting the print area of the template, no luck. Is there a way we can set it up? So far creating an HTML directly and converting that to PDF seemed the better option than Excel to PDF. What is your advice on this?
Thank you Mat!