Everything You Need To Know About Power Apps Patch Forms

In Power Apps there are two techniques for making a form: an Edit Form and a Patch form. I favor using Patch forms and I regularly get asked the questions “why should I use a patch form?” and “what are the best practices when creating a patch form?” In this article I will teach you everything I know about creating awesome Power Apps patch forms and guide you through an in-depth tutorial.
When To Use A Patch Form Vs. An Edit Form
Edit Forms are the fastest way to add a form to your Power Apps. Their input fields are automatically generated which cuts down development time, implementing your own logic for data validation and error-handling is easy to do and they have a consistent look and feel. If they suit your purpose, you should use them instead of a patch form.
However, there are many reasons you may want to use a Power Apps Patch Forms instead:
- Patch forms give you total control over the design/layout of the form as opposed to Edit Forms which have a highly-defined structure
- Patch forms are easier to maintain since you can select all of the controls at once to change their style and re-positioning their input fields is drag-and-drop
- Patch forms can write their data back to a local collection which useful when a form has multiple screens or the app has an offline-mode
Introduction: The Gradebook App
The Gradebook App is used by teachers at a high-school to record test scores. Teachers input the student name, subject, test name and score into a form and the data gets saved to a SharePoint list.
Setup The SharePoint List
Create a new SharePoint list called Test Scores with the following columns:
- StudentName (single-line text)
- Subject (choices: math, language arts, geography, science)
- TestName (single-line text)
- Score (number)
No data is required to be loaded into the the Test Scores SharePoint list initially. We will write data to the SharePoint list once the form is created.
| StudentName | Subject | TestName | Score |
Design The Patch Form Layout – Title, Inputs & Submit Button
When using an Edit Form control in our apps we insert the form onto the screen, select a datasource and then a form is automatically generated with input fields for each field found in the datasource. Oppositely, when we choose to build a Power Apps Patch Form, we must do all of that work manually. We will start by connecting to the datasource and designing the layout of our form.
Open Power Apps Studio and create a new tablet app from blank. Name the blank screen Gradebook Form Screen and add a new label to it with the text “Gradebook App” to serve as a titlebar.

Connect the Test Scores SharePoint list to the app.
Then insert 3 pairs of labels and text inputs onto the screen. Each label should display a the title of text input field (Student Name, Test Name, Score). Position the controls vertically as shown below as use the use control names found in the tree view on the left side of the screen.

Create one more pairing of a label and combobox. The Subject field in our Test Scores SharePoint list is a Choices data type and the combobox allows those choices to be selected from a list.
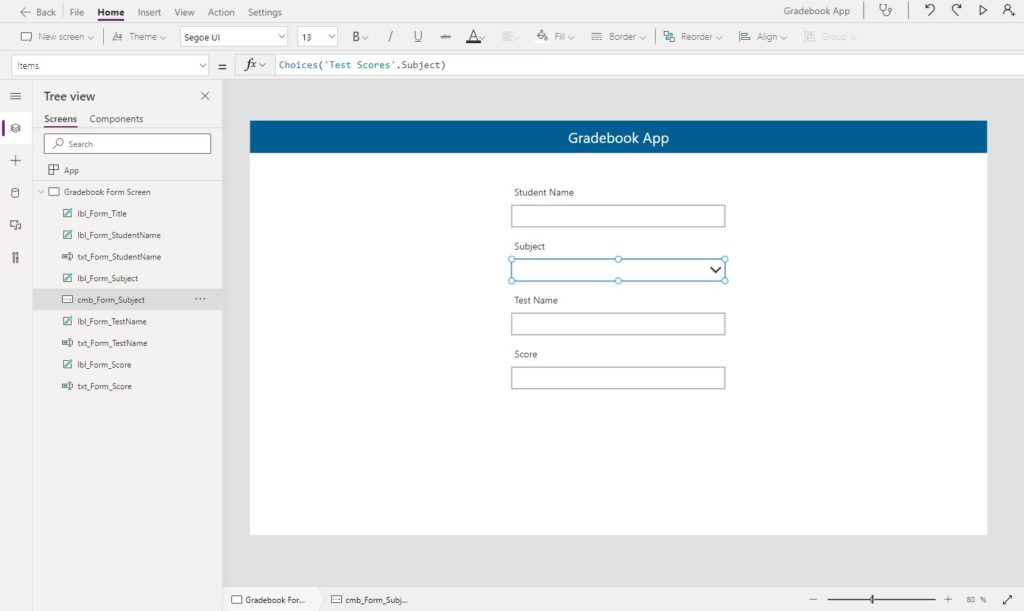
Use this code in the Items property of the ComboBox to populate it with values.
Choices('Test Scores'.Subject)Code language: JavaScript (javascript)
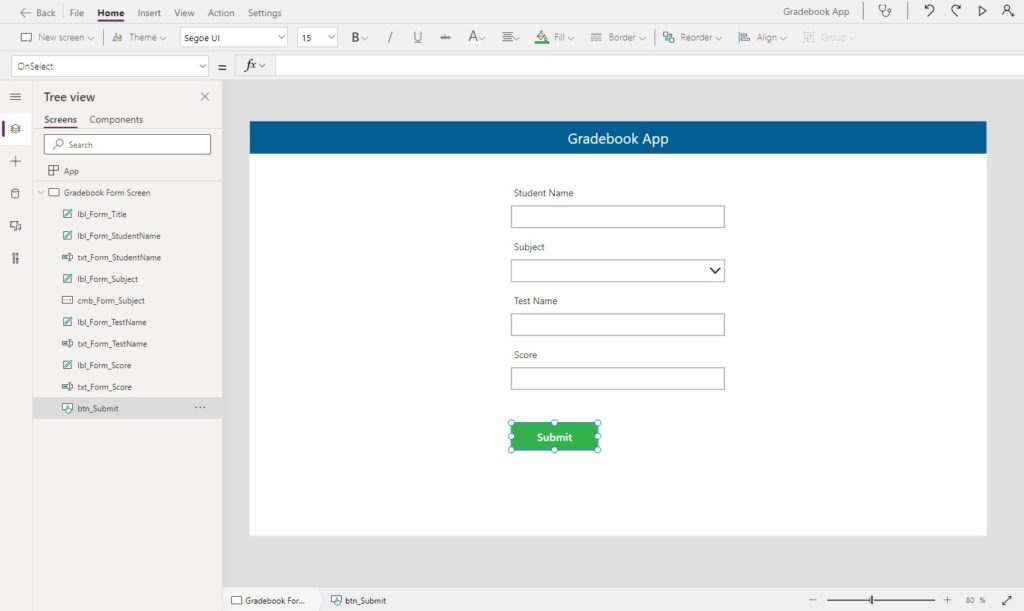
Finally, place a green-colored button submit button at the bottom of the form. Now our form layout is completed and we are ready to apply some code to it.
Submit Form Data With The Patch Function
With an Edit Form we use the SubmitForm function to save form data back to a SharePoint list. When building a Power Apps Patch Form our own form we must use the Patch function instead to submit data. The Patch function creates a new record or modifies an existing record in a datasource. It takes 3 arguments: the datasource name, the base record to modify or create, and a record containing the properties to modify the base record.
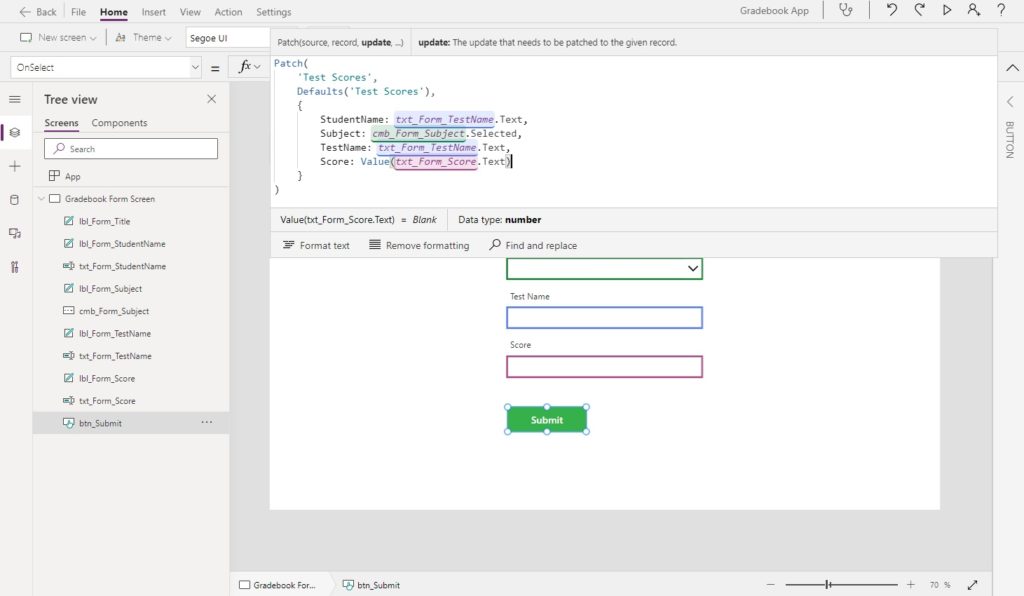
Write this code in the OnSelect property of the submit button. It will create a new record in the SharePoint list containing the input field values found in our form. We specify a new record should be created by using the Defaults function in the 2nd parameter.
Patch(
    'Test Scores',
    Defaults('Test Scores'),
    {
        StudentName: txt_Form_TestName.Text,
        Subject: cmb_Form_Subject.Selected,
        TestName: txt_Form_TestName.Text,
        Score: Value(txt_Form_Score.Text)
    }
)Code language: JavaScript (javascript)
For more information on how to patch every SharePoint column type check out this handy guide.
Check For Errors After Patching A Record
After attempting to patch a record (i.e. submit a record) to the SharePoint list it is a best practice to check for errors. We cannot simply assume that because we submitted the record that it saved successfully. Then, once we know what happened we ought to execute different code for a success and a failure. Edit Forms have a built in OnSuccess and OnFailure property but since we have chosen to build a Power Apps Patch Form we must write our own error-handing manually.
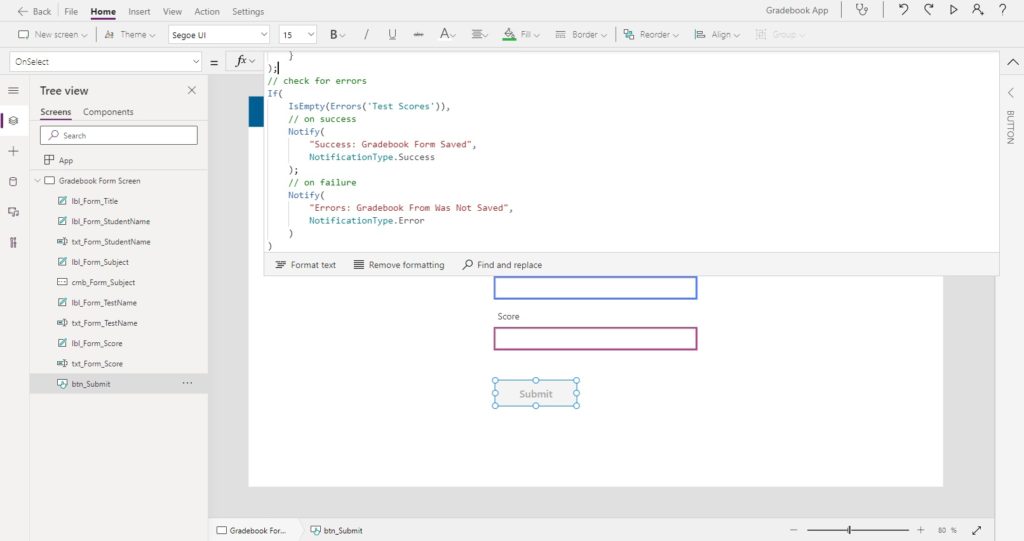
Update the submit button OnSelect property with the following code below. The Errors function returns error information for the previous write to a datasource. Or if there were no errors it returns nothing. Here we are writing an if statement to check whether the errors function is empty. When empty, we show a success message and when not empty, we show a failure message. We have essentially replicated the OnSuccess and OnFailure property of an Edit Form with this code.
// submit the form data
Patch(
    'Test Scores',
    Defaults('Test Scores'),
    {
        StudentName: txt_Form_TestName.Text,
        Subject: cmb_Form_Subject.Selected,
        TestName: txt_Form_TestName.Text,
        Score: Value(txt_Form_Score.Text)
    }
);
// check for errors
If(
    IsEmpty(Errors('Test Scores')),
    // on success
    Notify(
        "Success: Gradebook Form Saved",
        NotificationType.Success
    ),
    // on failure
    Notify(
        "Errors: Gradebook Form Was Not Saved",
        NotificationType.Error
    )
)Code language: JavaScript (javascript)
For a full-tutorial on how to perform error-handling in Power Apps check out this article.
Validate Patch Form Data Before Submission
Performing a data validation check on a form prior to submission ensures a good user experience. If the form data is not valid, we disable the submit button. This way the user cannot make a form submission when it we know it will not be accepted by the SharePoint list and avoids having to wait and find out the record was rejected.
In an Edit Form we perform data validation in the Valid property of each Card control. When creating a Power Apps Patch Form we write the data validation code inside the DisplayMode property of the submit button.
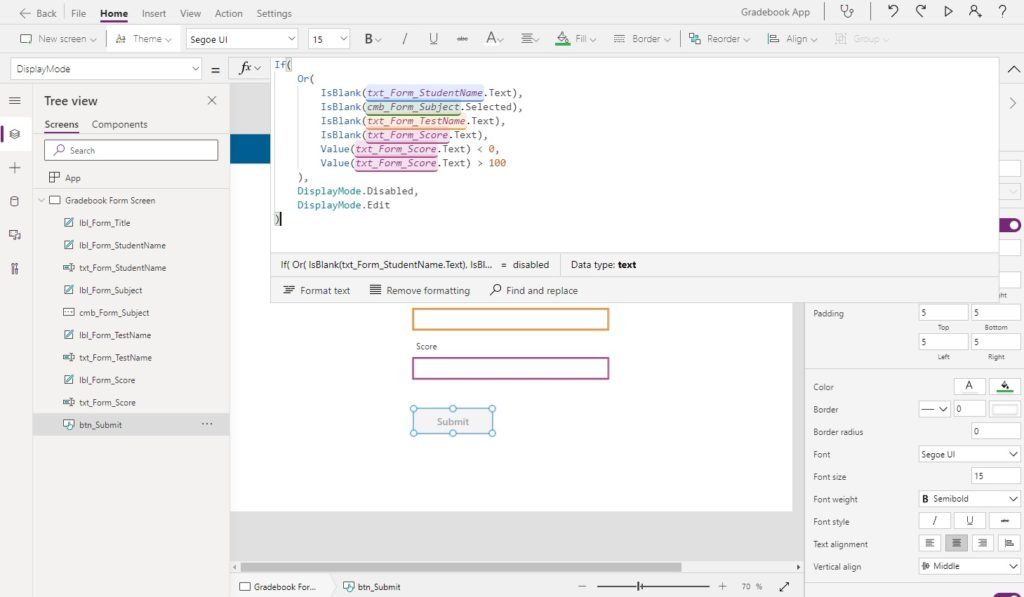
Use this code to ensure that no fields are blank when submitting the form and that test scores are not less than 0 or greater than 100. If any of the conditions are met the submit button becomes disabled.
If(
    Or(
        IsBlank(txt_Form_StudentName.Text),
        IsBlank(cmb_Form_Subject.Selected),
        IsBlank(txt_Form_TestName.Text),
        IsBlank(txt_Form_Score.Text),
        Value(txt_Form_Score.Text) < 0,
        Value(txt_Form_Score.Text) > 100
    ),
    DisplayMode.Disabled,
    DisplayMode.Edit
)Code language: CSS (css)
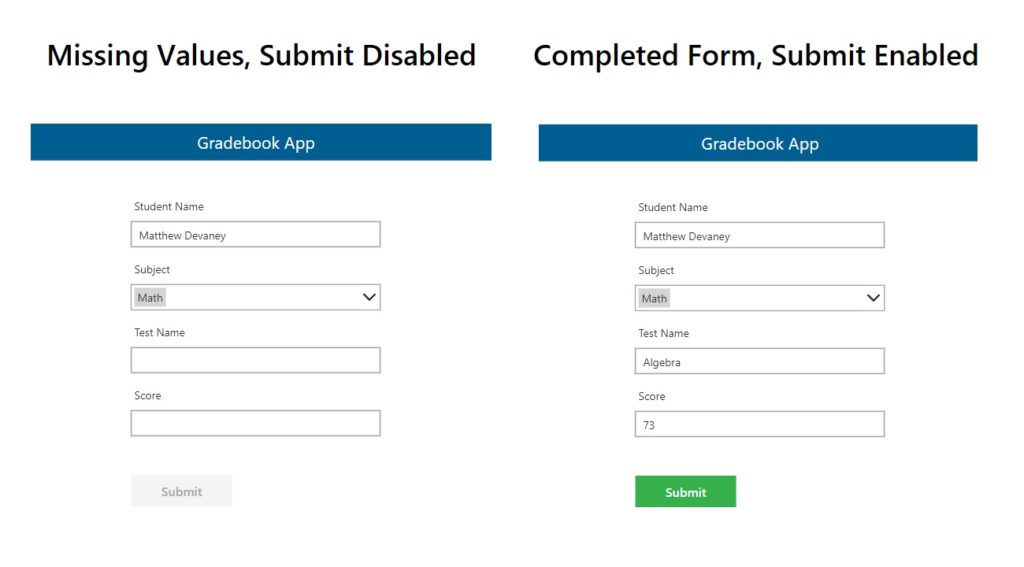
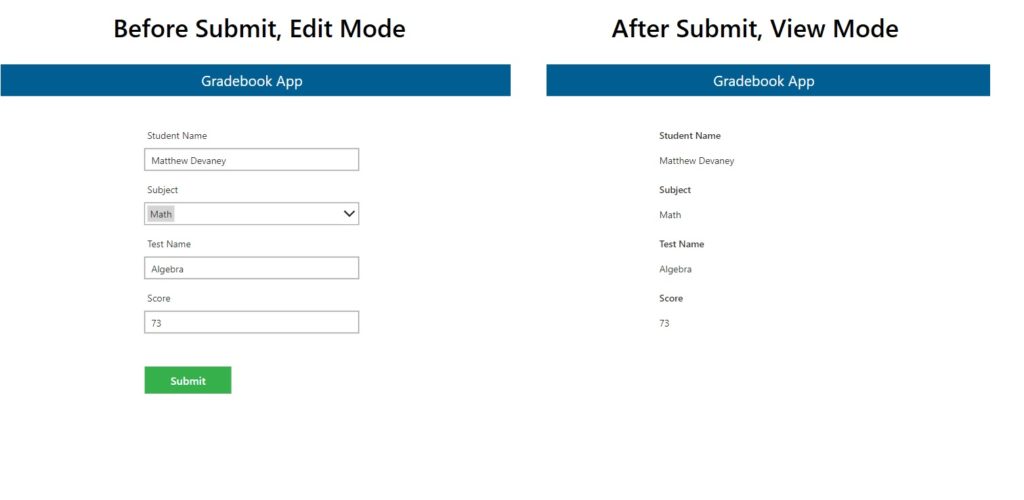
Here’s how the form should look when a teacher is filling-in the form. The submit button is disabled until the teacher fully completes the form.
For more advanced data validation techniques check out this article.
Change Patch Form Controls From Edit Mode To View Mode
When the form is submitted successfully the input fields should become locked and no-longer accept changes. In an Edit Form we do this by changing the entire form mode to View mode. With a Power Apps Patch Form we must update each individual input’s DisplayMode to View mode.
Go to the submit button, browse to the OnSelect property and scroll to the error-checking section of the code.
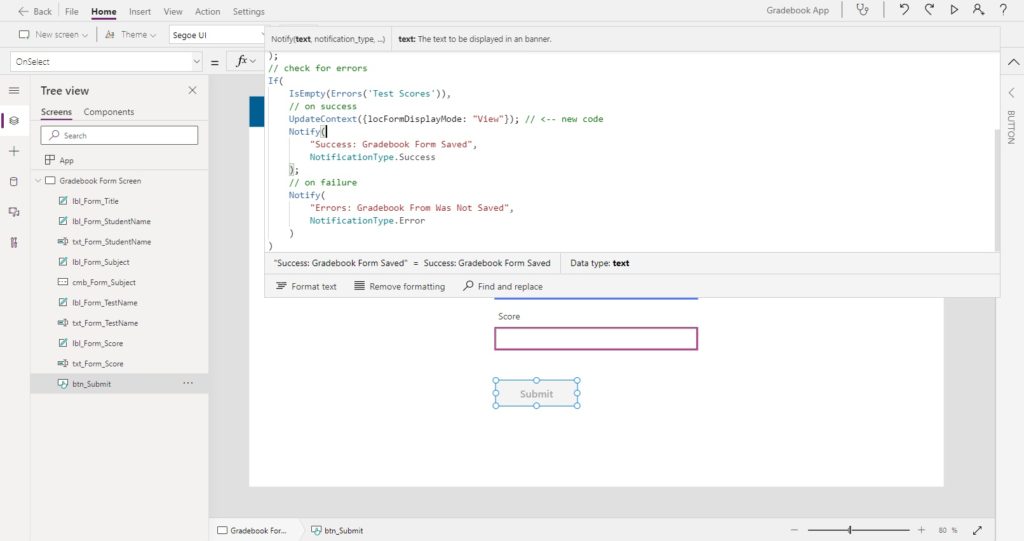
Add an UpdateContext function to the code’s on success branch and create a variable called locFormDisplayMode. This text variable will track the current DisplayMode of the Patch form: New, Edit or View mode.
// submit the form data
Patch(
    'Test Scores',
    Defaults('Test Scores'),
    {
        StudentName: txt_Form_TestName.Text,
        Subject: cmb_Form_Subject.Selected,
        TestName: txt_Form_TestName.Text,
        Score: Value(txt_Form_Score.Text)
    }
);
// check for errors
If(
    IsEmpty(Errors('Test Scores')),
    // on success
    UpdateContext({locFormDisplayMode: "View"}); // <-- new code
    Notify(
        "Success: Gradebook Form Saved",
        NotificationType.Success
    ),
    // on failure
    Notify(
        "Errors: Gradebook From Was Not Saved",
        NotificationType.Error
    )
)Code language: JavaScript (javascript)
Then, select all of the input fields at once…
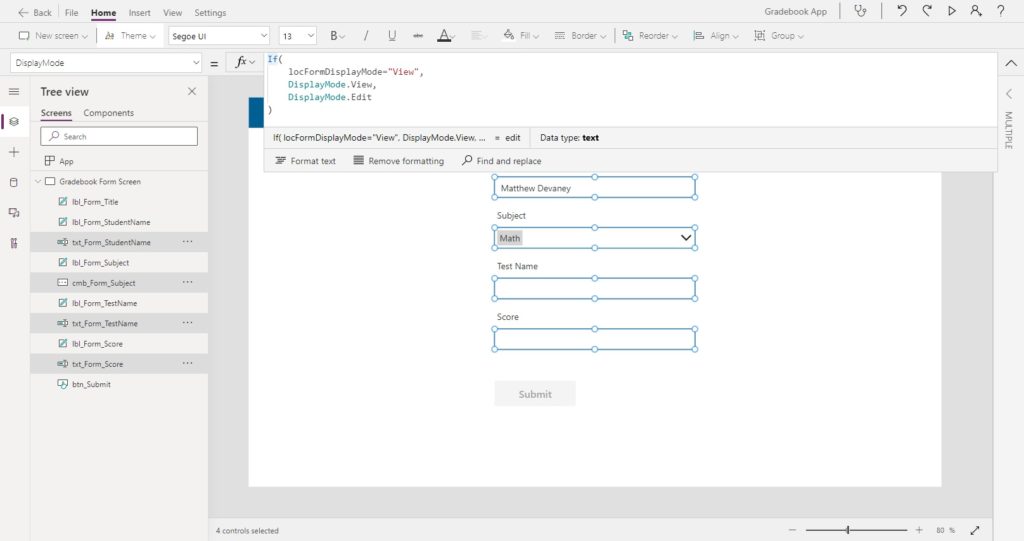
…and use this code in the DisplayMode property to control whether they are editable or are locked.
If(
    locFormDisplayMode="View",
    DisplayMode.View,
    DisplayMode.Edit
)Code language: JavaScript (javascript)
The submit button should also disappear when the form is in view mode to prevent form submission.
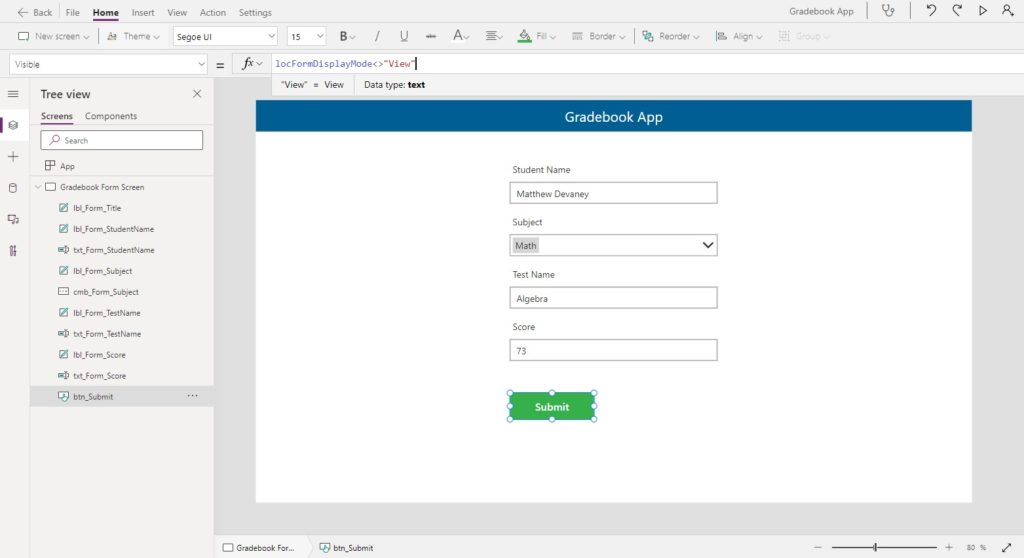
Use this code in the Visible property of the submit button to hide it.
locFormDisplayMode<>"View"Code language: HTML, XML (xml)
Select A Record To Edit From A Gallery
At this point we’ve covered how to submit an new record with the Patch function. The next scenario we must tackle is editing an existing record. Create a new screen called Gradebook List Screen. Insert a new gallery showing the list of Test Scores along with the student name and test name.
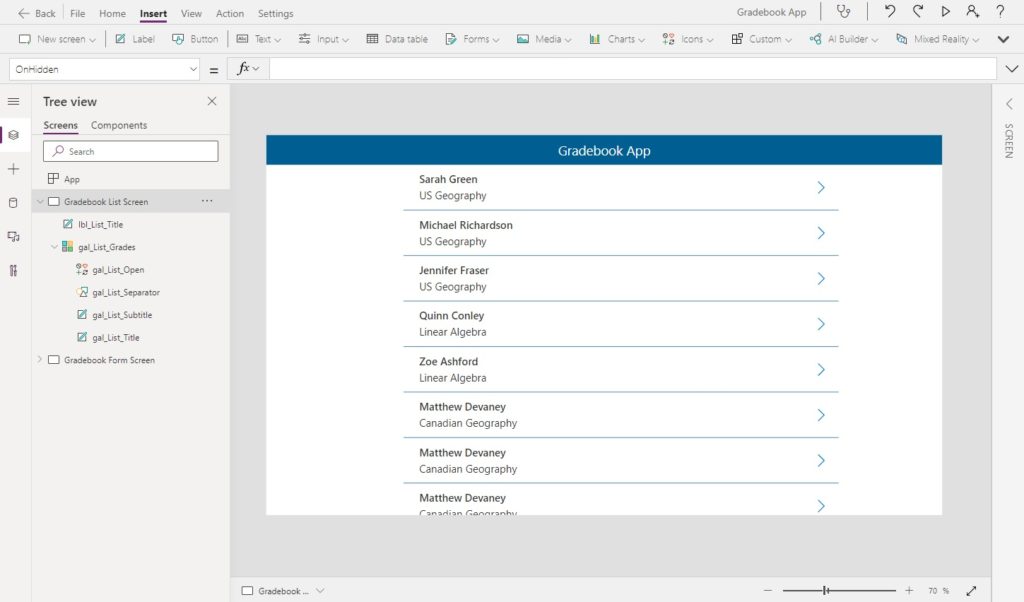
The Items property of the gallery should be the Test Scores SharePoint list.
'Test Scores'Code language: JavaScript (javascript)
When the teacher selects a record in the gallery they should be taken to the Gradebook Form Screen and be able to edit test details.
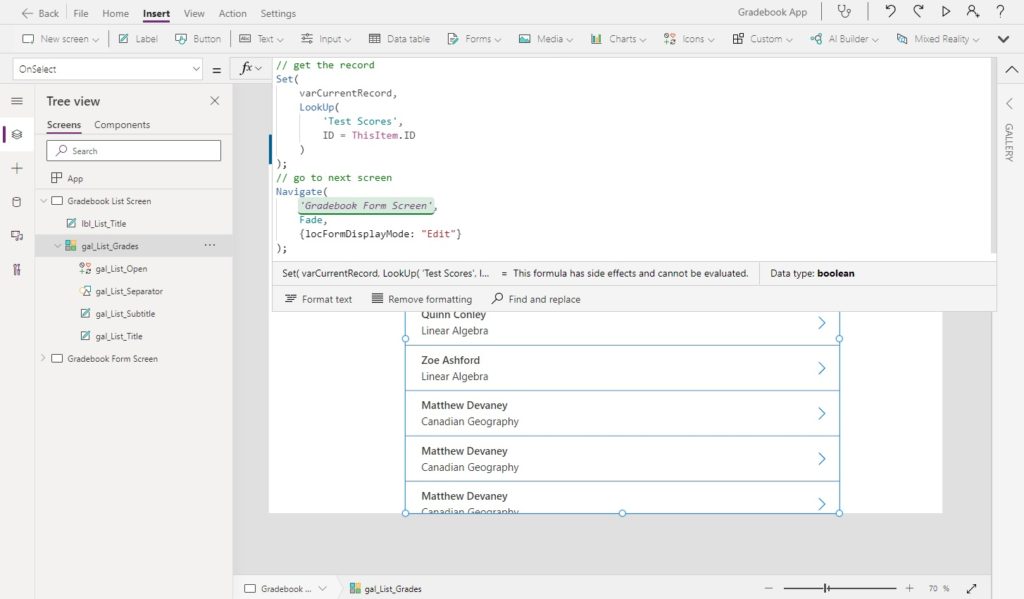
Write this code in the OnSelect property of the gallery.
// get the record
Set(
    varCurrentRecord,
    LookUp(
        'Test Scores',
        ID = ThisItem.ID
    )
);
// go to next screen
Navigate(
    'Gradebook Form Screen',
    Fade,
    {locFormDisplayMode: "Edit"}
);Code language: JavaScript (javascript)
Edit A Record With A Patch Form
Once the teacher selects a test score from the gallery the test data must appear in the Patch form. To make this happen, go to the Gradebook Form Screen and change the Default property of the Student Name text input…
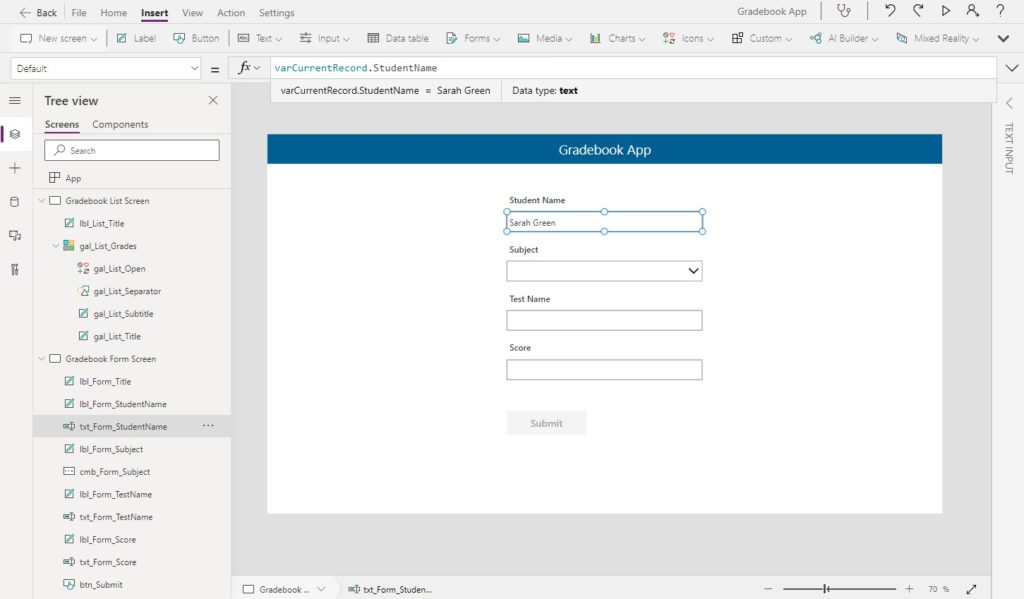
…to this code. It supplies the StudentName field from the varRecordCurrent variable.
varCurrentRecord.StudentNameCode language: CSS (css)
Continue the same pattern for the Default property of the Test Name and Score text input fields.
// Test Name
varCurrentRecord.TestName

// Score
varCurrentRecord.ScoreCode language: JavaScript (javascript)
The Subject field must be handled differently because it is a combobox.
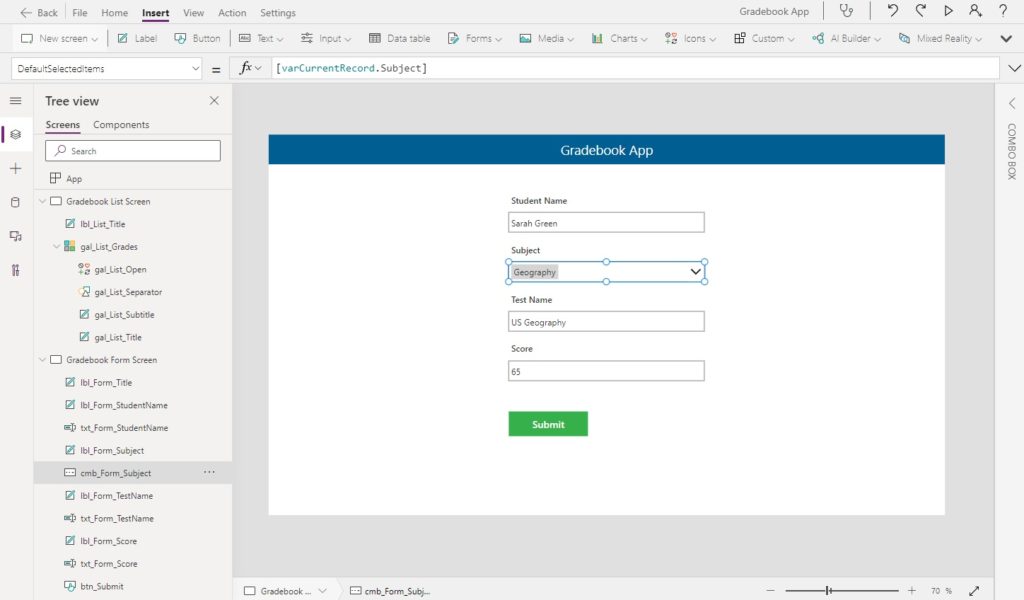
Put this code in the DefaultSelectedItems property of the Subject combobox.
varCurrentRecord.SubjectCode language: CSS (css)
Then we make two updates to the submit button’s OnSelect code. First, we replace the 2nd parameter of the patch function to supply the varCurrentRecord variable which holds our record to be edited. Then we encapsulate the patch function inside of the Set function and capture the response inside the same variable, varCurrentRecord.
// submit the form data
Set(  //<-- new code
    varCurrentRecord,
    Patch(
        'Test Scores',
        varCurrentRecord,  // <-- new code
        {
            StudentName: txt_Form_StudentName.Text,
            Subject: cmb_Form_Subject.Selected,
            TestName: txt_Form_TestName.Text,
            Score: Value(txt_Form_Score.Text)
        }
    )
);
// check for errors
If(
    IsEmpty(Errors('Test Scores')),
    // on success
    UpdateContext({locFormDisplayMode: "View"});
    Notify(
        "Success: Gradebook Form Saved",
        NotificationType.Success
    ),
    // on failure
    Notify(
        "Errors: Gradebook From Was Not Saved",
        NotificationType.Error
    )
)Code language: JavaScript (javascript)
Now the Patch form functionality to edit records is completed.
Reset Patch Form Input Fields
After editing a record the teacher will navigate back to the Gradebook List Screen to perform their next activity. We must reset the form so it is ready to display the next record the teacher chooses. With an Edit Form we would simply use the ResetForm function to do this. But with a Power Apps Patch Form, as always, we must define the form reset manually.
Insert a right arrow icon onto the left-side of the title bar.
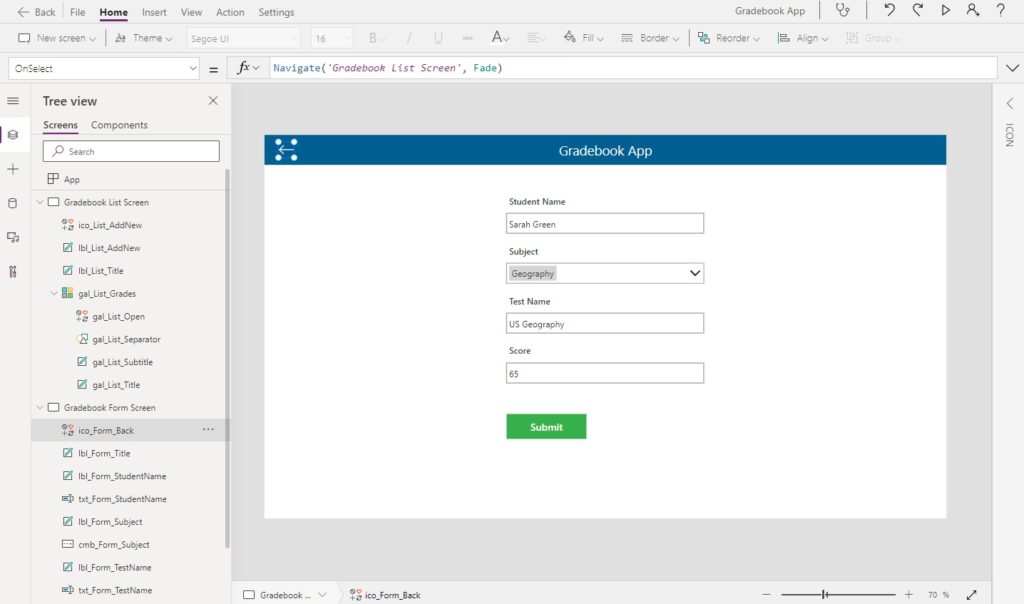
Then use this code in the icon’s OnSelect property to navigate back to the Gradebook List Screen.
Navigate('Gradebook List Screen', Fade)Code language: JavaScript (javascript)
Our form reset code will trigger when the teacher leaves the form Gradebook Form Screen.
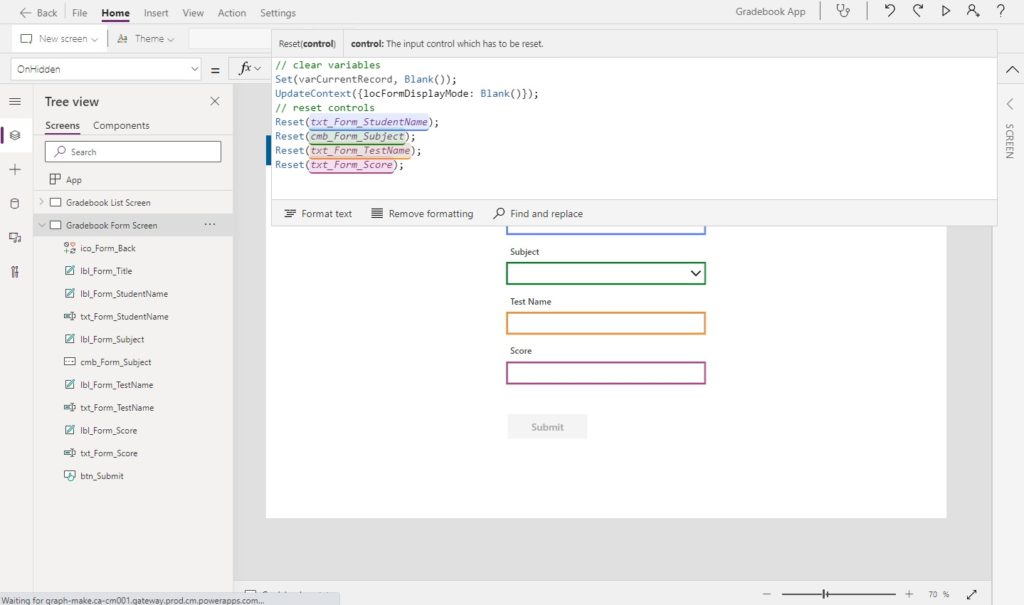
Use this code in the OnHidden property of the screen to clear all variables to blank and reset each form control individually.
// clear variables
Set(varCurrentRecord, Blank());
UpdateContext({locFormDisplayMode: Blank()});
// reset controls
Reset(txt_Form_StudentName);
Reset(cmb_Form_Subject);
Reset(txt_Form_TestName);
Reset(txt_Form_Score);Code language: JavaScript (javascript)
Add A New Record To A Patch Form
When we created the previous functionality to edit an existing record we removed the ability to create a new test score. We will now add that functionality back to the Gradebook app. With an Edit Form we would add a new record by changing the form to New mode. In a Power Apps Patch Form we specify a new record should be created by supplying a blank record in the 2nd argument of the patch function.
Insert an Add icon and a label on the right-side of the Gradebook List Screen titlebar with text “Add Test Score”.
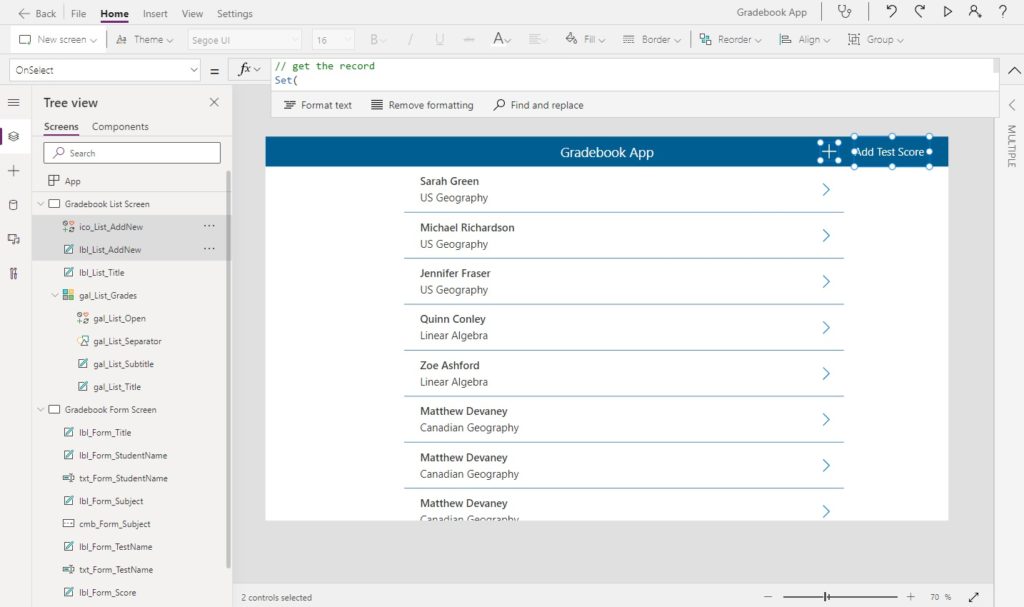
Use this code in the OnSelect property of both controls.
// get the record
Set(
    varCurrentRecord,
    Defaults('Test Scores')
);
// go to next screen
Navigate(
    'Gradebook Form Screen',
    Fade,
    {locFormDisplayMode: "New"}
);Code language: JavaScript (javascript)
That’s all you have to do. When we input data into the form and click submit it will create a new record.
Did You Enjoy This Article? 😺
Subscribe to get new Copilot Studio articles sent to your inbox each week for FREE
Questions?
If you have any questions or feedback about Everything You Need To Know About Power Apps Patch Forms please leave a message in the comments section below. You can post using your email address and are not required to create an account to join the discussion.


Nice article, thank you. I wish I had access to this a few weeks ago as I’ve just finished an app that uses patch forms. It is encouraging that I used many of the techniques you discuss. I never knew about using Defaults to set a blank record. I will also implement the OnSuccess and Failure block in my submit.
I used layout containers to build the form and make it responsive.
Dean,
Glad to hear you picked up few tips from the article. I’m also super stoked to hear that you are incorporating layout containers in your work. More people should be doing that in my opinion. It just makes apps look so much better when none of the controls are floating and controls are all perfectly aligned. Would loved to have incorporate the technique in this article but it was already 1,800 words long… hah!
I referenced one of your other articles for the layout containers. I won’t develop apps without them now. Hey are you a Kiwi by any chance? Stoked is such a Kiwi word. I’m based in Hawkes Bay.
Dean,
Containers everywhere? That’s awesome. We totally have the same approach to design. Thumbs up!
Nope, not a kiwi but NZ is a beautiful part of the world. I live in Winnipeg, Canada. Our countries are both part of the ‘Commonwealth’ though so maybe that’s why stoked is a ‘shared word.’
Ah awesome. I’ve not visited Canada yet but definitely on my list. Canada looks so nice, especially the skiing. Another thing in common – we’ve both got noisy neighbours 🙂
Great article, thanks. I enjoy reading your posts since they are well structured, you explain your reasoning behind your choices/advices and have good examples.
FYI – I think I have spotted some typos in this post in the section “Edit A Record With A Patch Form“. Screenshots shows “varCurrentRecord.StudentName” as default value but the text refers to varRecordCurrent.StudentName. Might be some other mixups between varRecordCurrent and varCurrentRecord elsewhere also.
This is awesome, Mattew! I was just about to delve into using patch for an app I’m building.
Great post as always. Just wondering the need to use lookup in the below formula on the Onselect property of the gallery.
// get the record
Set(
varCurrentRecord,
LookUp(
‘Test Scores’,
ID = ThisItem.ID
)
);
Can’t we use
set(
varCurrentRecord,
ThisItem
);
I am thinking this will avoid inquiring our data source.
Minte,
Agreed that it does perform a call to the datasource. My preference is to do it this way because ThisItem also contains extra fields for each control in the gallery which I do not want. LookUp to the datasource will retrieve a ‘clean’ record and I am willing to wait a very small amount of time for the data to be retrieved. However, its perfectly fine to do it your way.
Great discussion!
Thanks for the explanation. I see your point.
Thank you very much for this. One thing about making your custom (patch) forms is you can switch to using a different table as your data source. If you use the non-patch form, you basically can’t change the data source, so you end building a whole new form…
…Unless you know of something I don’t…which would be nice and not surprising ?
Jason,
Great point! That is 100% true. Patch forms end up being more re-usable because of this.
Matthew, thank you very much for sharing all this knowledge and making it easy to understand. I have done several of your tutorials. This one in particular, despite being simple, still shows an error that I don’t understand. When I start the application, I can create new items, however, when I try to edit an item and save, I get this error:
An error occured on the server.
Server Response: TestScores failed: BadGateway
I appreciate the help
Javier,
I think it could be this misnamed section of code. TestScore does not exist. Score does.
// Score
varCurrentRecord.TestScore
Please try changing it to this code.
// Score
varCurrentRecord.Score
Matthew, thanks for the quick reply. That’s not the problem, my list in Sharepoint is called TestScores, without spaces. I’ve been testing and I realise that it works fine when editing a gallery record and modifying at least the subject (ComboBox), however, when only one of the text fields is edited (Student name, test name or score), that’s where the error appears and obviously that record is not saved in the SPL. I will try to find out the problem, thanks again for the excellent tutorials you do.
Javier,
I too had the same problem when I opened my app again. Funny how Power Apps works sometimes. The app can be fine when you leave Studio mode but start misbehaving once you get back into it.
In any case, I was able to fix the issue by changing the DefaultSelectedItems property of the ComboBox from:
[varCurrentRecord.Subject]
to this instead:
varCurrentRecord.Subject
I’m a little baffled as to why we can pass a record value into this property. I thought it had to be a table. But hey, it works. Let me know if you have success.
Matthew, you are right, it worked!, it is weird though. Thanks again for your work, I hope you go on creating this wonderful learning material in the future, for now I wish you a happy new year 2022.
Hi Matthew, have you tried patching with the attachments control❓ Right now, I have a few patch forms that if I want to upload an attachment, I use the regular form for that part and the rest using patch.
Is there another way? From my understanding you can’t use patch with attachments.
Jason,
You are correct. Patch cannot send an attachment to SharePoint. You will need to use a Flow.
My most popular article shows how to do it for a SharePoint Document library. I’m sure you could adapt the technique for list item attachments. Also, Reza Dorrani has a great video about uploading attachments on YouTube.
Link to my article: https://www.matthewdevaney.com/power-apps-easiest-way-to-upload-files-to-a-sharepoint-document-library/
Hi Matthew,
Really good article thanks, as always.
Building a similar Patch Form for Contacts.
Having major trouble getting the Company Name for the contacts displaying.
I have a Combo Box and can choose the Company Name from list and this is successfully updating to Dataverse Tables.
However, I can’t get the Company Name defaulting into the Combo Box Display in the Form.
For Combo Box, I have:
Items=Filter(Accounts, ‘Accounts (Views)’.’All Customer Accounts’)
Fields=Company
DefaultSelectedItems=[varCurrentRecord.Company]
Any help would be much appreciated!
I am new to PowerApps but after building my first Patch Form, I agree that been able to adjust multiple controls is much better!
I jumped the Gun on this!
Just Solved with the following:
Items: [@Accounts]
DefaultSelectedItems: AsType(varCurrentRecord.Company, [@Accounts])
Finally!
Justin,
I’m glad to hear you solved. I also tend to figure out problems after writing/talking out a short explanation of the issue 🙂
Hi, Sorry i’m a bit late to this thread. Can you recommend when to use patch-form and Editform. I have four tables in a SQL Database, and use approximately. 100 fields alltogether. Today i use many Editforms and galleries to achieve my goal, but it requires alot of tweaking in size, font, font size, colors etc. to make it look good. Im new to Power Apps, and was wondering if it would better to just use patch and individual textboxes instead, also to be able to arrange the layout easier. Do you have any thoughts on this?
Hello, please i need your help.
i followed your instructions on how to patch custom fields but here is where i am having an issue
i have an app and i am having some difficulty.
here’s what i’m trying to do;
select an item to edit from the gallery which navigates to the custom form, add info and submit. once it’s submitted, i want to lock the fields
however, what keeps happening is when i lock the fields after submission, any item i select from my gallery becomes uneditable. it’s quite frustrating. please help
Tutu,
Did you follow all of the steps in the tutorial. If yes, what spot in the tutorial are you stuck on?
Hello Matthew, yes i did.
On my submit button, i set the fields to lock after submission but when i select another item from my gallery to edit, the custom fields stay locked and i’m unable to edit a different item.
Now if i set the updatecontext to “edit” on the button in my gallery, all items become editable and doesn’t lock after submission.
so i want to be able to;
lock an item custom field only if the value has been edited just once.
so from a list of items from gallery 1; i want to select an item to edit
navigate to the custom form, edit it just once then submit and lock fields just for that item but the fields should not be locked for the next item i select from my gallery.
i’m sorry if this a kinda confusing but i’m kind of stuck.
Hi Matthew,
Great article covering Patch Forms. If only I had read this before starting developing in PowerApps would’ve be awesome.
I have one big problem with one app that I built, we have a measurement app that it’s used along with a Verner to measure the fruit diameter, so app locally stores several records in a collection (around 1,200 per user) and once they have completed the measures they Save into a SP List (code uses ForAll + Patch) but sometimes data is duplicated in the SP List. ¿Any advice to avoid this?
Thanks in advance!
Francisco,
Sorry, its hard to know why the data is sometimes duplicated in the SP List. I think you first need to determine where the duplication occurs. Does duplication appear in the collection before patching? Or does it happen during ForAll + Patch? I suspect duplication is happening before patching because ForAll simply loops over records in the collection.
Great instruction guide. I’ve got a lot of experience with InfoPath, but now I’m struggling with re-learning how to do this. I followed all the directions to a tee and when I tested the form and hit the “Submit” button, I got the following error:
“Issue
Title: Field ‘Title’ is required.
Location
Button1
.OnSelect”
Here is the OnSelect formula that I re-entered from your guide (the only change is that I capitalized the first letter of each item):
Patch(‘Test Scores’,Defaults(‘Test Scores’),{StudentName: Txt_Form_TestName.Text,Subject: Cmb_Form_Subject.Selected,TestName: Txt_Form_TestName.Text,Score: Value(Txt_Form_Score.Text)})
Paul,
Good question. I did not mention this in the article but you can set the required property of the Title field to ‘No’ in the SharePoint list settings. This will solve your issue.
What if I need the field to be required?
Hello,
Is it possible to use patch form in order to create Powerapps Barcode scanner which you have shared on June 13, 2021 ?
Victor,
Yes, you can create your own Patch form instead.
Hi Matthew – I have followed your blog to the T on patch and created my own where user can view and edit. Exact same step as you have shown. when I submit the data it gets submitted however when other user tried to save it it shows data successfully submitted but it does not get saved on SharePoint. Please advise or help
Excellent! I have something very similar to this. But, can we pre populated the student name in the field of the edit form so user doesn’t have to type the name? Thank you.
Yoke,
You can prepopulate a text input by using the Default property.
Well explained.
What do you think about setting “locFormDisplayMode” to DisplayMode.Edit or .View, then set the “Diplay Mode” property of the controls to the variable directly without an if statement?
Thanks!
Mohamed,
That’s a better method that what I shared in this tutorial. Do it.
Great, thanks!
Great article Matthew! Have used a lot of this in my latest app.
I’ve been following your other article with regards to Deep Linking and emailing a link to a specific record. How would I apply this based on the values used in this article?
Thanks,
Chris
// submit the form data
Set( //<– new code
varCurrentRecord,
Patch(
‘Test Scores’,
varCurrentRecord, // <– new code
{
StudentName: txt_Form_TestName.Text,
Subject: cmb_Form_Subject.Selected,
TestName: txt_Form_TestName.Text,
Score: Value(txt_Form_Score.Text)
}
)
);
// check for errors
If(
IsEmpty(Errors(‘Test Scores’)),
// on success
UpdateContext({locFormDisplayMode: “View”});
Notify(
“Success: Gradebook Form Saved”,
NotificationType.Success
),
// on failure
Notify(
“Errors: Gradebook From Was Not Saved”,
NotificationType.Error
)
)
Dup,
You are correct. I’ve updated my blog to fix the error. Thank you for reporting it 🙂
No problem. By the way the error is still present in the rest of the blog text.
Dup,
My website is served through Cloudflare. Updates aren’t reflected immediately unless I login to that service and clear the cache. So you will see it within the next day or so.