Easy Power Apps Scrollable Screen Using A Vertical Container
When we use a basic Power Apps form or gallery whose contents extend beyond its limits a scrollable screen is automatically generated. But outside of those controls, when we want to do something custom we must make the scrollable screen for ourselves. Fortunately, the responsive containers in Power Apps make this easy. By changing the vertical overflow property of a container to scroll we can turn it into a scrollable screen and add any controls we like.
In this article I will show you how to make a scrollable screen in Power Apps using a vertical container.
Introduction: Projects Backlog App
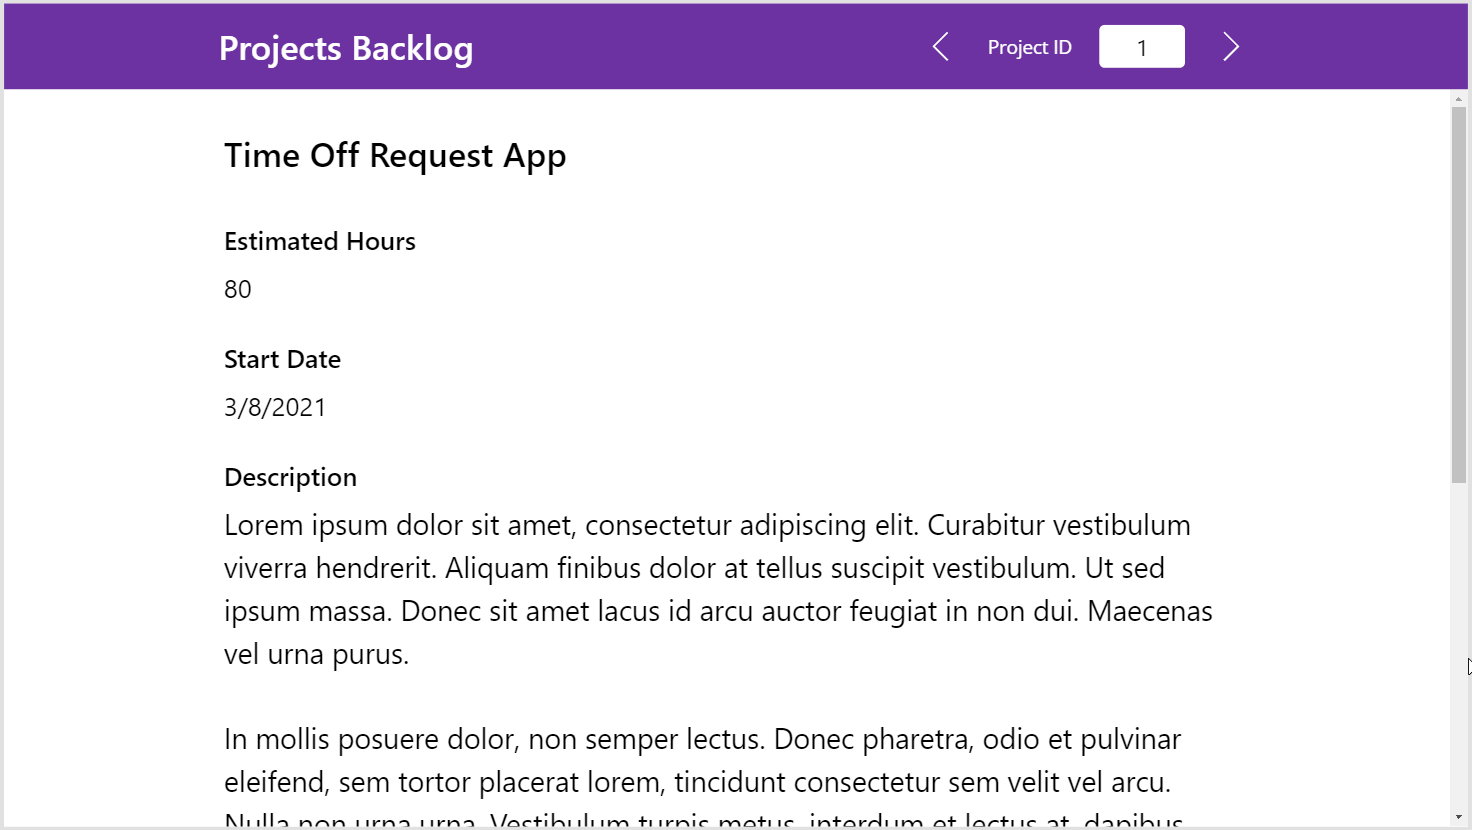
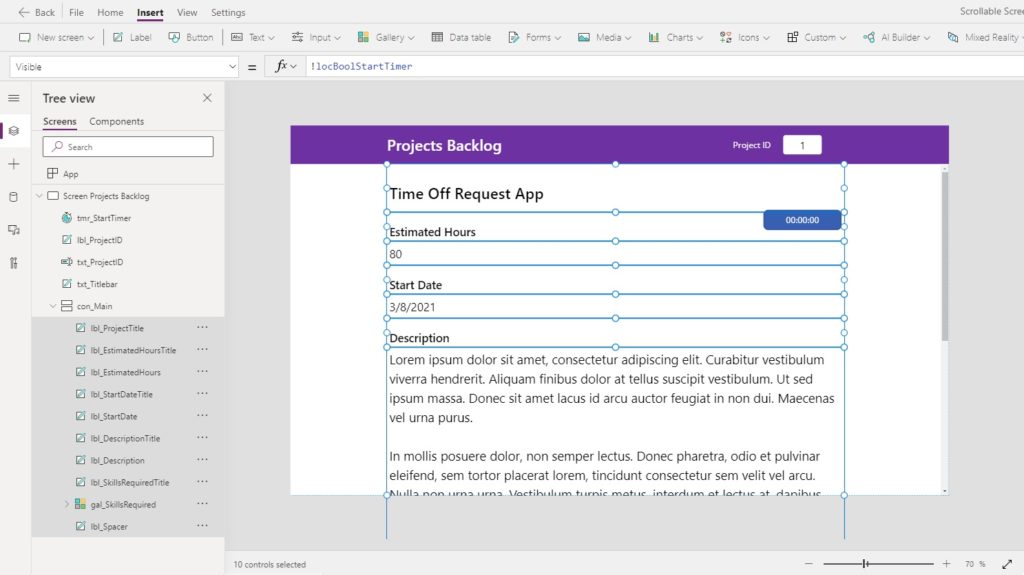
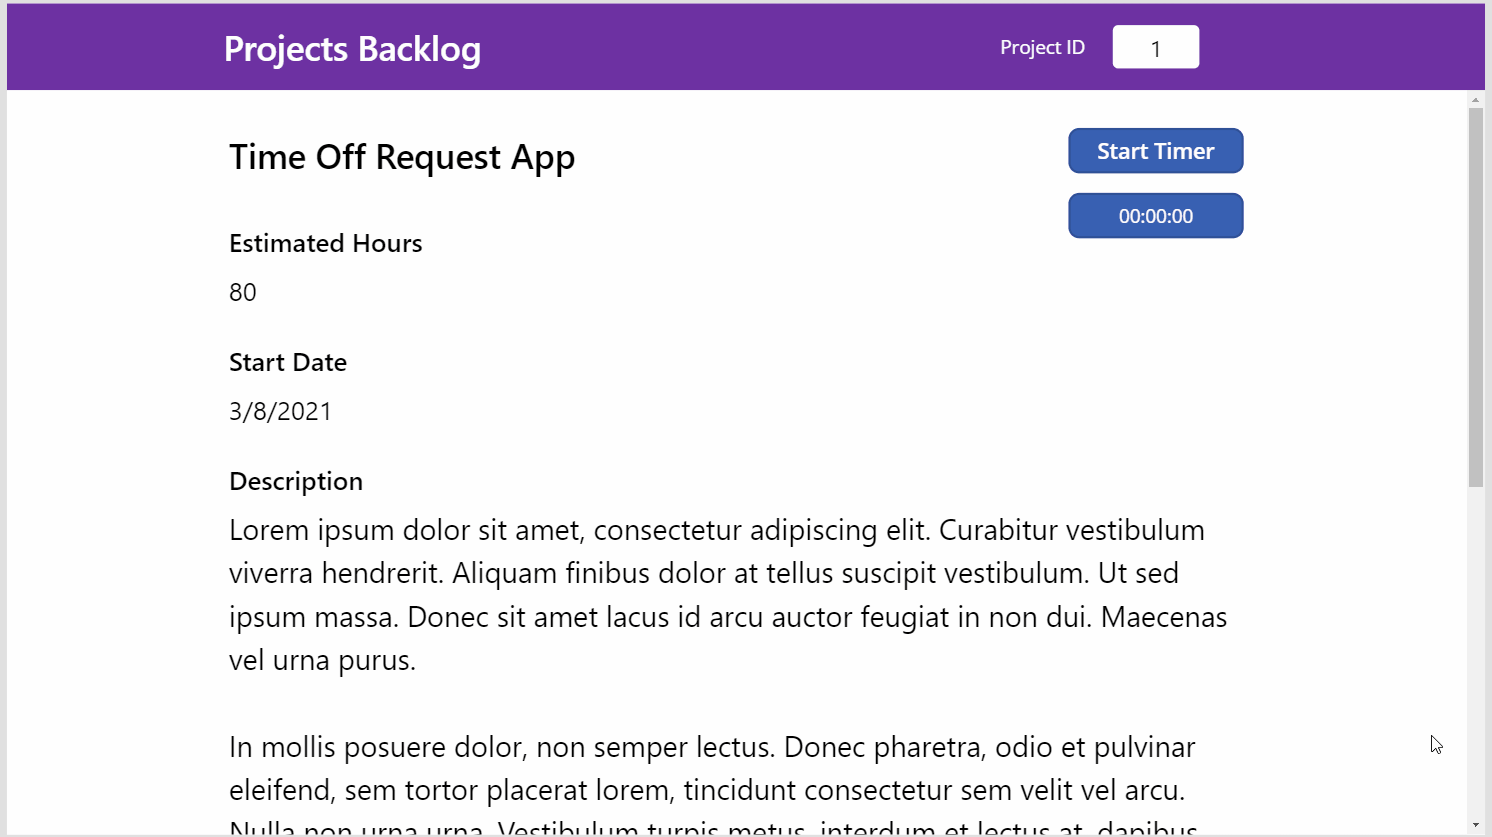
The Projects Backlog App is used by a software development team to track a list of projects that need to be done. A scrollable screen shows the project title, estimated hours, start date, description and skills required.
Setup The SharePoint List
Create a new SharePoint list to called Projects Backlog to store data for the app. Add the following columns:
- Title (single-line text)
- Description (multiple-line text)
- Start Date (date)
- Estimated Hours (number)
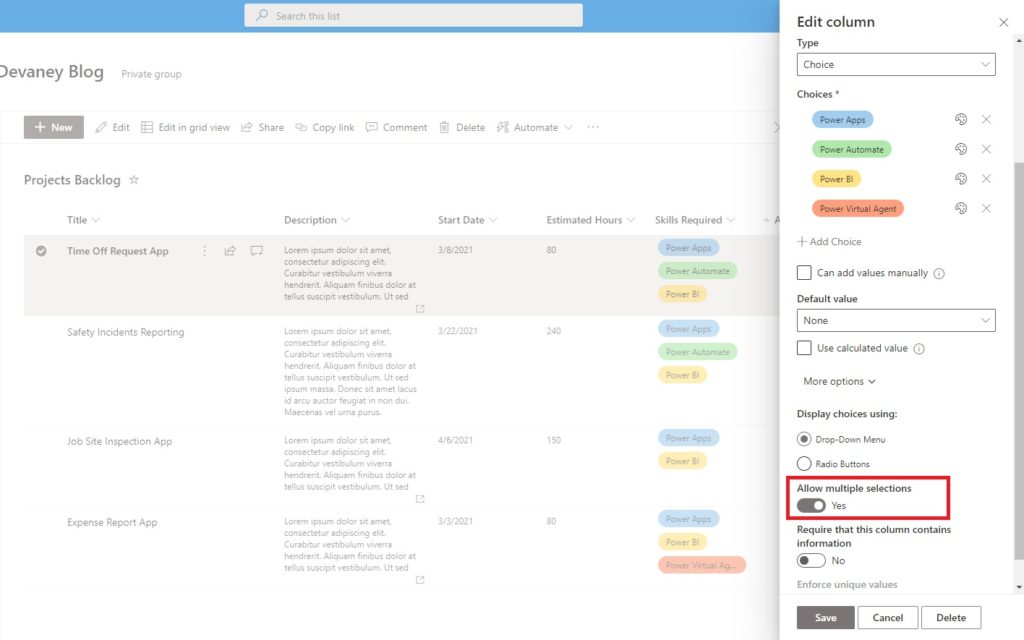
- Skills Required (choices) (allow multiple selections)
The Skills Required (choices) column needs 4 options: Power Apps, Power Automate, Power BI and Power Virtual Agent. It must have the Allow Multiple Selections setting enabled to allow more than one skill to be chosen.
Input this data into the SharePoint list…
| ID | Title | Description | Start Date | Estimated Hours | Skills Required |
| 1 | Time Off Request App | Lorem ipsum dolor… | 3/8/2021 | 80 | Power Apps, Power Automate, Power BI |
| 2 | Safety Incidents Reporting | Lorem ipsum dolor… | 3/22/2021 | 240 | Power Apps, Power Automate, Power BI |
| 3 | Job Site Inspection App | Lorem ipsum dolor… | 4/6/2021 | 150 | Power Apps, Power BI |
| 4 | Expense Report | Lorem ipsum dolor… | 3/3/2021 | 80 | Power Apps, Power BI, Power Virtual Agents |
…and use this Lorem Ipsum text inside the description column. For the first row copy and paste all of the text into the description. For the rest of the records copy and paste only 1 or 2 paragraphs. The purpose of this is to learn how to deal with text fields of variable length.
Lorem ipsum dolor sit amet, consectetur adipiscing elit. Curabitur vestibulum viverra hendrerit. Aliquam finibus dolor at tellus suscipit vestibulum. Ut sed ipsum massa. Donec sit amet lacus id arcu auctor feugiat in non dui. Maecenas vel urna purus.

In mollis posuere dolor, non semper lectus. Donec pharetra, odio et pulvinar eleifend, sem tortor placerat lorem, tincidunt consectetur sem velit vel arcu. Nulla non urna urna. Vestibulum turpis metus, interdum et lectus at, dapibus vulputate leo.

Fusce bibendum augue ut dictum sollicitudin.  Nam purus odio, condimentum in lobortis et, finibus vitae arcu. Sed sodales mollis faucibus. Integer ultrices felis magna, vitae malesuada magna pellentesque vel. Curabitur a libero vel erat tempor faucibus sit amet convallis risus.
Create A Scrollable Screen Using A Vertical Container
Open Power Apps Studio and create a new tablet app from blank. Insert a label at the top of the screen with the text “Projects Backlog” to at as the titlebar.

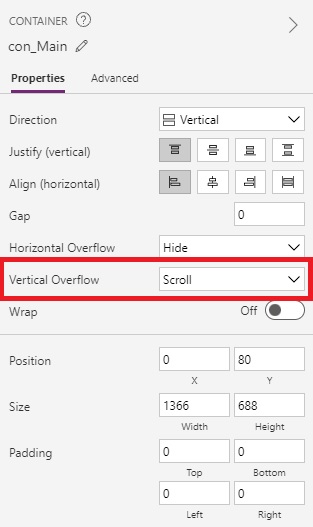
Go to the Insert menu on the left navigation menu and search for a vertical container. Place a vertical container on the screen and resize the container so it fills the entire canvas under the titlebar.
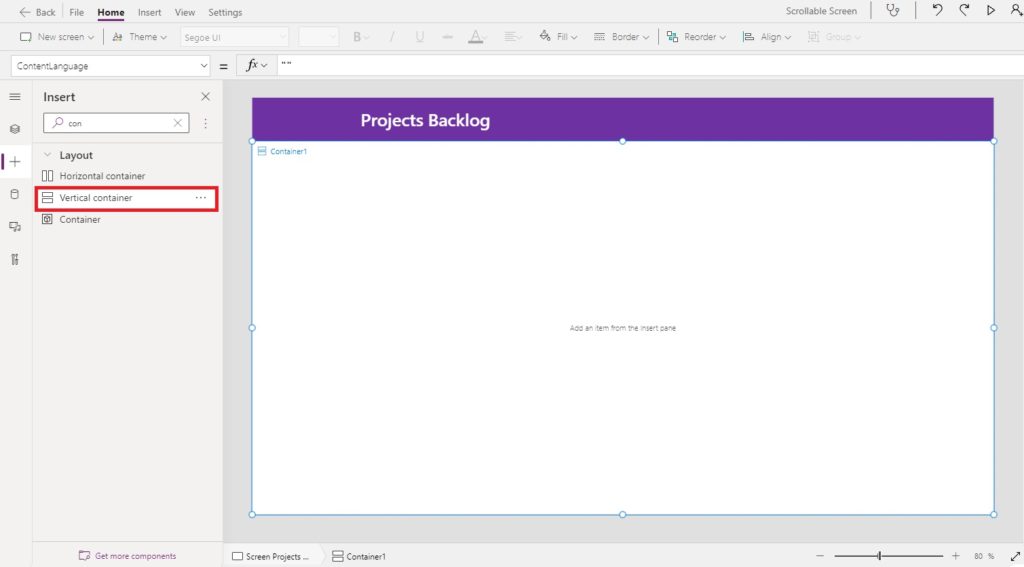
By default a vertical container will hide any controls placed beyond its borders. Instead, we want to create a scrollable screen that will allow us to see those controls. To do this, select the vertical container and change its vertical overflow property to Scroll using the properties menu on the right-side of Power Apps Studio.
Add Controls To A Power Apps Scrollable Screen
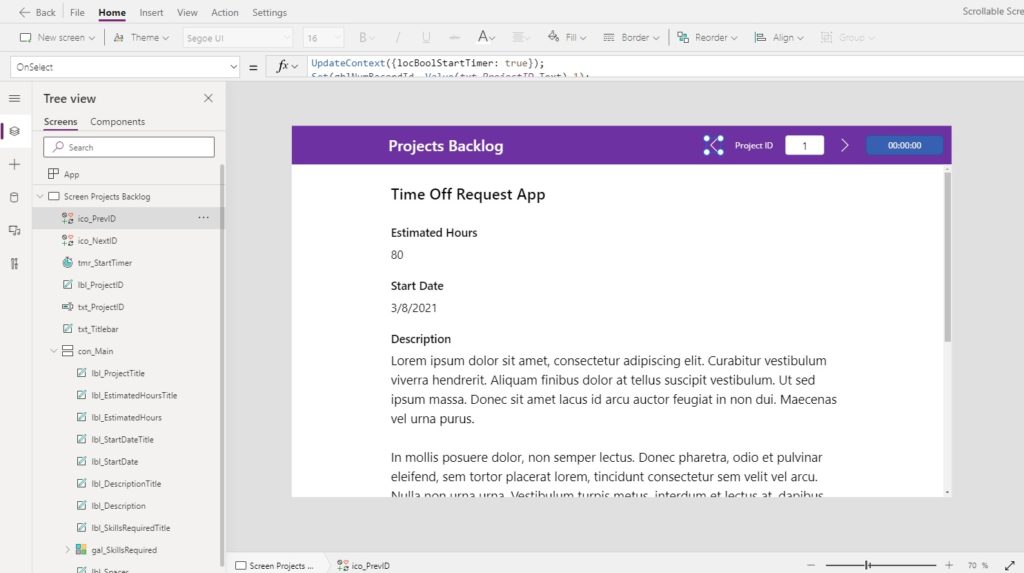
The scrollable screen shows the project title, estimated hours, start date, description and skills required. We must define which record the app is currently showing and retrieve those details. Make a new text input and place it inside the titlebar with the label “Project ID” beside it.
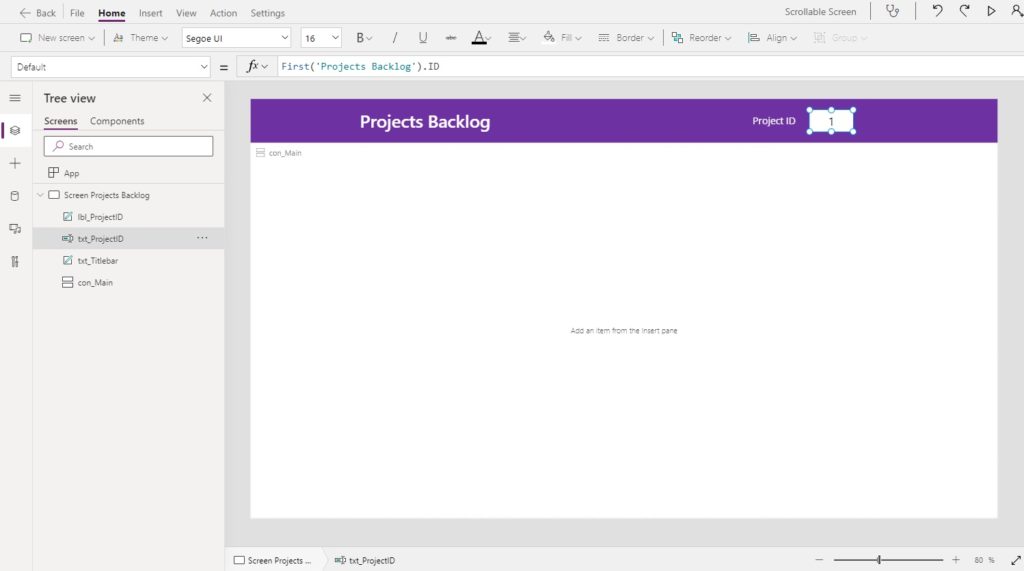
Write this code in the Default property of the text input to get the ID of the first project.
First('Projects Backlog').IDCode language: JavaScript (javascript)
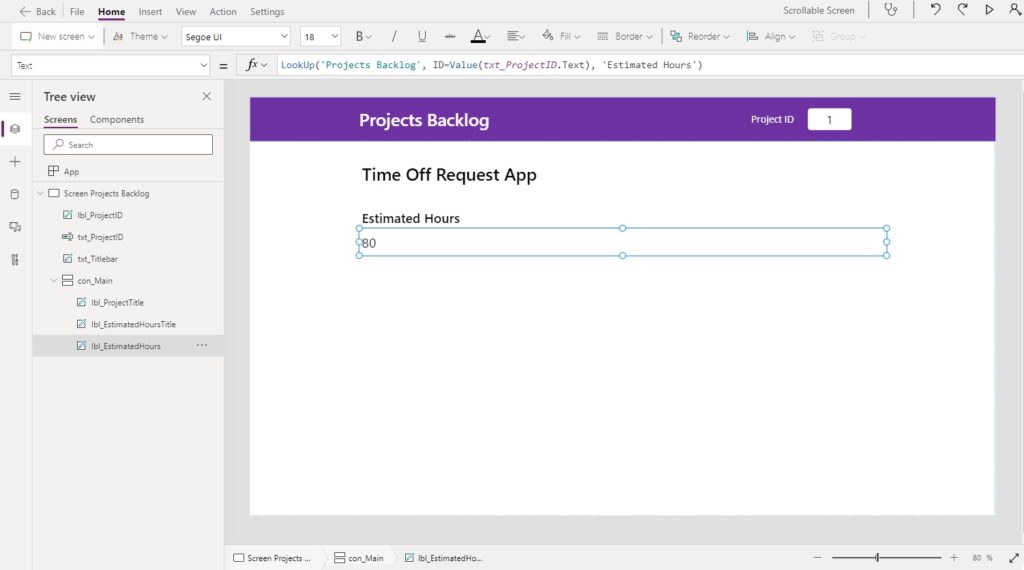
Then insert three labels into the vertical container:
- Project Name
- Estimated Hours Title
- Estimated Hours
Use this code in the Text property of the project name label to show the first project’s name.
LookUp('Projects Backlog', ID=Value(txt_ProjectID.Text), Title)Code language: JavaScript (javascript)
Similarly, use this code in the Text property of the estimated hours label to show the estimated hours for the first project.
LookUp('Projects Backlog', ID=Value(txt_ProjectID.Text), 'Estimated Hours')Code language: JavaScript (javascript)
Then add two more labels to the vertical container for:
- Start Date title
- Start Date
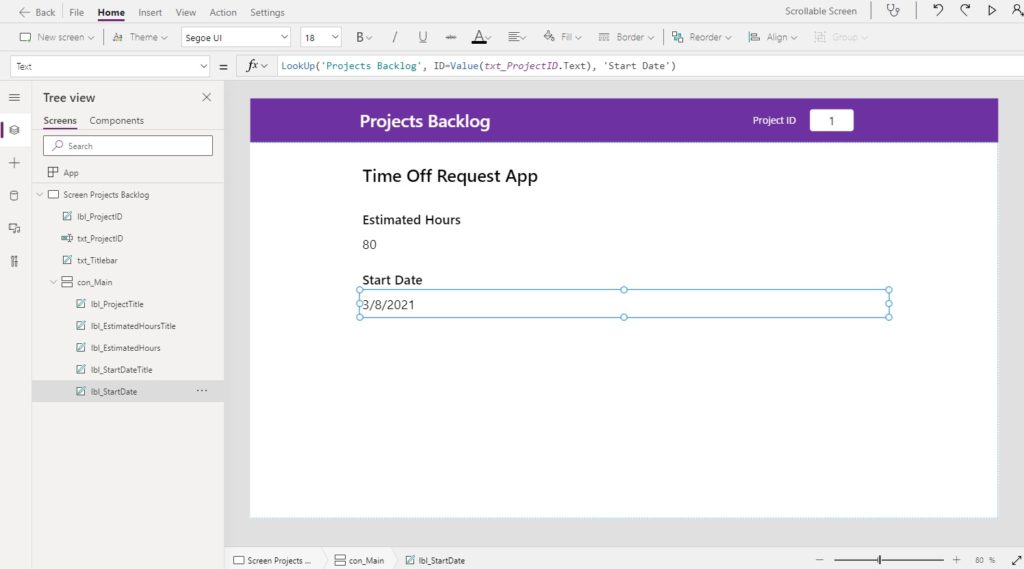
Put this code in the Text property of the start date label to display the first project’s start date.
LookUp('Projects Backlog', ID=Value(txt_ProjectID.Text), 'Start Date')Code language: JavaScript (javascript)
Insert An Auto-Height Label Into A Power Apps Scrollable Screen
Our scrollable screen will have a description field with several lines of text that is variable in size. If we make the description label too short some of the text might be hidden. Or if we make the description label too big there could be a large amount of whitespace. The solution is to make an auto-height label that re-sizes itself to fit the text inside it.
Insert two labels into the vertical container:
- Description Title
- Description
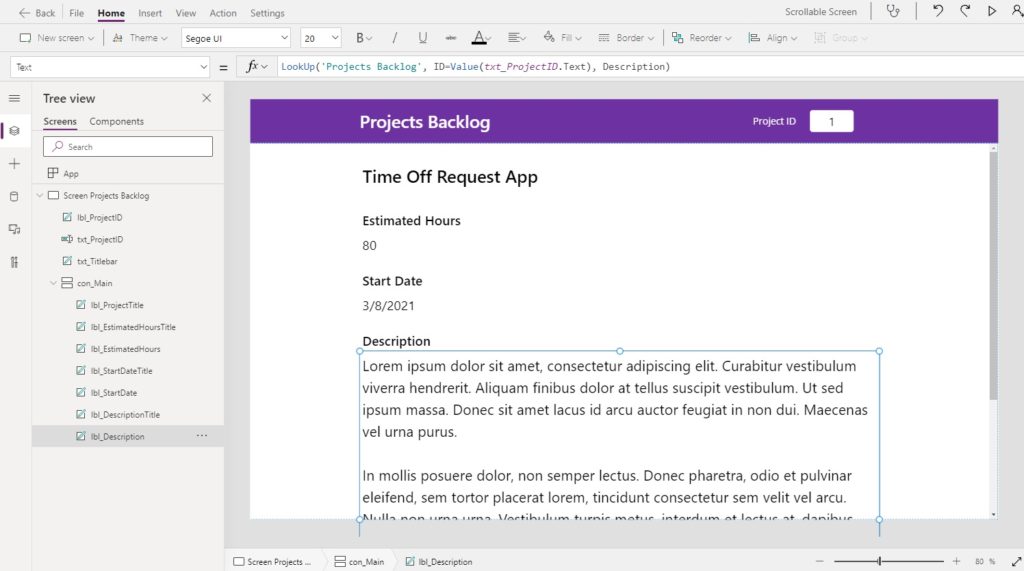
Put this code in the Text property of the description label to show the first project’s description.
LookUp('Projects Backlog', ID=Value(txt_ProjectID.Text), Description)Code language: JavaScript (javascript)
Then change the AutoHeight property of the label to true.
trueCode language: JavaScript (javascript)
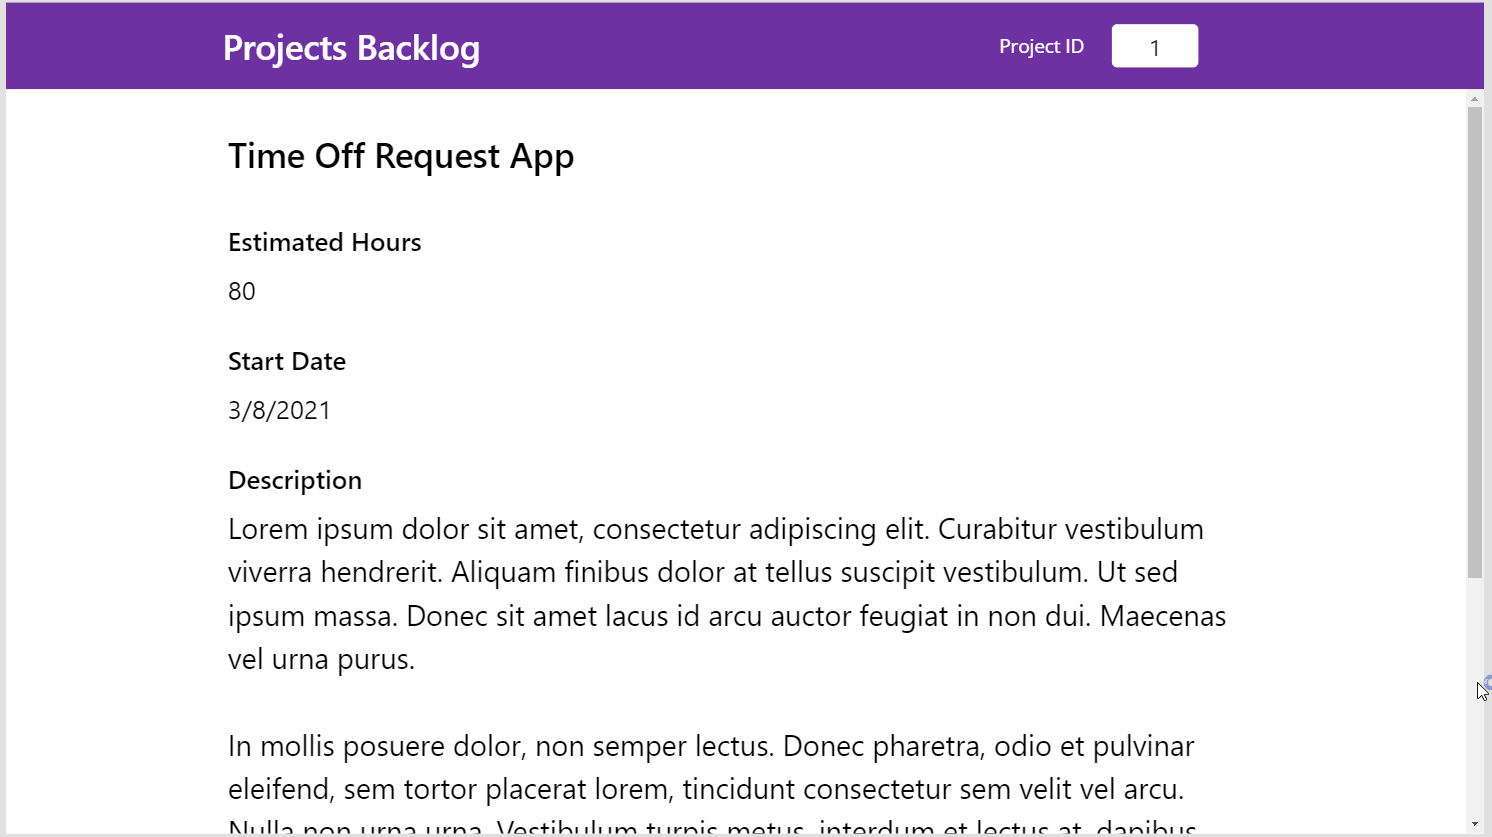
Now the label will extend to fit the text in the description field and a scrollbar appears on the right side of the container to allow navigation to the bottom of the screen.
Insert An Auto-Height Gallery Into A Power Apps Scrollable Screen
The scrollable screen must also show the skills required for a project inside a gallery which contains between 1-to-4 skills. This means we need the gallery to auto-size as well. Insert a new label with the text “Skills Required” and a gallery into the vertical container.
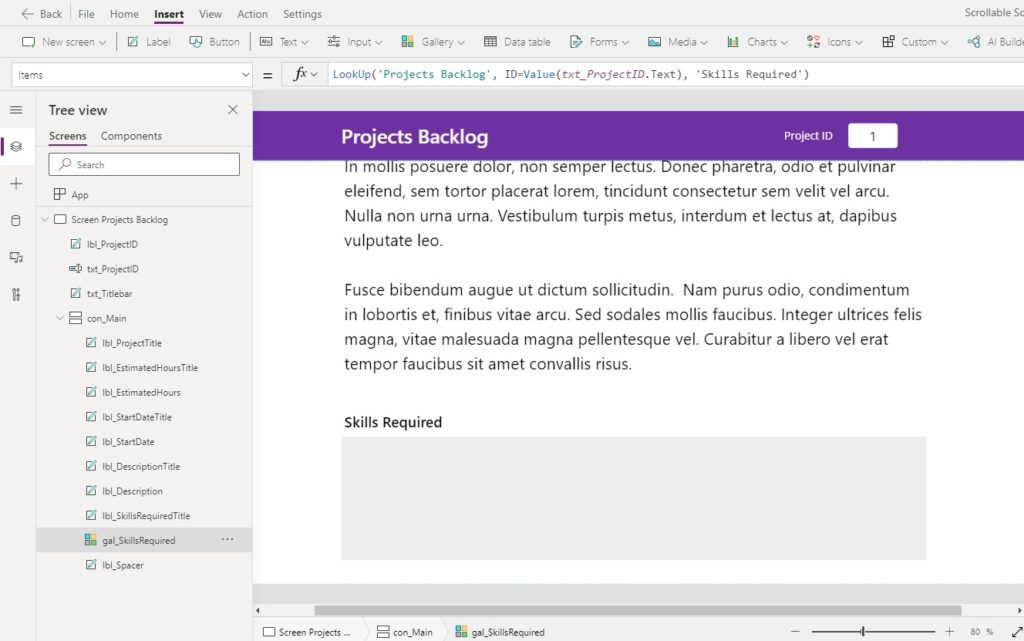
Use this code in the Items property of the gallery to load it with the skills required for the first project.
LookUp('Projects Backlog', ID=Value(txt_ProjectID.Text), 'Skills Required')Code language: JavaScript (javascript)
Then use this color in the gallery’s Fill property to make it’s background light gray.
RGBA(237, 237, 237, 1)
To make the gallery re-size itself to the correct height supply this code to the Height property. It counts the number of rows and multiplies by the height of each individual row. Additional pixels are added for the padding in between each gallery row as well.
With(
  {varNumCountRows:
   CountRows(
     LookUp(
       Projects Backlog',
       ID=Value(txt_ProjectID.Text)).'Skills Required'
  )},
  Self.TemplateHeight * varNumCountRows
  + Self.TemplatePadding * (varNumCountRows + 1)
)Code language: PHP (php)
Now add a label to the gallery and size it fill the entire space in each row.
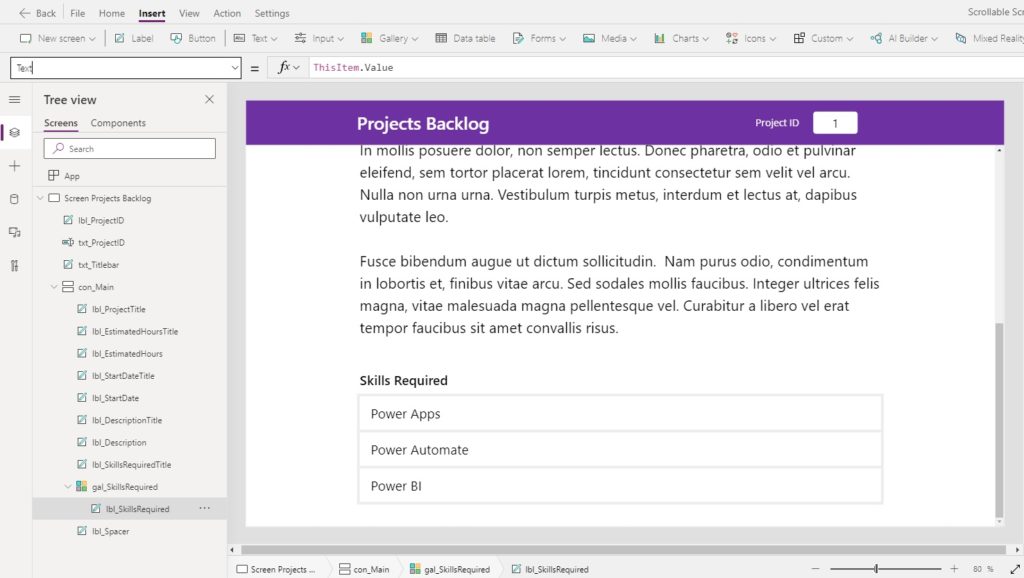
Use this code in the Text property of the gallery’s label to show the skill required.
ThisItem.ValueCode language: CSS (css)
Also, change the Fill property of the label to white to make it appear as if the skills are listed inside a table.
White
Reset The Scrollable Screen Scrollbar Back Top
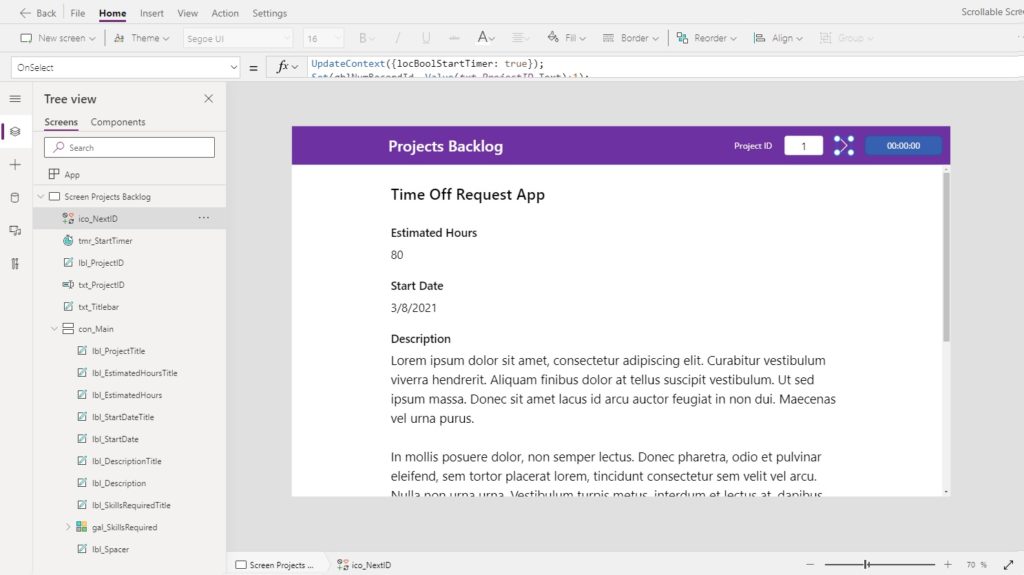
The Projects Backlog app allows the software development team to navigate away from the current project to another project in order to view its details. When the current project being viewed changes the scrollable screen must be reset back to the top.
Insert two new controls onto the screen: a button and a timer. When the controls inside a scrollable screen are hidden and then made visible the position of the scrollable becomes reset to the top. However, if this happened too quickly Power Apps will not detect that the control’s visibility was toggled. Therefore we must introduce a delay using the timer.

Put this code in the OnSelect property of the button to start the timer.
UpdateContext({locBoolStartTimer: true});Code language: CSS (css)
Then use this code in the following properties of the timer. The timer will delay for 0.5 seconds before setting the locBoolStartTimer variable back to false
Duration: 500
StartTimer: locBoolStartTimer
OnTimerEnd: UpdateContext({locBoolStartTimer: false})Code language: CSS (css)
Select all of the controls inside of the scrollable screen…
…and use this code in the Visible property.
!locBoolStartTimer
Play the app in preview more, scroll to the bottom of the screen and then click the Start Timer button. The scrollable screen will reset to the top.
Navigate To The Next Record Or The Previous Record And Reset The Scrollbar
Now that we know how to reset the scrollable screen screen the final step is to build our navigation menu. When the user clicks the Right icon the next record will appear. Make a new icon and place it too the right of the Project ID text input.
Also, delete the Start Timer button. It was created for testing purposes and we no longer require it.
Put this code in the OnSelect property of the right record icon. When the icon is clicked it starts the timer and increments the Project ID by one.
UpdateContext({locBoolStartTimer: true});
Set(gblNumRecordId, Value(txt_ProjectID.Text)+1);
Reset(txt_ProjectID);Code language: CSS (css)
To make the next record ID appear in the Project ID text input we must modify its code.
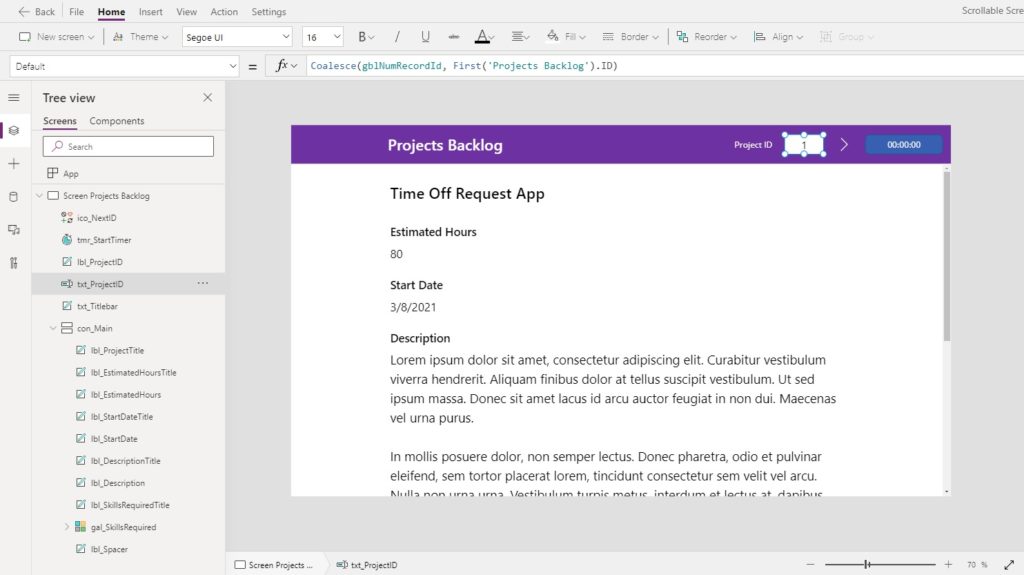
Change the Default property of the Project ID text input to this code. The text input will first look at the variable gblNumRecordId to get the Project ID. If gblNumRecordId is blank the Coalesce function allows us to fallback to the first ID found in the Projects Backlog SharePoint list.
Coalesce(gblNumRecordId, First('Projects Backlog').ID)Code language: JavaScript (javascript)
Next, add a Left icon to the left of the Project ID text input to allow navigation back to the previous record.
Then use this code in the OnSelect property of the left icon. Its the same as the next record icon expect the gblNumRecordId variable is decremented by 1.
UpdateContext({locBoolStartTimer: true});
Set(gblNumRecordId, Value(txt_ProjectID.Text)-1);
Reset(txt_ProjectID);Code language: CSS (css)
The timer must remain on the screen but we don’t want it to be visible.
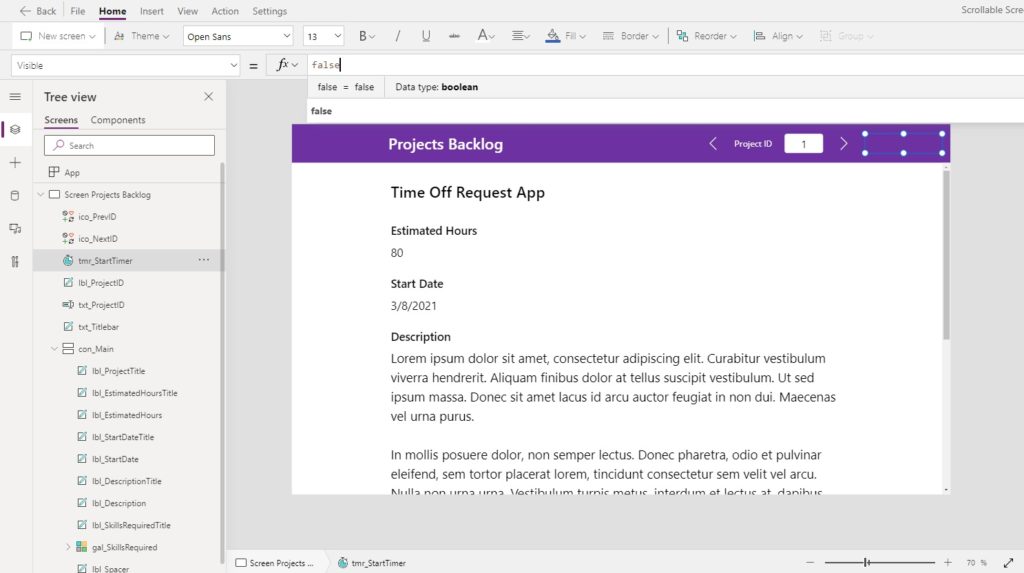
Change the Visible property of the timer to false.
falseCode language: JavaScript (javascript)
Implementing navigation is now complete. Test the app in preview mode by clicking on the navigation icon to test going to the next record and back to the previous record.
Did You Enjoy This Article? 😺
Subscribe to get new Copilot Studio articles sent to your inbox each week for FREE
Questions?
If you have any questions or feedback about Easy Power Apps Scrollable Screen Using A Vertical Container please leave a message in the comments section below. You can post using your email address and are not required to create an account to join the discussion.


Pretty cool, loved the timer hack. Thanks!
Leandro,
Agreed, the timer hack is great! I was expecting that toggling the controls visibility without a timer would work but it turns out a delay was needed. I think we could change the delay to 10ms and it would still work.
Matthew, are you able to scroll your screen within the PowerApps editor?
I have found that while I can scroll fine in Preview, to scroll within the editor I have to hold down Alt.
I also have weirdness when trying to select controls in that I either can’t select them or the selection box shows up in a weird position. In the screenshot, if I try to click on anything above and including label 12, it selects the canvas as a whole.
I’m doing this in a phone layout but it shouldn’t make any difference.
Duncan,
In response to this question
“Matthew, are you able to scroll your screen within the PowerApps editor? I have found that while I can scroll fine in Preview, to scroll within the editor I have to hold down Alt.”
The behavior you are seeing is how its supposed to work. You cannot scroll in editor unless holding the ALT key which switches editor to preview mode.
Yes, and when editing the scrollable container I find I can’t select controls on the canvas. I always use the Tree menu to select the control I need. Otherwise, random stuff just seems to get selected. Sad, but necessary.
Hello Thank you first for your efforts and your help. Is there any possibility to make the scroll bar invisible or well designed ?
Thank you Again
Marwane,
Sorry, but I’m afraid the scroll bar for a container cannot be turned off like it can for a gallery. Also, please note the scroll bar will not appear on mobile unless the user is actively scrolling. But on desktop it will always appear.
Hi Mathew,
I have 2 forms. I want to use two forms inside vertical Container. But I see a scroll bar on both the forms. What should I set the Minimum layout height ???
Aafreen,
To ensure the scroll bar is not seen on each form you’ll want the form height to be greater than or equal to the cards inside of the form
I don’t have any questions, but I would like to say Thank you very much. This website is my go-to place as a guide in the project I’m tackling.
Thank you again, and keep up the good work.
Jek,
You’re welcome buddy. I’m just getting started. This site will continue to grow along with Power Apps!
Hi
i am trying to make a horizontal gallery scroll vertically. i have tried the reverse of your solution but i don’t get the output i require. can you help?
Hi Matthew,
I have tried some many options but i can’t get the result i’m looking for. All i want is to display a multiple samples by date in a format i can pdf.
using a horizontal gallery and a vertical scroll that will automatically be readjusted based on the fields that are hidden is all i’m trying to achieve.
this has proven quite difficult. i’ll be glad if you could help cos the project is quite time sensitive
Tutu,
Sorry, I don’t quite understand what you are asking me to do.
If you are looking for help generating a PDF please try this tutorial.
https://www.matthewdevaney.com/easiest-way-to-generate-a-pdf-in-power-apps-no-html/
If you are looking for a vertical/horizontal gallery to be readjusted based on hidden items I don’t know what that means
Tutu,
I’d just delete the horizontal gallery and create a new vertical gallery. Unfortunately the gallery direction is not a property. Each gallery type is a different control type.
Solved an issue for me: how to scroll a container back to the top. It’s just a pity that Microsoft didn’t think to implement this as a simple action. A scroll to bottom would also be useful.
Did you use SetFocus?
Hi Matthew,
Thanks for this wonderful article. I was trying to reset the scroll bar in gallery control.
Is it possible to achieve it?
Thanks
Vaideeswaran.M
Vaideeswaran,
Please read through to the end of the article. Resetting the scroll bar is covered.
Thanks Matthew, your website is a mine of gold 🙂
What about if I want to use containers but I with a vertical scrollbar on all the screen and not only on the content container?
Juilien,
To do this you would need to place the title bar inside of the main container as well.
I want to create boxs with space in vertical container.
am using a vertical gallery with a SharePoint list. This list has an image and a 3D object in each item (I will have approximately 20 items in total in the SharePoint list). My idea is that the gallery shows the item’s image and some characteristics, and when clicked, it opens another window (or makes a container visible) where all the item’s information and its 3D model can be seen.The first problem I have is that when I make the call, the information and images are displayed without any issues, but when I scroll down, the images disappear and reappear. I suppose this happens because the images are loading as I scroll down. How can I solve this? Any tips that could help me load these images first so the user doesn’t have this problem? Additionally, any tips for correctly uploading the 3D models so that something similar doesn’t happen as it happened with the images? I am relatively new, I understand several things already, but I need to polish some topics. Thank you very much.
I am working on a Blank screen.Have several containers at the top for title, etc. I then added a vertical container, and added forms, containers, and galleries into it. Even with the Vert Overflow set to Scroll, the Vert Container does not scroll the length of the page.