Quickly Add Multiple Rows to Excel Table In Power Automate

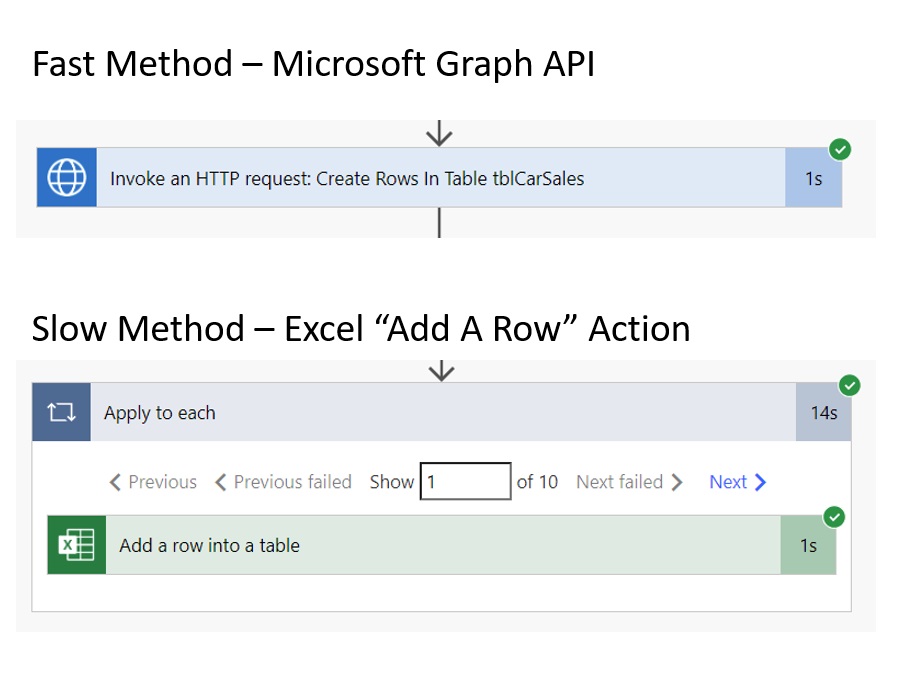
Multiple rows can be added to an Excel table using a single Power Automate action. And the best part is its blazing fast. Using the HTTP for Azure AD connector I added 10 rows to a table in 1 second vs. doing it individually in 14 seconds with the Excel connector. The best part is this technique scales up to 100,000 rows added at once. You’ve got to check out this article on how to add rows to an Excel table super fast!!!
Introduction: The Car Sales Report
Each day a car manufacturing company uses an automation to create a Car Sales Report. The automation adds multiple rows to an Excel table to be displayed in the report.

The automation uses the HTTP With Azure AD – Invoke An HTTP Request action combined with the Microsoft Graph API to POST all rows to an Excel table in a single batch.

It only takes 1s to execute as opposed to the 14s it would that to add each row one by one using the built in Excel For Business (Online) – Add A Row Into A Table action.
Setup The SharePoint List
Create a new SharePoint List named Car Sales Inventory with the following columns and data types:
- Year – number
- Make – single line text
- Model – single line text
- Cost – number
Include these rows in the SharePoint List. Our flow will add all of the rows to an Excel table.
| Year | Make | Model | Cost |
| 2000 | Honda | Accord | 15,242.74 |
| 1998 | Oldsmobile | Aurora | 14,691.91 |
| 1984 | Maserati | Quattroporte | 7,568.83 |
| 2011 | Chevrolet | Malibu | 22,711.39 |
| 2006 | Mercedes-Benz | G-Class | 13,949.48 |
| 1985 | Ford | Laser | 34,159.31 |
| 2009 | Kia | Spectra | 29,023.15 |
| 1996 | Dodge | Ram Van 3500 | 24,883 |
| 1985 | Buick | Century | 33,778.10 |
| 2009 | Mercedes-Benz | S-Class | 27,039.57 |
Once the SharePoint list is setup it will look like this.

Get All Items From The SharePoint List
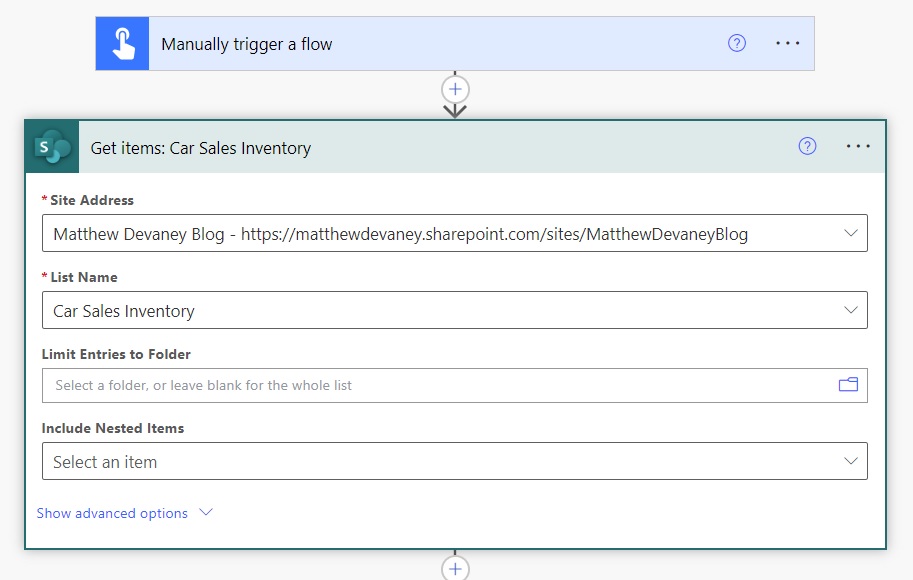
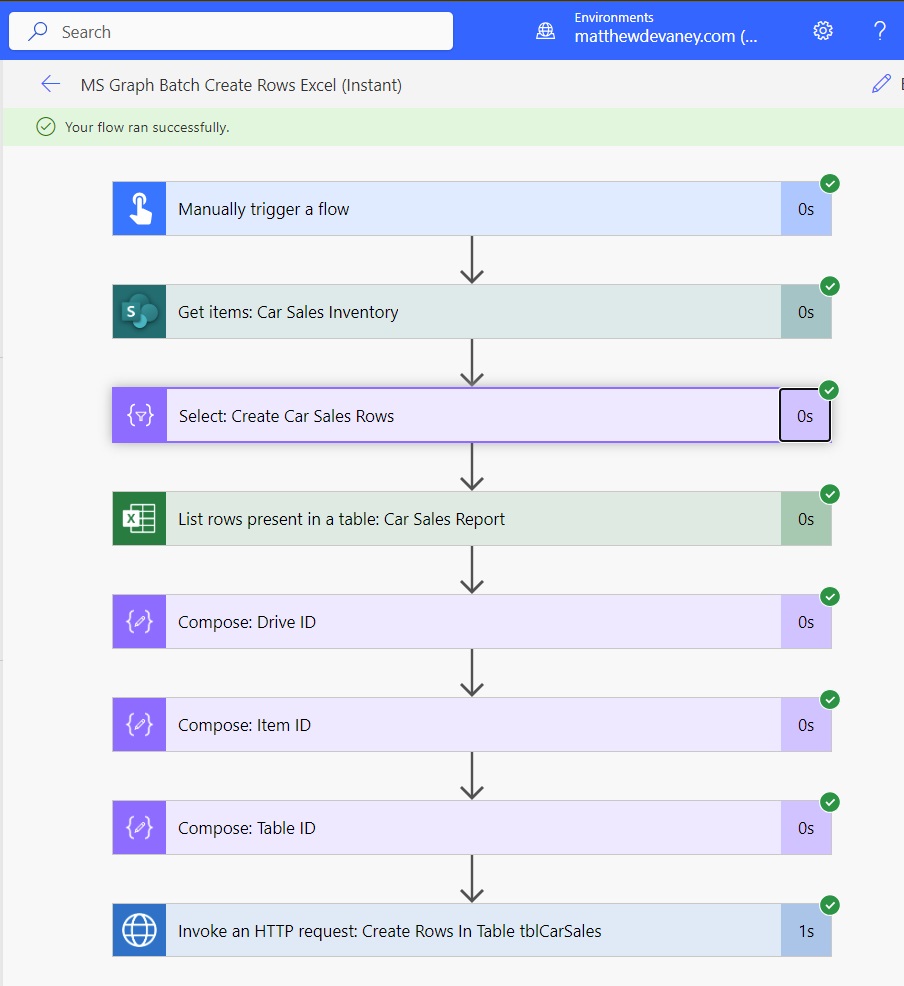
Open Power Automate and create a new flow with an instant trigger. Add the SharePoint – Get Items action and choose the Car Sales Inventory list we just created.
The SharePoint – Get Items action only returns up to 100 items by default. Our example does not return more than 100 items but the maximum rows can be increased up to 100,000 if needed. Go to the action’s settings, enable Pagination and input the new maximum number of rows.

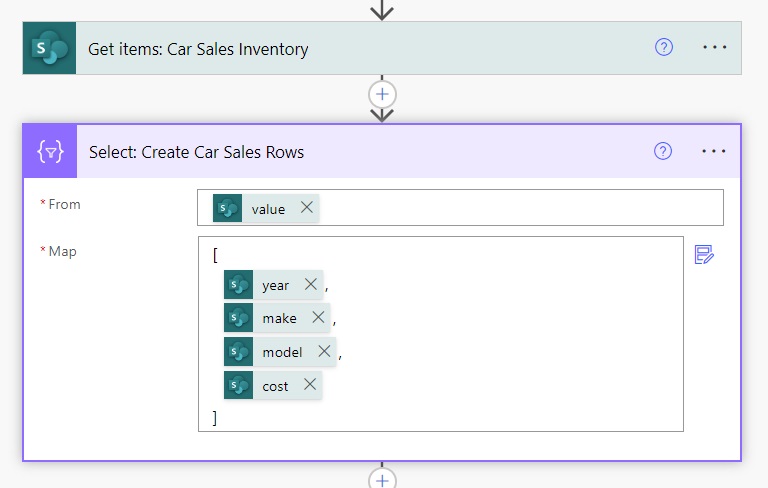
Create An Array Of Multiple Excel Rows
We will use the HTTP With Azure AD connector and the Microsoft Graph API to batch insert rows into an Excel table. The Microsoft Graph API call requires us to load an array of rows in a specific format. Insert the Data Operations – Select action into the flow. Switch the Map field into text mode and create an array in the format shown below.
Note: in this examples the Map field uses square brackets.
Make A New Excel Workbook With A Table
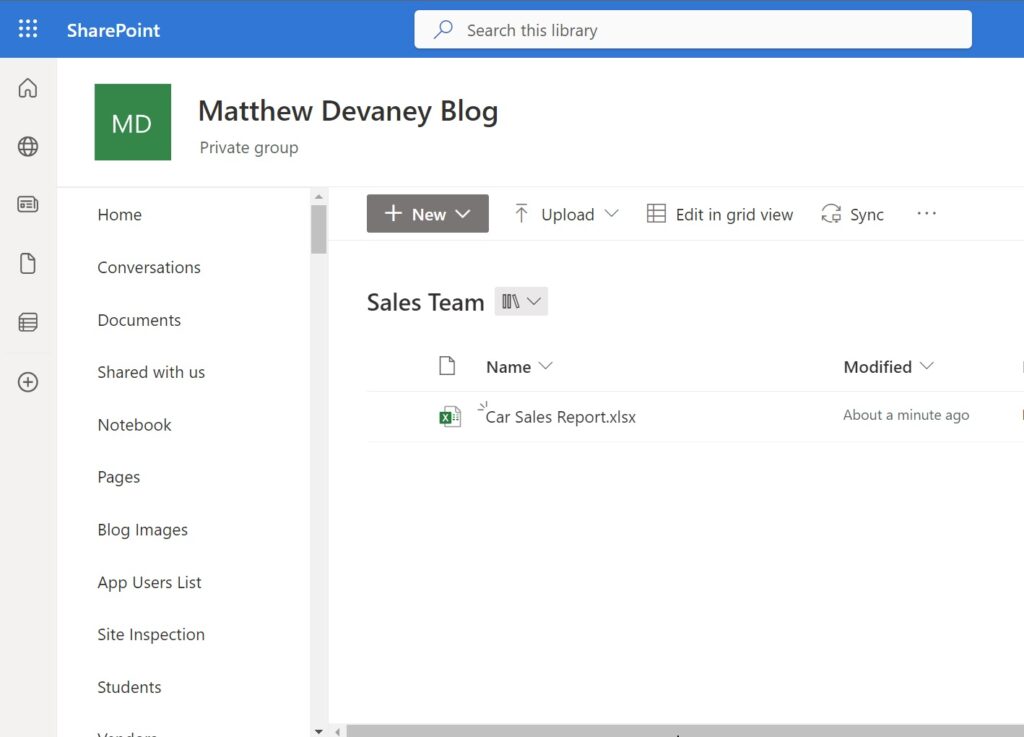
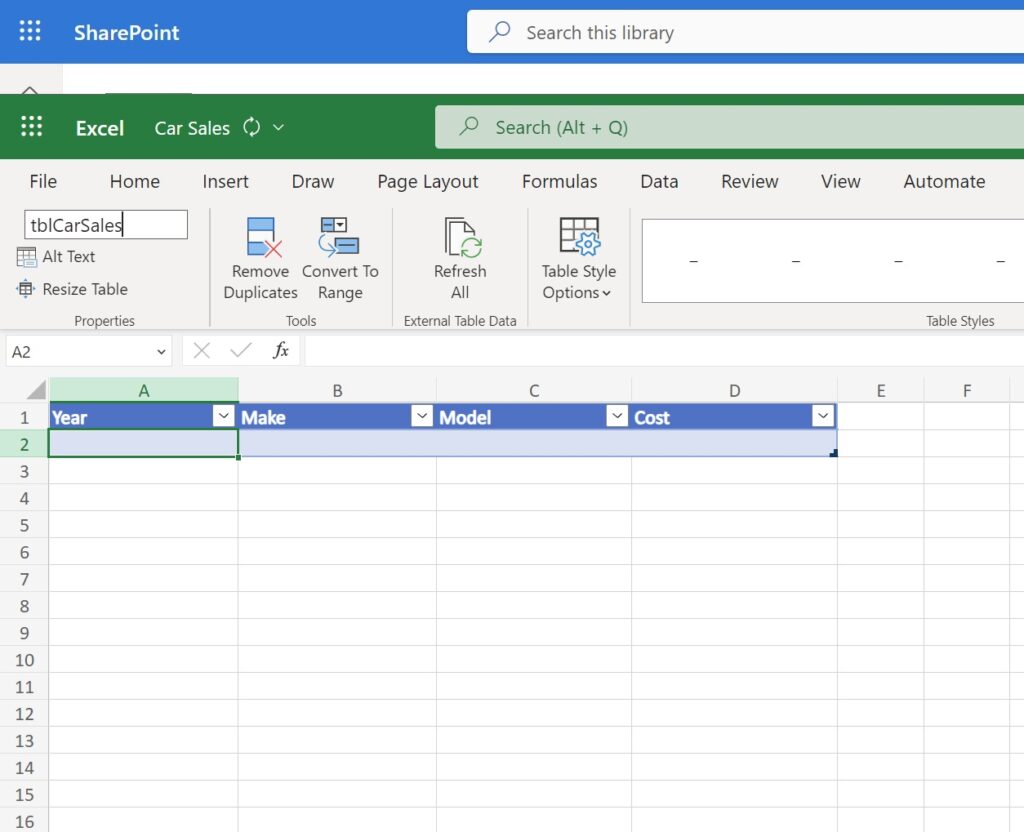
The rows in our array will be added to the end of an Excel table. Open SharePoint and create a new spreadsheet called Car Sales Report.xlsx inside of a document library.
Insert an Excel table into Sheet1 of the spreadsheet with the columns: Year, Make, Model and Cost. Rename the table tblCarSales. Then save & exit the file.
Get The Excel Workbook Drive ID And Item ID
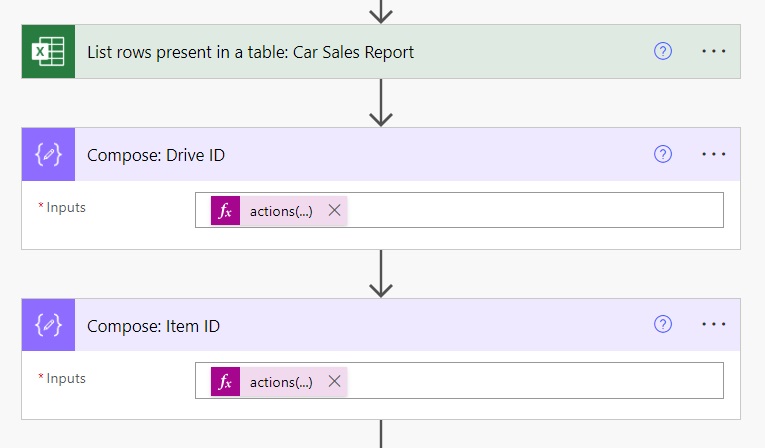
The Microsoft Graph API call to add rows to a table requires the Excel workbook’s Drive ID and Item ID. To obtain these IDs go back to Power Automate and add the Excel for Business (Online) – List Rows Present In A Table action to the flow. Select the Excel table named tblCarSales from the Car Sales Report.xlsx spreadsheet.
Set the Top Count field to 1 to make the action run faster. We aren’t actually trying to retrieve the table rows in this action. We only want to get the information about where the table is located.

Once the flow is run the Drive ID (“drive”) and the Item ID (“file”) can be found in the action’s inputs.

Then create a set of two Data Operations – Compose actions named Compose: Drive ID and Compose: Item ID.
Get the Drive ID using this Power Automate expression.
actions('List_rows_present_in_a_table:_Car_Sales_Report')?['inputs']?['parameters']?['drive']Code language: JavaScript (javascript)
And get the Item ID using this Power Automate expression.
actions('List_rows_present_in_a_table:_Car_Sales_Report')?['inputs']?['parameters']?['file']Code language: JavaScript (javascript)
Configure A Connection To The Microsoft Graph
The Microsoft Graph API provides access to Microsoft 365 data and services, such as allowing developers to programmatically interact with Excel files stored in SharePoint. We can access it using the HTTP With Azure AD connector. Add the HTTP With Azure AD – Invoke An HTTP Request action to the flow.
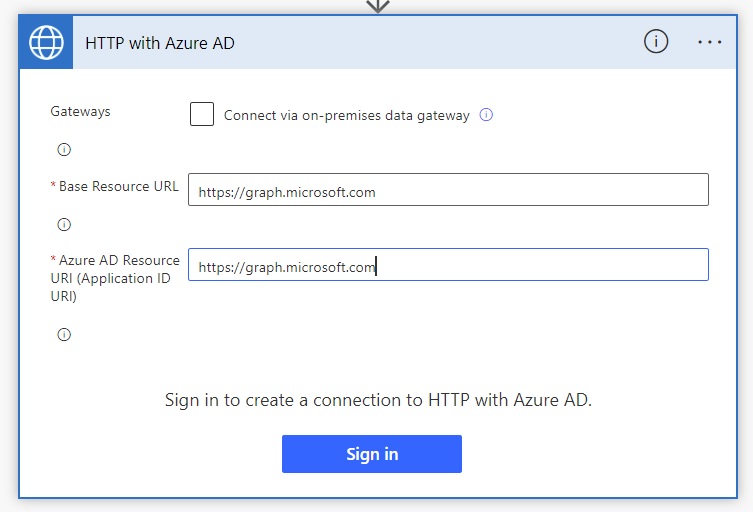
Use this URL for both the Base Resource URL and Azure AD Resource URI fields when configuring the connection.
https://graph.microsoft.comCode language: JavaScript (javascript)
Add Multiple Rows To An Excel Table Using HTTP With Azure AD
Now that we are connected to the MS Graph we can use the Create Table Row endpoint for Excel workbooks endpoint to add multiple rows to a table at once. Choose the POST HTTP method to indicate a resource is being updated.
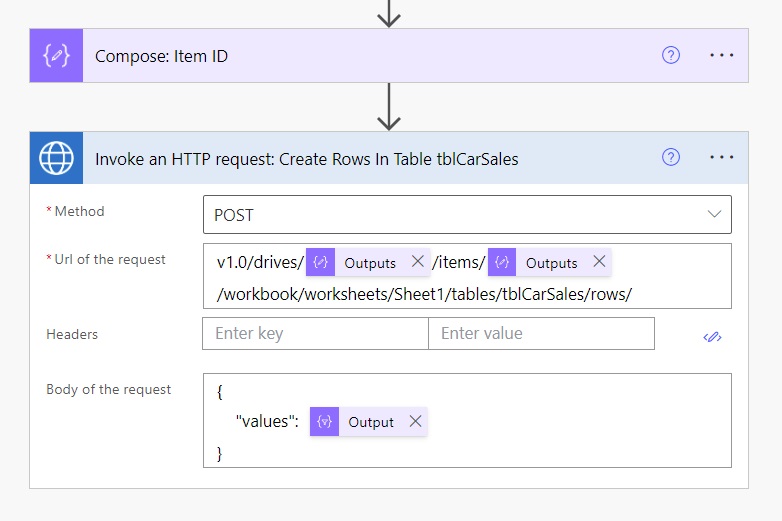
Then add this code to the Url of the request.
v1.0/drives/@{outputs('Compose:_Drive_ID')}/items/@{outputs('Compose:_Item_ID')}/workbook/worksheets/Sheet1/tables/tblCarSales/rows/Code language: JavaScript (javascript)
And use this code in the Body of the request.
{
    "values":  @{body('Select:_Create_Car_Sales_Rows')}
}Code language: JavaScript (javascript)
Run The Flow To Perform A Batch Update To The Excel File
We have now completed building the flow. Save the flow and give it a test run. The example below used a single action to write 10 rows to an Excel table in 2s.
The Excel file now shows all the rows from the SharePoint list.

Did You Enjoy This Article? 😺
Subscribe to get new Copilot Studio articles sent to your inbox each week for FREE
Questions?
If you have any questions or feedback about Quickly Add Multiple Rows to Excel Table In Power Automate please leave a message in the comments section below. You can post using your email address and are not required to create an account to join the discussion.


Hey Matthew! Thanks for another great post! Just an FYI, the URL in the copy/paste block is missing a “:” and may throw some folks of the more copy/paste variety 🙂
Joe,
I appreciate you taking the time to leave a note. It’s fixed now 🙂
This is a cool solution!
Another option to consider and/or explore is to use Office Script to add the rows.
This doesn’t require any additional licensing.
Harold,
Here’s my take on the subject:
Graph is favourable in high volume situations. Office Scripts may only be run 1,600 times per day.
Scripts are also not as ALM friendly. You may not place them in a solution. But you can store the Scripts in a repo and ‘jerry-rig’ a deployment.
Office Scripts are fine for low-volume scenarios. They are as blazing fast as Graph. And they do work in non-premium scenarios.
Both approaches are acceptable. Which one should you choose? As they say in the consulting world – “it depends.”
Thank you for leaving a thoughtful comment.
Thank you Mathew for sharing this. This is very helpful. Just one query here, do we need premium or any specific license to use this method?
Kumar,
A premium license is needed for this method.
Very nice solution!
Is there also a way to batch delete all the items with “Invoke an HTTP request” in the table that we just created?
I want my template to be rid of content, but right now I’m using the “Delete a Row” action so I’m basically at the same point again with a very slow flow.
Unfortunately I don’t get this ID of the dynamic file that I create when I copy the excel sheet before adding the content via flow. So I see no other way than to delete the content after making a copy of the original file.
AFU,
This StackOverflow post has the best suggestions I’ve seen so far:
https://stackoverflow.com/questions/62353086/is-it-possible-to-delete-all-rows-in-an-excel-table-with-the-graph-rest-api
There’s not a dedicated batch delete action for Excel. That link is close as they come.
If you use the Office365 Groups connector – there’s an HTTP request action that can do this same thing without needing a premium license. The V2 HTTP request can only do this by going through the /groups/ endpoint, but if you have a way to get a copy of the original HTTP request, you can do this through /sites/ or /drive/ or /me/ – for free.
Matt,
Yes, that’s true. But the Office 365 Groups connector actions are being deprecated. For that reason I wouldn’t use V1 on client work. Better to create solutions that will be supported long-term IMHO.
Well it’s been a few months, but I see the SharePoint connector generally able to hit Graph for this purpose (if you use https://graph.microsoft.com as your “site” and the rest of the URI in the URI field). O365 Users HTTP request can write to /me/ as well.
Can you provide the syntax for this? Doing as suggested did not work with the SharePoint connector.
Matthew Thanks for that post, it´s interesting. how can i get “Item ID” of an action “Create file in Sharepoint”?
Jose Conde,
I don’t use Item ID in this tutorial. Suggest you ask this general question in the Power Automate forums.
https://powerusers.microsoft.com/t5/Microsoft-Power-Automate/ct-p/MPACommunity
sorry if I didn’t make myself understood, you get the “compose: Item ID” after the “List rows present” action which I would like to know instead of the excel action to get the rows, how could I get the “compose:Item ID” of an action that creates an excel file dynamically.
I am also interested in a solution for this, as i’ve gotten stuck on this part of the solution. I can’t retrieve the Item ID (“file”) from a newly created file, only the path. Is there a solution for this?
Max,
You would need to use MS Graph to list all items in the folder, filter by the filename you want and get the file id that way. Unfortunately it is not a standard action in Power Automate.
Hey Matt,
What configuration is required prior to using the action “Invoke an HTTP Request”. I get below error. Can you please throw some references?
The resource principal named https//graph.microsoft.com was not found in the tenant named xxxxx. This can happen if the application has not been installed by the administrator of the tenant or consented to by any user in the tenant.
Ramesh,
You appear to be missing the colon after https:
My bad. Yes, thank you
Hi Matthew, looking to implement this but with rows coming from a dataverse table instead of sharepoint. I can’t seem to get the array to work with the dataverse data any guidance?
Jason,
What error are you seeing? Screenshots too please. It will work with Dataverse.
Hi Matthew, I redid the flow and it is working as expected now! I must have done something wrong when I first tried! Thanks for your great content!
It did work! But then when I was trying add more than 30k rows, I get an error: The response is not in a JSON format.
Gez,
That’s an interesting result I’ve never seen before. Was the successful attempt on the exact same file with less rows?
Hi Matthew,
It was on a different file but with less rows (around 18k). I was able to add more than 30k rows by incorporating: https://curbal.com/curbal-learning-portal/export-more-than-100k-rows-of-power-bi-data-to-csv-using-power-automate-remove-headers. This is how my flow looks like now:
Hi Matthew,
Just curious on how would you tackle a dynamic file ID as the input in the list rows in a table but same excel format? Rationale is I want to keep a blank excel template and create a duplicate of the file template (using create file of sharepoint) and feed the ID to the list rows in a table. There is a difference between the ID as it shows an encoded file path compared to your example that starts at 0173.
Jake,
You would need to obtain the Drive ID and the Item ID using the MS Graph and pass them into the URI used to get rows.
This doesn’t work for items around 7000 which I am exporting from Dataverse to Excel. It simply throws error “The response is not in a JSON format.”
Ramesh,
I disagree. I’ve done this on over 50,000 rows. The problem is likely with the data you have chosen. Excel cannot handle complex fields. Only use primitives.
I am getting AADSTS65002: Consent between first party application ‘###’ and first party resource ‘###’ must be configured via preauthorization – applications owned and operated by Microsoft must get approval from the API owner before requesting tokens for that API. Trace ID: ### Correlation ID: ### Timestamp: ### ‘. Please sign in again.
What do I need to ask of my admin?
Did you find a solution to the problem? I have the same problem and haven’t found a solution for it
Just ran into this problem. There’s two HTTP with Entra ID connectors now. If you choose “HTTP with Microsoft Entra ID (preauthorized)“, it started working for me
Hey Matthew! Thanks for this, it works perfectly, but I am not able to execute more than 1,10,000 records. My use case is I have a Do-Unit loop where I am writing records into an excel file from the API, in the batches of 10,000. This works fine till 11th loop that is 1,10,000 records after which it gives bad gateway issues. Any workaround for this? It will be great help!
Error details – {
“error”: {
“code”: 504,
“message”: “{\r\n \”error\”: {\r\n \”code\”: 504,\r\n \”source\”: \”uk-001.azure-apim.net\”,\r\n \”clientRequestId\”: \”4ec097dc-82d5-41a1-9d45-7dd826c02b00\”,\r\n \”message\”: \”BadGateway\”,\r\n \”innerError\”: {\r\n \”error\”: {\r\n \”code\”: \”MaxRequestDurationExceeded\”,\r\n \”message\”: \”We’re sorry. We couldn’t finish what you asked us to do because it was taking too long.\”,\r\n \”innerError\”: {\r\n \”code\”: \”gatewayTimeoutUncategorized\”,\r\n \”message\”: \”The service wasn’t able to complete the request within the time limit.\”,\r\n \”innerError\”: {\r\n \”code\”: \”MaxRequestDurationExceeded\”,\r\n \”message\”: \”We’re sorry. We couldn’t finish what you asked us to do because it was taking too long.\”\r\n },\r\n \”date\”: \”2024-02-05T17:13:27\”,\r\n \”request-id\”: \”65e1e33e-cd22-4f10-b9c7-6f224fd9ab7d\”,\r\n \”client-request-id\”: \”65e1e33e-cd22-4f10-b9c7-6f224fd9ab7d\”\r\n }\r\n }\r\n }\r\n }\r\n}”
}
}
Ajay,
I think you’re exceeding service limits with this 100k rows circumvention technique.
Hi Matthew , Great article thanks for sharing . I was just wondering do you have any suggestion or solution for this problem which ajay is facing . I’m also seeing same in my powerautomate and you are right excel does have more than 6k records.
Hi Ajay,
having the same error.
Can you please share your approach using do until ? Interested to see since my dataset is around 80k rows.
Thanks.
I found one exception to this, in that the file ID is only returned if you specifically select the file in the action ‘List_rows_present_in_a_table:_Car_Sales_Report’. When using a variable or output from a previous action like Sharepoint – Create File, the output for ‘file’ is the filename not the ID. I suspect this is due to a lookup function when the object is not selected manually.
There is a way around to get the fileid if your filepath is dynamic. Use the below API to get the fileid –
Invoke an HTTP request
URL for the request –
v1.0/drives/<driveid>/root/children?$filter=name eq ‘<filename>’
Headers-
{
“accept”:”application/json”
}
Set the path in the URL of the request.
Can you provide an example of the ‘Url of the request’ and show where to enter the path?
I was trying to filter by file name and add rows to excel table.But getting error as Invalid filter clause: An identifier was expected at position 8. Can you please help me resolve this
URI used: v1.0/drives/b!4QvxWSo2p0OlwTaOemSPWDBX6Ajk17pGjOCPL988KQbjLR3Odd6hSaxTQpzSnRYj/root/children?$filter=name eq ‘PartsExcel01.xlsx’/workbook/tables/PartsTable/rows/add
For what it’s worth, I was able to pull this information from the ‘Create worksheet’ and ‘Create table’ actions. In the output body of ‘Create worksheet’, there’s an “@odata.id” node that contains a useful chunk of the URI, so you don’t need the two compose actions to get the Drive ID and Item ID. The HTTP request now looks like:
v1.0@{body('Create_worksheet')?['@odata.id']}/tables/@{outputs('Create_table')?['body/title']}/rows/which resolves to:
v1.0/drives('<drive-id>')/items('<item-id>')/workbook/worksheets(<worksheet-id>)/tables/<table-id>/rows/This worked for me, and I hope it helps someone else!
Thanks Andrew,
You save my whole day trying to find a way to retrieve the ItemID
You are a saviourr!
does not work with over 41k files
JRovera,
Not true. It works with files up to 100k rows. I’ve tested this.
HI I’m Getting this below error
“Transfer-Encoding”: “chunked”,
“Vary”: “Accept-Encoding”,
While Using Graph Api
Hi Matthew!. If I want to add the create excel file and create table in the flow too instead of create it manually. What value I need to put in the file field in List_rows_present_in_a_table step? I try to use the file ID of the create file item. It show status 400 when I invoke the http request.
I am also facing same issue as @derek.
Hi Matthew, Thank you for great article.
I tried this example for a Dynamicaly created Excel file but the Item ID is being fetched as the path of the excel file relative to the share point rather than the ID value like you have in example which is maing the Graph API call to fail.
Please advise how can we get the file id based on its share point path.
I relied on an earlier comment, and saw you had the same question.
For what it’s worth, I was able to pull this information from the ‘Create worksheet’ and ‘Create table’ actions. In the output body of ‘Create worksheet’, there’s an “@odata.id” node that contains a useful chunk of the URI, so you don’t need the two compose actions to get the Drive ID and Item ID. The HTTP request now looks like:
v1.0@{body('Create_worksheet')?['@odata.id']}/tables/@{outputs('Create_table')?['body/title']}/rows/which resolves to:
v1.0/drives('<drive-id>')/items('<item-id>')/workbook/worksheets(<worksheet-id>)/tables/<table-id>/rows/This worked for me, and I hope it works for you too!
Interesting. In my case I used another API call to graph to get the id and then parse json to fish out the id. There were multiple ids so I figured out which was the correct one by testing with a static file and then querying that with the API call to verify the id.
hi @Andrew Pegram, I faced an issue regarding the HTTP request (400/bad request), I used your approach to add a ‘Create worksheet’ and ‘Create table’ actions before the API call and used the URL mentioned by you and this fixed my issue. Thanks for your solution!
v1.0@{body('Create_worksheet')?['@odata.id']}/tables/@{outputs('Create_table')?['body/title']}/rows/Hey Matthew! Great article, used it and worked like a charm.
But I believe there is an issue that comes after you update the Excel spreadsheet, unless I’m doing something wrong, it takes a couple of minutes to update, at first I though it didn’t work.
This becomes an issue when you have to send the file over and the update hasn’t been saved.
My file is sitting in Sharepoint (not in Sharepoint List), maybe that’s why?
If anyone in the future finds a solution, would really appreciate it.
It sometimes takes a while for the file to close. I’ve had to add a delay to allow for this.
Great article. Very useful, thanks. Like others my use case was to perform these inserts on a dynamically created excel file. I used the graph to get the file id.
Another gotcha for me was that as soon as I added this flow to my powerapp users would be presented with the connector dialog for authentication for the entra id connector, with empty fields for the resource uris! Not good, but even worse is that this is a premium connector so users must now need a premium licence even though the premium connector is in the flow and not the app itself. I managed to work around this by creating another small flow without the premium connector and used this in the powerapp to call the flow with the entra id connector as a child flow. Powerapps doesn’t look beyond the first flow at the connectors so no dialog and no premium requirements. If they ever change this I will have to move to office scripts to do fast inserts in order to avoid the premium charge.