Power Apps Drag & Drop Kanban Tutorial

Power Apps drag and drop functionality is now available as a code component. We can use it to group, re-order and move objects in a gallery-like container. This feature built by Scott Durow is one of my favorite new additions to Power Apps this year. To celebrate its release, I’ve decided to do a tutorial on how to build a kanban board that fully explores how to build apps with drag & drop in Power Apps.
Introduction: The Kanban Board App
Developers at a software company use the Kanban board to show their progress on development tasks and bug fixes. When a developer starts a new task, they drag it from Not Started to In Progress. When work on the item is done they drag and drop it into the Completed section.
Install The Power Apps Drag And Drop Managed Solution
Drag and drop functionality is not included in Power Apps out-of-the box. We must download it and install it. Launch a web browser and navigate to the Power Apps drag and drop repository owned by Scott Durow.
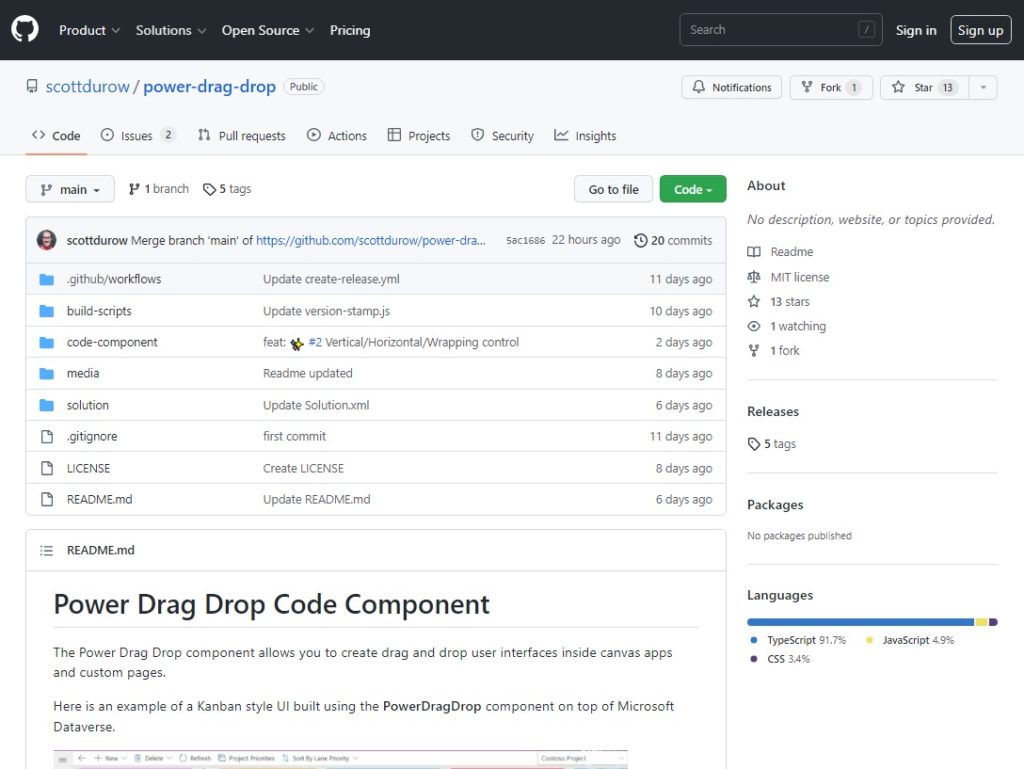
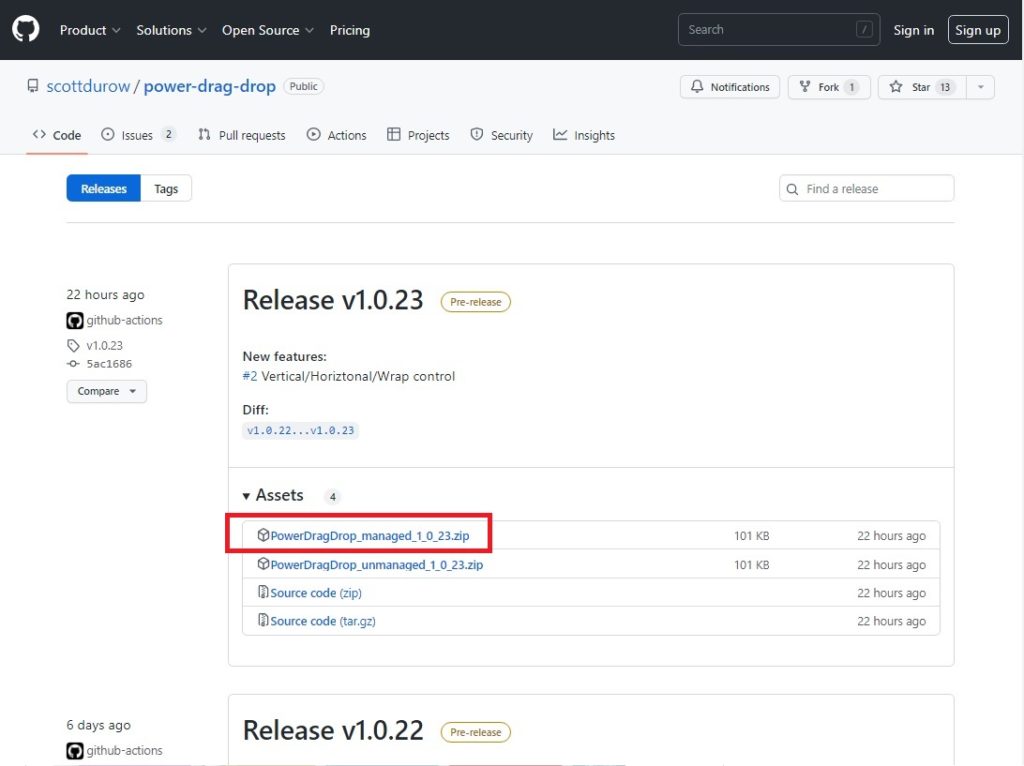
Go to the Power Apps drag and drop releases page and download the latest managed solution zip file.
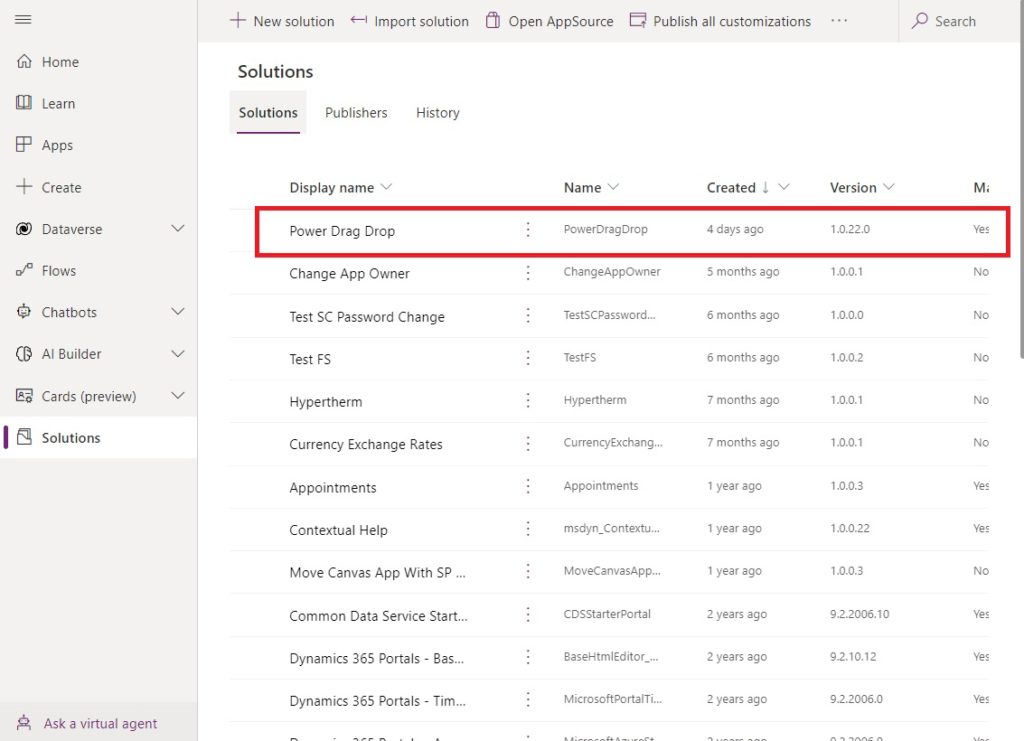
Then open make.powerapps.com. Go to the Solutions menu. Then choose Import Solution. Browse and select the Power Apps Drag and Drop managed solution we just downloaded. Click next the Next button then the import button.
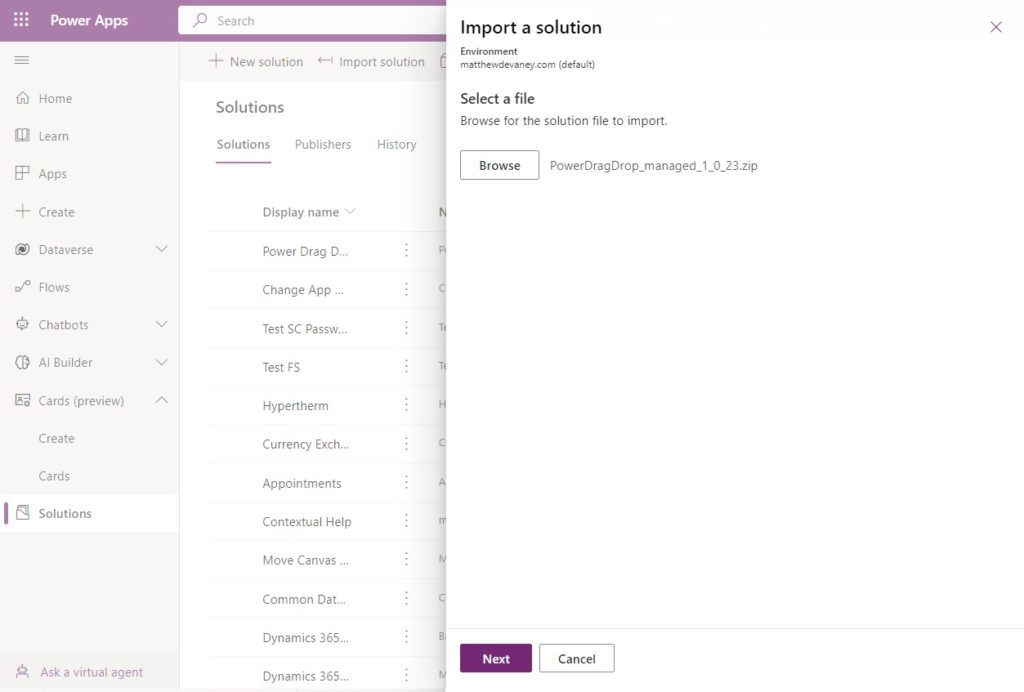
After a few minutes of waiting the Power Apps Drag And Drop component will successfully install and appear in the Solutions menu.
Enable Power Apps Component Framework In Admin Center
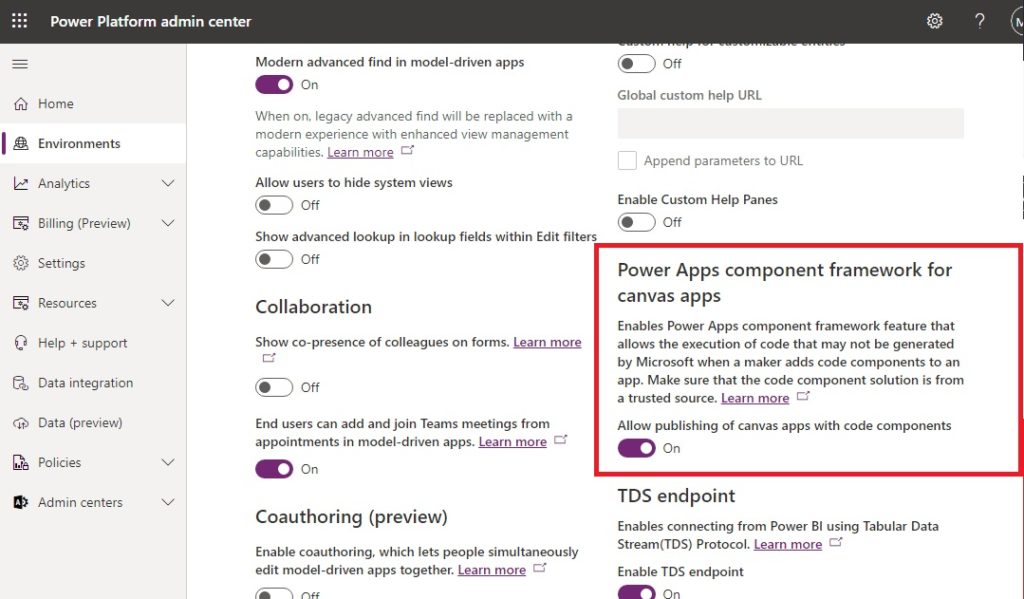
The drag and drop functionality we installed was built using the Power Apps component framework (PCF). To use it in a canvas app, we need to enable the PCF in our environment. Go to the Power Platform admin center, open the environments menu and select the environment where drag and drop was installed. Then open the settings page and choose the features.
Toggle on the Power Apps component framework for canvas apps setting. Now we are ready to start building our kanban board app.
Add The Drag And Drop Component To A Canvas App
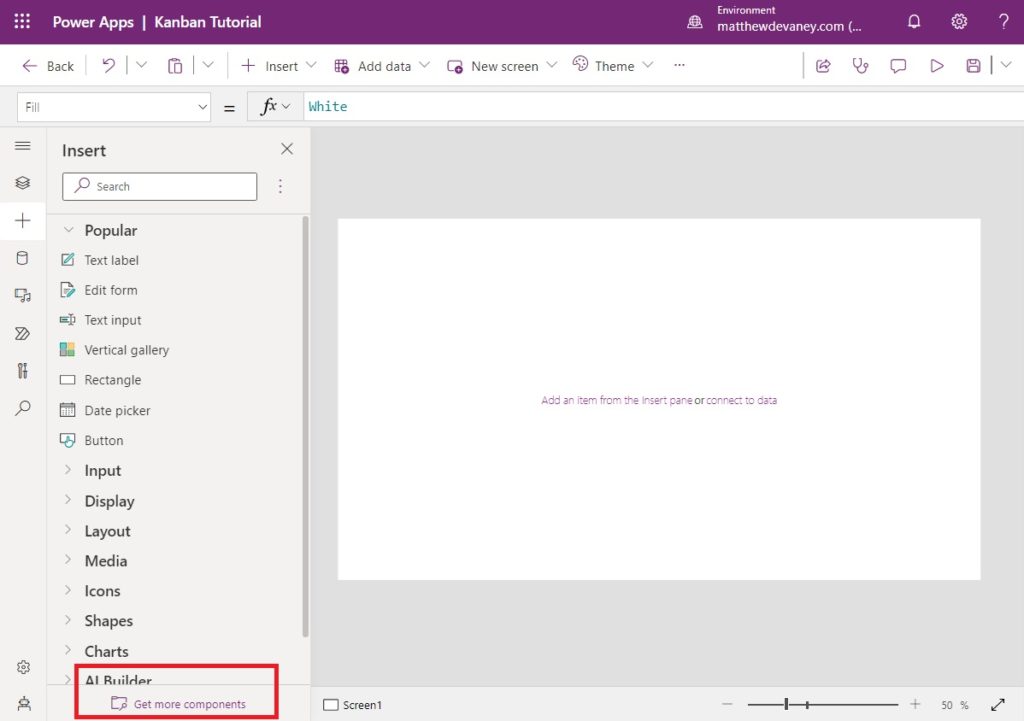
Open make.powerapps.com and create a new canvas app from blank. Go to the Insert menu and select Get more components from the bottom.
The Power Apps drag and drop component is a code component. Select the code tab and choose it from the list. Then click Import.
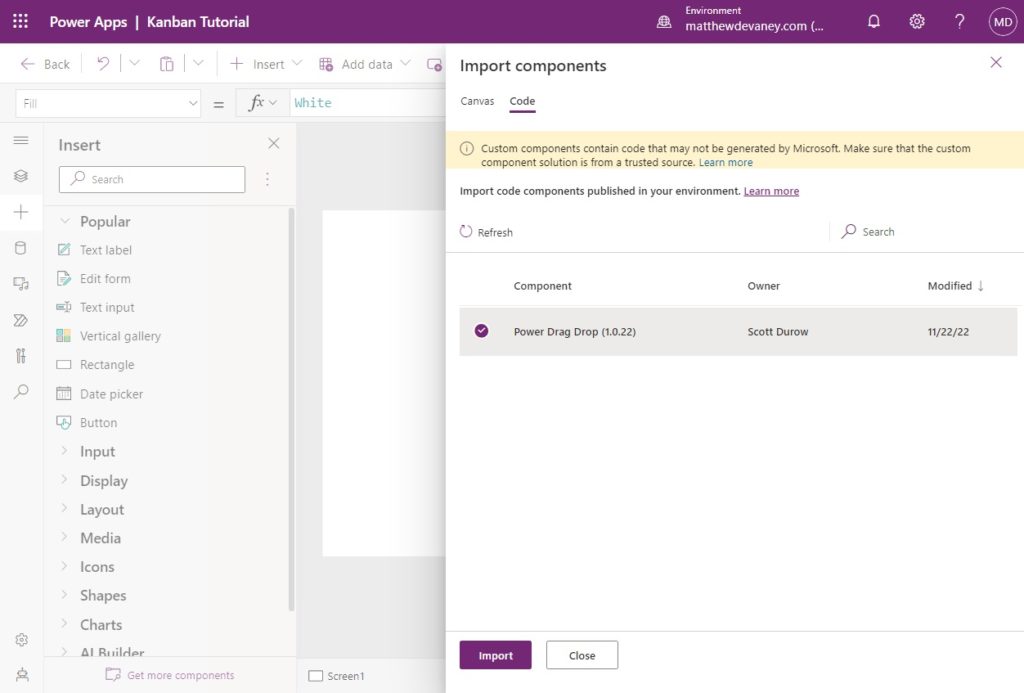
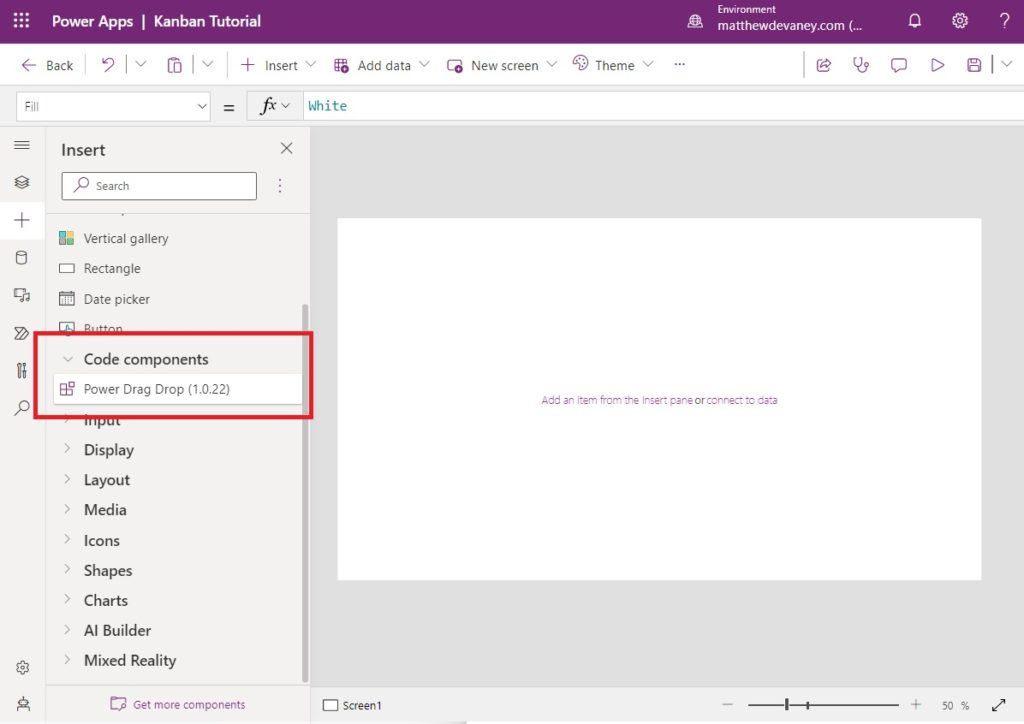
The Power Apps drag and drop component will now appear in the the Insert menu under the heading code components.
Populate The Kanbans With Items From A Collection
Place two drag and drop components on the screen and name them pcf_NotStarted and pcf_Completed. Tasks with the status Not Started will appear on the left and tasks with the status Completed will appear on the right. Then insert a new button onto the screen to create a collection of items that will appear in the kanbans.
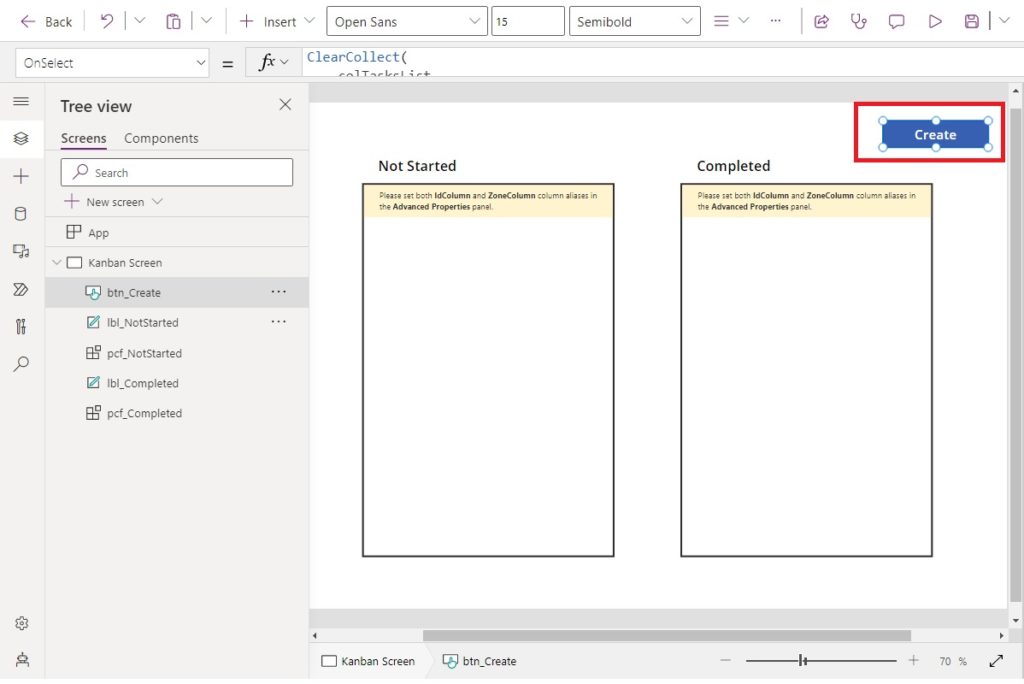
Use this code in the OnSelect property of the button to generate a collection named colTasksList.
ClearCollect(
    colTasksList,
    Table(
        {
            ID: 1,
            Title: "Task A",
            Description: "Ipsum Lorem Facto",
            Status: "Not Started",
            DisplayOrder: 1,
            Type: "Task",
            TypeIcon: "📘",
            AssignedTo: "Matthew Devaney"
        },
        {
            ID: 2,
            Title: "Task B",
            Description: "Ipsum Lorem Facto",
            Status: "Not Started",
            DisplayOrder: 2,
            Type: "Task",
            TypeIcon: "📘",
            AssignedTo: "Matthew Devaney"
        },
        {
            ID: 3,
            Title: "Task C",
            Description: "Ipsum Lorem Facto",
            Status: "Not Started",
            DisplayOrder: 3,
            Type: "Task",
            TypeIcon: "📘",
            AssignedTo: "Mary Baker"
        },
        {
            ID: 4,
            Title: "Bug A",
            Description: "Ipsum Lorem Facto",
            Status: "Not Started",
            DisplayOrder: 4,
            Type: "Bug",
            TypeIcon: "🐞",
            AssignedTo: "Matthew Devaney"
        },
        {
            ID: 5,
            Title: "Bug B",
            Description: "Ipsum Lorem Facto",
            Status: "Not Started",
            DisplayOrder: 5,
            Type: "Bug",
            TypeIcon: "🐞",
            AssignedTo: "Mary Baker"
        }
    )
)Code language: CSS (css)
Click the Not Started drag and drop component and select colTasksList as the datasource.
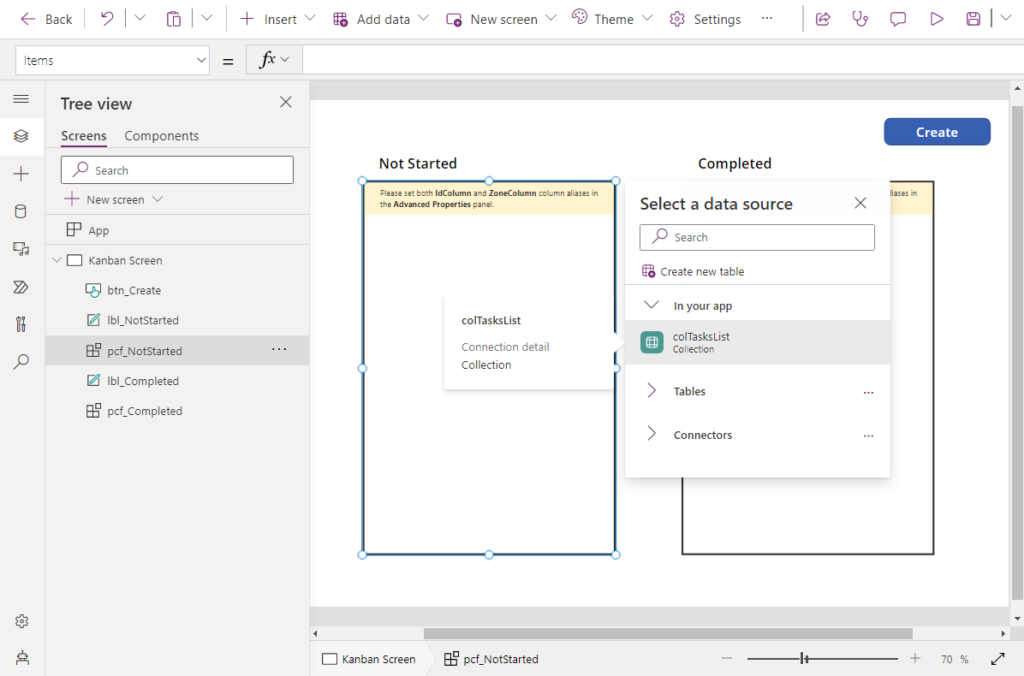
Then Edit its fields, check every field shown in the menu and click Add. No items will appear in the component just yet. We must do a few more actions first.
Repeat these same steps to select a datasource and add fields for the Completed drag and drop component.

Define The Drop Zone IDs
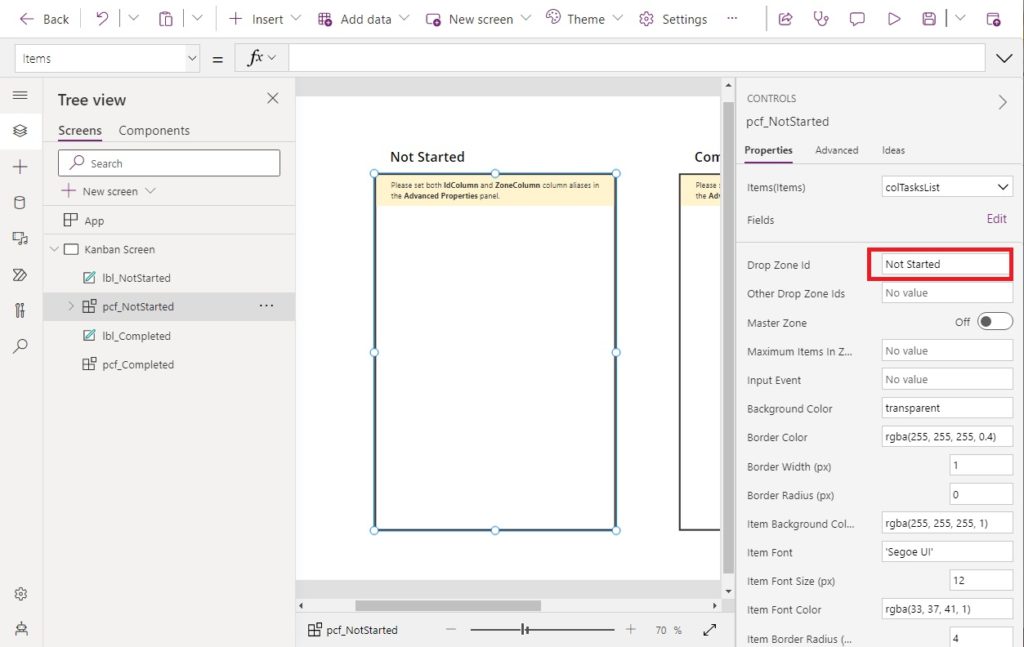
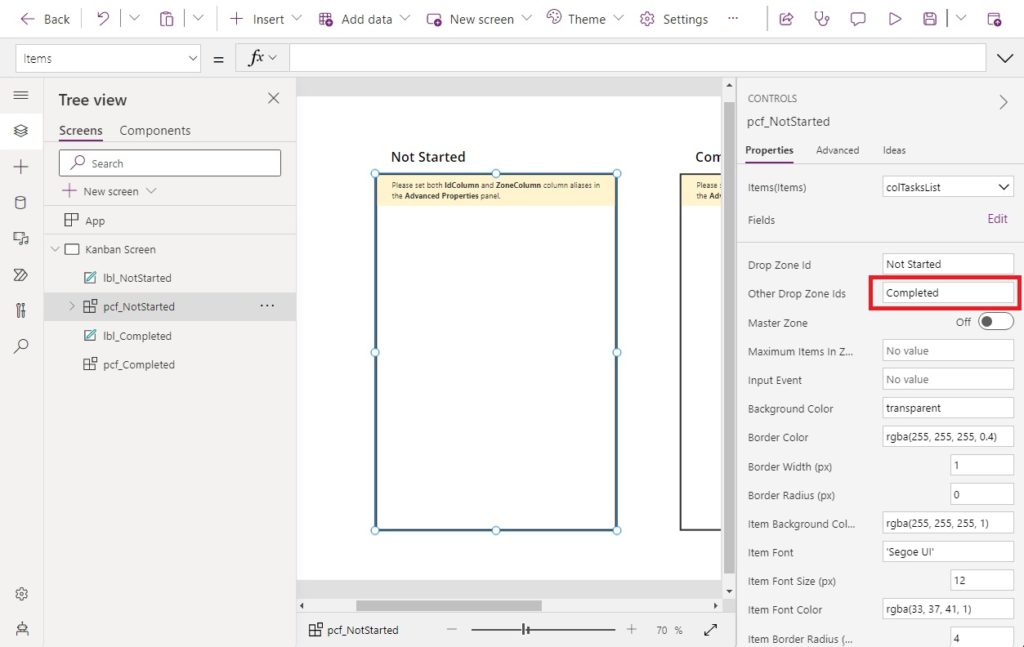
Each drag and drop component requires a drop zone id. A drop zone id is a unique name which identifies the component. Use the drop zone id Not Started for the component pcf_NotStarted.
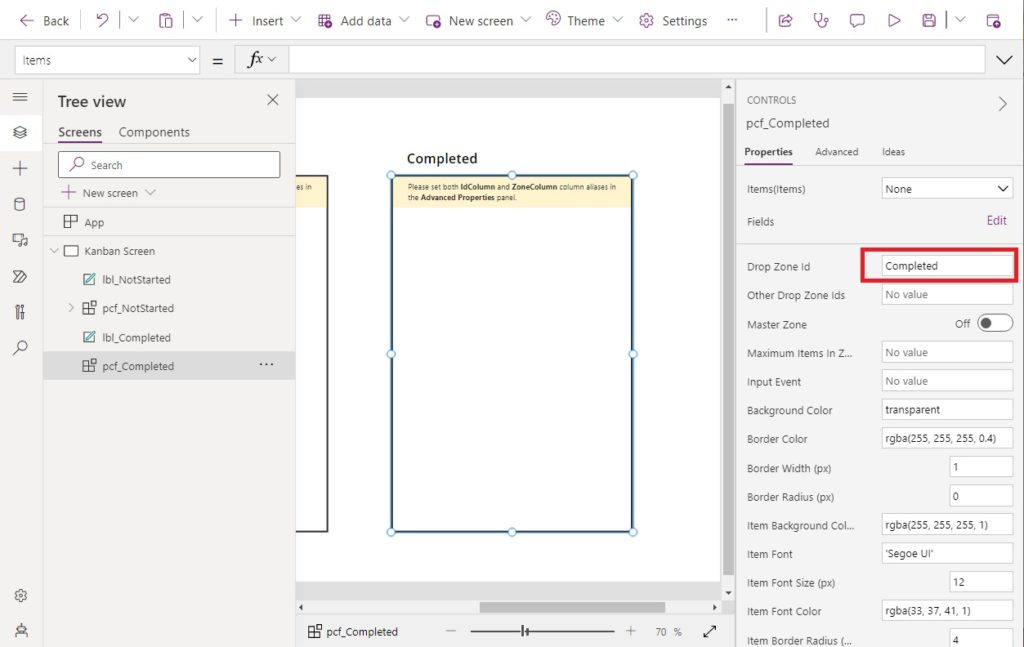
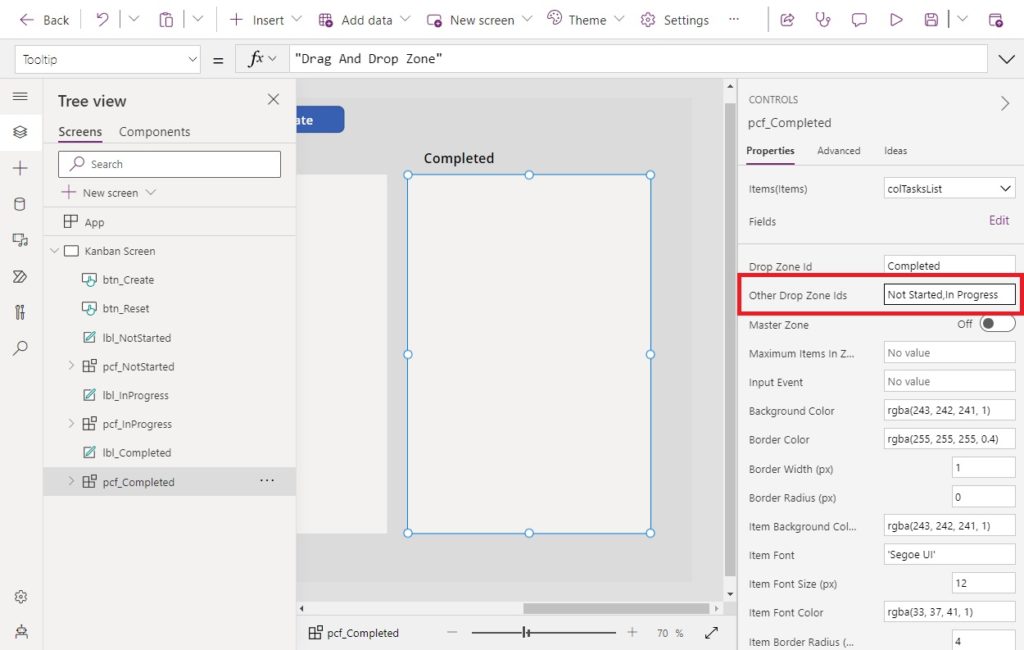
Similarly, use the drop zone id Completed for the component named pcf_Completed.
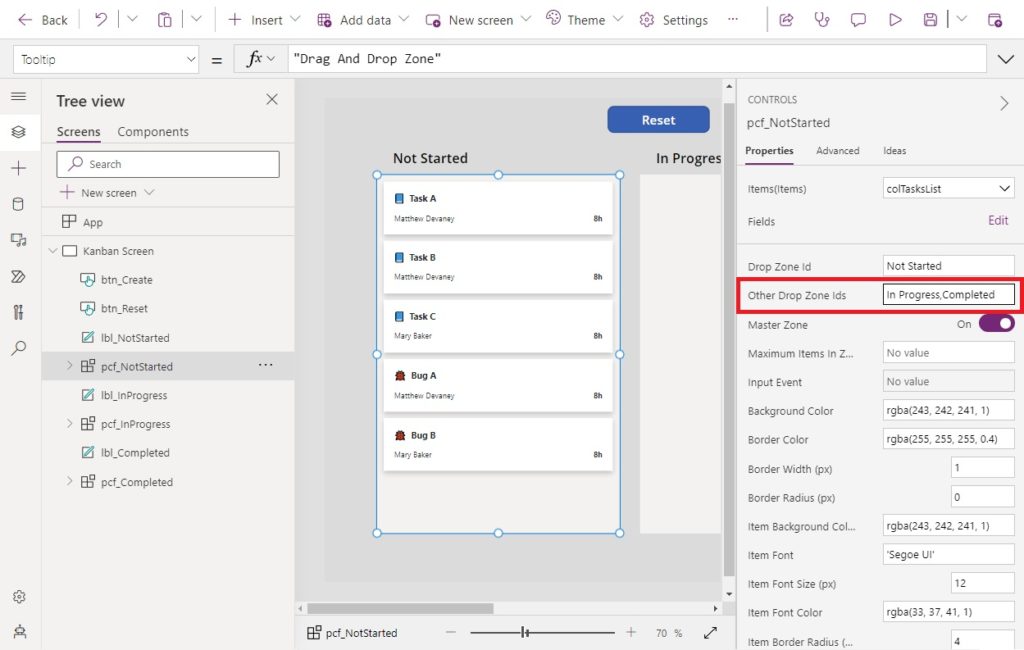
There is another property called other drop zone ids which controls the drag and drop components that may interact with one another. Define the other drop zone id property as Completed for pcf_NotStarted.
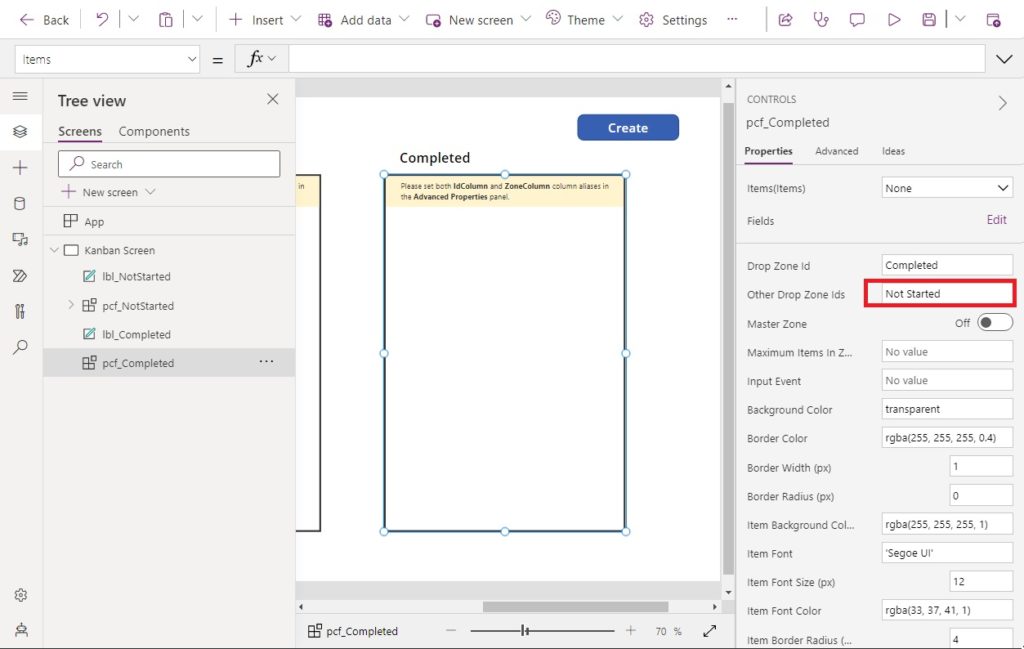
Oppositely, write Not Started into the other drop zone id of pcf_Completed.
Setup The IdColumn, ZoneColumn And MasterZone
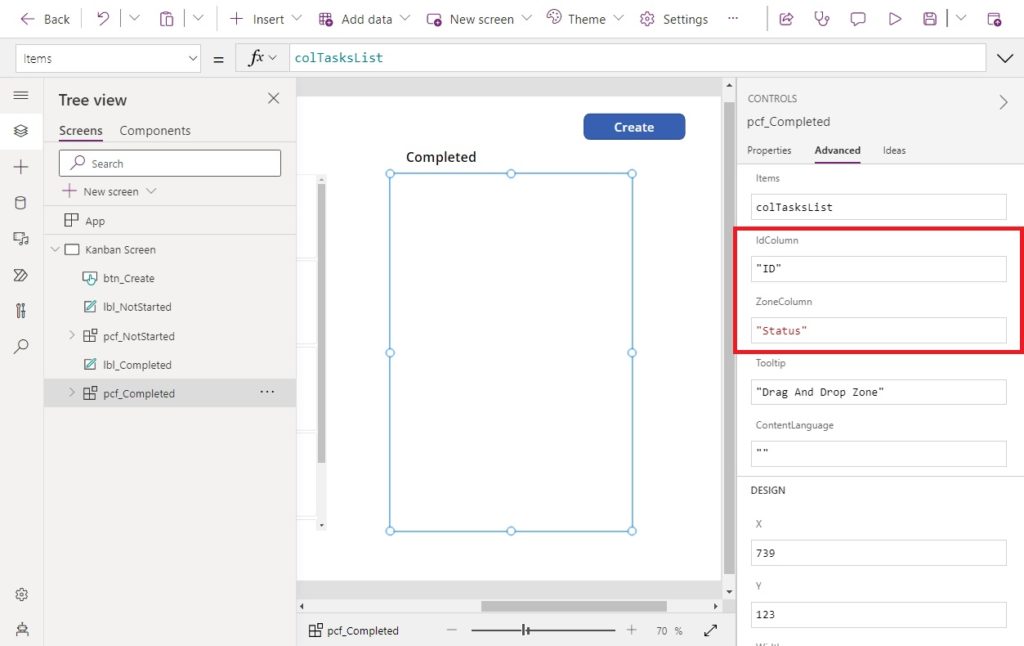
Once we setup the IdColumn and ZoneColumn properties of the drag and drop component we will finally see some items inside of it. The IdColumn must be set to the unique id of the records in colTasksLists. The ZoneColumn needs to match the record’s field that corresponds to which kanban it’s currently displayed in.
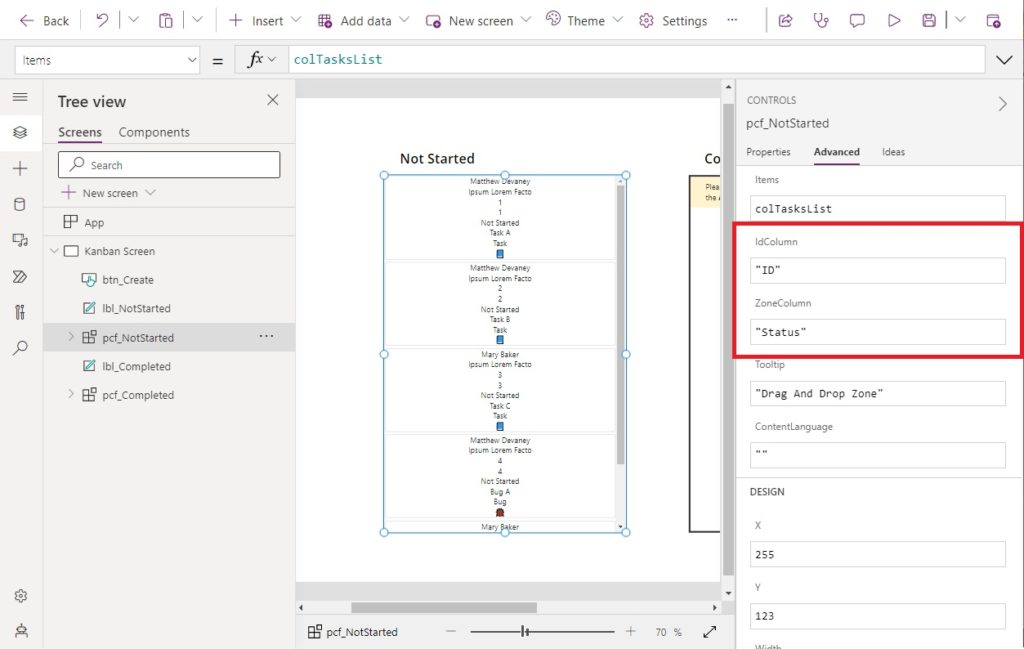
Select the pcf_NotStarted component and use this code in the IdColumn property.
"ID"Code language: JSON / JSON with Comments (json)
Write this code in the ZoneColumn property. Once this code is input we see tasks appear in the component. But we cannot drag and drop them yet.
"Status"Code language: JSON / JSON with Comments (json)
Toggle on the MasterZone property of pcf_NotStarted. There must always be one MasterZone in each group drag and drop components to orchestrate their actions. Now tasks inside the kanban can be re-ordered by dragging and dropping.
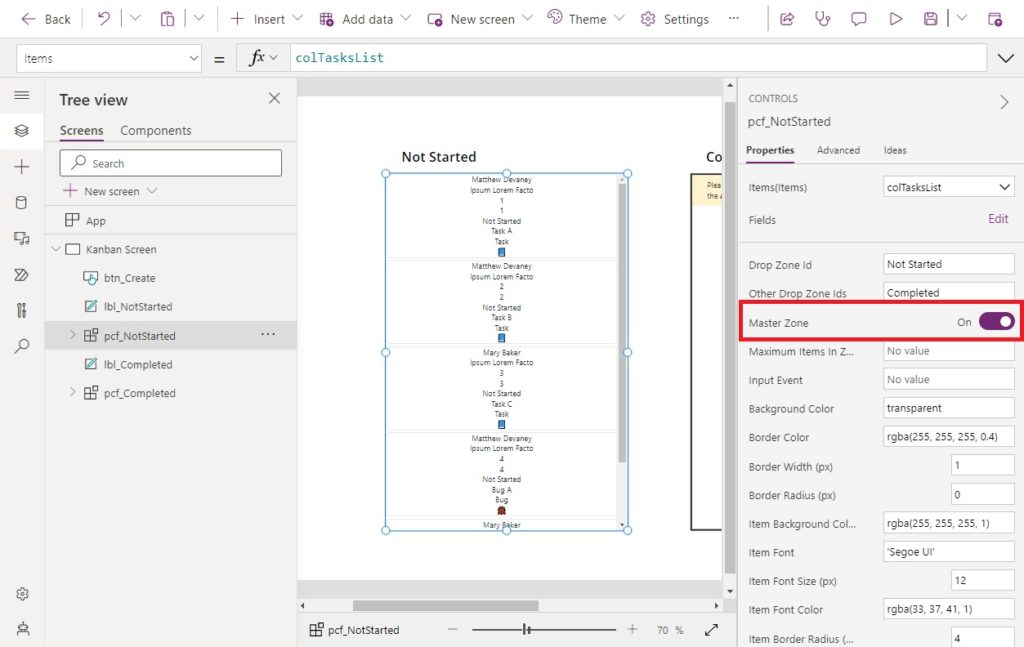
We must also set the same values for the IdColumn and ZoneColumn for pcf_Completed.
But the MasterZone property of pcf_Completed should be toggled off.

Test The “Not Started” And “Completed” Kanbans
Put the app in preview mode and give it a try. We can now reorder items inside a drag and drop component and move them to another drag and drop component. Super cool!
Reset The Drag And Drop Component
To return the kanbans to their initial state we can reset the drag and drop component. The component does not have a Reset property like most Power Apps controls. We must do this a different way.
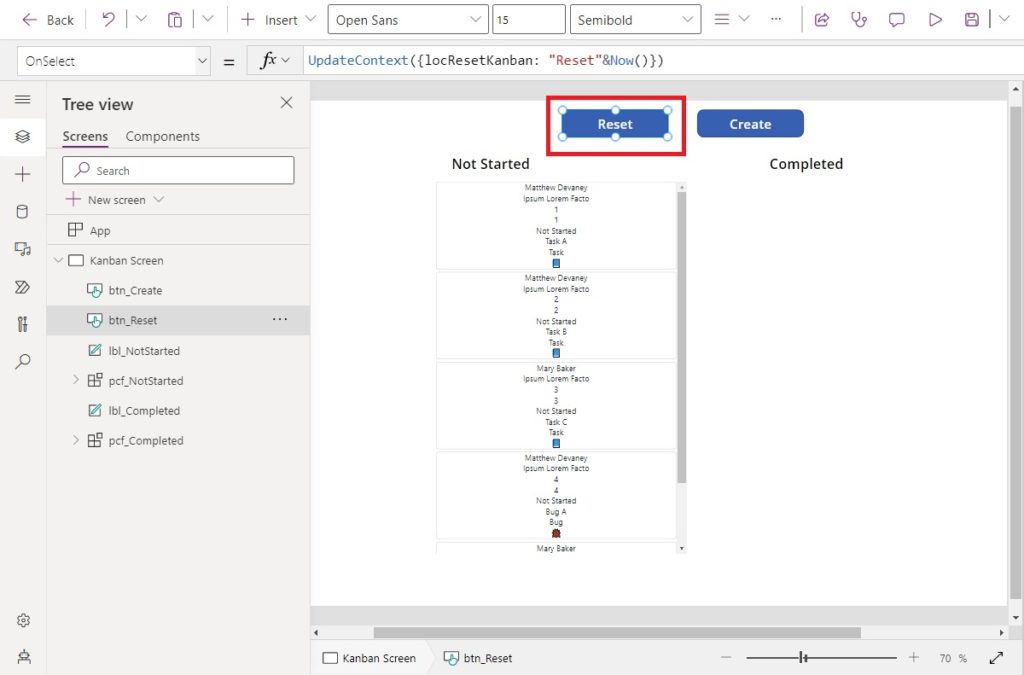
Create a button and write this code in the OnSelect property. The word Reset will be used to identify what action to take. The Now function is added at the end to generate a unique value that will ensure the control is reset.
UpdateContext({locResetKanban: "Reset"&Now()})Code language: CSS (css)
Then select the pcf_NotStarted control.

Write the variable name in the InputEvent property of the control. Do the same thing for pcf_Completed.
locResetKanban
Now when the reset button is clicked items will move back into their original positions inside the drag and drop components.
Formatting Items In The Drag And Drop Component
We can control which values from colTasksList appear inside the drag and drop component using the ItemTemplate property and some HTML code. Formatting can also be applied using a combination of HTML and inline-CSS. I highly suggest using the Live Preview extension in VS Code demoed by Scott Durow to perfect your code.
This simple example shows how to display the task name in bold.
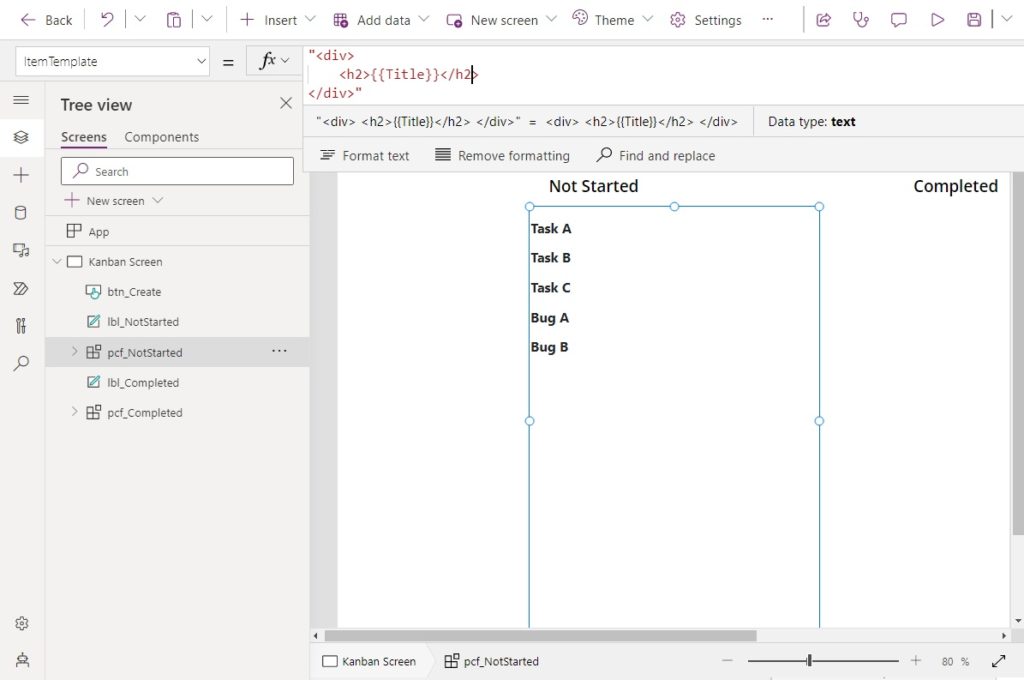
Write this code in the ItemTempate property of both the pcf_NotStarted and pcf_Completed components. Note that fields from colTasksList can be included by placing them between a set of squigglybrackets {{ }}.
"<div>
    <h2>{{Title}}</h2>
</div>"Code language: HTML, XML (xml)
In this next example, the a bolded title showing the task name appears above a description of the task.
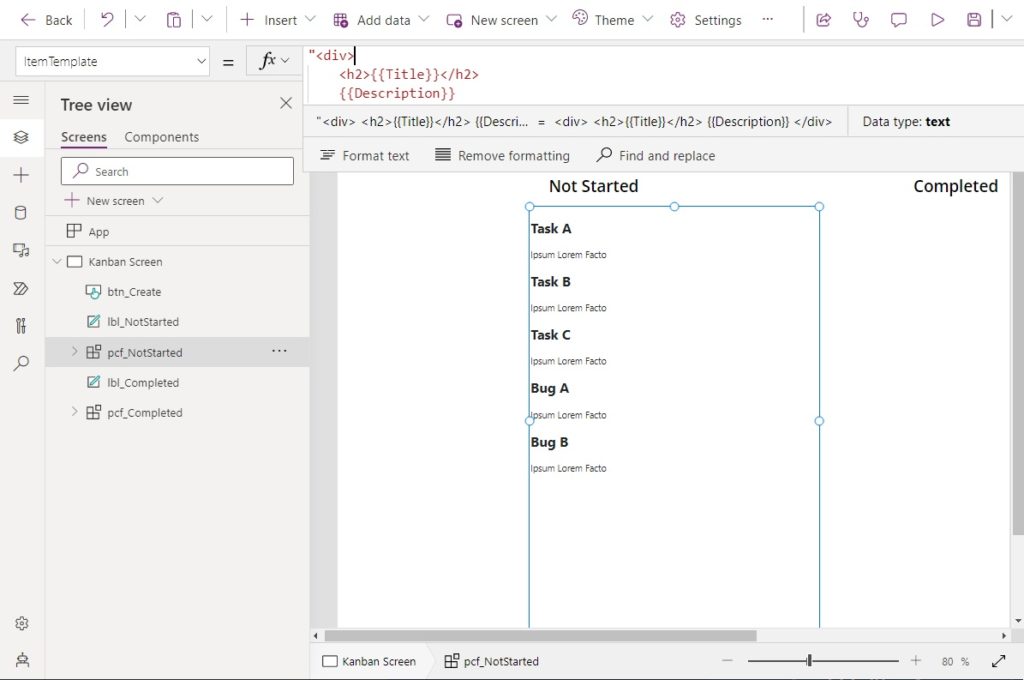
Use this code in the ItemTempate property of both the pcf_NotStarted and pcf_Completed components.
"<div>
    <h2>{{Title}}</h2>
    {{Description}}
</div>"Code language: HTML, XML (xml)
If you want to get really fancy (like me) you can use drop shadows on the item borders to make them look like card elements. I’ve also used CSS flexbox to make the template responsive and emojis (hotkey: [Windows] + [Period]) to make cool looking icons.
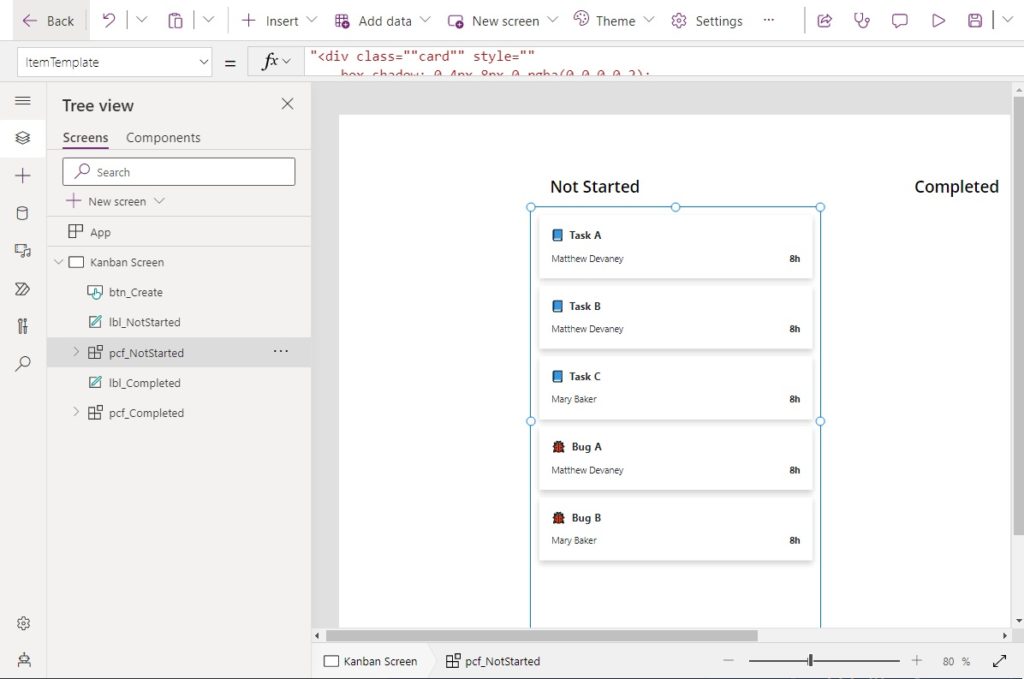
Apply this code to ItemTemplate for pcf_NotStarted and pcf_Completed to make them look very stylish indeed. 😀
"<div class=""card"" style=""
box-shadow: 0 4px 8px 0 rgba(0,0,0,0.2);
margin: 10px;
"">
<div class=""container"" style=""
background-color: white;
padding: 2px 16px;
"">
<h3>{{TypeIcon}} {{Title}}</h3>
<div class=""flex-container"" style=""
display: flex;
padding: 0 0 16px
"">
<div class=""flex-child"" style=""
flex: 4;
margin: 0px;""
>
{{AssignedTo}}
</div>
<div class=""flex-child"" style=""
flex: 1;
text-align: right;
"">
<b>8h</b>
</div>
</div>
</div>
</div>"Code language: HTML, XML (xml)
Style The Kanban Board App
A few more minor improvements are needed to make the app look really awesome.
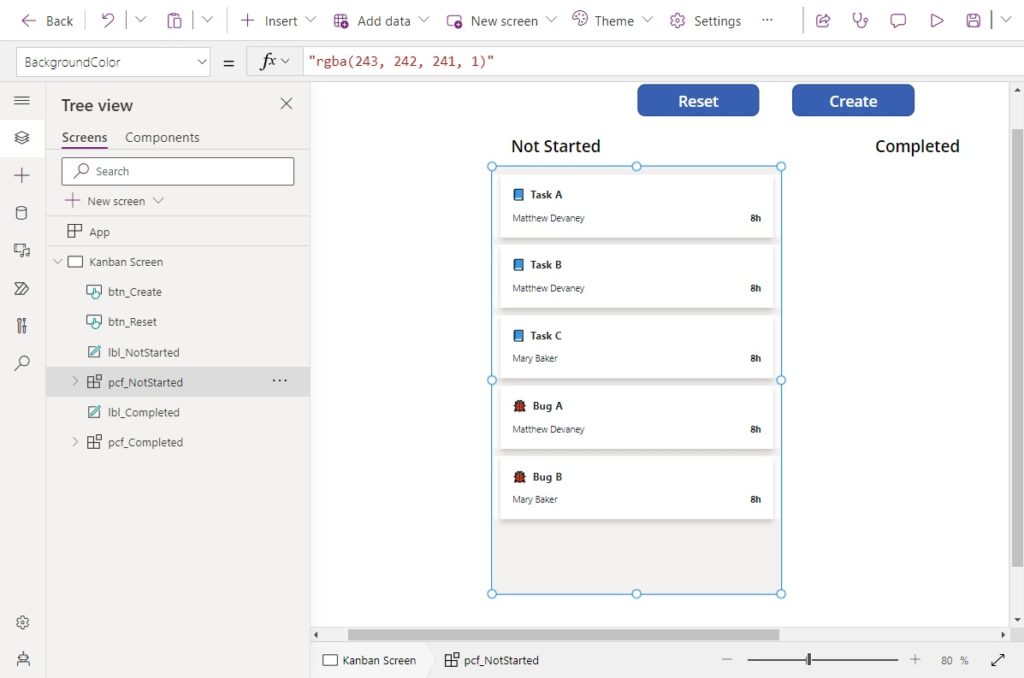
Update the BackgroundColor property of the pcf_NotStarted control to make it appear light gray.
"rgba(243, 242, 241, 1)"Code language: JSON / JSON with Comments (json)
Do the same for the ItemBackgroundColor property.
"rgba(243, 242, 241, 1)"Code language: JSON / JSON with Comments (json)
Then highlight the pcf_Completed control.
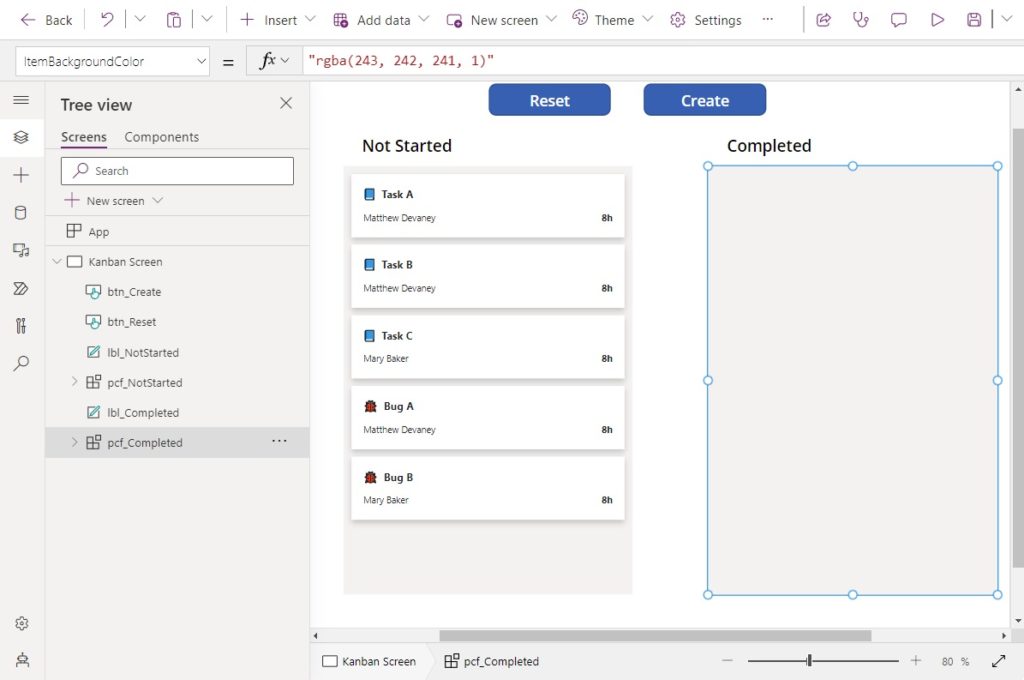
And write the same code for the BackgroundColor and ItemBackgroundColor properties.
"rgba(243, 242, 241, 1)"Code language: JSON / JSON with Comments (json)"rgba(243, 242, 241, 1)"Code language: JSON / JSON with Comments (json)
Then make the screen a dark gray to contrast with the light gray of the drag and drop component.
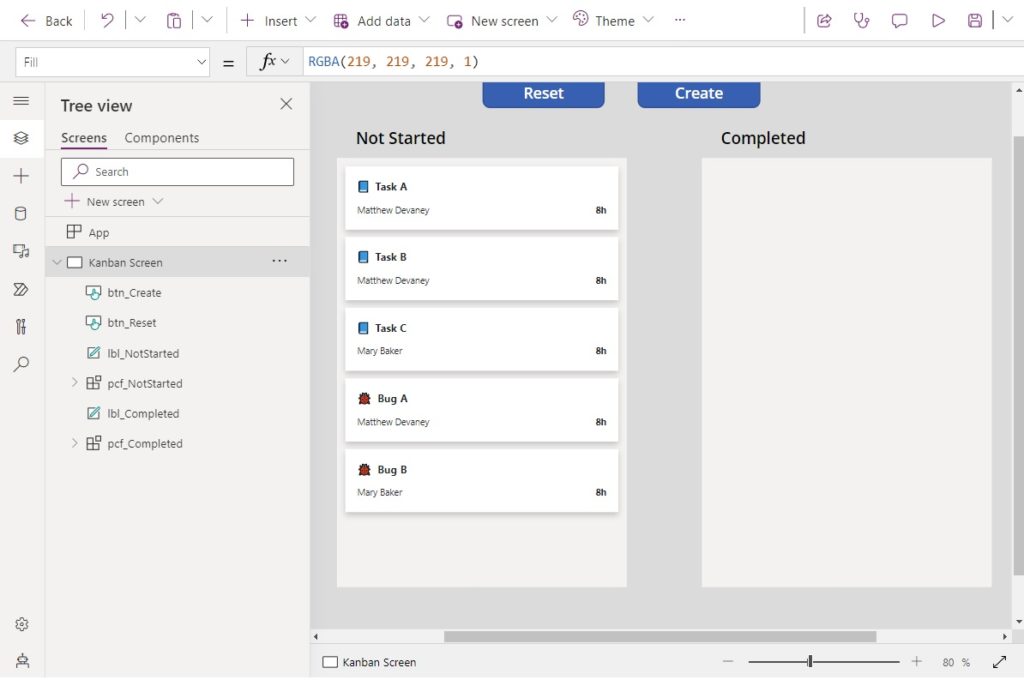
Use this code in the fill property of the screen.
RBGA(219, 219, 219, 1)
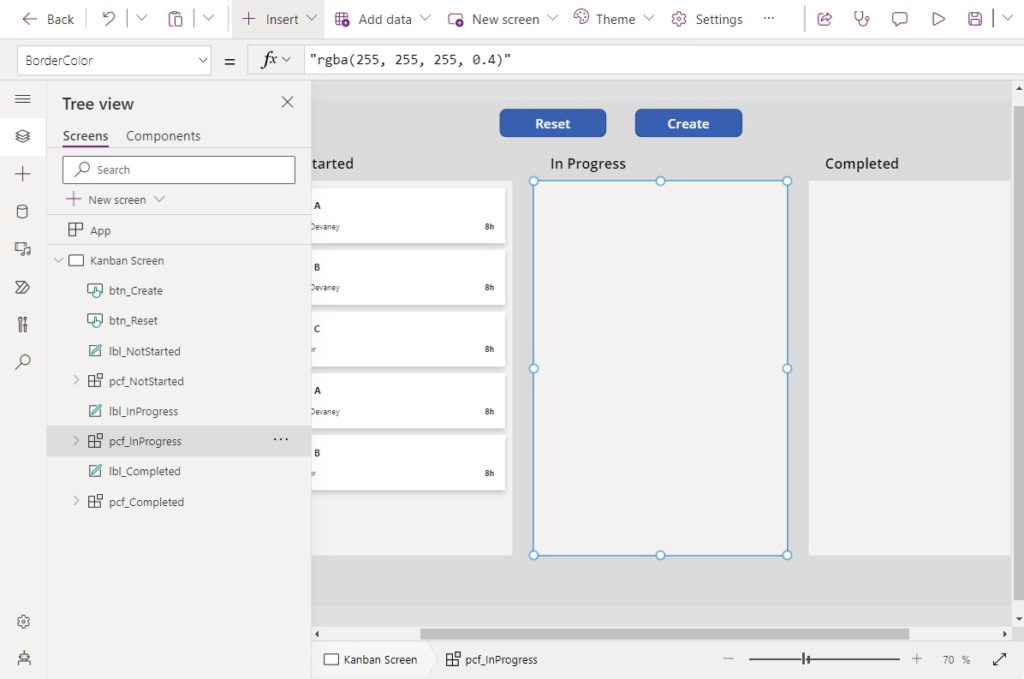
Make An “In Progress” Kanban
The app should actually have 3 kanbans: Not Started, In Progress and Completed. So let’s go ahead and setup the missing In Progress kanban. Copy the Completed drag and drop component and paste it between Not Started and Completed.
Set the drop zone id to In Progress and the other drop zone ids to Not Started,Completed.
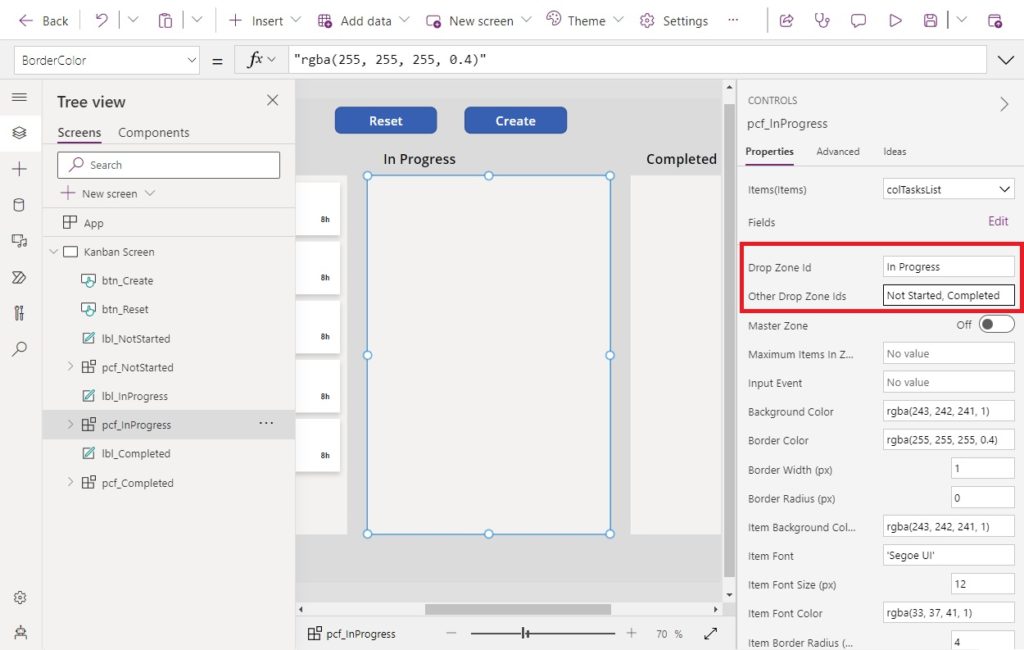
Change the other drop zone ids property to In Progress,Completed for pcf_NotStarted.
And update the other drop zone ids property for pcf_Completed to NotStarted, In Progress.
Test The “Not Started”, “In Progress” And “Completed” Kanbans
That’s all folks. We’re done. Play the app in preview mode and give the drag and drop functionality a try for all 3 kanbans.
Further Documentation
We’ve only scratched the surface here of what Scott Durow’s Power Apps Drag and Drop component can do. For more documentation, visit his Github repository or check out his Youtube series on this topic.
Did You Enjoy This Article? 😺
Subscribe to get new Copilot Studio articles sent to your inbox each week for FREE
Questions?
If you have any questions about Power Apps Drag & Drop Kanban Tutorial please leave a message in the comments section below. You can post using your email address and are not required to create an account to join the discussion.


Can Power apps develop OKR tool?
Thassika,
Yes, you could make a goal setting app using the OKR methodology.
Hi! Great post, thanks for share. Could you answer one question? Why you use ClearCollect and Table?”ClearCollect( colTasksList, Table(”
Is it possible use ClearCollect(colTasksList, {},{},{})?
Marques,
Yes, you can do that. Next week I’ll also show how to use a SharePoint list as a data source.
I like this solution and I hope to see your post how o use int with a SharePoint list.
Christer,
Originally I had planned a series on this Kanban component that included how to write back to SharePoint. But as I started writing, I found it was much too long for an article. I’d suggest asking Scott Durow (the creator) to do a SharePoint list tutorial (link: https://github.com/scottdurow/power-drag-drop/issues)
Ok Matthew, I will post a question there.
I had seen the Scott Durow new component last week, but I didn’t understand how it works.
Thanks for the explanation!!!.
Now it became very clear to me and I will use it in an app that I was thinking of developing for IT project management.
Julián,
You’re welcome! Scott Durow is awesome. I love his work.
Stay tuned for next week where I’ll show how to do create/read/update/delete kanban items.
Hi Matt, did you do this article on creating, reading, updating, and deleting Kanban Items
Great job Matthew…I saw this a long time ago, but I could never figure it out. The tutorial you made is simple and very helpful. I look forward to what you share next on this!!
J Ray,
This component by Scott Durow is actually brand new. It was based on the one you saw a long ago. It’s been improved.
Thanks Matthew, we were looking for this type of capability using PowerApps, in Kanban we have the concept of Variability. That is type of tasks, for e.g Urgent Issues are tagged as “Expedite’ and will have SLA’s associated to it, and based on effort we will have task type as Small, Medium, Large, Planned. These will be shown as horizontal swim lanes, will you be able to enhance the plugin to have Horizontal Plugin’s as well ?
Balaji,
It’s not my component. It’s Scott Durow’s. You can make a feature request on his Github repo here:
https://github.com/scottdurow/power-drag-drop/issues
Thank You, i have logged in as new issue
<div>ndrop smmmart hack 🙂
thnnnks Scott Durow !!!
Mery Xmmmatthew ♪
Thanks Matthew for the post,
I had a doubt, how to add the icon to the gallery?
Thiago,
Emojis hotkey is [Windows Key]+[Period]
Thank you very much to both. Scott and Mattew for developing and explaining this component to us. One of the best that they have released for Power Apps in recent times.
Hi! Great tutorial Matthew – thanks a lot!
I am experiencing an issue when following your tutorial step-by-step: The collection items are not displayed within the Power Drag Drop components after setting up the IdColumn and ZoneColumn, Master Zone enabled, collection referenced in items. The App is deployed in a default environment.
Anybody else experiencing the same issues? Am I missing something? I tested v 1.0.22; .23 and .24 the last days.
Daniel,
I sometimes found it necessary to re-create the Kanban component when an issue like this occurred.
Unable to get drag and drop to work for Inprogress and completed even after recreating component . Am i missing something ?
For me it helped to save, close and restart the app.
Great
Hi, I’ve rebuilt the kanban board and restarted the app. but it’s not showing up for me either. What’s weird is that when I select the collection source, it never appends in the “Items” field. But I CAN add said fields from the collection – that’s not showing up.
I was able to resolve this by using a temporary solution from GitHub:
DUE TO ISSUE WITH LATEST VERSION OF POWER APP, USE THIS AT END OF URL TO EFFECTIVELY ADD THE FIELDS.
Hello, we are aware of this issue and are actively working on a fix.
We have identified a temporary mitigation that you can utilize to unblock setting fields on the DetailsList controls by doing the following:
1. Open the affected application for edit
2. Append the following onto the URL bar in your browser and then hit enter:
&studio-version=v3.24052.30.298708436
3. The editor will reload the application
4. Make any changes you need to the fields of the affected control and save the application
5. You can then re-open the application for edit as you normally would, but to edit the fields for affected controls you will need to repeat steps 1 through 4.
Apologies for the inconvenience caused by this
From <https://github.com/microsoft/powercat-creator-kit/issues/475#issuecomment-2164606080>
I am also facing same issue. Is the issue for you resolved?
How the changes has been saved ? Its automatically done ?
Charalampos,
Unfortunately, no it’s not automatically done. It requires more code to actually save the data. Check out this video by Scott Durow which explains the kanban’s OnSave property. He built it so he’s a going to be a great source of knowledge on it.
Link: https://www.youtube.com/watch?v=wkHvjusgLEE
Ok i will check it again , i have seen the video but i dont figure out how he have done that, in your case what did you write as a code ? If you can explain it more .Thank you very much for you response I have seen a lot of your posts , I am power platform developer for over a year
I have the same issue. Did you could to solve it? Can you help me?
Really enjoyed this tutorial. You motivated me to build a POC for one of my production departments.
Been struggling with the last part of Scott’s tutorial. Mainly the subtle differences between patch to dataverse vs a list. Working with my own data seems to add to the challenge, lol.
Super close, though. All the boards work but I cannot get the data to stick. I’ll keep chipping away at it while waiting for your usual straight-forward tutorial on connecting the KanBans to a sharepoint list.
I do appreciate the effort you put into this!
Thanks!
Howard,
Best of luck. Many thanks.
Great Kanban example. I’m hoping to use this to more easily manage project tasks. But I was unable to get the reset button to work though I am able to create and move the cards around with ease.
Is this feature able to add input field within the html format and overwrite the data within the Collection table? I was wondering also if the header style is provided in the html forms because i was not able to implement it. I’m wondering if changing the color by javascript is working to because i need to update the background colors based on the value being distributed.
The drag and drop feature seems to be strong but i feel there could be improvement overall with managing and accessing data more dynamically(similar to powerapps gallery).
Sangwan,
I don’t think you can make an input field inside the drag and drop control. Suggest you ask the creator Scott Durow.
https://github.com/scottdurow/power-drag-drop/issues
I have an item template similar to the below:
<div
	style="
		box-shadow: rgba(0, 0, 0, 0.35) 0px 5px 15px;
		display:flex;
		flex-direction: column;
		margin: 16px;
        padding: 8px;
        border-radius: 8px;
	">
	<div>{{Start Time}}</div>
</div>
The
Start Timedata comes from a SharePoint list Date Time field and therefore displays the date according to the ISO 8601 standard i.e.2011-08-12T20:17:46.384Z.How do I format this data from within the item template so that it appears as just the time portion, i.e.
20:17?The formatting part is straightforward if I could use Power App formatting functions, however, I do not seem to be able to use those in the context of the item template and the handlebar notation.
Thanks for the help!
Mark,
Try this:
Mid(“2011-08-12T20:17:46.384Z”, 12, 5)
Matthew,
I really like the simplicity of this, and your explanation was perfect. But I have one question, how would I go about counting the number of items on each board? I’ve tried the basic formula CountRows(Filter(Collection, pcf_Notstarted = Title)) but I cannot get it to work properly despite different iterations.
Thank you.
great tutorial! Does an item know in which box it is dragged into? I hoped the Status would change but that doesn’t.
Is it possible to create a PowerApps Gallery drag-and-drop functionality with this component, so moving the existing records up and down?
Hi Matthew, This looks brilliant. I would like to use this on my survey form builder app. At the moment the form admin needs to press up and down arrows to re-order questions.
Hello Matthew
Great article !
However, i can’t figure out how to display/render icons via {{TypeIcon}}
In your code for colTasksList no values are affected to this property.
And when I run the app no icons appear on the screen.
Thanks for your answer !
As always, great post and cheers to Scott for making this PCF. Part of the credit to you too Matthew for explaining in detail via your blog on this, it is indeed very helpful. Just wondering if you have a blog published already on how to do create/read/update/delete kanban items as i mentioned by you in one of below responses. Eagerly waiting for it. As always keep the new content coming in. Cheers.
Kamesh,
I have decided not to pursue this topic of kanban any further. Scott Durow has some excellent videos on the topic. I do suggest you check to see if he has something there on Youtube that could help.