Create An MCP Server And Deploy To Copilot Studio
You can create your own MCP server and then build an agent in Copilot Studio which uses its tools and resources. In this tutorial, we will create an MCP server using Python and the FastMCP framework. After testing it locally with MCP Inspector we will then deploy it as an Azure container app. Finally we will connect the MCP server to an agent in Copilot Studio
Introduction: The Bank Of Canada Exchange Rates API
The MCP Server we will deploy consumes currency exchange rates data from the Bank Of Canada. It includes the following tools:
- convertToCanadianDollars: convert an amount of Canadian dollars into a foreign currency
- listCurrencies: lists the currencies available for conversion
Documentation for the Exchange Rates API is provided by the Government of Canada. It is an ideal data source for building an first MCP Server because it does not require authentication to use.
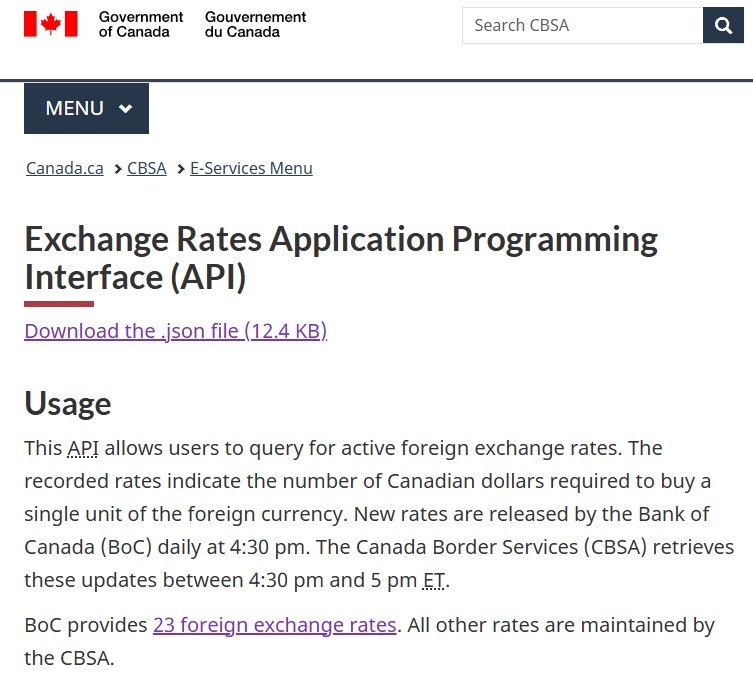
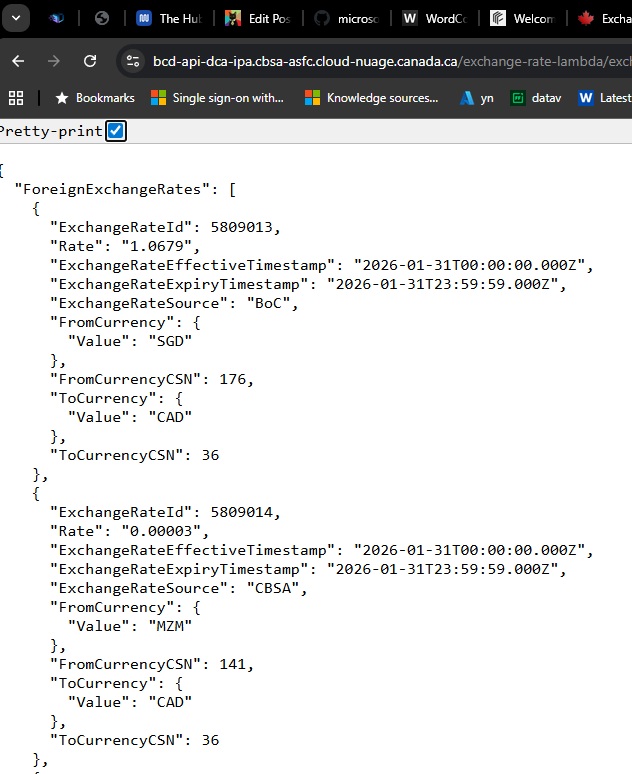
Copy and paste this URL into a web browser to view the Exchange Rates API response.
The Exchange Rates API returns a JSON array of all available foreign currencies and their exchange rates. Our MCP Server will use this information to perform a currency conversion from Canadian dollars to foreign dollars.
Install Prerequisites For Building An MCP Server
The following prerequisites are required to complete this tutorial:
- 🤖 Copilot Studio (link) – agent building platform that will consume the MCP server
- 🐍 Python v3.14 or greater (link) – coding language used to write the MCP server
- 📦 UV python package (link) – python package manager
- 🐳 Docker Desktop (link) – builds a container for the app
- 👨💻 VS Code (link) – code editor
- 💾 Git (link) – version control system
- 🐙 Github Account (link) – online hosted version control
- ⌨️ Azure CLI (link) – command line tool for managing Azure resources
- 🌐 Azure Subscription (link) – required for creating Azure resources
Create A New Repository Based Upon The Template Repo
The MCP Server code and other files needed to deploy to an Azure container app are stored in the Github repo https://github.com/matthewdevaney/boc-forex-mcp. Open the Github repo in a web browser and select the Use This Template button. Choose create repository.
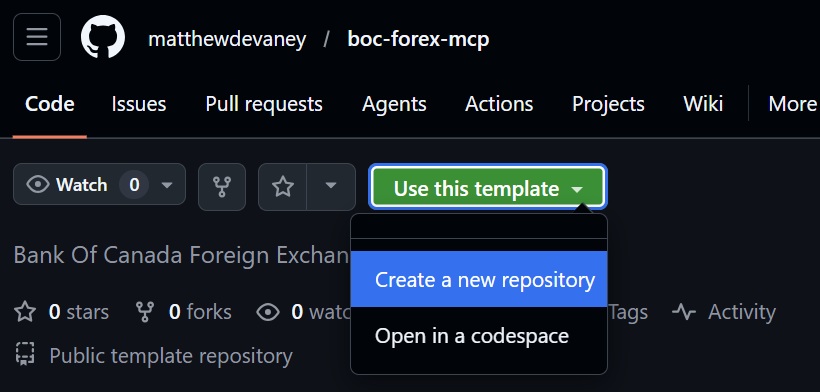
Configure the repository with these values:
- Repository name: copilotstudio-mcp-tutorial
- Description: Python FastMCP server deployed to an Azure container app
- Visibility: Private
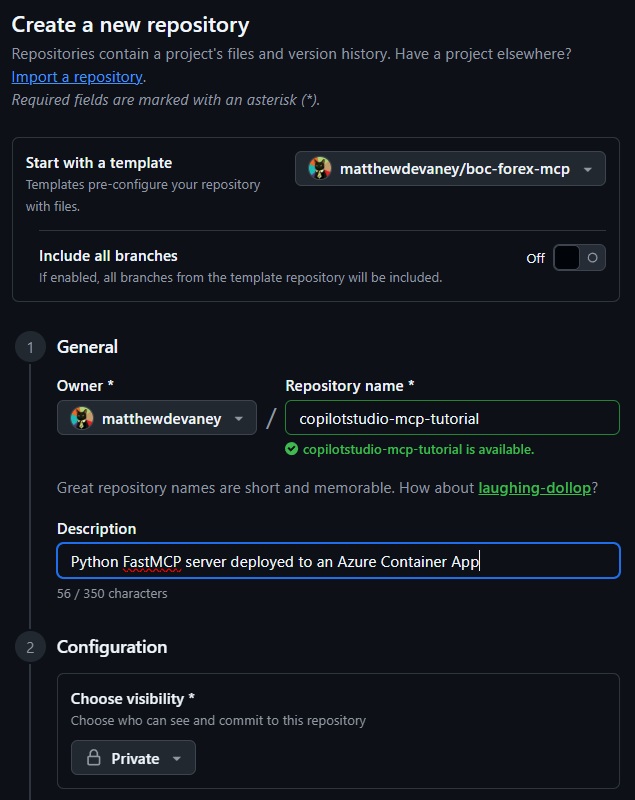
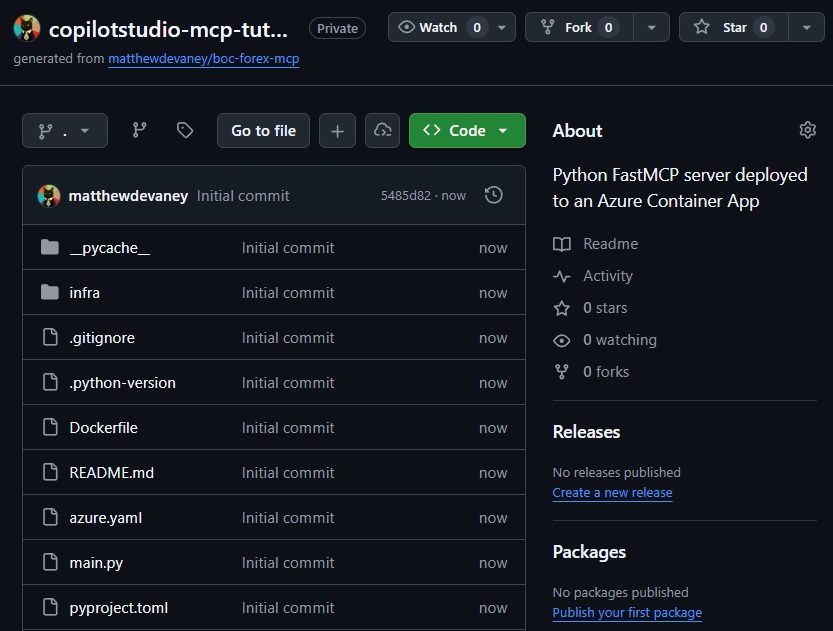
The files are copied into the newly created repository.
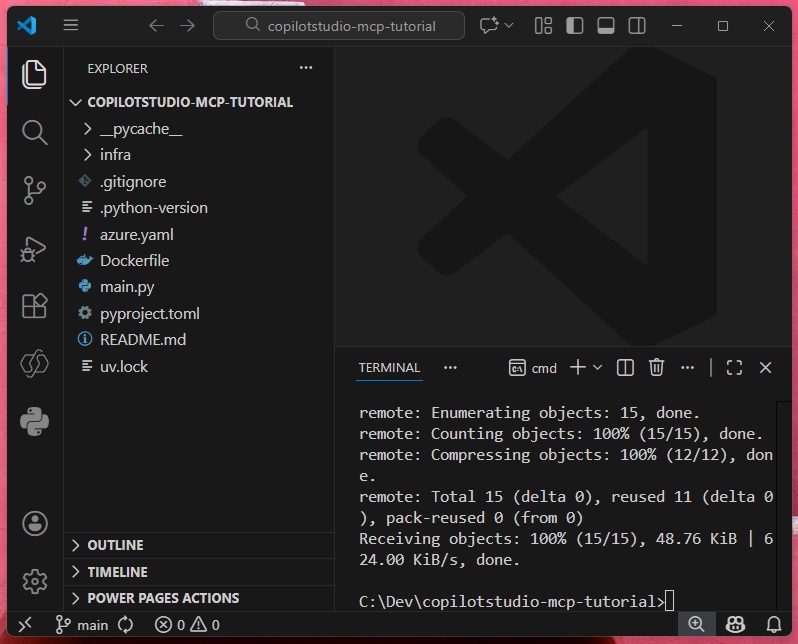
Clone The Repository To A Local Folder
The next step is to clone the repository to a local folder. Start by copying the web URL for the new repository to the clipboard.

Open a terminal in VS and navigate to the folder you want to clone the repo to such as C:\Dev\copilotstudio-mcp-tutorial.
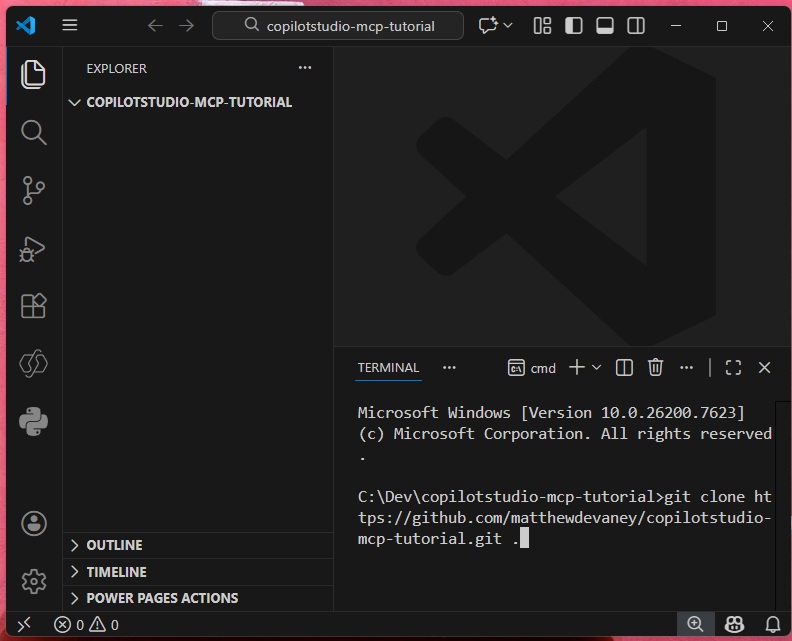
Then enter a git clone command into the terminal to clone the repo. Use the cmd terminal type and don’t forget the dot symbol at the end of the command.
| git clone https://github.com/matthewdevaney/copilotstudio-mcp-tutorial.git . |
All of the files from the Github repo now appear in the local folder.
Python libraries used by the script named main.py are stored in the file uv.lock. Import the dependencies by entering this command.
| uv sync |
A virtual environment name (.venv) is created and the necessary python libraries are installed.

Understand The MCP Server Python Code
The MCP server definition is stored in the file main.py. Let’s take a moment to review the file and understand how it works.
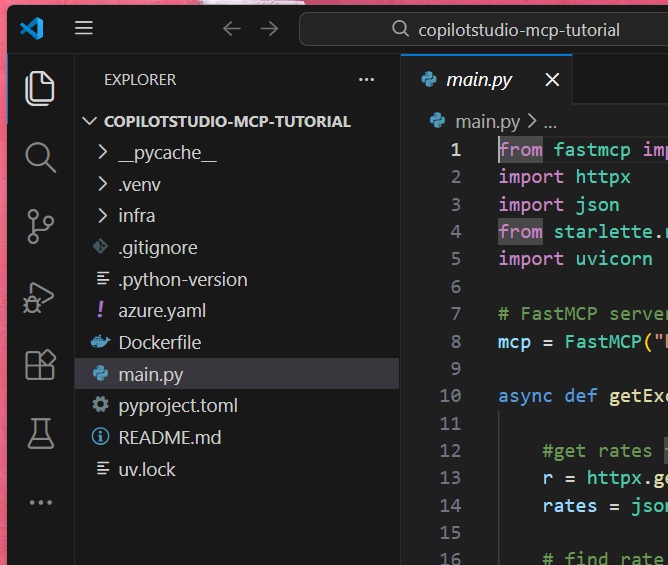
The file starts by importing the following packages:
| Import | Purpose |
| from fastmcp import FastMCP | creates the mcp server |
| import httpx | enables sending async requests |
| import json | provide json manipulation abilities |
| from starlette.responses import JSONRepsonse | takes some data and returns an application/json encoded response |
| import uvicorn | run an ASGI compatiable web server |
These four lines of code setup the MCP Server using the FastMCP framework. We begin by creating a new instance of a FastMCP server named bankofcanada-exchangerates. Then it creates an ASGI web application which can communicate over HTTP. Finally, the app is run on a uvicorn web server, and broadcast on port 8000.
# FastMCP server configuration
mcp = FastMCP("bankofcanada-exchangerates")

# Create a Starlette ASGI web application for uvicorn to serve
app = mcp.http_app()

if __name__ == "__main__":
    uvicorn.run(app, host="0.0.0.0", port=8000)
Code language: PHP (php)
MCP tools are defined by python functions using the decorator @mcp.tool. This MCP Server has two functions: listCurrencies and convertToCanadianDollars. It also has a getExchangeRate function which is called by convertToCanadianDollars but is not exposed as an MCP tool. API endpoints that are reachable without mcp can also be defined using the @mcp.custom_route decorator.
| Decorator | Function | Purpose |
| @mcp.tool | listCurrencies() | mcp tool lists the currencies available for conversion |
| @mcp.tool | convertToCanadianDollars(amount, currencyCode) | mcp tool to convert an amount of Canadian dollars into a foreign currency |
| None | getExchangeRate(currencyCode) | function to get exchange rates used in conversion, not directly callable as an mcp tool |
| @mcp.custom_route | health_check(request) | check if the server is running by using the /health endpoint |
Let’s review one of the functions used to create an MCP tool. To define a function as an MCP tool we use the decorator @mcp.tool(). We also add the keyword async before the function definition since MCP tools must operate asynchronously. A docstring is included describing the function’s purpose/when to use, each argument used as input and each output returned. The docstring is crucial for an AI agent’s understanding of how to call the MCP tool.
@mcp.tool()
async def convertToCanadianDollars(amount: float, currencyCode: str):
    """
    converts a given amount of Canadian currency to a target currency

    Args:
        amount: The amount of Canadian currency to be converted to the target currency (e.g. 500.23)
        currencyCode: The ISO 4217 currency code for the target currency (e.g. "USD")

    Returns:
        target currency amount
    """
    rate = await getExchangeRate(currencyCode)
    convertedAmount = amount / rate
    return round(convertedAmount, 2)Code language: PHP (php)
The health check function is also interesting. It uses the decorator @mcp.custom_route to add the /health endpoint for a GET request. It returns a simple JSON showing the mcp server is healthy. It is not necessary to include this endpoint in an MCP server, but it is a convenient way to check it its running.
# Add health check endpoint for Azure Container Apps
@mcp.custom_route("/health", methods=["GET"])
async def health_check(request):
    return JSONResponse({"status": "healthy", "service": "mcp-server"})Code language: PHP (php)
Run MCP Inspector To Test MCP Server Tools
MCP Inspector is an application used to test MCP servers during development. It is included in the FastMCP python package so it doesn’t require a separate download. We will use it to test our own MCP server.
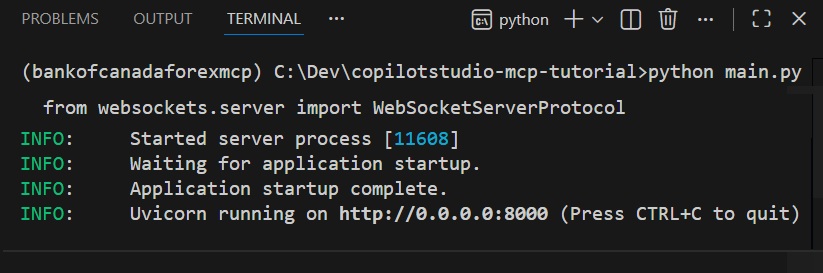
First, launch a terminal and run this command to start the web server.
| python main.py |
We will see the message uvicorn running on http://0.0.0.0:8000 if the web server starts successfully.
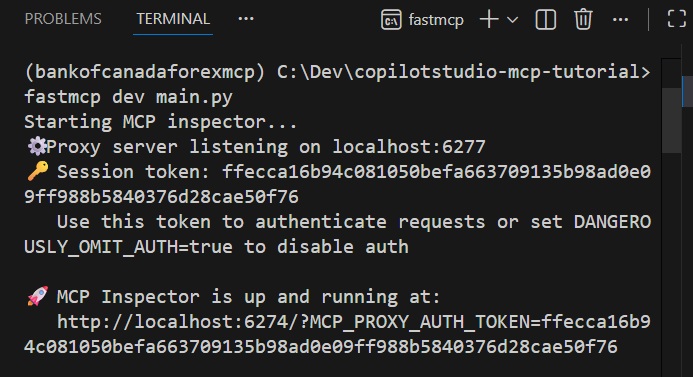
Launch a 2nd terminal and give this command to open MCP Inspector. Do not close the first terminal which is running the web server.
| fastmcp dev main.py |
MCP Inspector is started and launches in a new browser tab.
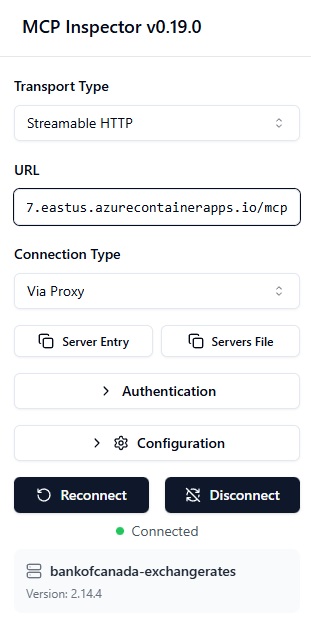
Select the following options then press the connect button:
- Transport Type: Streamable HTTP
- URL: http://0.0.0.0:8000
- Connection Type: Via Proxy
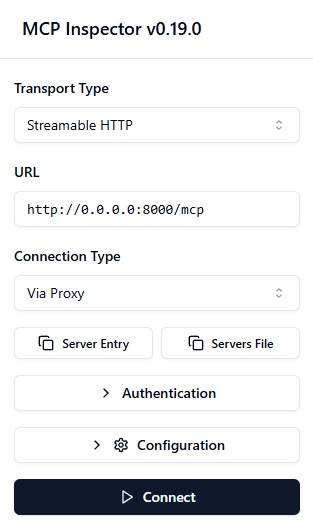
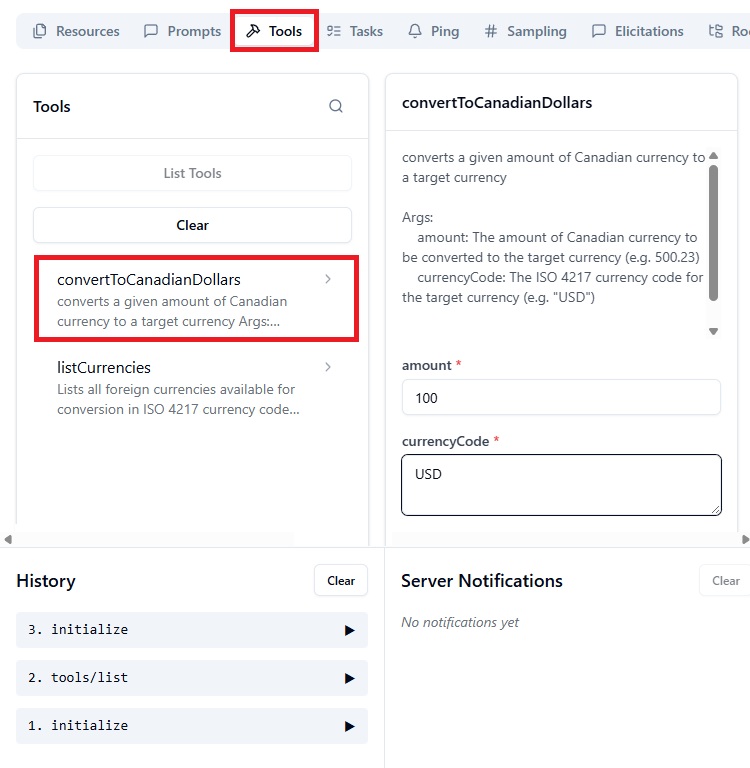
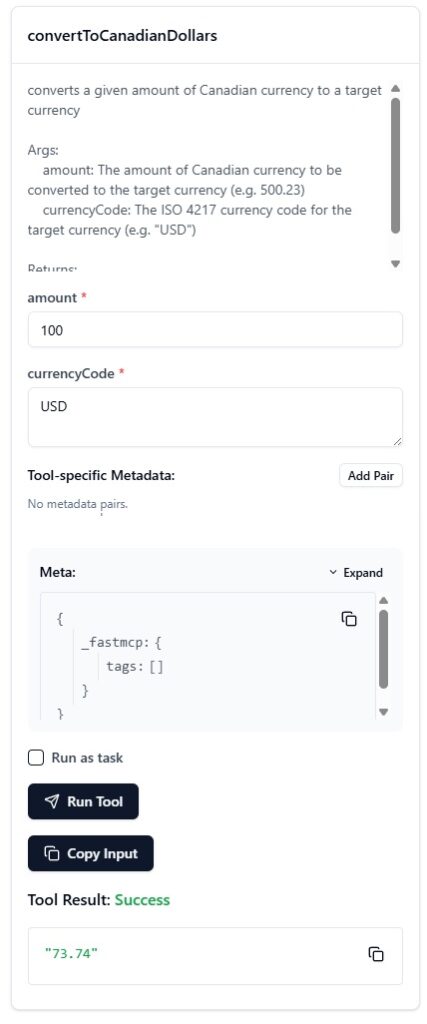
MCP Inspector connects to the MCP server and makes the tools available for testing. Select the tools menu option, then press List Tools and choose convertToCanadianDollars. Input the amount 100 and the currency code USD. This will tell us how many US dollars we can get for 100 Canadian dollars.
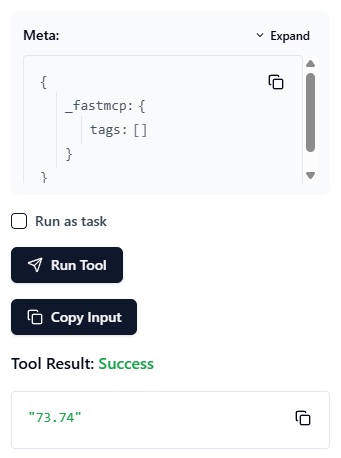
Press the Run Tool button. The MCP server successfully returns the response 73.74 (US dollars).
Deploy The MCP Server To Azure Container App
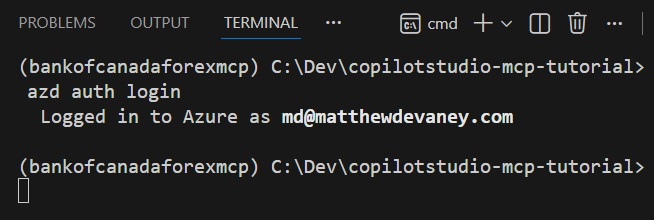
We want to deploy the MCP server to an Azure container app so it is available for agents to use. Open the terminal in VS code and type this command.
| azd auth login |
It will prompt a login to an Azure user account. The user account chosen will be used to create new resources in Azure. If the command is not recognized, make sure you have installed the Azure command line interface from the prerequisites.
Once a user account is authenticated we will perform the deployment. Deployment is orchestrated using these files:
| File | Purpose |
| infra/main.bicep | Deployment automation script for Azure |
| infra/resources.bicep | Defines Azure resources created by main.bicep |
| Azure.yaml | Instructs the deployment to use DockerFile |
| DockerFile | Builds an image with Python and libraries needed to run main.py, exposes port 8000 and uses a command to run main.py |
Open Docker Desktop. Docker needs to be open on the local machine during the deployment to use the Dockerfile. Then run this command to start the deployment:
| azd up |
The first time a deployment is performed, answer these initial setup questions. After the first successful deployment their values will be saved and they will not be asked again:
| Question | Value |
| Enter a unique environment name | copilotstudio-mcp-tutorial-20260130 |
| Select an Azure Subscription to use | <your subscription name> |
| Enter a value for the ‘environmentName’ infrastructure parameter | boc-forex |
| Pick a resource group to use | create a new resource group |
| Select a location to create the resource group in | <nearest to your location> |
| Enter a name for the new resource group | rg-copilotstudio-mcp-tutorial-20260130 |
The deployment will run for a few minutes and show a success message once its done.
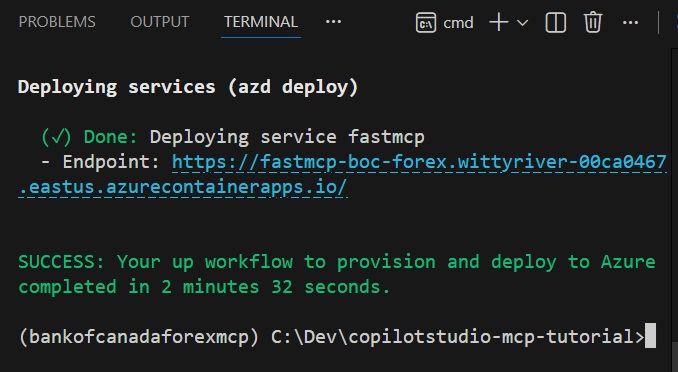
Find the link to the Azure deployment in the terminal and open it in a web browser.
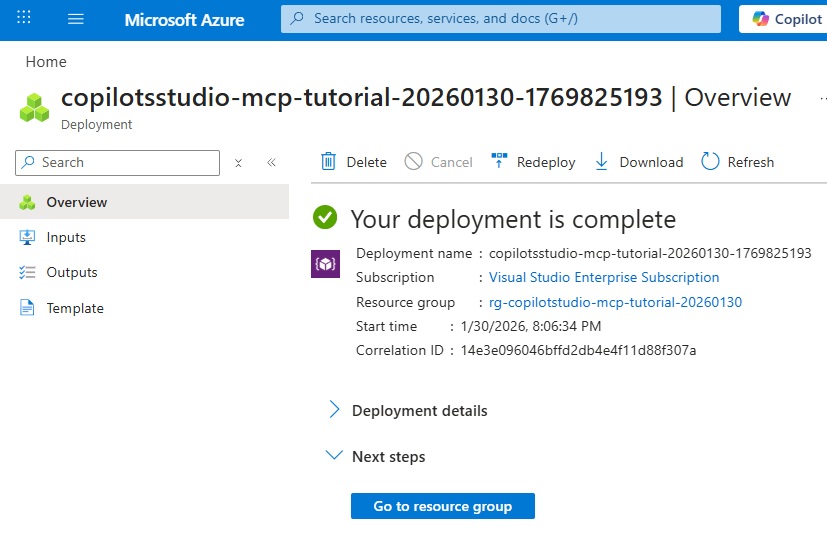
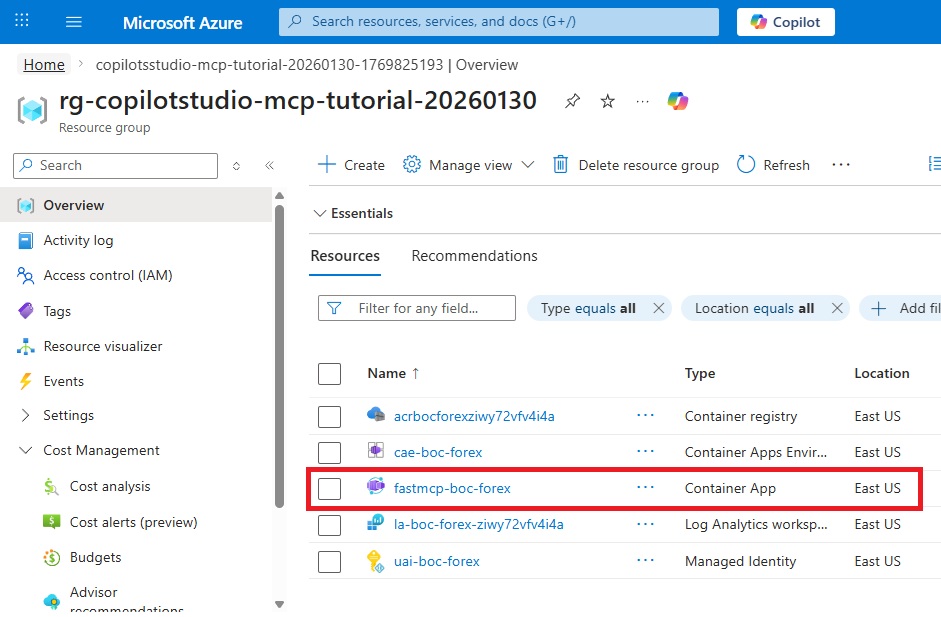
Then navigate to the container app to view its details.
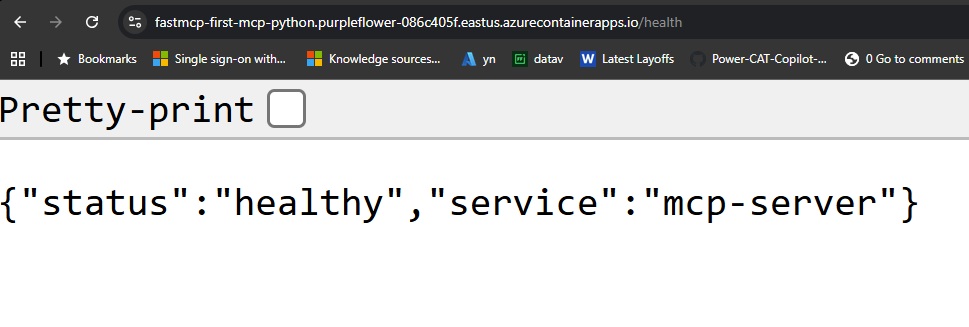
Check The MCP Server Health Endpoint
We included a /health endpoint in the main.py file to provide an easy way to check if the MCP server is deployed properly. Copy the application URL from the container app overview page.
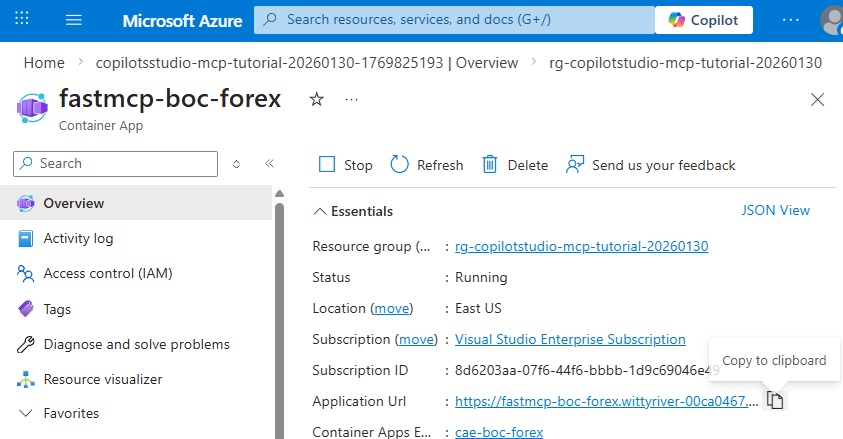
Then paste it into a web browser and type /health at the end. If the MCP server is working this message will be displayed.
Test The Deployed MCP Server Using MCP Inspector
Before connecting the MCP server hosted in a container app to Copilot Studio, we can test it in MCP Inspector. Copy the application URL to the clipboard.
Then open VS code and type this command into the terminal to open MCP Inspector.
| fastmcp dev main.py |
Paste the Azure container app URL into the URL field and add the suffix /mcp. Press the connect button.
Run the convertToCanadianDollars MCP tool and check for a success message.
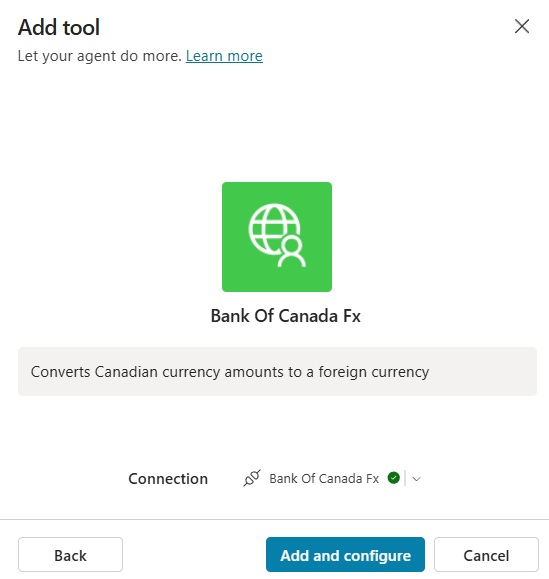
Add An MCP Server Tool To Copilot Studio
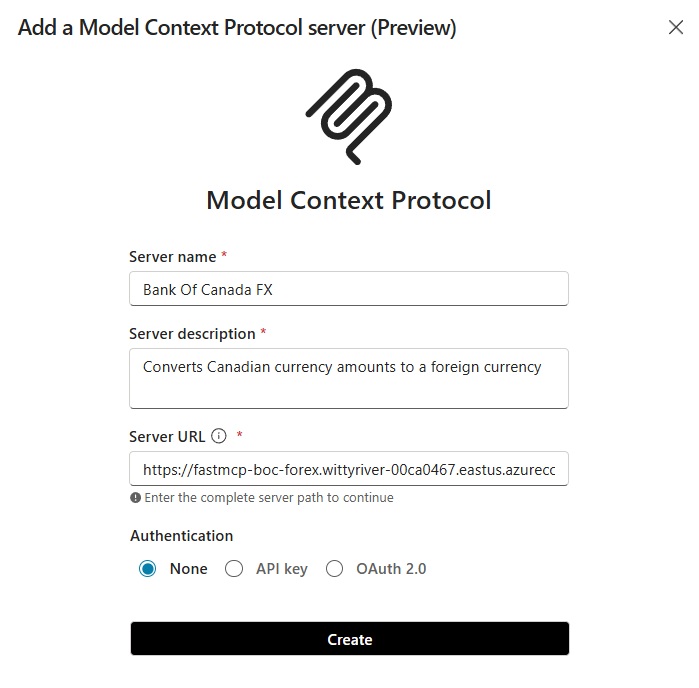
MCP Server are very easy to add to Copilot Studio. Create a new agent then open the tools menu. Select new tool then choose model context protocol.

Give the MCP server a name and description. Then copy and paste the application url from the Azure container app into the server URL field. Remember to append the suffix /mcp to the end of the URL. Select none for authentication then press connect.
Create a new connection for the tool and then press the add and configure button. The MCP server is now available for use by the agent.
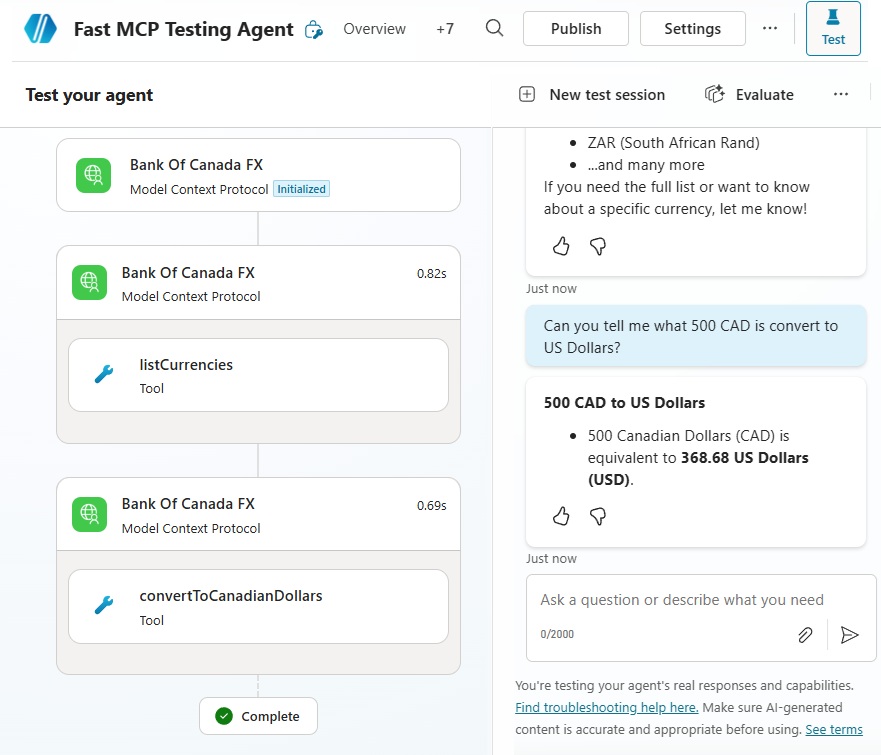
Test The MCP Server In Copilot Studio
We’re done. Ask the agents these questions and it will use the MCP server to respond with an answer:
- “What currencies can you convert CAD into?”
- “Can you tell me what 500 CAD is converted to US dollars?”
Use Azure CLI Commands To Update Or Remove The Azure Resources
If any changes are made to the python file or deployment files in VS code they will need to be redeployed to the Azure Container app. Use this command to push the changes. Ensure you have committed the changes in git first or they will not pushed to Azure.
| azd up |
Once you are finished the tutorial, if you no longer want to keep the Azure container app you can delete the entire resource group using this command.
| azd down |
Video: Copilot Studio: Create An MCP Server With Python
Watch this video to see a demonstration of the techniques described in the tutorial.
Did You Enjoy This Article? 😺
Subscribe to get new Copilot Studio articles sent to your inbox each week for FREE
Questions?
If you have any questions or feedback about Create An MCP Server And Deploy To Copilot Studio please leave a message in the comments section below. You can post using your email address and are not required to create an account to join the discussion.


Génial, pas contre Mattthew, ne PAS installer Python 3.14.0a5 (alpha) qui avait un bug qui tuait silencieusement le processus lors de l’import de fastmcp → aucun message d’erreur, juste un crash
Why do we need to open docker when deploying it in azure? Aren’t we deploying into the cloud? why need to open docker locally?