How To Build Multi-Agent Workflows In Copilot Studio

In Copilot Studio you can use multi-agent workflows to accomplish a single task with the help of multiple agents. By breaking a task down into separate agents with a narrower focus, you will get higher quality outputs, and more predictable results. Multiple agents can also be run in parallel to speed up workflow execution.
Introduction: The Loan Application Reviewer Multi-Agent Workflow
Loan officers at a bank use the Loan Application Reviewer multi-agent workflow to ensure a PDF loan application document is filled-in correctly according to a set of pre-defined rules.
Then, once the review is completed, an agent makes a decision to accept or reject the loan application, and an a email message is sent to the loan applicant.
Setup A SharePoint Document Library
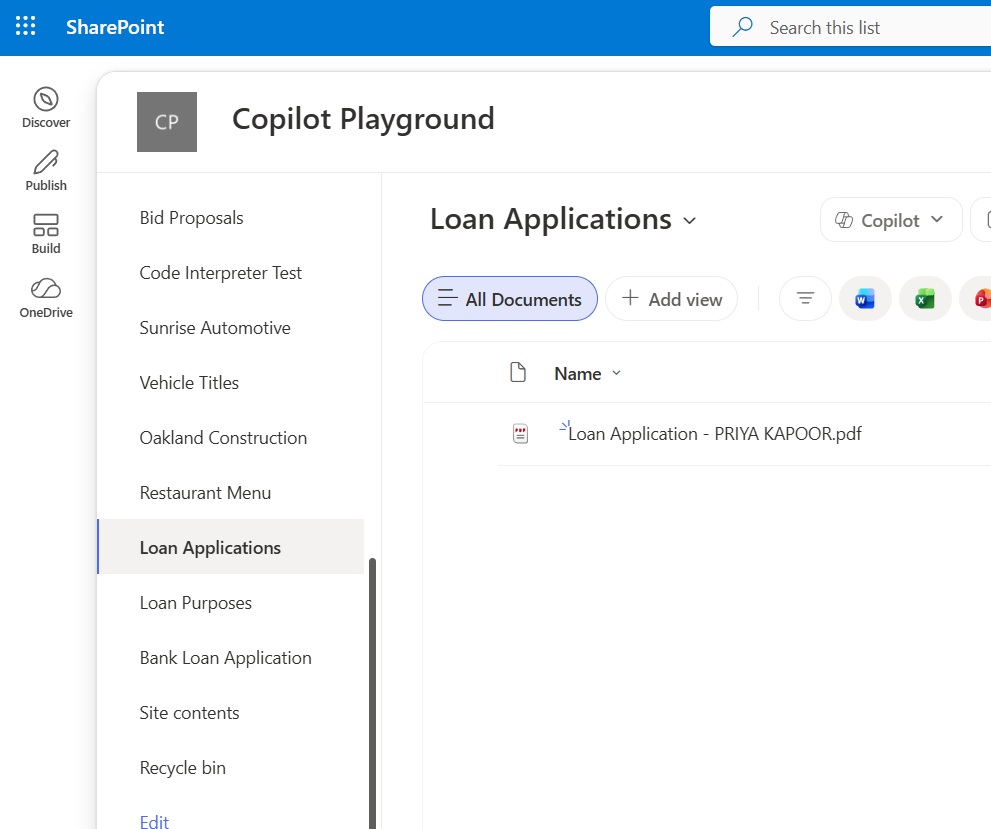
The agent will review PDF loan applications uploaded to a SharePoint document library. Go to SharePoint and create a new document library named Loan Applications. Then get the file Loan Application – PRIYA KAPOOR.pdf from Github and then upload it to SharePoint.
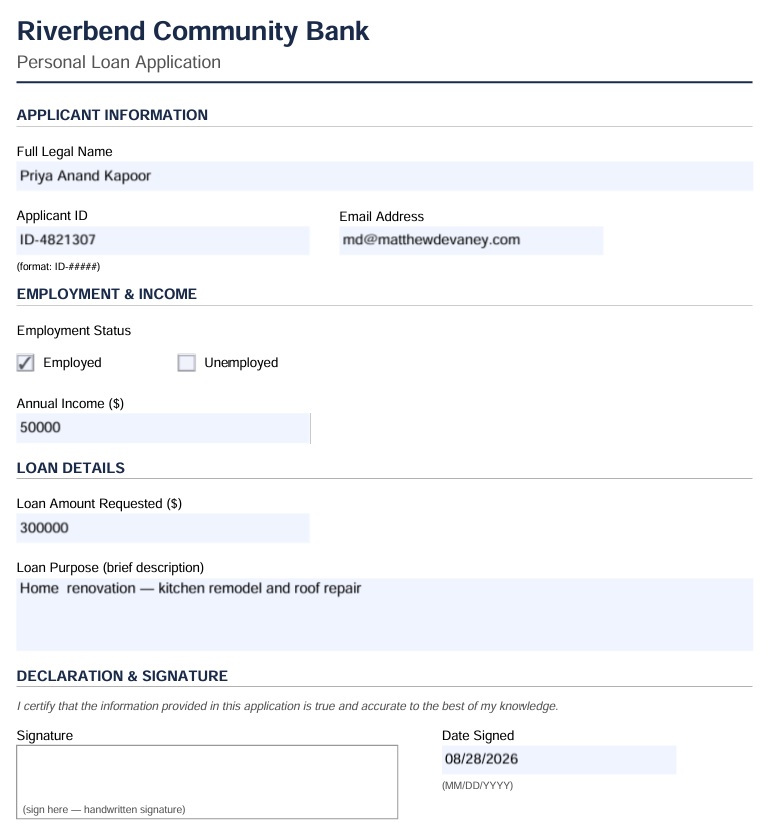
The loan application form for Priya Kapoor includes sample data. Our multi-agent workflow will review the sample data to ensure it is correctly filled-in.
Start A New Workflow In Copilot Studio With A SharePoint Trigger
Open Copilot Studio and create a new workflow named Loan Application Reviewer. Start the workflow with the trigger type Connector and choose the SharePoint – When A File Is Created (Properties Only) trigger. Select the Loan Applications document library.
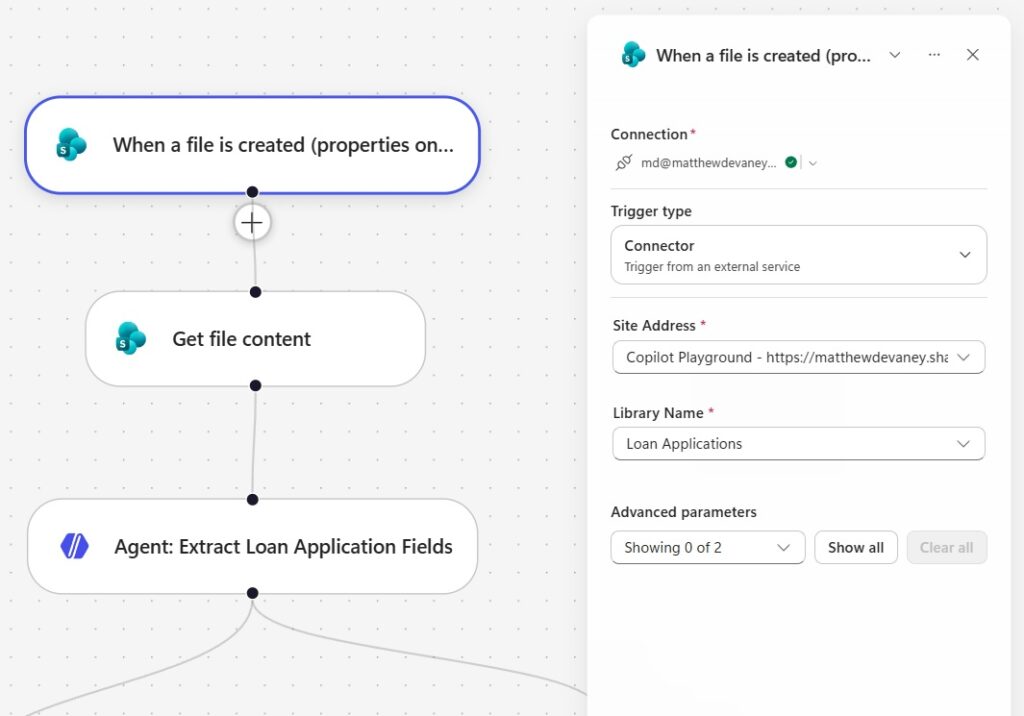
Then we want to get the created file’s content to pass to an agent. Insert a SharePoint – Get File Content action into the workflow and use the identifier value from the trigger in the File Identifier field.
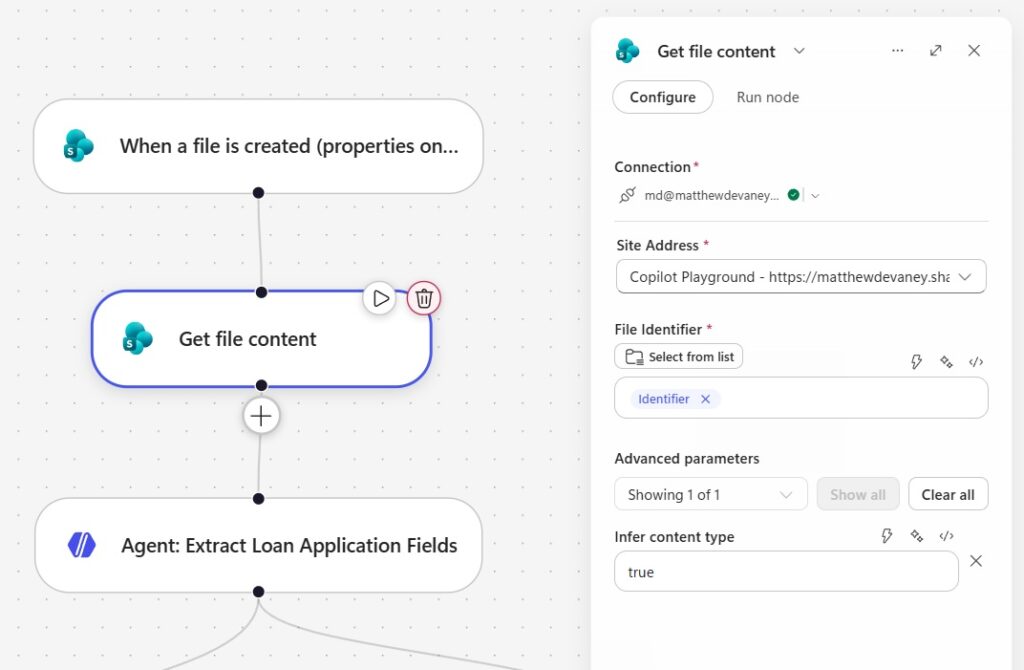
Create An Agent To Extract PDF Document Fields
The first agent in our workflow will be used to extract fields from the PDF loan application. Add an agent node to the workflow.
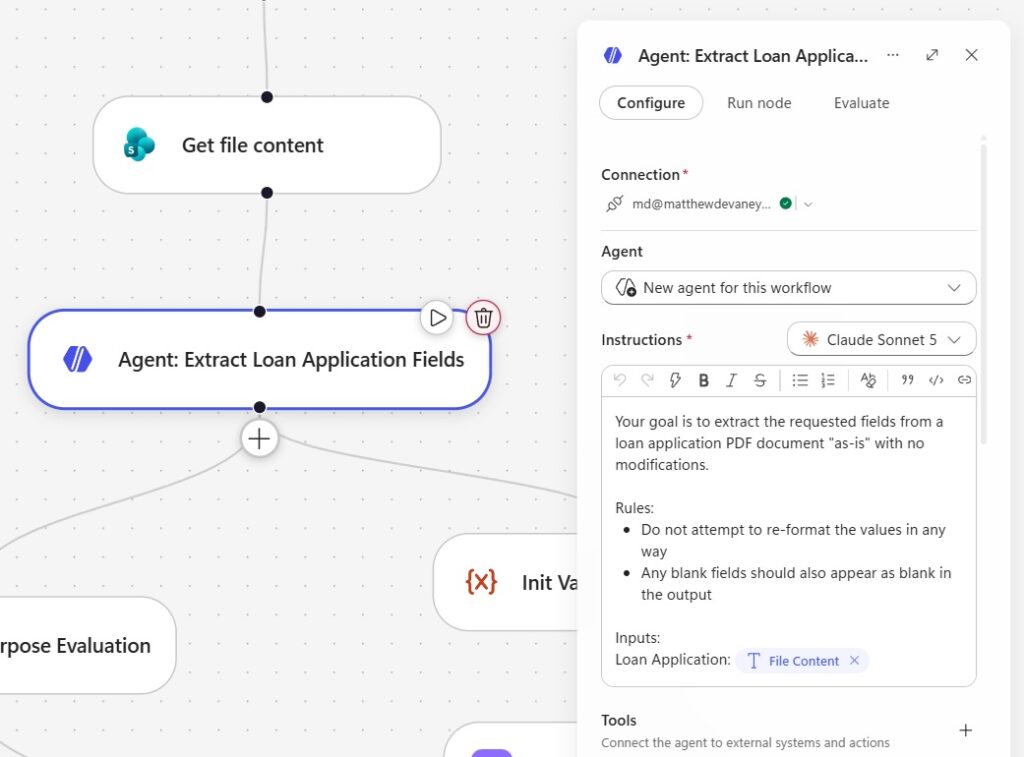
Then copy and paste the following instructions into the agent and pass the file content from the previous workflow action to the agent.
| Your goal is to extract the requested fields from a loan application PDF document “as-is” with no modifications. Rules: * Do not attempt to re-format the values in any way * Any blank fields should also appear as blank in the output Inputs: Loan Application: [File Content] |
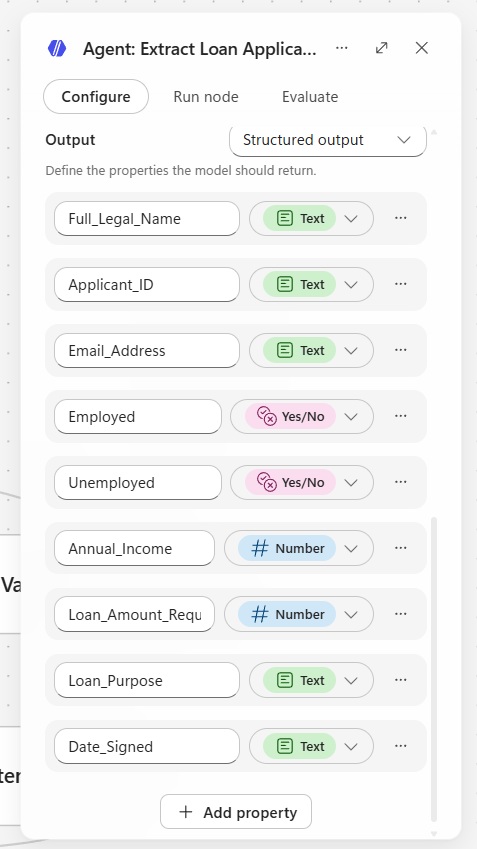
Choose the output method structured output then add a property for each field to be extracted along with its data type.
Test The Extract PDF Fields Agent
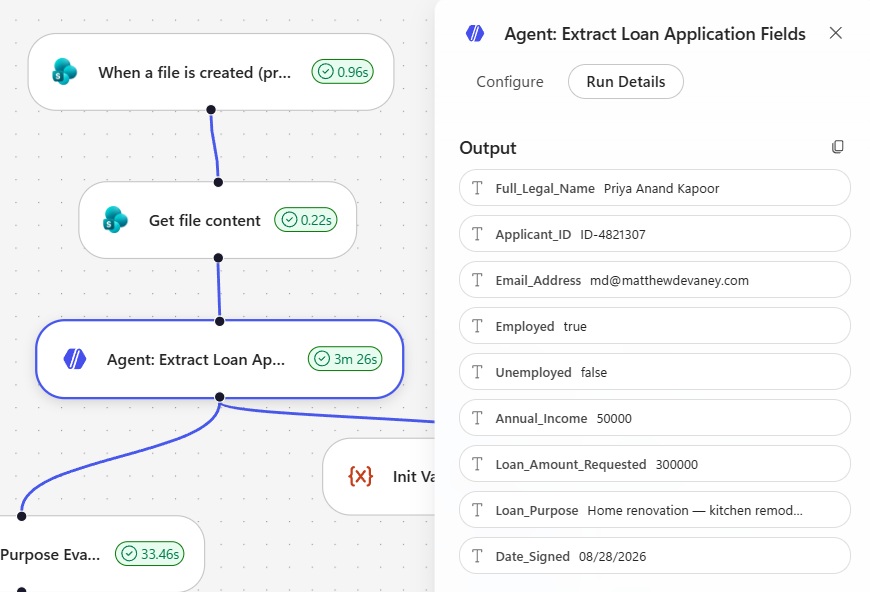
Before we go any further, its a good idea to check if the agent is working as intended. Save and publish the workflow. Then, start a new test run and re-upload the Loan Application PDF to the SharePoint document library. The agent should read the values from the PDF as shown below.
Validate The PDF Document Fields Against Hardcoded Rules
After the agent extracts all fields from the PDF their values must be validated against a set of rules. There are two ways to validate a rule: hardcoded logic and agentic reasoning.
Add an Initialize Variable action to the workflow and name the variable varRulesEngine. Select the variable type array.
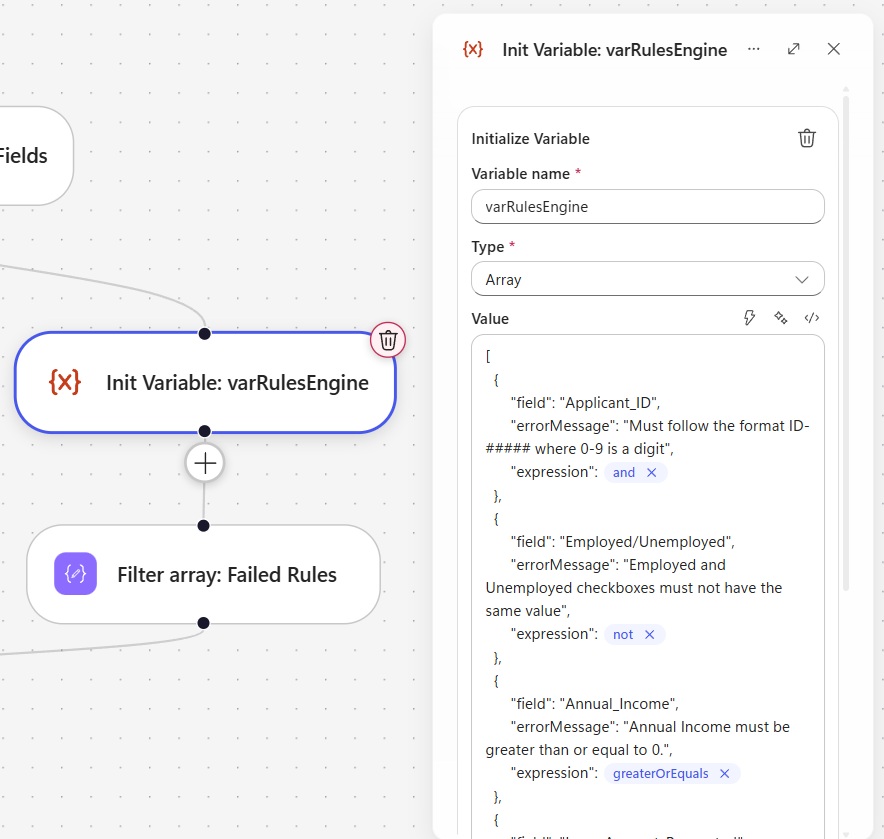
In this example, the following field values will be evaluated through hardcoded logic. We will write and expression for each rule that evaluates to true (pass) or false (fail).
| Applicant_ID – Must follow the format ID-##### where 0-9 is a digit Employed/Unemployed – Employed and Unemployed checkboxes must not have the same value Annual_Income: – Must be greater than or equal to 0 Loan_Amount_Requested: – Must be greater than or equal to 0 – Must be less than or equal to 5x the value in the “Annual_Income” field |
Copy and paste this code into the Value property of the Initialize Variable action.
[
  {
      "field": "Applicant_ID",
      "errorMessage": "Must follow the format ID-##### where 0-9 is a digit",
      "expression": @{and(startsWith(body('Agent__Extract_Loan_Application_Fields')?['structuredOutput/Applicant_ID'], 'ID-'), equals(length(body('Agent__Extract_Loan_Application_Fields')?['structuredOutput/Applicant_ID']), 8), and(greaterOrEquals(int(substring(body('Agent__Extract_Loan_Application_Fields')?['structuredOutput/Applicant_ID'], 3, 5)), 0), lessOrEquals(int(substring(body('Agent__Extract_Loan_Application_Fields')?['structuredOutput/Applicant_ID'], 3, 5)), 99999)))}
  },
  {
      "field": "Employed/Unemployed",
      "errorMessage": "Employed and Unemployed checkboxes must not have the same value",
      "expression": @{not(equals(body('Agent__Extract_Loan_Application_Fields')?['structuredOutput/Employed'], body('Agent__Extract_Loan_Application_Fields')?['structuredOutput/Unemployed']))}
  },
  {
      "field": "Annual_Income",
      "errorMessage": "Annual Income must be greater than or equal to 0.",
      "expression": @{greaterOrEquals(body('Agent__Extract_Loan_Application_Fields')?['structuredOutput/Annual_Income'], 0)}
  },
  {
      "field": "Loan_Amount_Requested",
      "errorMessage": "Must be greater than or equal to 0",
      "expression": @{greaterOrEquals(body('Agent__Extract_Loan_Application_Fields')?['structuredOutput/Loan_Amount_Requested'], 0)}
  },
  {
      "field": "Loan_Amount_Requested",
      "errorMessage": "Must be less than or equal to 5x the value in the Annual Income field",
      "expression": @{lessOrEquals(body('Agent__Extract_Loan_Application_Fields')?['structuredOutput/Loan_Amount_Requested'], mul(body('Agent__Extract_Loan_Application_Fields')?['structuredOutput/Annual_Income'], 5))}
  }
]Code language: JSON / JSON with Comments (json)
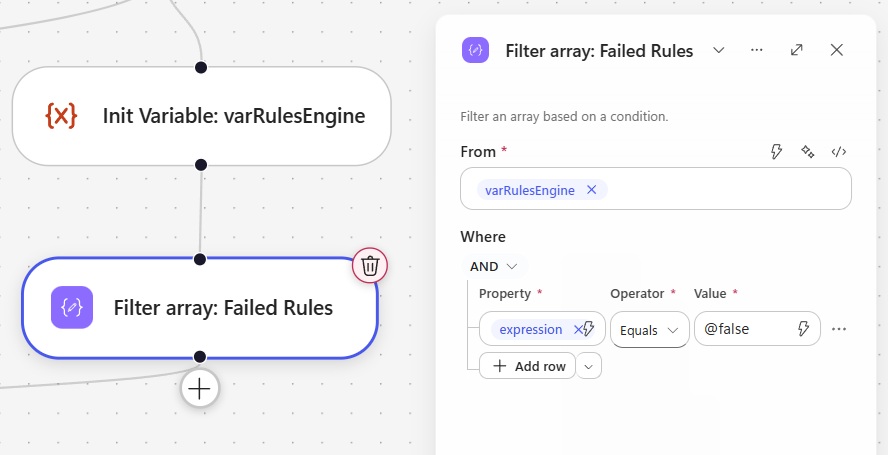
Once the rules have been evaluated, we only want to pass the failed tests and their error messages to the Response Writer agent. The Response Writer agent will be created later in the workflow.
Insert a Filter Array action into the workflow and choose the varRulesEngine variable. Then set the filter condition to when the expression field equals the value false.
Test The Hardcoded Field Validation Rules
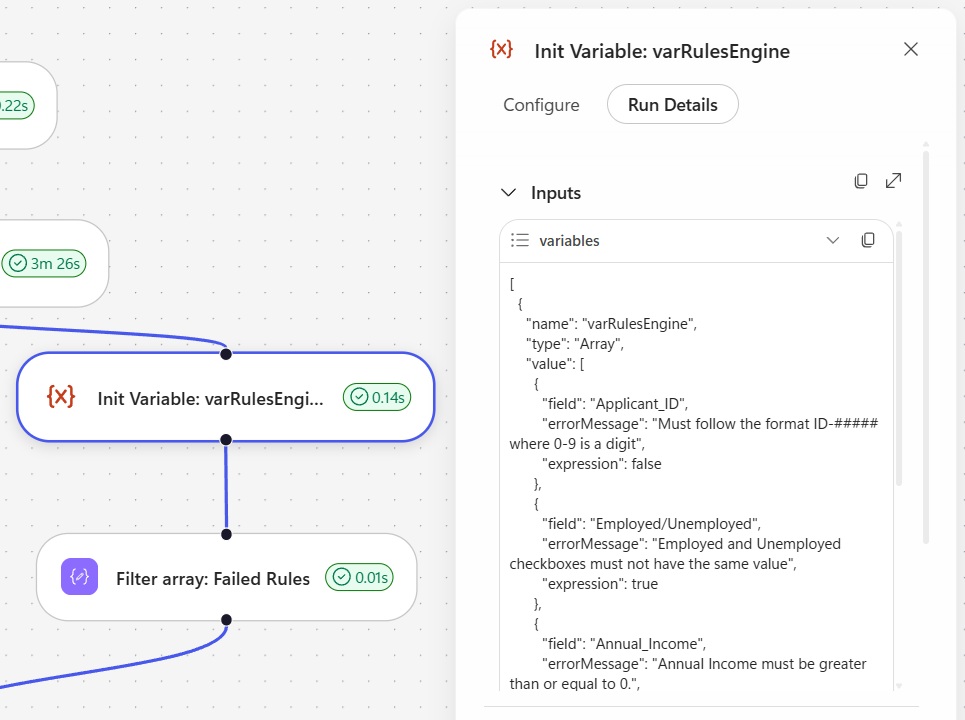
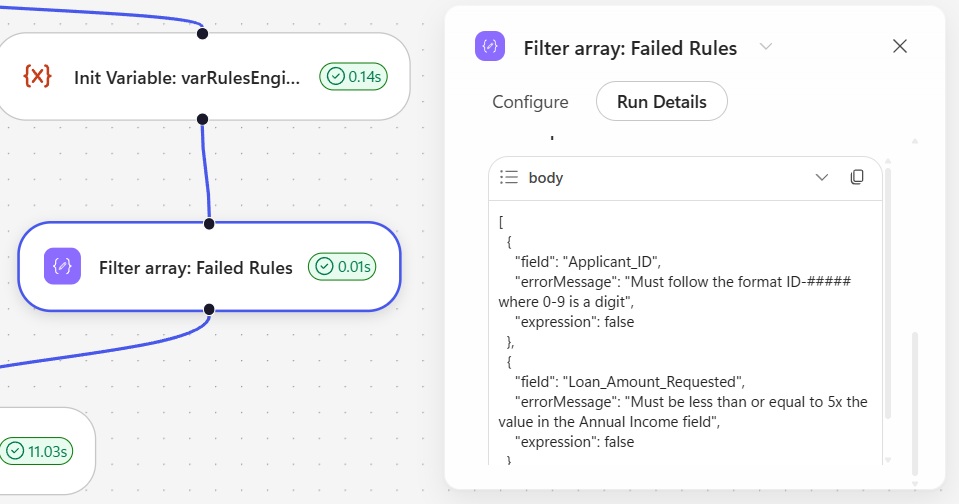
Validation rules should be tested against a variety of different scenarios. Save and publish the workflow, then test the PDF Loan Application multiple times. Each time, enter a new set of values and determine whether they are expected to pass or fail. Compare any predictions against the actual result.
The result of the Loan Application for Priya Kapoor looks like this:
And only two rules are expected to fail validation:
Add A SharePoint Knowledge Agent
Validating the Loan Purpose field in the PDF Loan Application requires agentic reasoning. We cannot use hardcoded logic to test whether the value in a free-form text field matches one of the pre-approved loan purposes in a SharePoint list.
Insert a new agent node into the workflow directly after the Extract PDF Fields Agent. This agent should run in parallel with the hardcoded field validation rules.
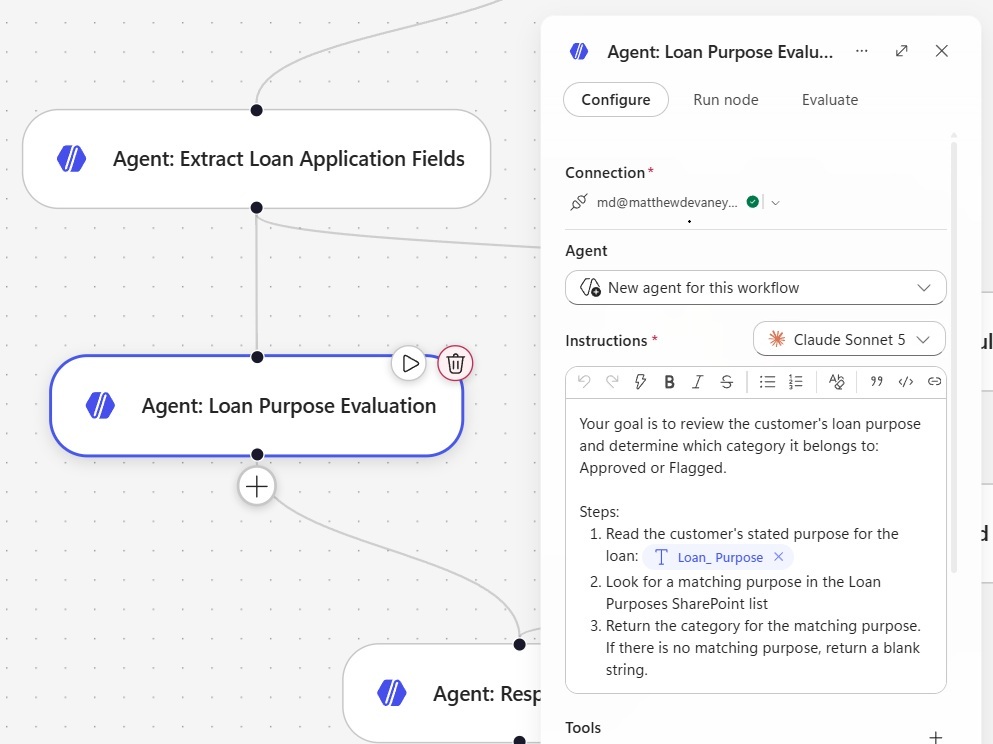
Copy and paste the following instructions into the agent.
| Your goal is to review the customer’s loan purpose and determine which category it belongs to: Approved or Flagged. Steps: 1. Read the customer’s stated purpose for the loan: [Loan Purpose] 2. Look for a matching purpose in the Loan Purposes SharePoint list 3. Return the category for the matching purpose. If there is no matching purpose, return a blank string. |
Select structured output and have the agent return a single text field named category.
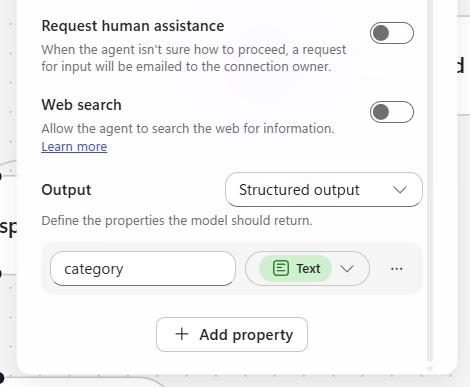
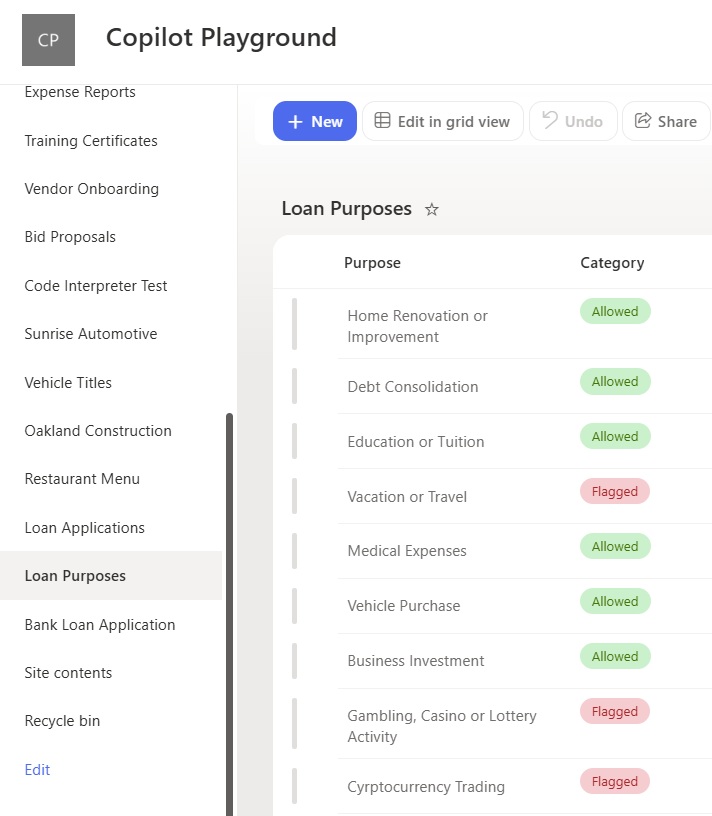
The SharePoint knowledge agent requires a list of loan purposes to check for a valid reason. Create a new SharePoint list named Loan Purposes and populate it with the following data.
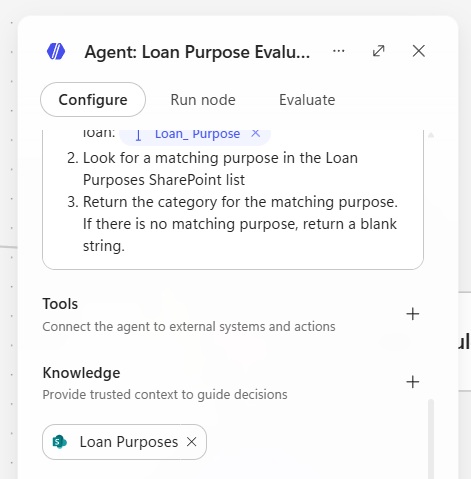
Add the newly created SharePoint list to the agent.
Design The Email Response Writer Agent
Now that the hardcoded logic validations and the agentic reasoning validation have been completed, we must decide whether to approve or reject the loan an write an email response to the loan applicant.
Add a new agent to the workflow. The agent only should run after all actions in each parallel workflow branch are finished.
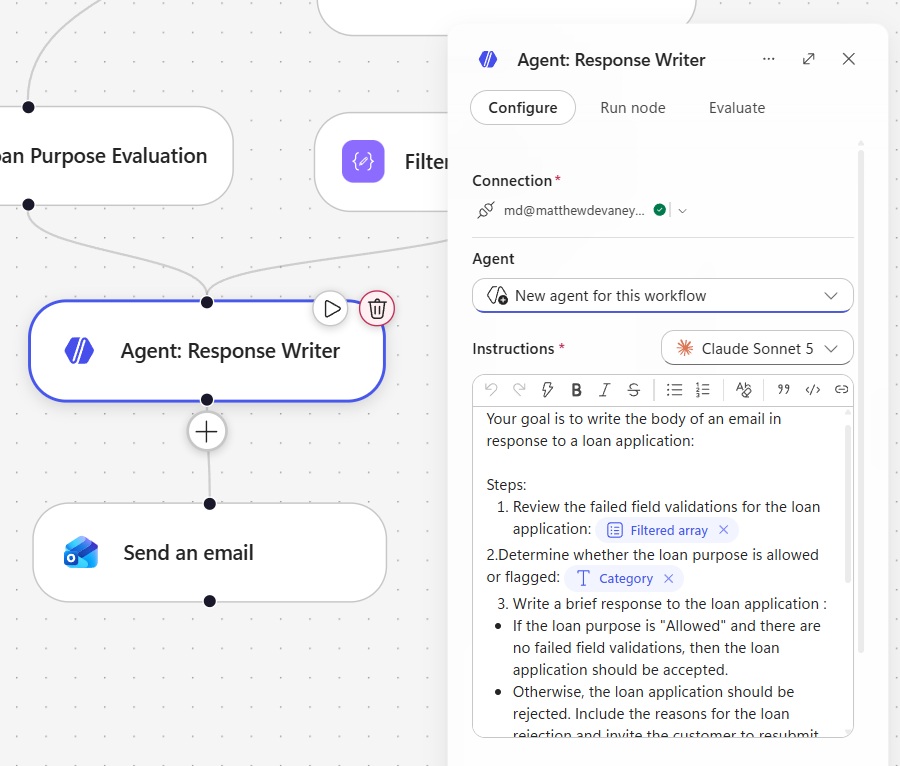
Copy and paste the following instructions into the agent.
| Your goal is to write the body of an email in response to a loan application: Steps: 1. Review the failed field validations for the loan application: [Filtered array] 2.Determine whether the loan purpose is allowed or flagged: [Category] 3. Write a brief response to the loan application : * If the loan purpose is “Allowed” and there are no failed field validations, then the loan application should be accepted. * Otherwise, the loan application should be rejected. Include the reasons for the loan rejection and invite the customer to resubmit the loan application. Response Format: * Output as HTML code with paragraphs * Do not include code language identifiers such as “`html * Do not include a subject line * Use a polite professional tone in the response * Loan application rejection reasons should always be in a bulleted list * Each rejection reason should be limited to 1 sentence and be communicated to a non-technical person |
Send An Email Response To The Loan Applicant
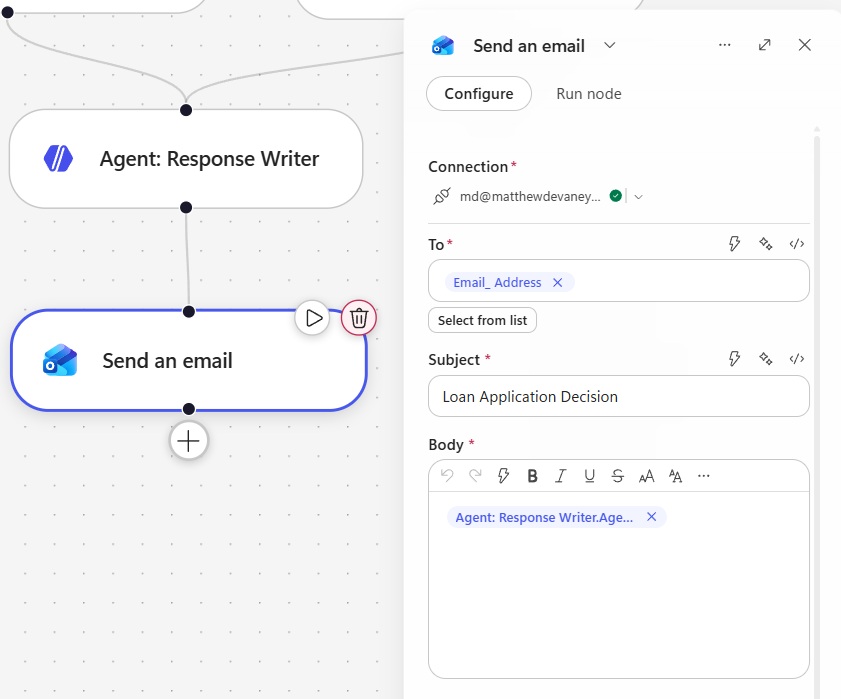
The purpose of the response writer agent was only to generate a response. Now we want to send an email to the loan applicant and inform them we’ve accepted their loan application, or rejected their loan application with a list of reasons for the rejection.
Insert a new Outlook – Send An Email action to the workflow. Send the email to the Email Address extracted from the PDF loan application. Use the Response Writer Agent’s output in the body of the action.
Test The Multi-Agent Workflow From End-To-End
We’ve finished building the entire multi-agent workflow. Save and publish the agent, then test the workflow one more time.
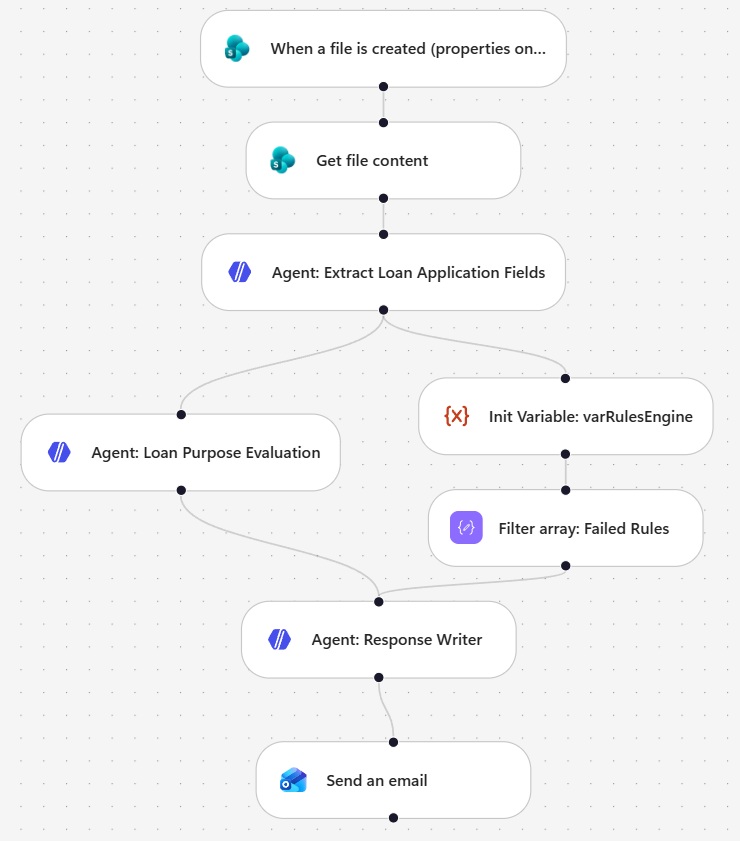
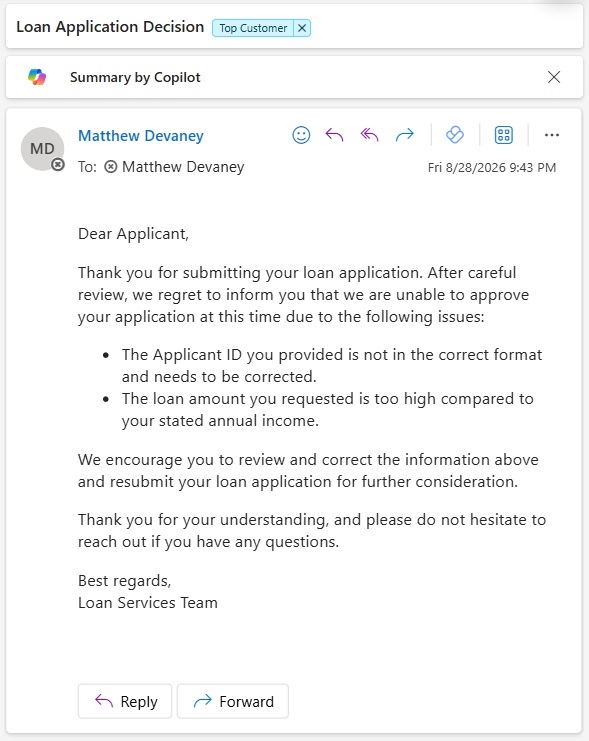
Once the workflow is completed, the loan applicant should receive a rejection notice just like the one shown below.
Video: Multi-Agent Workflows In Copilot Studio
Watch this video for a full demonstration of how to build the multi-agent workflow outlined in this tutorial.
Did You Enjoy This Article? 😺
Subscribe to get new Copilot Studio articles sent to your inbox each week for FREE
Questions?
If you have any questions or feedback about How To Build Multi-Agent Workflows In Copilot Studio please leave a message in the comments section below. You can post using your email address and are not required to create an account to join the discussion.