Copilot Studio Autonomous Agent To Read & Write Excel Files

With Copilot Studio autonomous agents, you can give any Agent the ability to read and write to an Excel file. When the agent is triggered, its can read an Excel file’s contents using code interpreter. Then it uses its instructions and knowledge to determine which cell values to update and uses and agent flow to write them to the spreadsheet. In this tutorial I will show you how to create your own Excel autonomous agent in Copilot Studio.
Introduction: The Excel Autonomous Agent
The autonomous agent has the ability to read any Excel file, use its instructions and knowledge to determine what to do next, and then write values back to the spreadsheet.
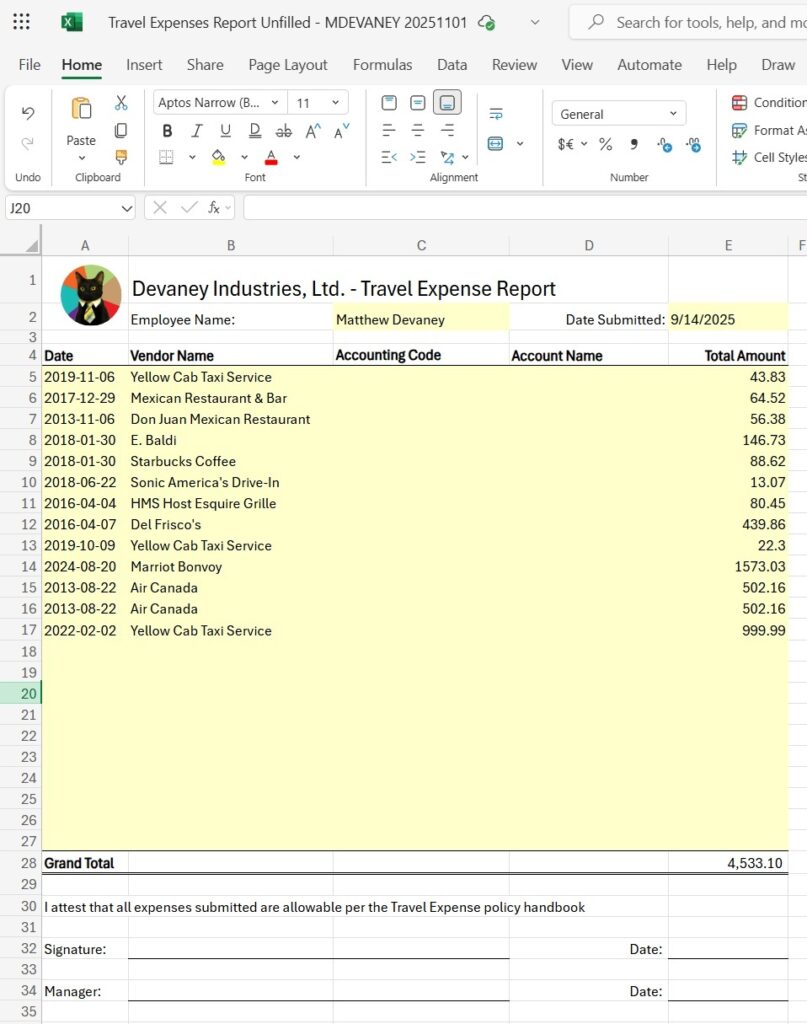
In this example, the Copilot Studio agent reads a travel expense report Excel file and writes the the proper account codes and account names on each line.

Setup A SharePoint Document Library
The Excel files being read and written to by the Copilot Studio Agent will be stored in a SharePoint document library. Create a new document library named Expense Reports.
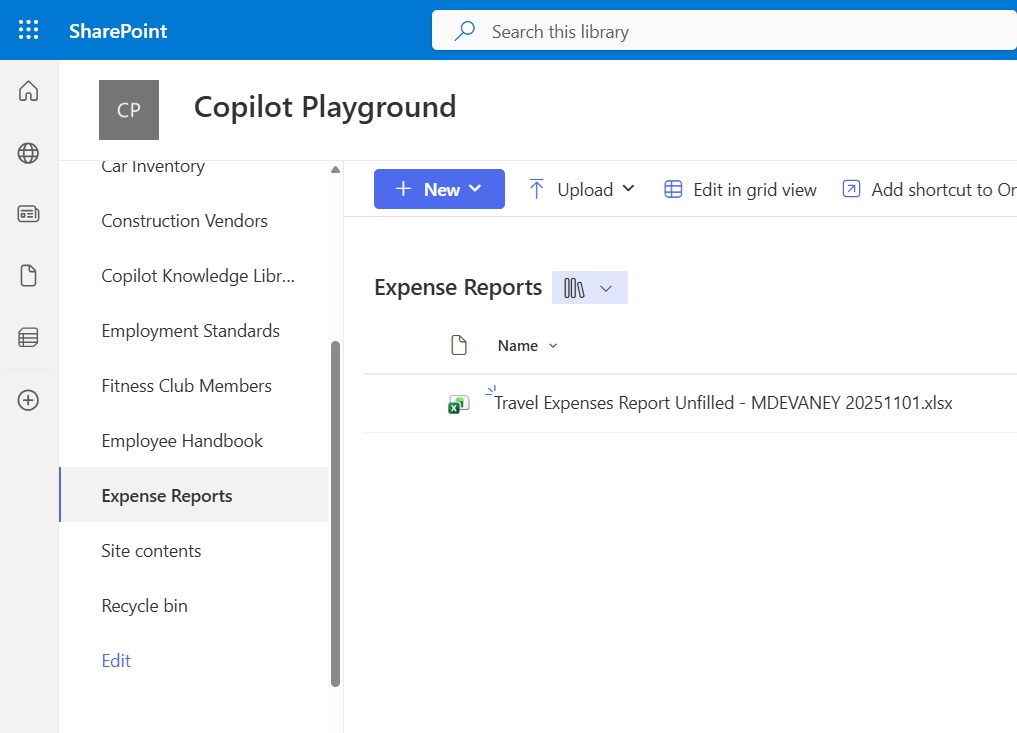
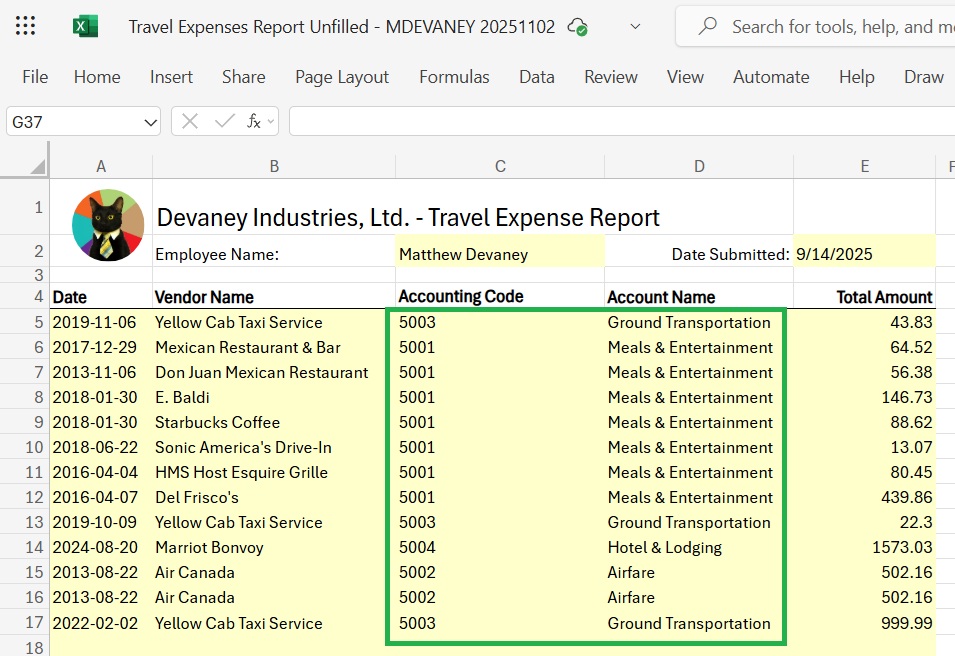
Then add the Travel Expense report Excel file to the document library. The travel expense report Excel file can be downloaded using this link. This expense report is partially completed with the date, vendor name and total amounts. The Agent will determine the account code and account name for each line and write it to the Excel file.
Create An Excel Autonomous Agent In Copilot Studio
Create a new Copilot Studio Agent named Excel Auto Agent. Enable generative orchestrations mode and update the Agent’s model to GPT-5 Chat.
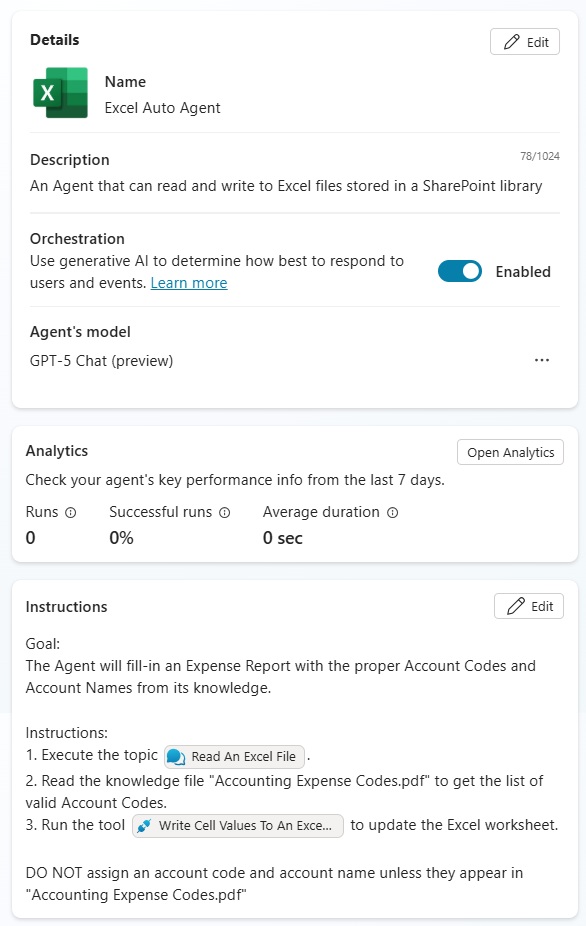
Use this description for the Excel autonomous Agent.
| An Agent that can read and write to Excel files stored in a SharePoint library |
Give the Copilot Studio Agent the following instructions.
| Goal: The Agent will fill-in an Expense Report with the proper Account Codes and Account Names from its knowledge. Instructions: 1. Execute the topic [Read An Excel File]. 2. Read the knowledge file “Accounting Expense Codes.pdf” to get the list of valid Account Codes. 3. Run the tool [Write Cell Values To An Excel Worksheet] to update the Excel worksheet. DO NOT assign an account code and account name unless they appear in “Accounting Expense Codes.pdf” |
Add A When File Is Created In SharePoint Trigger
The Agent will be triggered when a new file is created in the SharePoint document library. Press the add trigger on the Agent’s overview tab.

Select the when a file is created (properties only) trigger from the menu.

Choose the SharePoint site and library name where the Excel file are located. Then press the Create Trigger button.

Read An Excel File Using A Copilot Studio Agent
The Copilot Studio autonomous Agent will read an excel file to understand its contents. To do this, add new topic named Read An Excel File to the Agent.

Create an new input variable to store the full path to the Excel file that was capture within the trigger. Go to the topic’s Details menu, then select the input tab and add a new variable. Use these settings for the input variable:
- Variable name: CreatedFileFullPath
- How will the agent fill this input? Dynamically fill with best option
- Variable data type: String
- Description: The full path of the file created to trigger the Agent
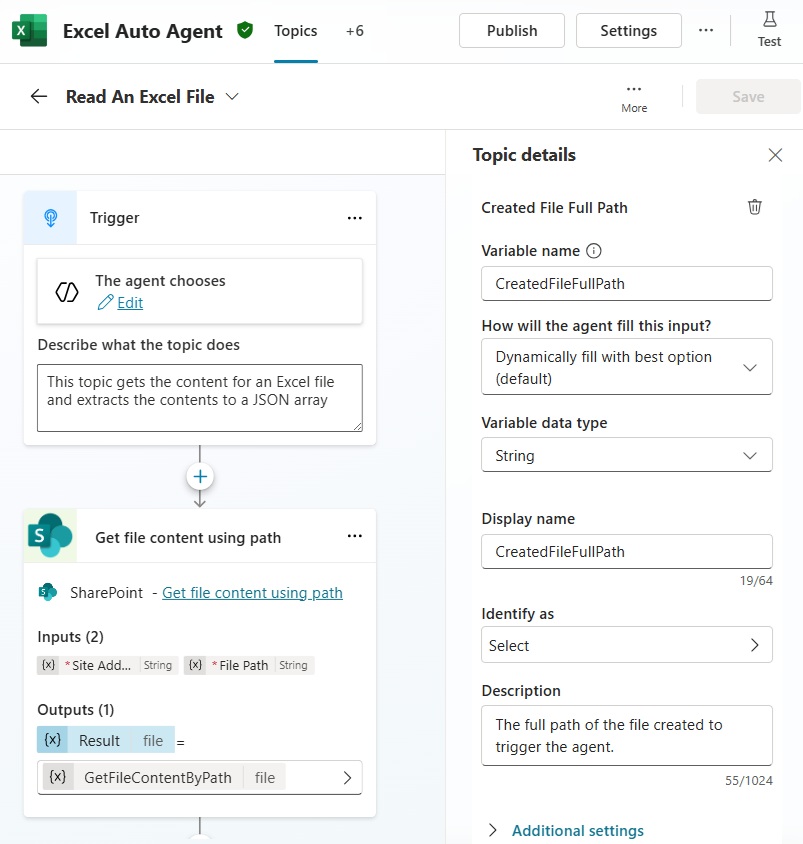
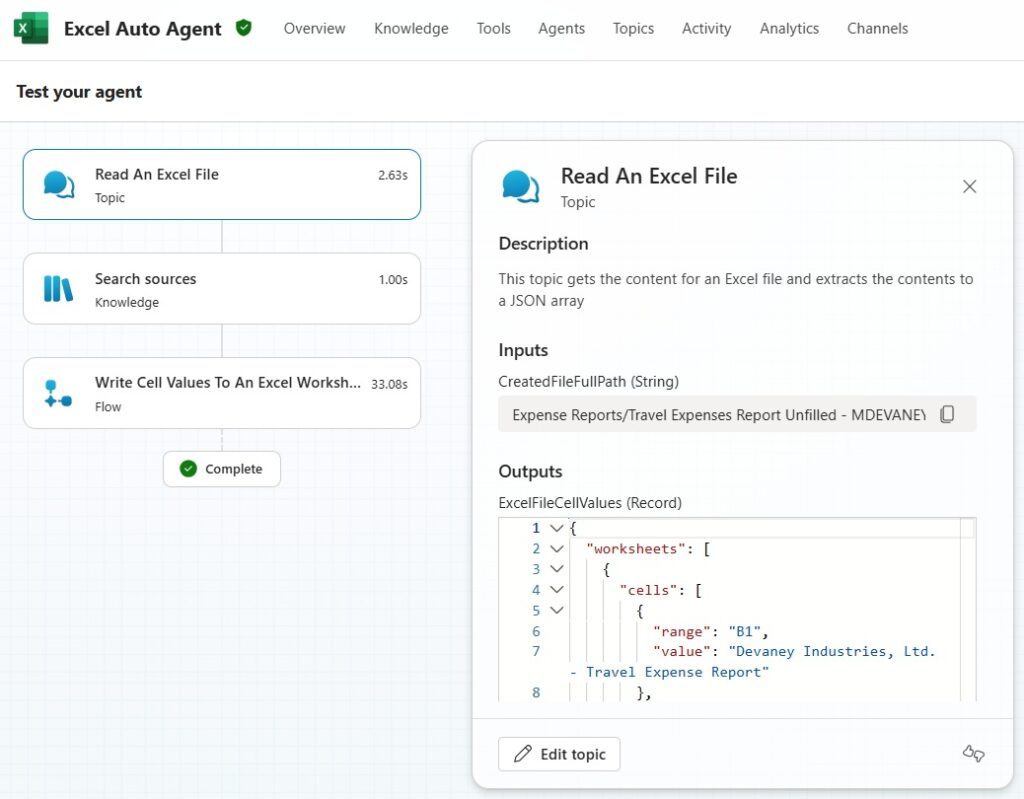
Use the Agent chooses trigger type and write this description for the topic.
| This topic gets the content for an Excel file and extracts the contents to a JSON array. |
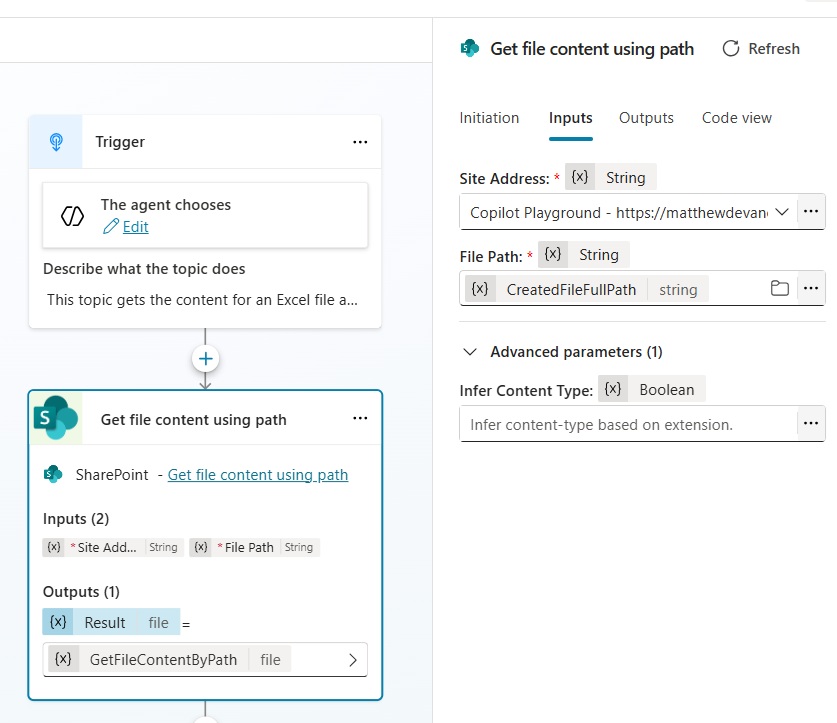
Add a SharePoint – Get File Content Using Path connector node to the Agent to get the Excel file content. Then select the document library site address and its file path using the CreatedFileFullPath input variable.
Use A Code Interpreter Prompt To Read Excel Worksheet Values
We will use an AI Prompt to read all values in the Excel file and output them to a JSON object of ranges, cell values, and worksheets. Create a new prompt node in Copilot Studio named Excel File Worksheet Values To JSON.
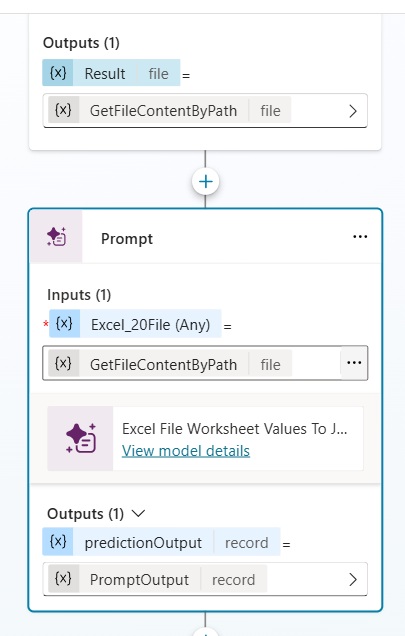
The prompt accepts an Excel file as input. Then it iterates over all worksheets in the file to extracts their values.
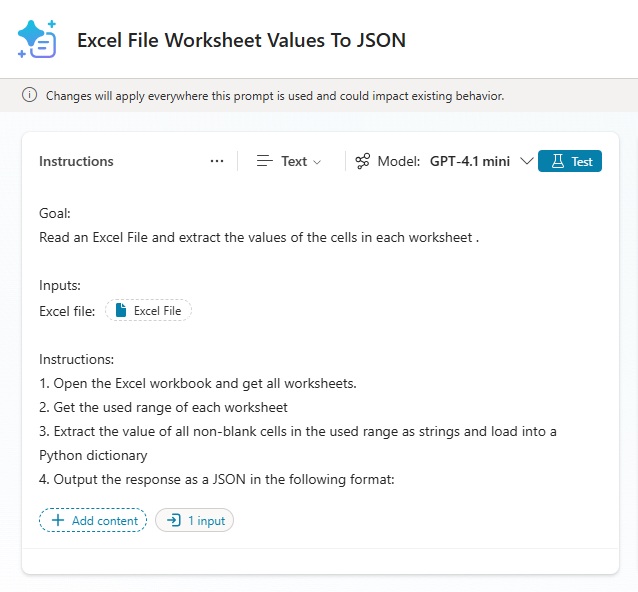
Copy and paste these instructions into the prompt editor. Use the document variable type for the Excel file input variable.
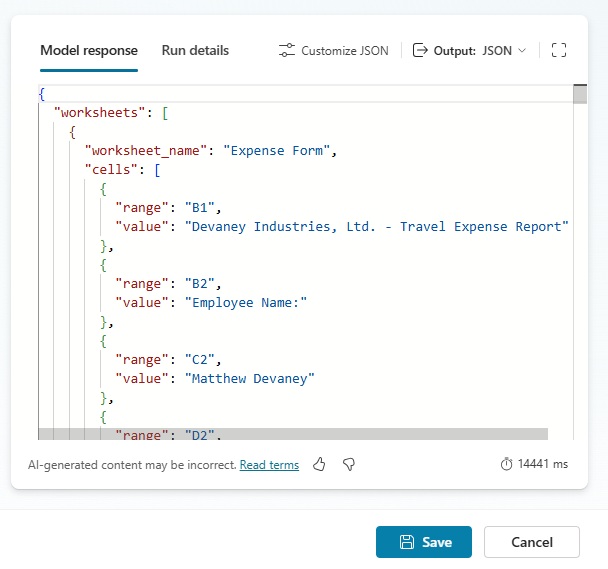
| Goal: Read an Excel File and extract the values of the cells in each worksheet . Inputs: Excel file: [Excel File] Instructions: 1. Open the Excel workbook and get all worksheets. 2. Get the used range of each worksheet 3. Extract the value of all non-blank cells in the used range as strings and load into a Python dictionary 4. Output the response as a JSON in the following format: { “worksheets”: [ { “worksheet_name”: “Tab1”, “cells”: [ {“range”: “A1”, “value”: “myvalue1”}, {“range”: “B1”, “value”: “myvalue2”}, {“range”: “C3”, “value”: “myvalue3”} ] }, { “worksheet_name”: “Tab2”, “cells”: [ {“range”: “A1”, “value”: “myvalue1”}, {“range”: “B1”, “value”: “myvalue2”}, {“range”: “C3”, “value”: “myvalue3”} ] } ] } |
Enable code interpreter give the prompt and ability to accept an Excel file as an input and read its contents.
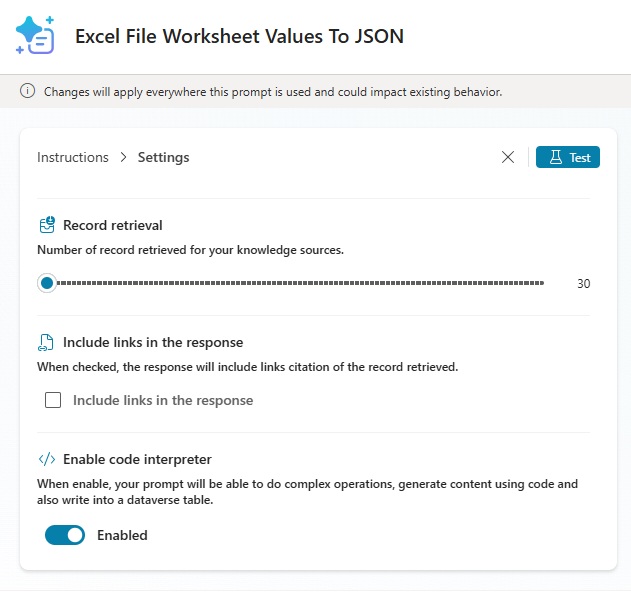
Select the JSON output type then run a test on the prompt. The JSON output will look like this. Save and close the prompt editor window and return to Copilot Studio.
Store The Excel File Values In A Output Variable
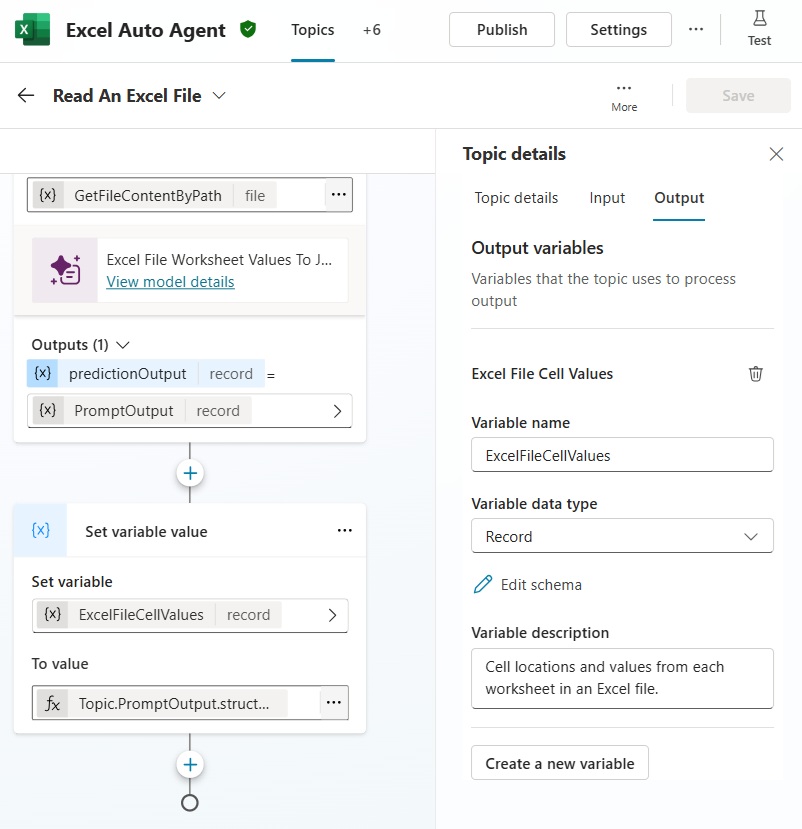
The JSON object containing ranges, cell values and worksheets will be used by other tools so we must store in an output variable. Go to the topic details menu, select outputs, then add a new output variable with these values:
- Variable Name: ExceFileValues
- Variable Data Type: Record (schema is available below)
- Variable Description: Cell locations and values from each worksheet in an Excel file
Use this schema for the record data:
kind: Record
properties:
  worksheets:
    type:
      kind: Table
      properties:
        cells:
          type:
            kind: Table
            properties:
              range: String
              value: String

        worksheet_name: StringCode language: JavaScript (javascript)
Upload Knowledge To The Excel Autonomous Agent
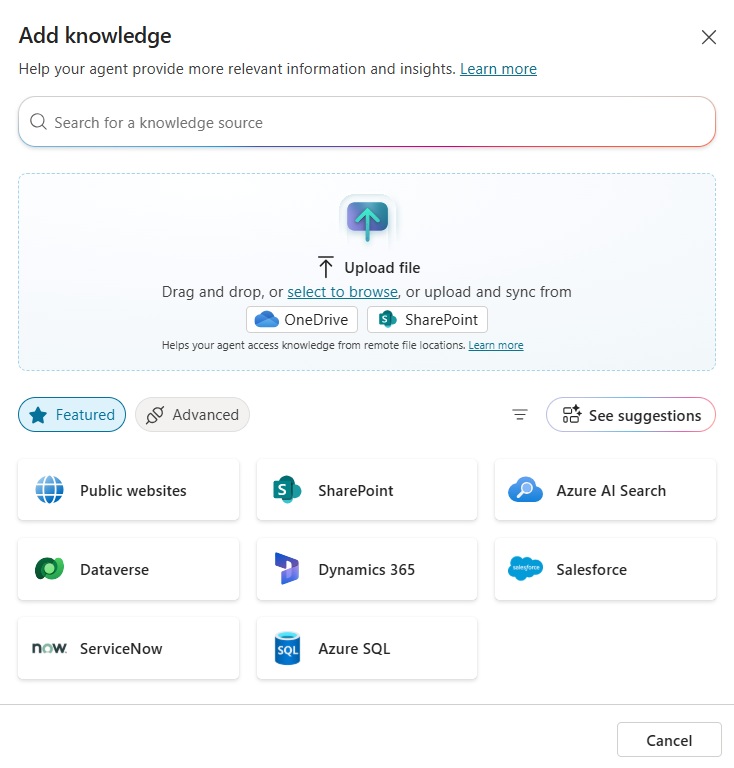
The Copilot Studio Agent needs a list of valid accounting expense codes to write to the Excel file. We will upload a PDF of accounting expense codes to the Agent’s knowledge. Go to the knowledge section of the Agent overview tab and press the add knowledge button.
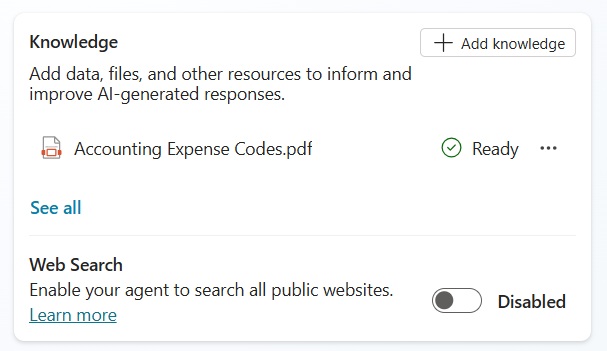
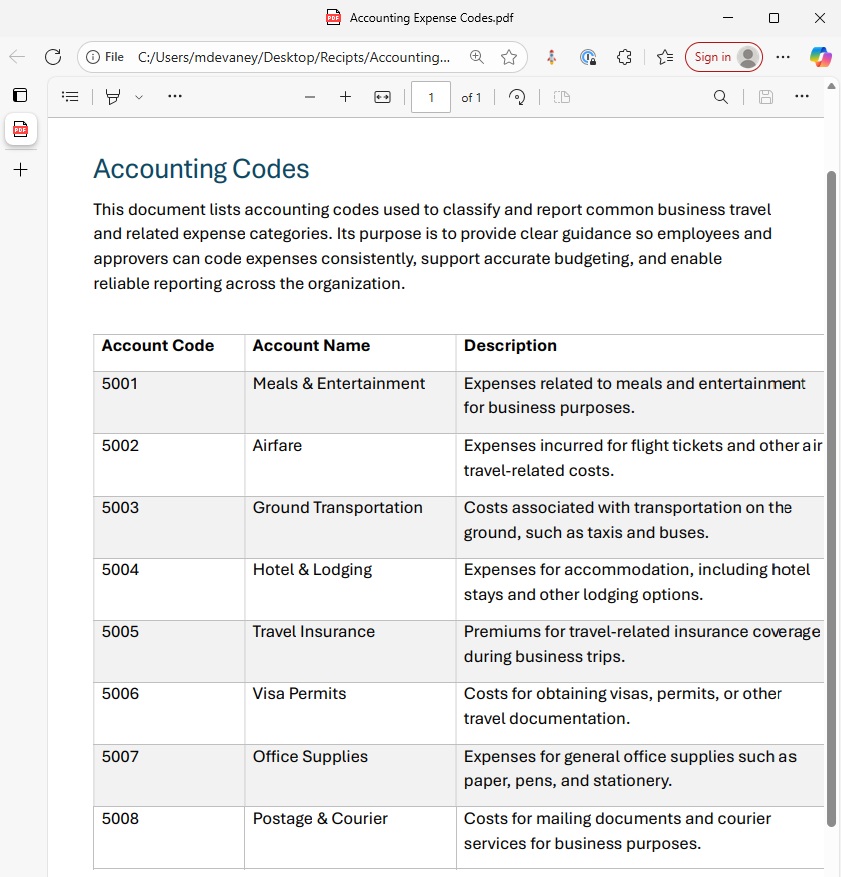
The Accounting Expense Codes can be downloaded using this link. It includes account codes, account names and descriptions to help the Agent decide which code to apply.
In the add knowledge menu, drag and drop the accounting expense codes PDF onto the upload file area and wait for the file to upload.
Once the PDF is uploaded open the knowledge component to view its details.
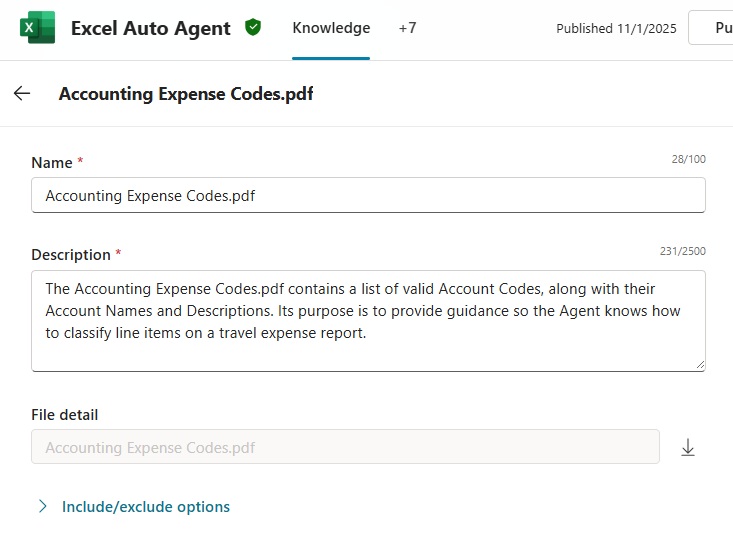
Use this description to let the Agent know how the Accounting Expense Codes.pdf should be used.
| The Accounting Expense Codes.pdf contains a list of valid Account Codes, along with their Account Names and Descriptions. Its purpose is to provide guidance so the Agent knows how to classify line items on a travel expense report. |
Create A Tool To Write Values To An Excel Worksheet
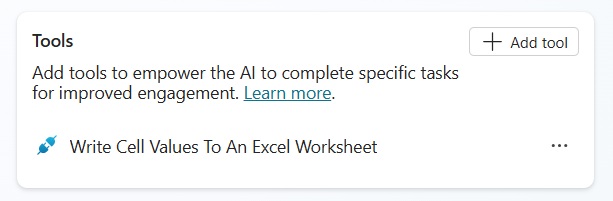
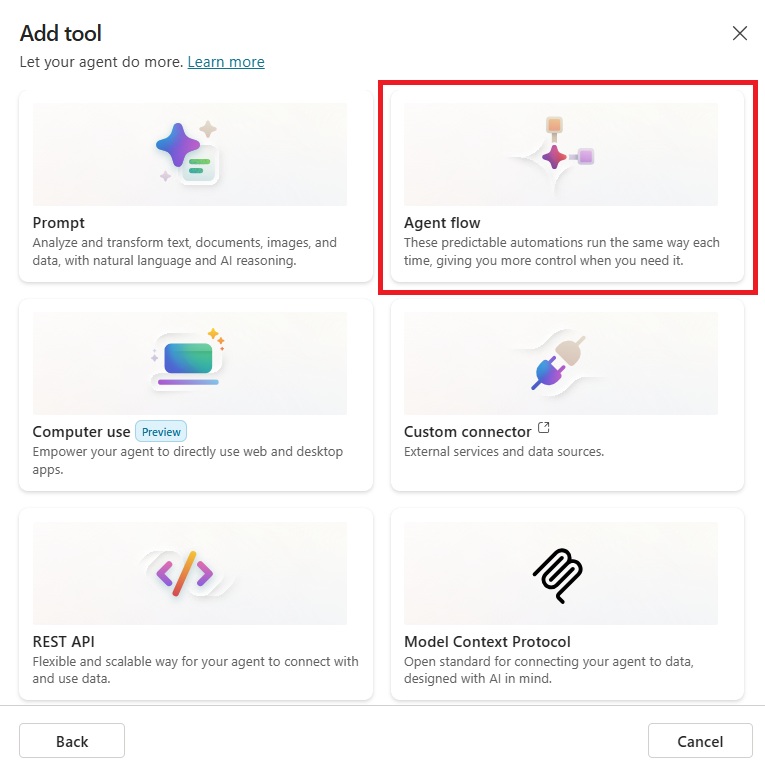
Once the Agent has read the Excel file and used its knowledge to determine what cells to update it will use a tool to write cell values to a worksheet. We must create this tool as a new Agent flow. Go to the Tools section in the Agent’s overview and press the add tool button.
Select Agent flow.
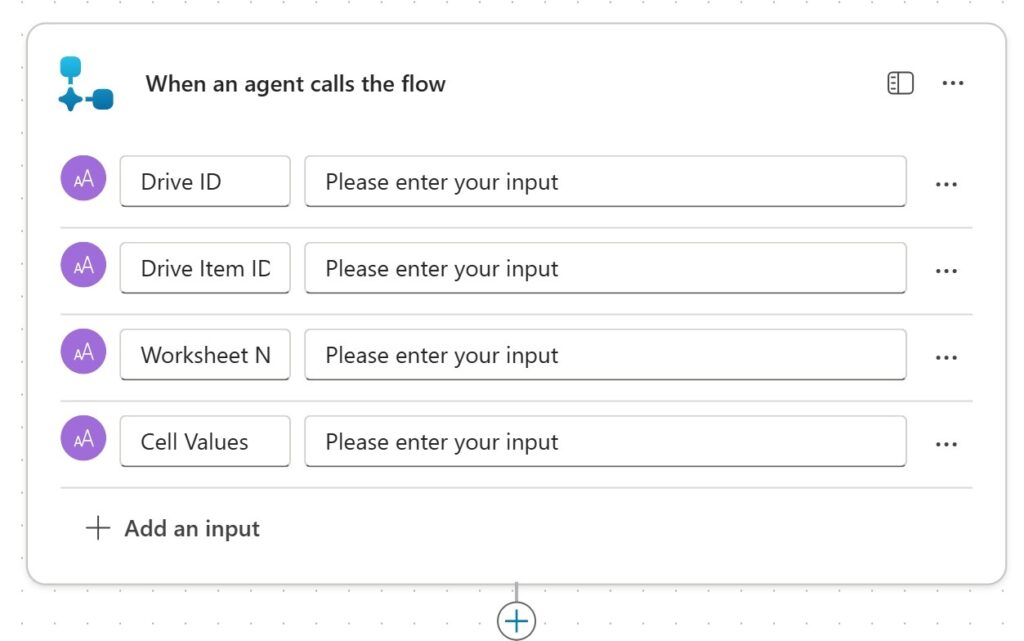
The Agent flow editor menu appears with a trigger named when an agent calls the flow. Add these text type inputs to the flow:
- Drive ID
- Drive Item ID
- Worksheet Name
- Cell Values
Parse The Cell Values Into A JSON Array
The cell values are input as a text type variable. But we need them to be a JSON array instead so the Agent flow can use its values. Add a Parse JSON action to the flow and supply the cell values input variable to the content field.
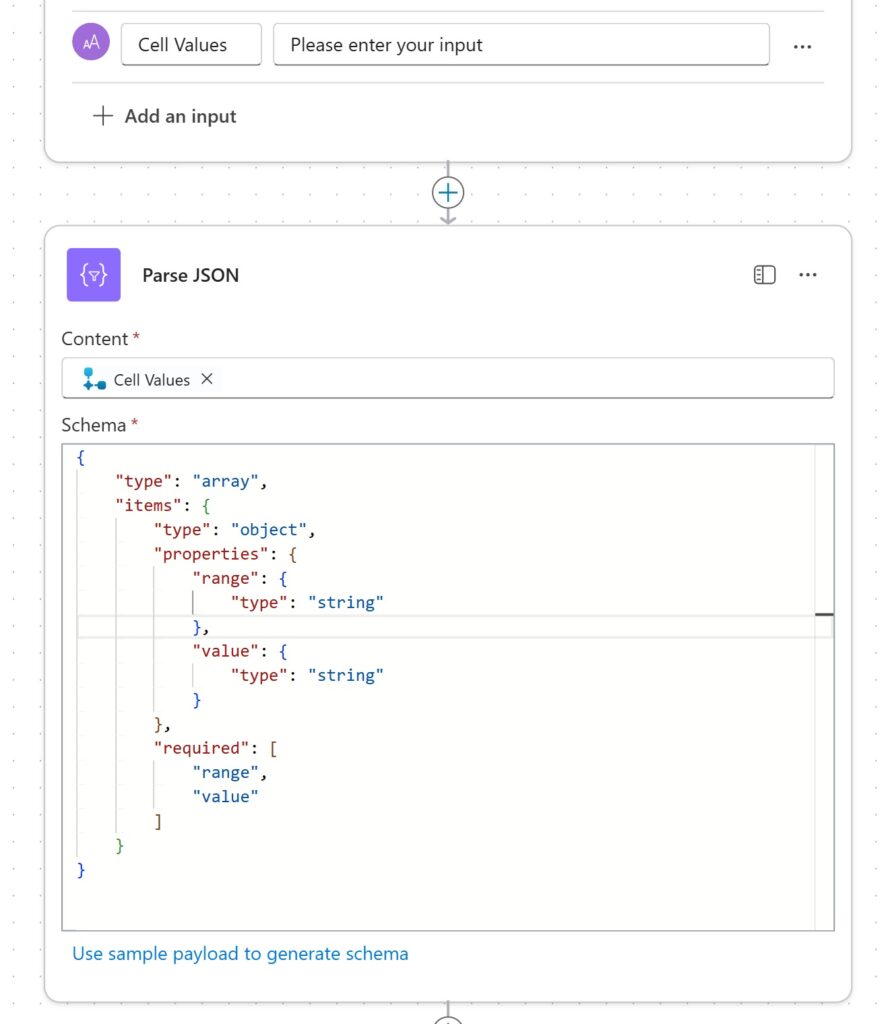
Use this code as the JSON array schema.
{
    "type": "array",
    "items": {
        "type": "object",
        "properties": {
            "range": {
                "type": "string"
            },
            "value": {
                "type": "string"
            }
        },
        "required": [
            "range",
            "value"
        ]
    }
}Code language: JSON / JSON with Comments (json)
Write Cells To An Excel Worksheet Using The Graph API
The Agent work through the the array of cell values and ranges and write them to the Excel file one-by-one. Add an apply to each loop to the agent flow and use the Parse JSON action body in the select an output from previous steps field.
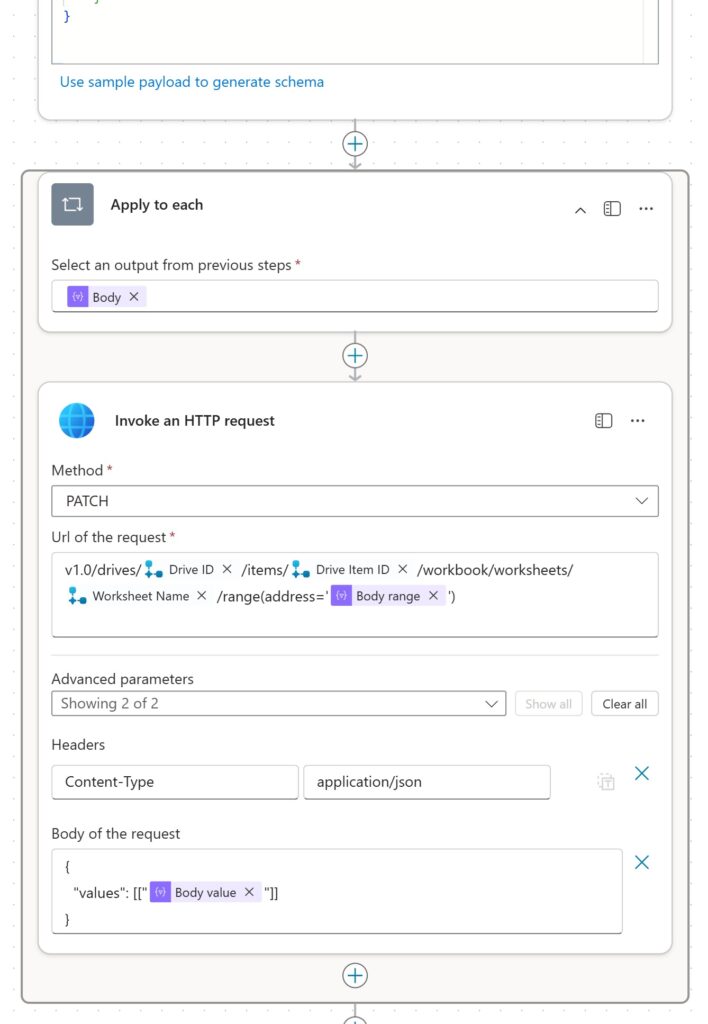
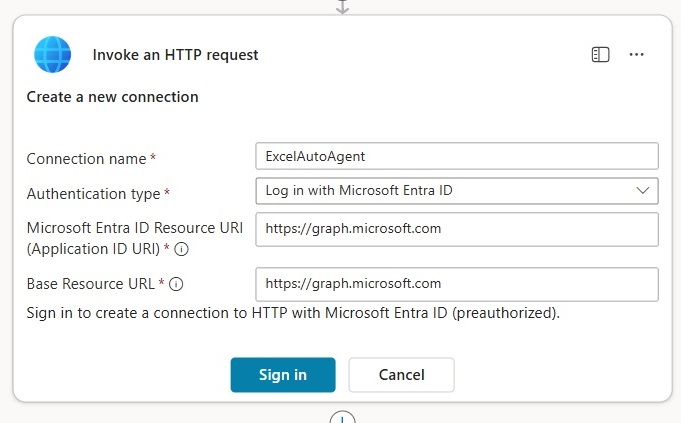
Then insert an HTTP With Microsoft Entra ID (pre-authorized) – Invoke an HTTP request action. Use the following settings for the connection:
- Authentication Type: Log in with Microsoft Entra ID
- Entra ID Resource URI: https://graph.microsoft.com
- Base Resource URL: https://graph.microsoft.com
Use this method for the HTTP request to indicate a write operation.
| PATCH |
Copy and paste this URI into the HTTP request to target the correct Excel file, worksheet tab and range.
v1.0/drives/@{triggerBody()?['text']}/items/@{triggerBody()?['text_1']}/workbook/worksheets/@{triggerBody()?['text_2']}/range(address='@{items('Apply_to_each')?['range']}')Code language: JavaScript (javascript)
Use these header values:
| Header | Value |
| Content-Type | application/json |
And supply the cell value to write to the Excel worksheet in the body.
{
  "values": [["@{items('Apply_to_each')?['value']}"]]
}Code language: JSON / JSON with Comments (json)
Then finally, conclude the Agent flow by responding to the Agent.

Configure The Agent Flow Details And Inputs
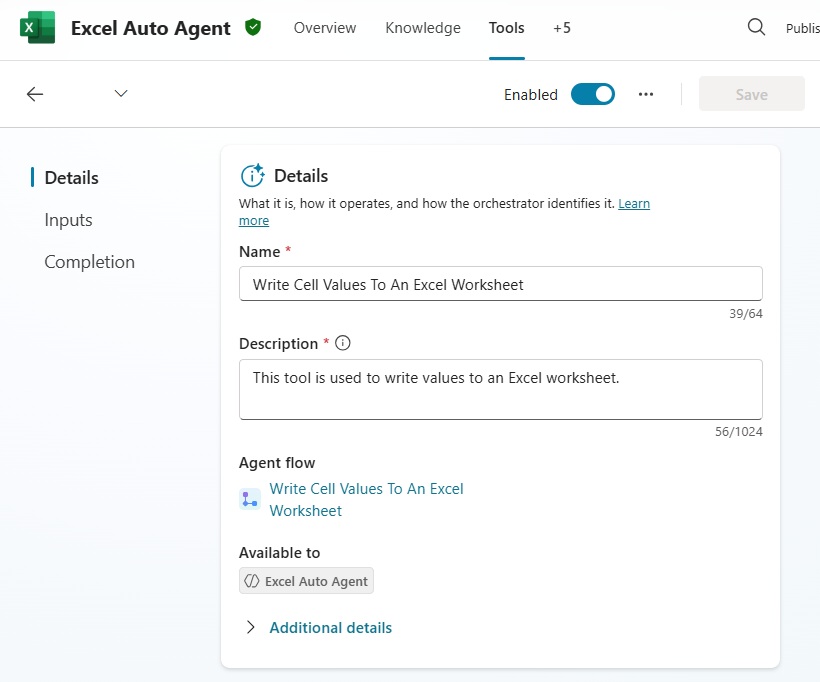
The final step we must do is describe the Agent flow in Copilot Studio so the orchestrator knows how to use it. Open the Write Cell Values To An Excel Worksheet Agent flow. Give it the description “this tool is used to write values to an Excel worksheet.”
Then write a description for each input field. Leave the Identify as property as user’s entire response.
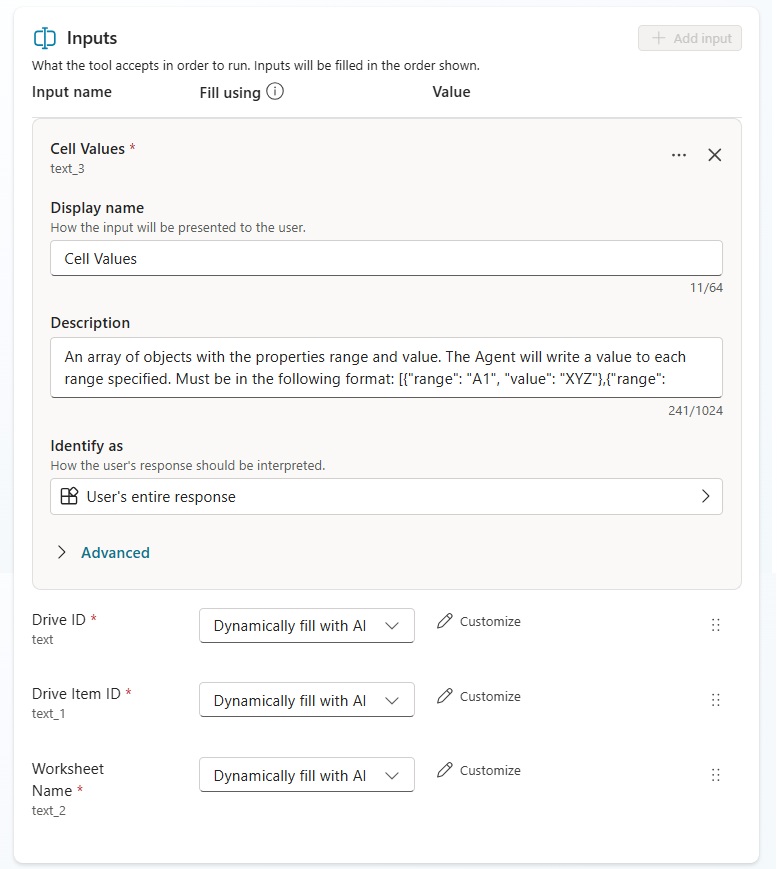
Copy and paste these descriptions into the description fields:
| Cell Values: An array of objects with the properties range and value. The Agent will write a value to each range specified. Must be in the following format: [{“range”: “A1”, “value”: “XYZ”},{“range”: “B2”, “value”: “XYZ”},{“range”: “C3”, “value”: “XYZ”}] |
| Drive ID: Value from the {DriveId} property “when a file is created” trigger. Example: “b!a9XkYtZpQ3Lm2WvNdrJPlEzU-7C4_X9RtGh-yuNaTRfg8J2k_QKrB7cd9A_Zxqdy” |
| Drive Item ID: Value from the {DriveItemId} property “when a file is created” trigger. Example: “01XE2SPHKITSGJOCPK7JEKTOS3HGOGTC63” |
| Worksheet Name: The name of the worksheet where the Agent will write values. |
Test The Excel Autonomous Agent
We’re done. Publish the Agent then start a test run with the When A New File Is Created in SharePoint trigger. The Agent reads the Excel file, uses its knowledge to determine the correct account codes, and then writes the selected values to the worksheet.
The Agent uses its tools to write values to the highlighted area of this Excel file.
Video: Incredible Excel-Writing Autonomous Agent In Copilot Studio
Watch this video for a full demonstration of how to build the Excel autonomous agent.
Did You Enjoy This Article? 😺
Subscribe to get new Copilot Studio articles sent to your inbox each week for FREE
Questions?
If you have any questions or feedback about Copilot Studio Autonomous Agent To Read & Write Excel Files please leave a message in the comments section below. You can post using your email address and are not required to create an account to join the discussion.


I cannot see the option to upload a document/photo to the prompt.
Fari,
Press the [/] button and you will see it appear 🙂
Thanks Mathhew, I could only see powerfx formula and text after pressing [/].
Hey Matthew. I always appreciate your learning articles and videos and the detail and care that you put into them – impressive. I am curious, what is your process to figure out the details for schemas, parameters, etc. How do you learn?
Brian,
That’s a great question. I cover it in my video for this article which is releasing next week. Subscribe to my email list on this website and you’ll get it on Sunday 🙂
Ha ha a teaser
Hi, this is great! Do you happen to have a video to demo read & write excel as well?
Lin,
It’s coming this Sunday and will be added to my YouTube channel and the end of this article.
great! thank you very much
First of all, congratulations on your videos and posts they are incredible.
I am trying to adapt the agents you create to my work environment, and I’ve run into a few doubts. If it’s not too much trouble, I would really appreciate your help to understand whether I am doing something wrong or missing a step.
I want to create an agent that automatically fills out an Excel file, but I want to provide the document myself.
My trigger is a question in which I ask the user for a country or region.
After that, I request the Excel file, which will be filled in depending on the chosen country.
So I have two variables: a string called “VarCountry” and a record called “VarExcelOferta”, which corresponds to the Excel file the user wants the agent to complete.
I created a request similar to your example, where I extract the Excel content in JSON format. And this is where I noticed something: the PromptOutput does not appear in the result.
Could it be that at some point it was outputting the content as text and later switched to JSON?
Continuing with the rest:
Once I have the Excel information, I want the agent “using the existing knowledge” to evaluate the first variable (“Country”) and perform cost calculations, which should then be written into the empty cells I have specified in the Excel. All of this is included in the agent’s knowledge and in the main prompt.
After that, to write back into the file, I assume the agent will reference it through the variable defined in the previous steps. Is this assumption correct? I haven’t reached that part yet, so I’m not sure, and I’m hoping you might be able to help.
Thank you again for your videos.
Best regards,
Ismael
I have the same issue of PromptOutput Not appearing did you ever find a solution?
Hi Matthew,
I tried your method on a large file (600+ rows). The program ran fine initially but stopped at row 16 with a timeout error. Could you please let me know what might be causing this?
Angie,
All flow actions have a timeout: max allowable time they can run. Consider chunking the values you are writing or submitting them all in a single batch.