Configure MS Auth for Test Automation in Copilot Studio Kit
Copilot Studio agents using Microsoft Authentication can now take advantage of test automation. Test automation sends a set or pre-defined test messages to the Agent and evaluates whether the response was correct. It can be performed after you’ve installed the Copilot Studio Kit. I recommend using test automation on all agents before promoting changes from development to production.
Create A New Agent Configuration In Copilot Studio
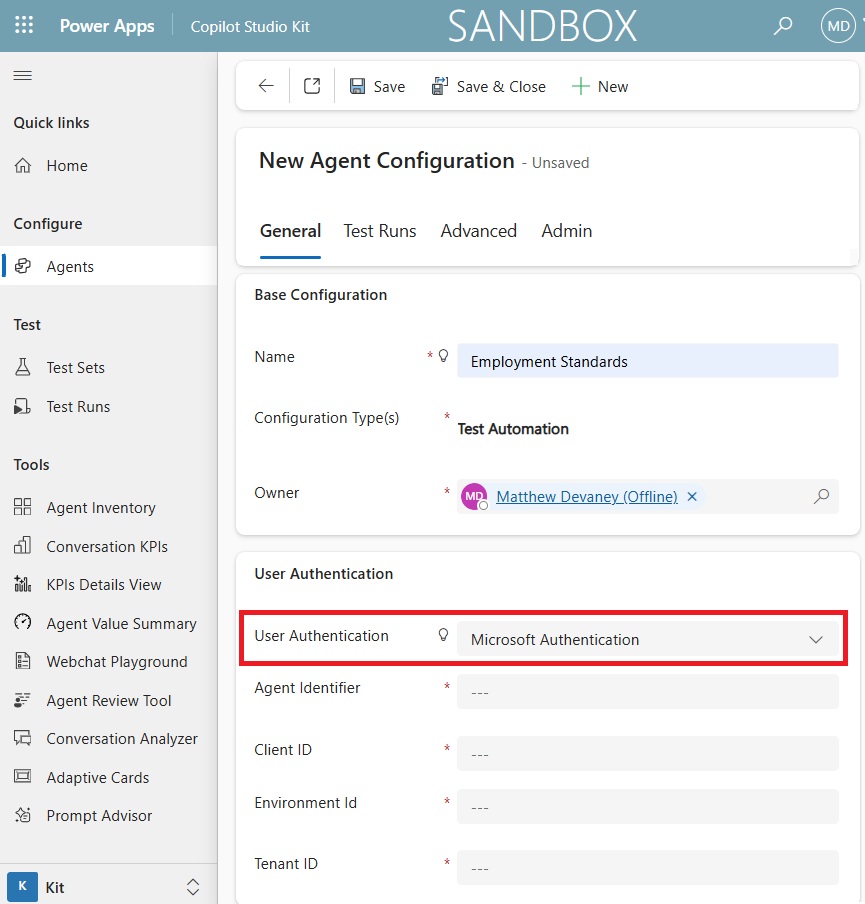
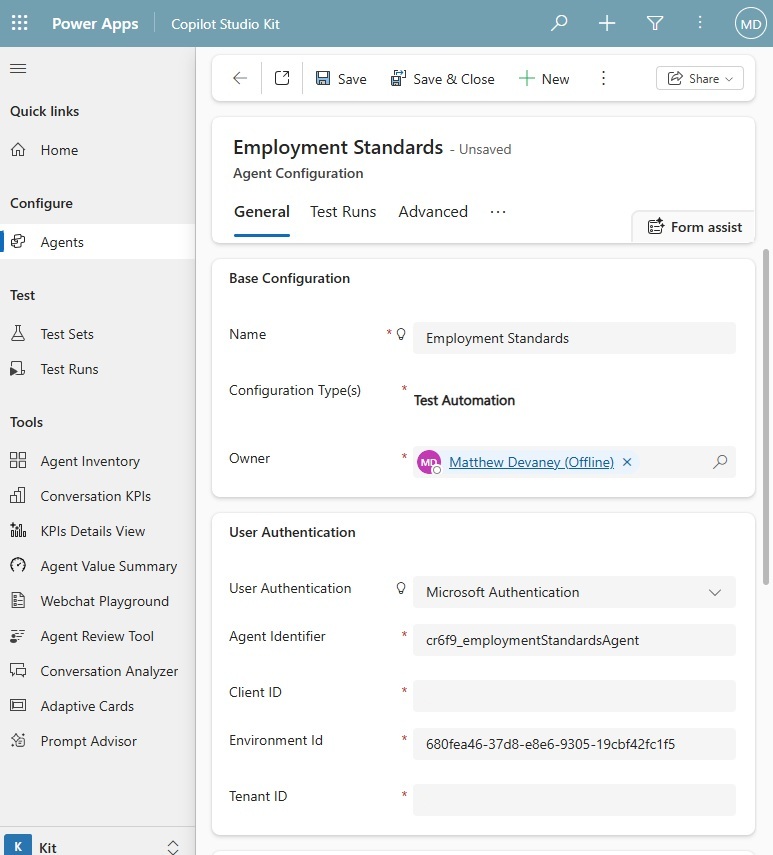
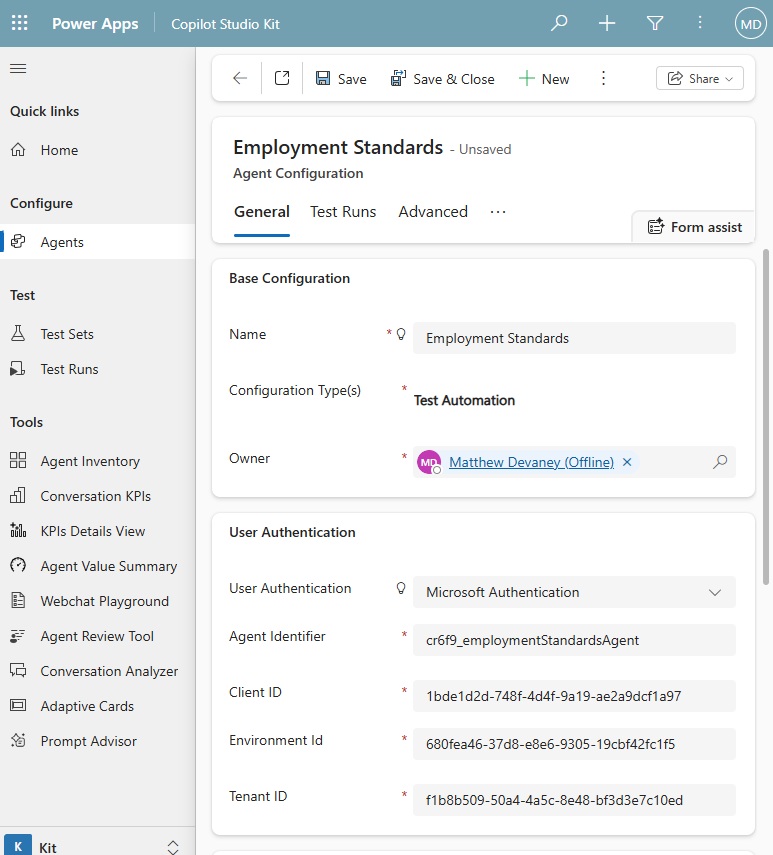
An Agent Configuration holds the information Copilot Studio Kit test needs to connect to an Agent and perform test automation. Open Copilot Studio Kit and create a new agent configuration with the following values:
- Name: <display name of the Agent>
- Configuration: Test Automation
- User Authentication: Microsoft Authentication
Set Agent Authentication To Authenticate With Microsoft
Go to Copilot Studio and open the Agent you want to configure for test automation. Then open the settings menu.
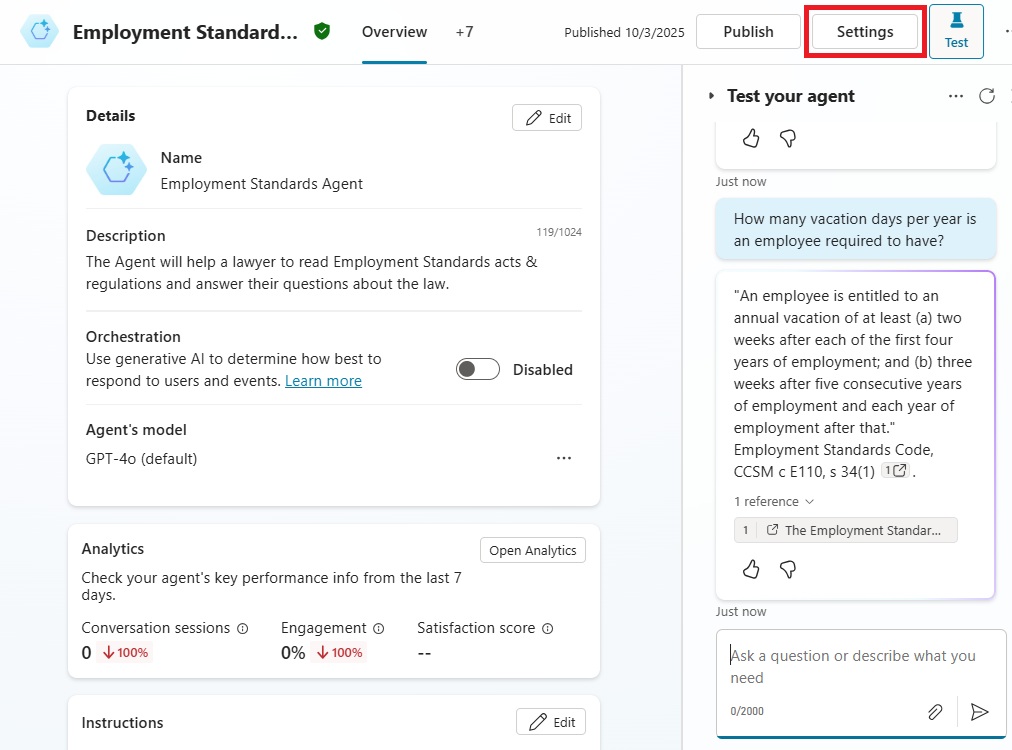
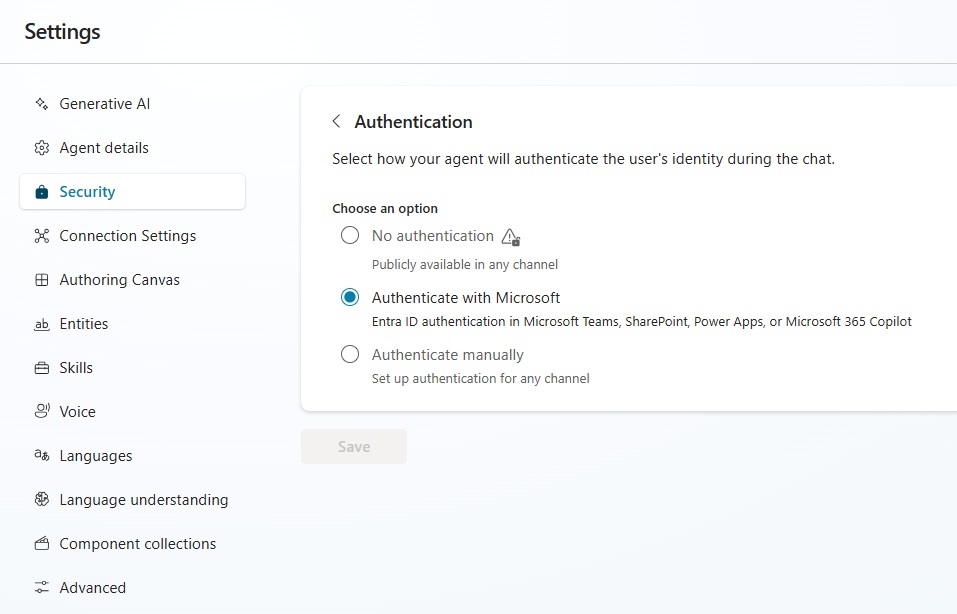
Choose the authentication method Authenticate with Microsoft. Once deployed, the Agent will rely on Entra ID to authenticate users in Microsoft Teams, SharePoint, Power Apps or Microsoft 365 Copilot.
Get The Agent Schema Name and Environment ID
To configure the Agent for test automation we need to get the schema name and environment ID. In the settings menu go to Advanced > Metadata.
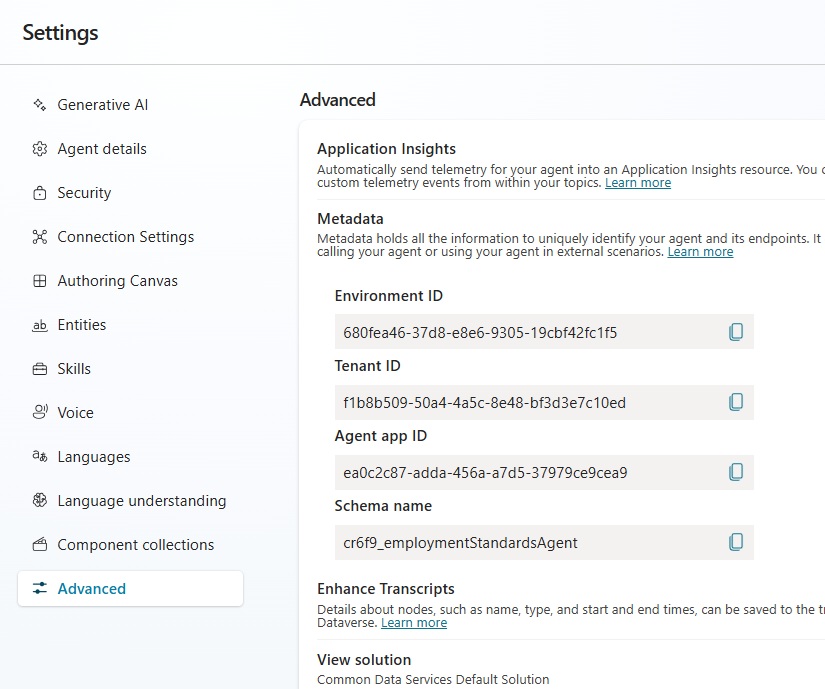
Copy and paste values from the Agent metadata to the following fields:
- Schema Name -> Agent Identifier
- Environment ID -> Environment Id
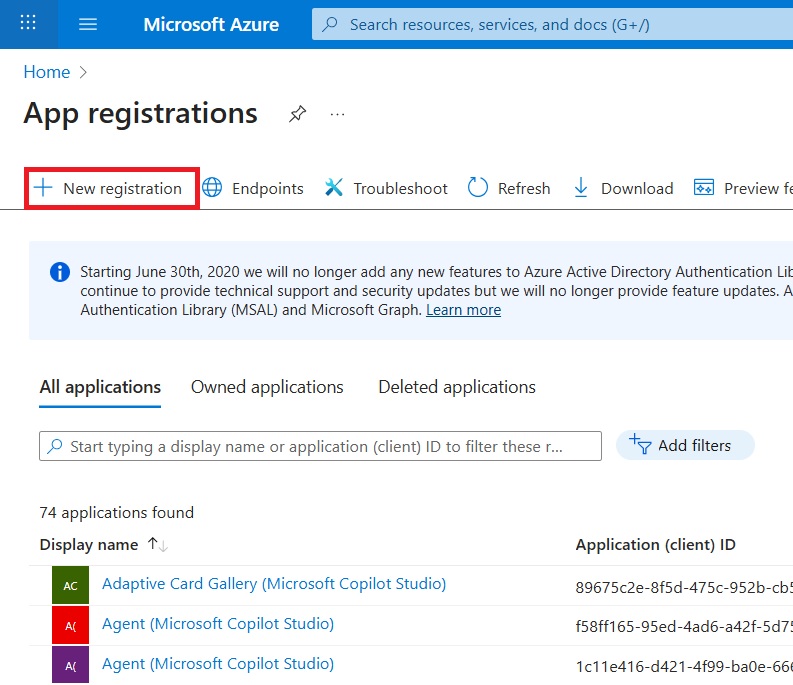
Create A New App Registration For Test Automation In Azure
We need to create an app registration in Azure to allow Copilot Studio Kit to invoke Agents and perform test automation. Go to the Azure Portal and open app registrations. Create a new registration.
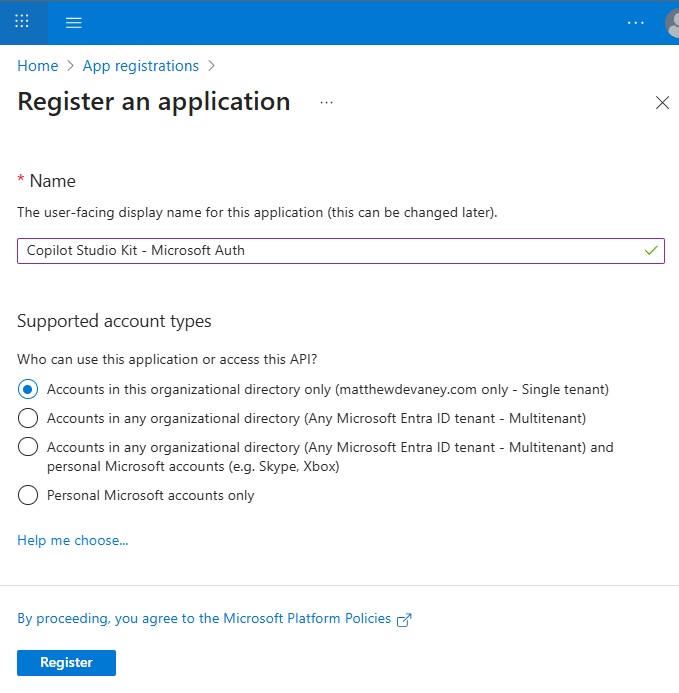
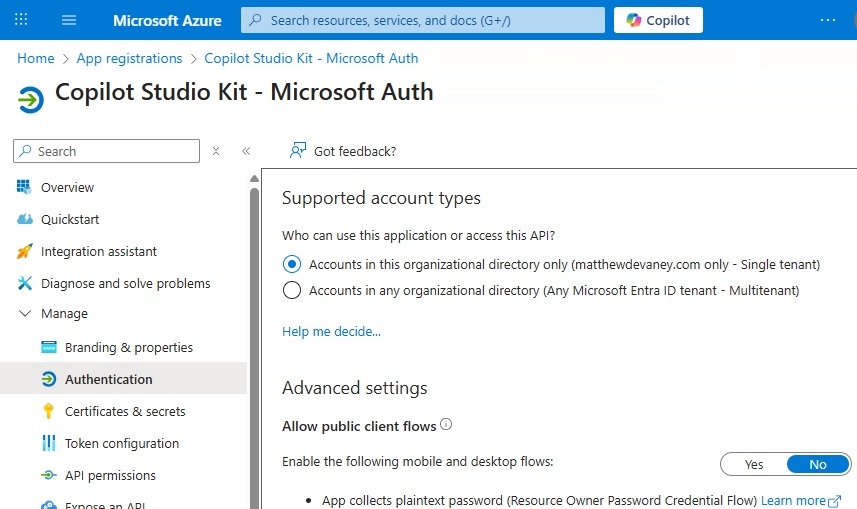
Name the application Copilot Studio Kit – Microsoft Auth and choose single tenant. Press the Register button.
When the app registration is created the overview page shows the Application (client) ID and Directory (tenant) ID.
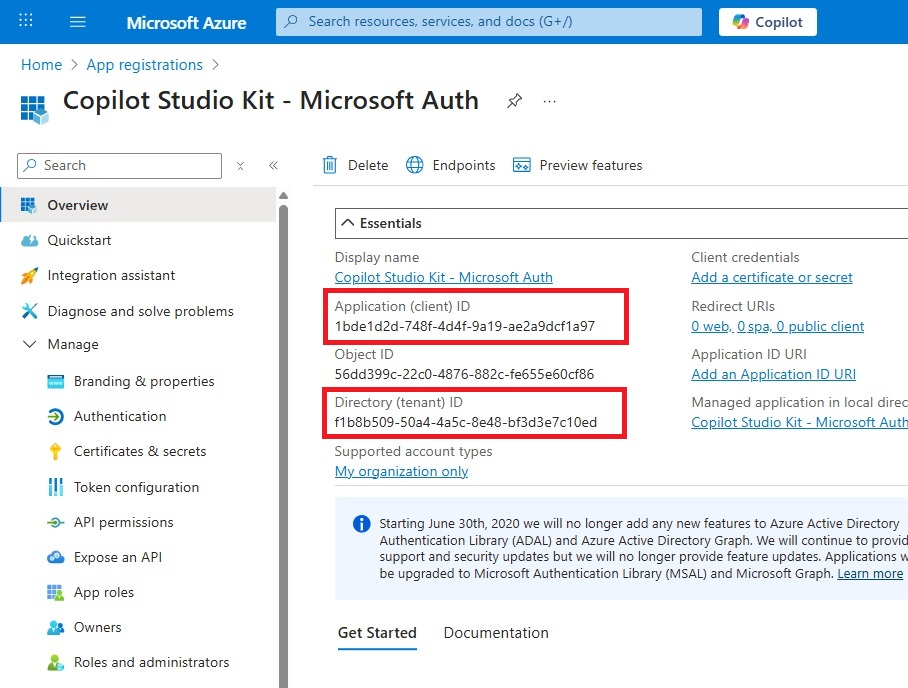
Copy and paste the following values from the app registration into the Agent Configuration:
- Application (client) ID -> Client ID
- Directory (tenant) ID -> Tenant ID
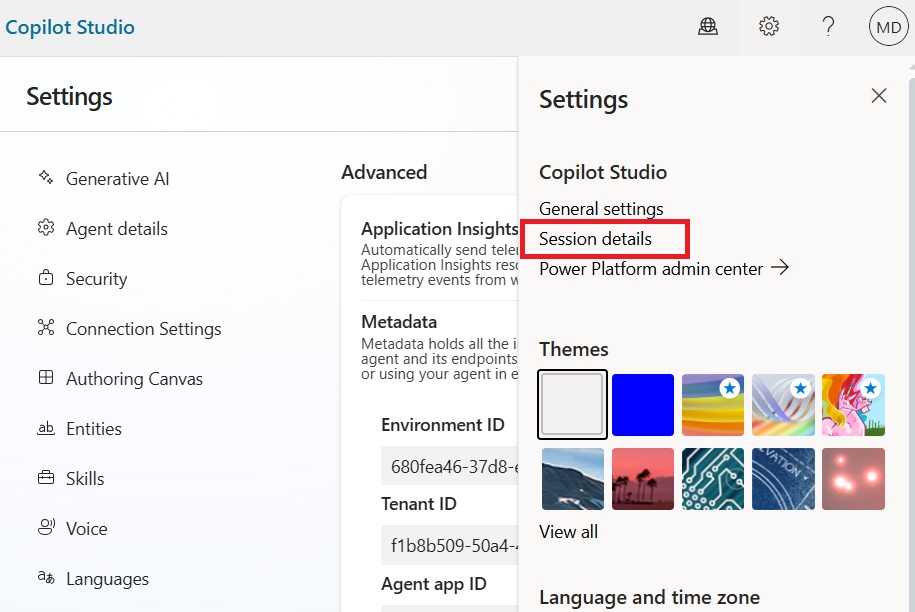
Find The Agent’s Environment URL In Copilot Studio
The next step in Azure will require us to know the URL of the Agent we want to test. In Copilot Studio select the gear icon and open the session details.
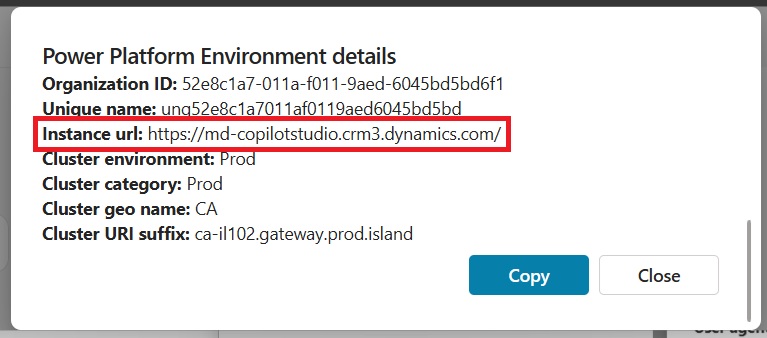
The instance url (environment url) is found inside of the Power Platform Environment details section.
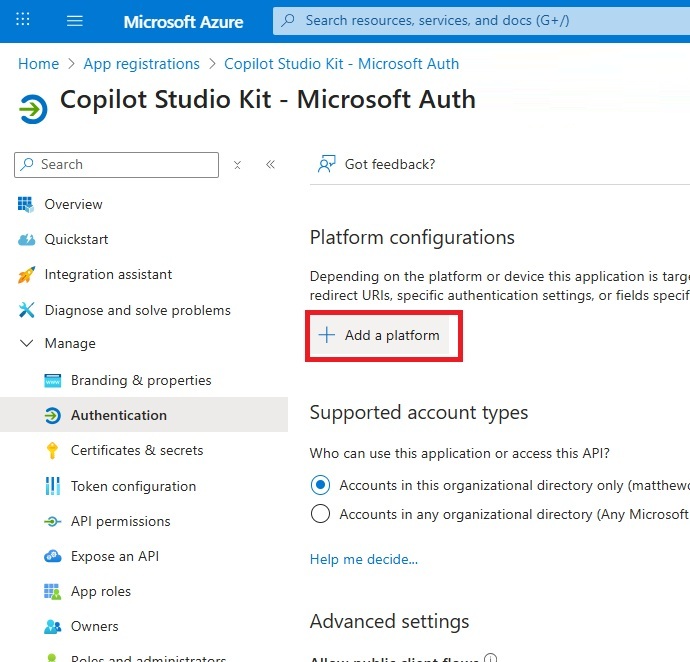
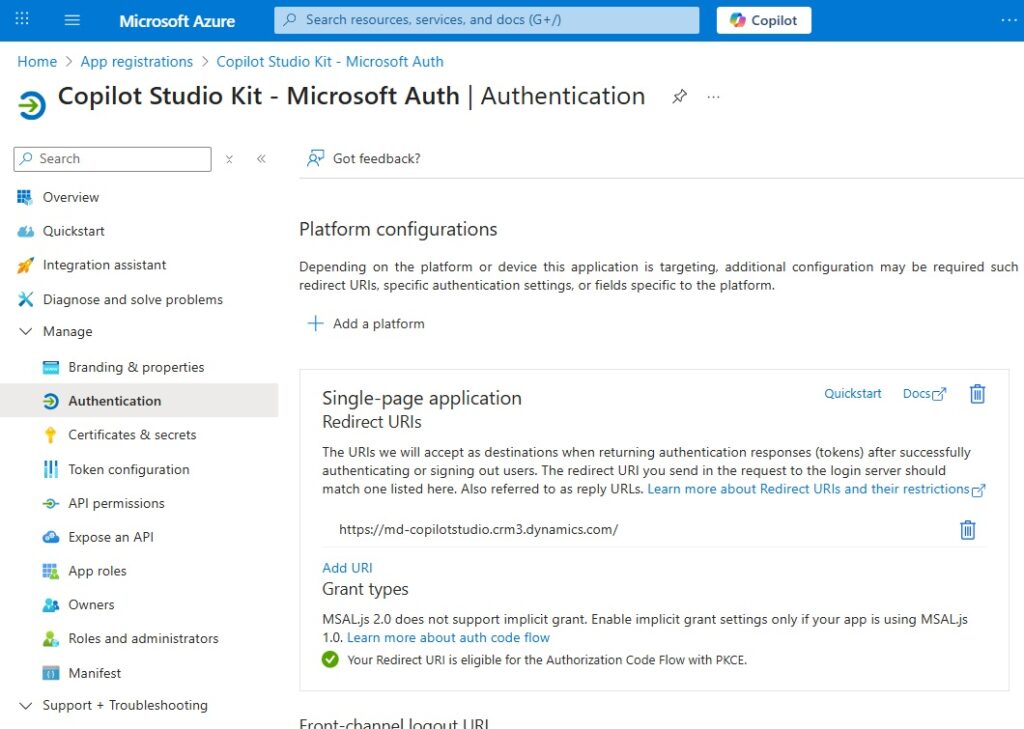
Provide A Redirect URI For A Single Page Application
Back in Azure, go to the app registration’s Authentication menu and select Add a platform.
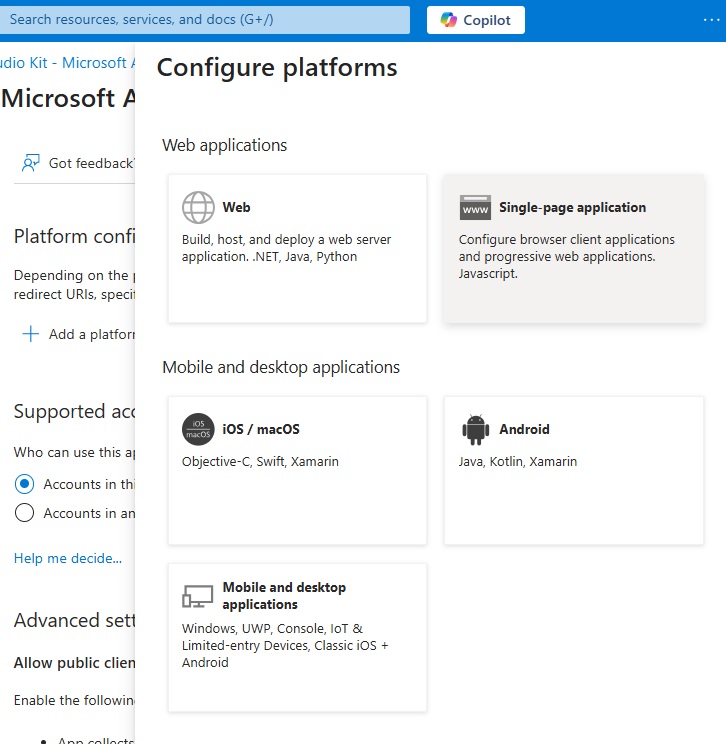
Choose single-page application.
Provide the Agent’s environment url in the Redirect URIs field. Check the checkboxes for Access tokens and ID tokens. Then press the Configure button.
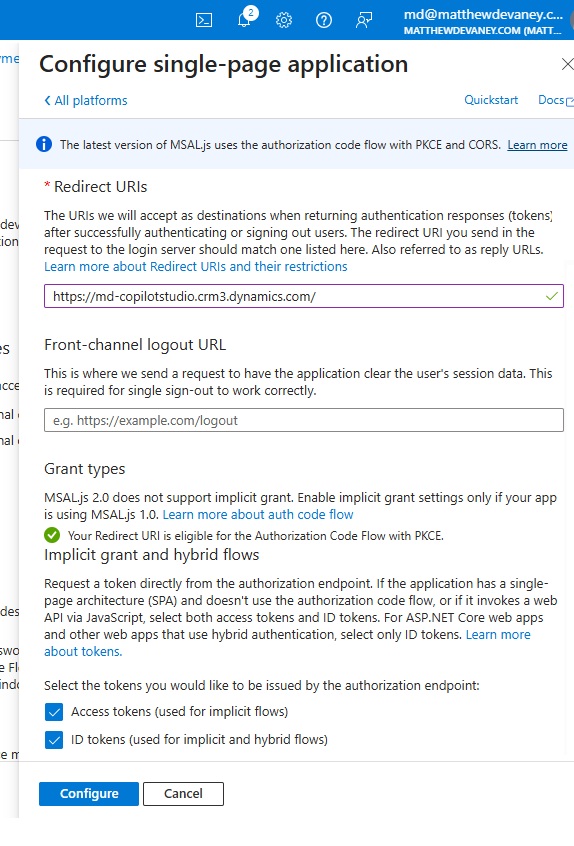
The Redirect URI looks like this once it is setup.
Confirm the supported account types is set to single tenant in the same menu.
Add Power Platform API Permissions To The App Registration
Test Automation relies upon the Power Power API to call the Agent so we will need to add it to the app registration. Go to the API permissions menu and choose add a permission.
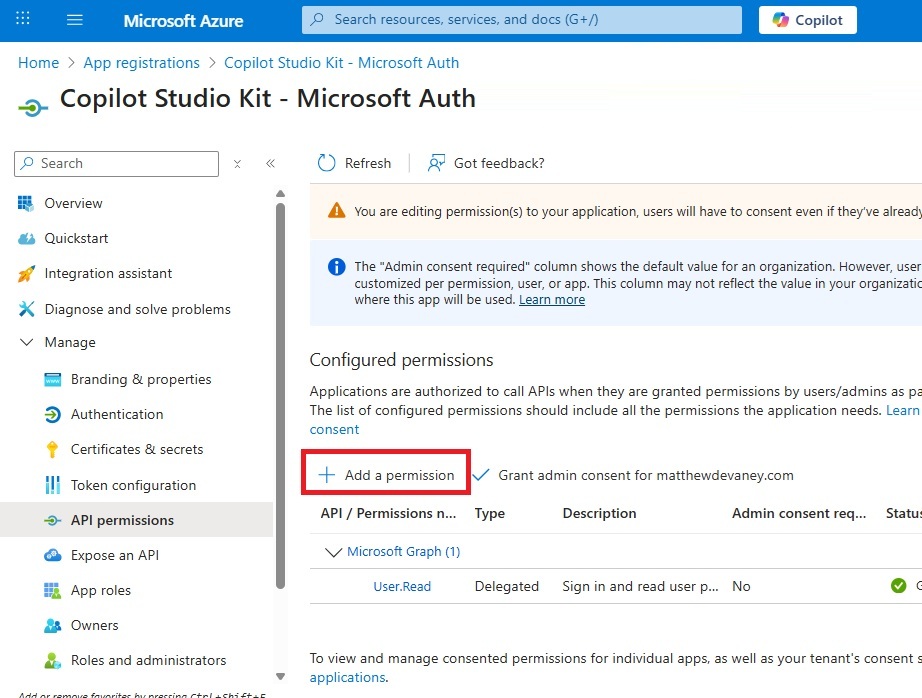
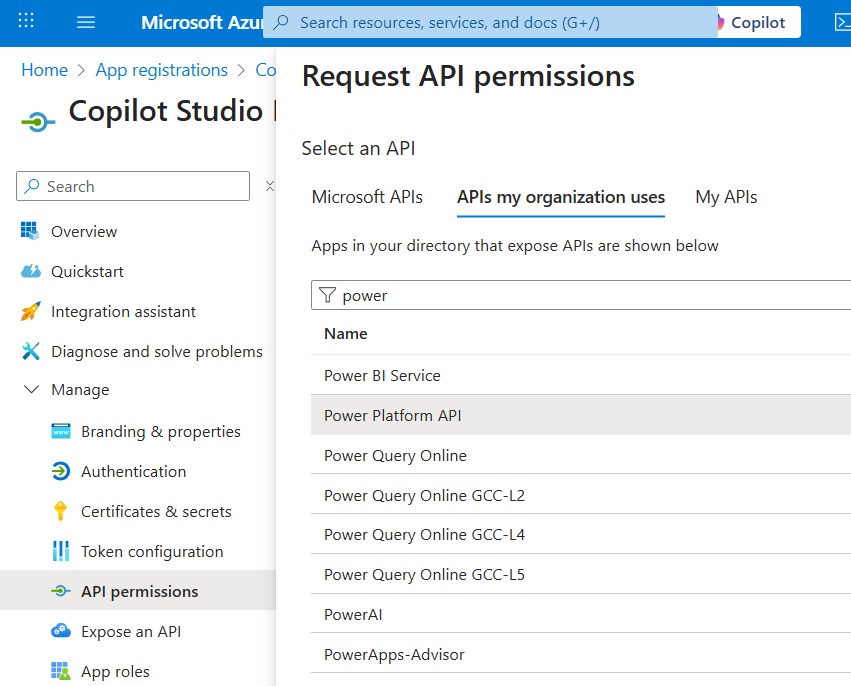
Select the APIs my organization uses tab and choose Power Platform API. If the Power Platform API does not appear run this PowerShell script as administrator to enable it.
On the next screen choose delegated permissions select the permission copilotstudio.copilots.invoke. Press the Add Permissions button.
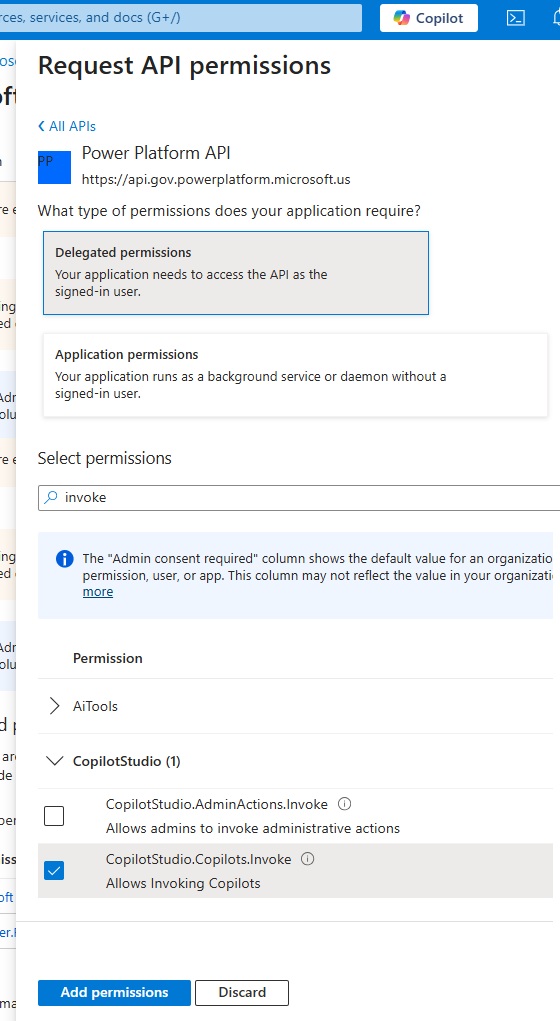
Grant admin consent for the newly added permissions.

Run A PowerShell Script To Enable The Power Platform API (Optional)
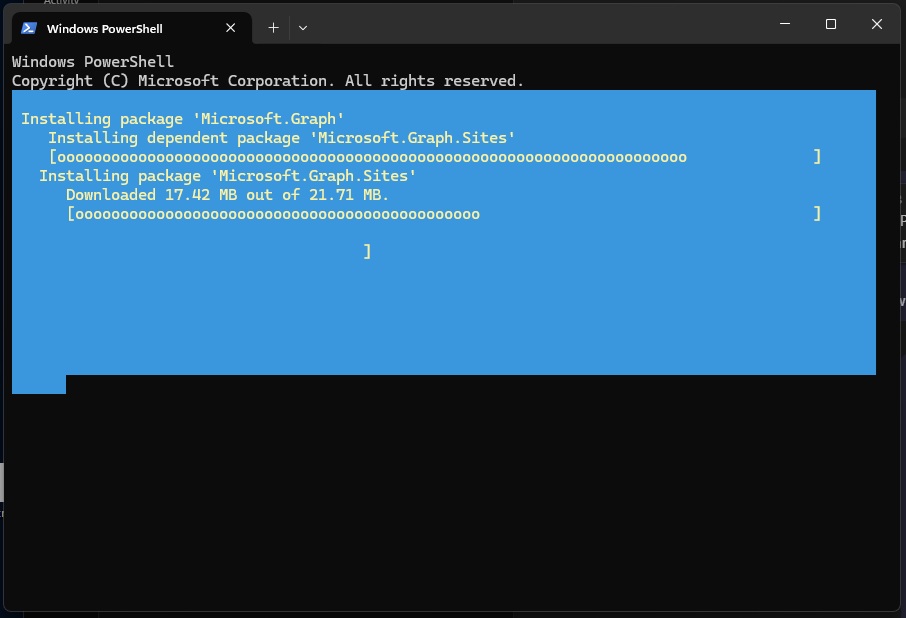
If the Power Platform API did not appear you’ll need to run this PowerShell script to enable it.
#Install the Microsoft Graph PowerShell SDK module
Install-Module Microsoft.Graph -Scope CurrentUser -Repository PSGallery -Force

Connect-MgGraph
New-MgServicePrincipal -AppId 8578e004-a5c6-46e7-913e-12f58912df43 -DisplayName "Power Platform API"Code language: PHP (php)
Go to Windows PowerShell, open it as an admin, and copy & paste the PowerShell script into the terminal. Wait for the packages to install. Then go back to the API Permissions page and look for the Power Platform API again.
Save The Agent Configuration In Copilot Studio Kit
The Copilot Studio agent is now configured to run test automation for the Agent using Microsoft Authentication.

Video: Copilot Studio Test Automation: STOP Testing Manually
Watch this video for a full explanation of Copilot Studio test automation including how to configure an agent using Microsoft Authentication.
Did You Enjoy This Article? 😺
Subscribe to get new Copilot Studio articles sent to your inbox each week for FREE
Questions?
If you have any questions or feedback about Configure MS Auth for Test Automation in Copilot Studio Kit please leave a message in the comments section below. You can post using your email address and are not required to create an account to join the discussion.