Copilot Studio Easiest Way To Upload A File In A Chat Window

In Copilot Studio you can upload a file to a chat window and then perform actions on it like run a prompt or save the file to SharePoint. This method shows how to upload a file by using a question node. We will also perform additional validation to ensure the correct file type was uploaded. Then the Agent can be deployed to MS Teams, M365 Copilot, SharePoint, etc.
Introduction: The Request For Proposal Agent
Employees at a construction firm use the Request For Proposal Agent to get important details from an RFP. The employee can open the Copilot Studio Agent, upload the file to a Teams chat window and the Agent will return all project related deadlines.
Add A New Topic To The Copilot Studio Agent
Open Copilot Studio and create a new Agent named File Upload Agent.
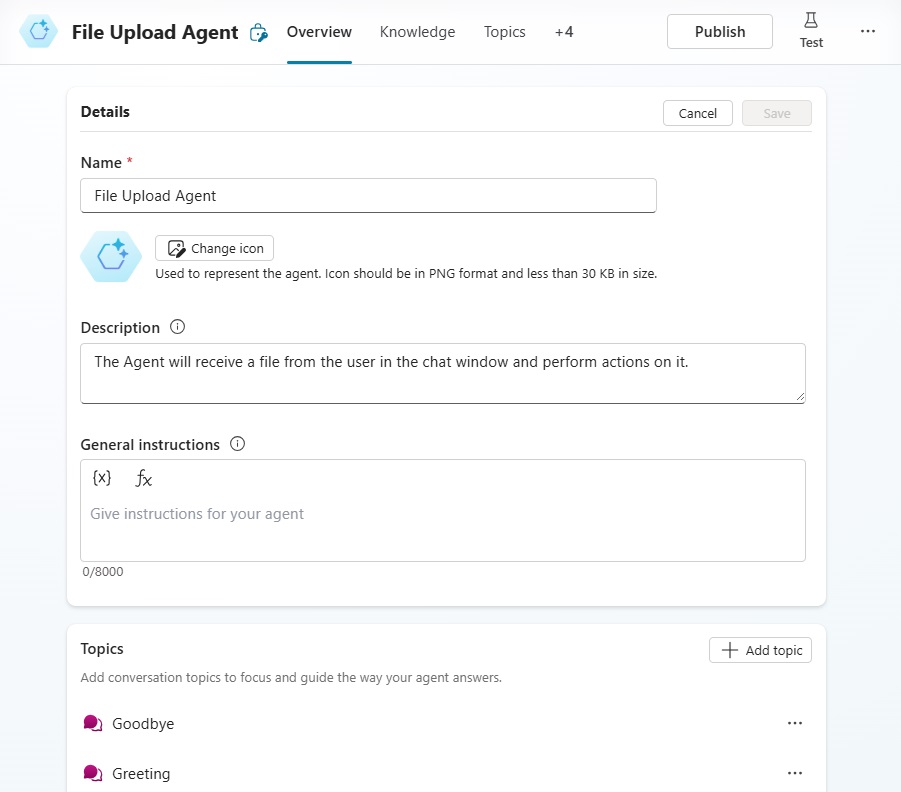
Use this text in the Agent description.
| The Agent will receive a file from the user in the chat window and perform actions on it. |
Then go to the Topics tab and add a new Topic from blank named Upload A File To Copilot Studio (Teams).
We want the topic to trigger when the User asks to “analyze an RFP.”
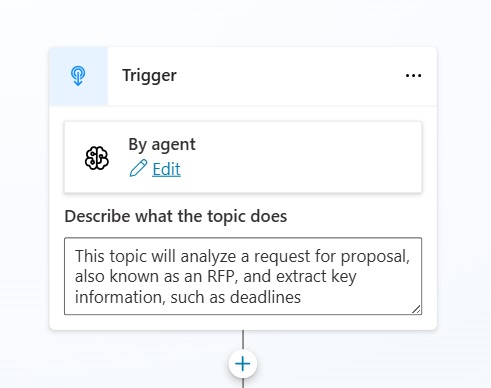
Use this text to describe what the topic does.
| This topic will analyze a request for proposal, also known as an RFP, and extract key information, such as deadlines. |
Upload A File To The Copilot Studio Agent Chat Window
We want the Copilot Studio Agent to ask the User to upload and then verify that a file was attached to the User’s response. To do this, add a Question node to Copilot Studio that identifies a File type entity.

Validate The File Type And Number Of Files
For the Agent to operate properly we must ensure that a PDF file was uploaded in the chat, and that multiple PDF files are not present. To do this we create two new variables: isFileExtensionPdf and isFileCountEqualToOne.
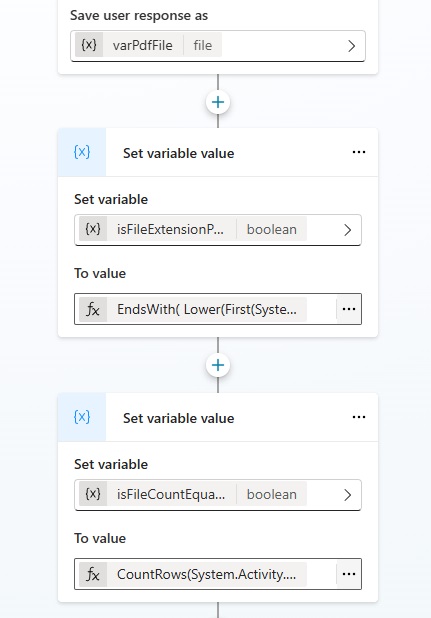
Use this code to set the variable value isFileExtensionPdf and check if the filename ends in pdf.
EndsWith(
    Lower(First(System.Activity.Attachments).Name),
    ".pdf"
)Code language: CSS (css)
And use this code to set the variable value for isFileCountEqualToOne to determine if only one file was uploaded
CountRows(System.Activity.Attachments)=1
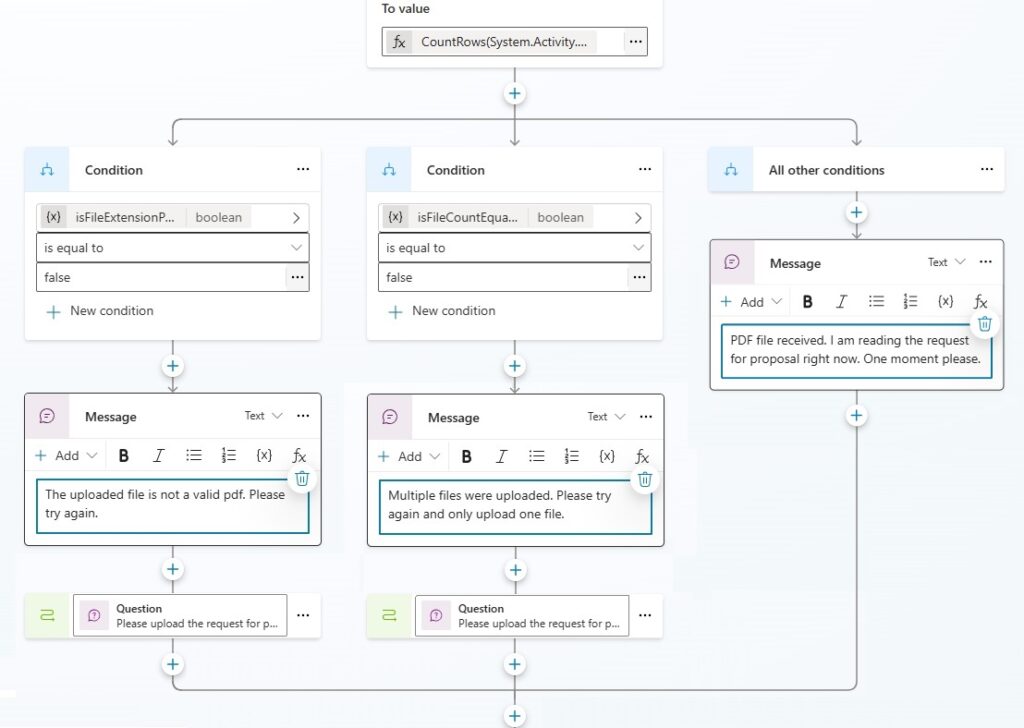
After setting the file validation variables add these two conditional branches to the topic and setup the all other conditions branch like this:
- Condition: isFileExtension equal to false
- Message node: “The uploaded file is not a valid pdf. Please try again.”
- Go to step node: go back to the question node.
- Condition: isFileCountEqualToOne
- Message node: “Multiple files were uploaded. Please try again and only upload one file.”
- Go to step node: go back to the question node.
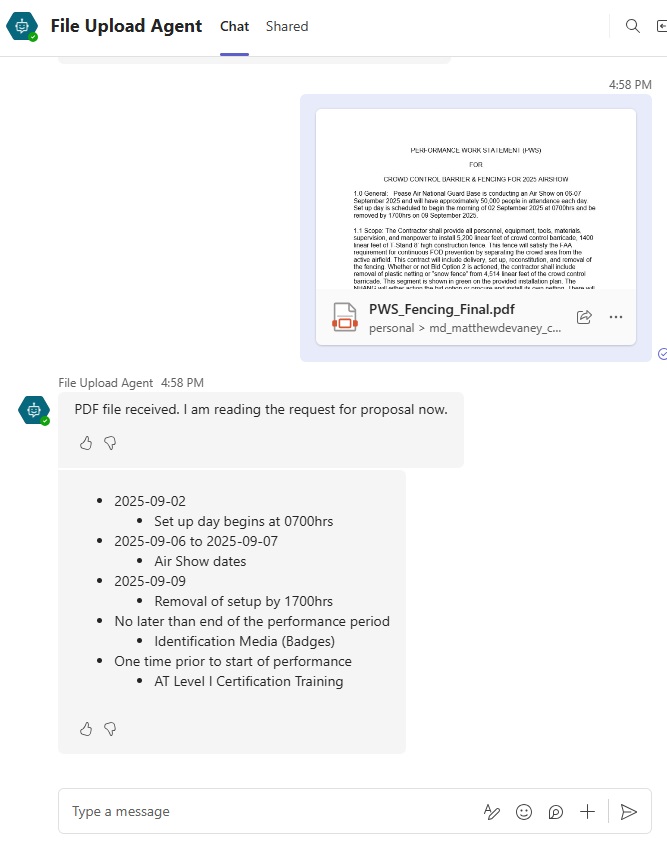
- All other conditions
- Message node “PDF file received. I am reading the request for proposal right now. One moment please”
- Message node “PDF file received. I am reading the request for proposal right now. One moment please”
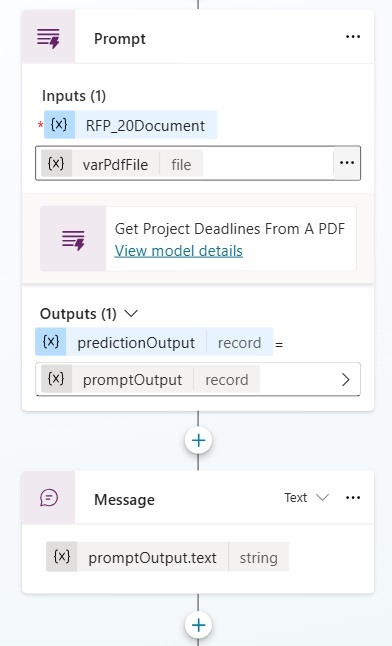
Run A Prompt Action With The Uploaded File As An Input
The Agent will analyze a PDF file uploaded to the chat window and return all project deadlines from it. We will run a prompt action to determine the deadlines and return the output to the Agent.
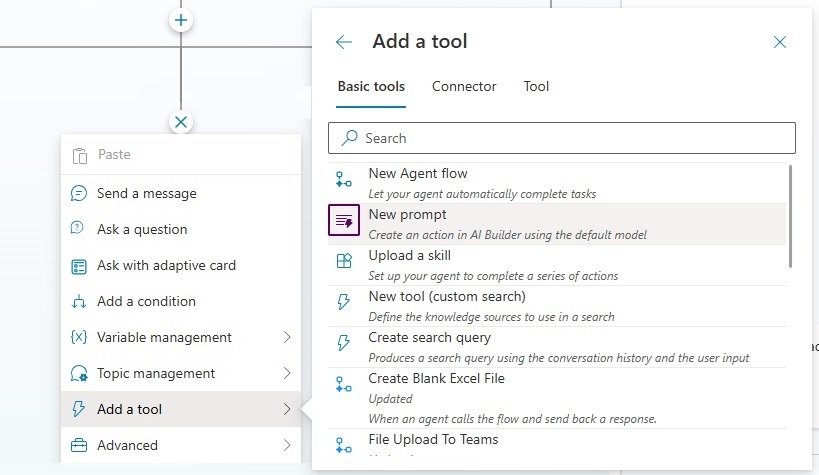
Go to Add A Tool and select New Prompt.
Name the prompt Get Project Deadlines From A PDF.
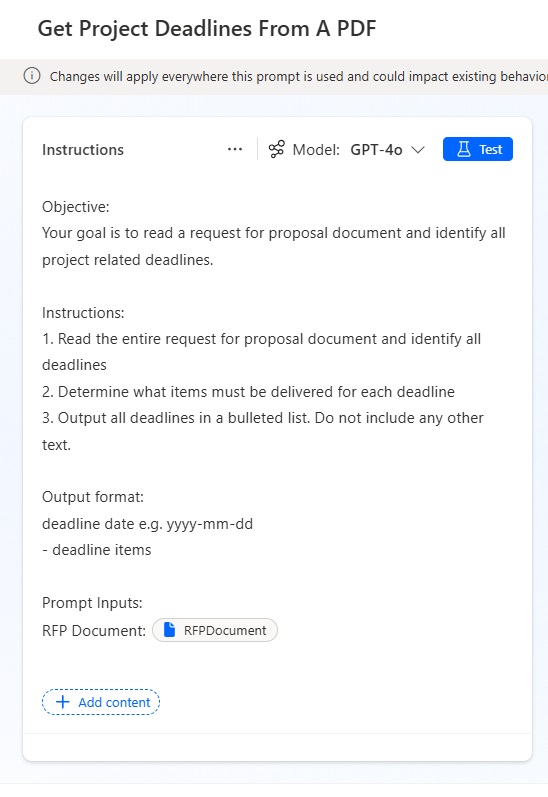
Then copy and paste the instructions below into the prompt designer and add RFP document as a document type input.
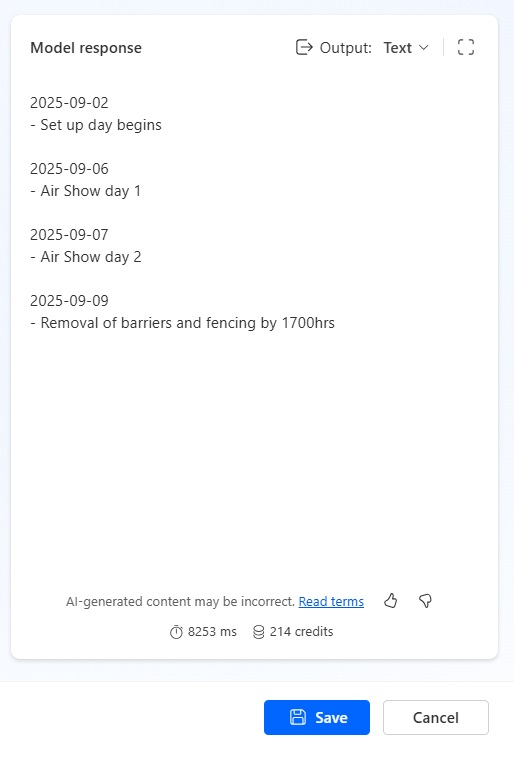
| Objective: Your goal is to read a request for proposal document and identify all project related deadlines. Instructions: 1. Read the entire request for proposal document and identify all deadlines 2. Determine what items must be delivered for each deadline 3. Output all deadlines in a bulleted list. Do not include any other text. Output format: deadline date e.g. yyyy-mm-dd – deadline items Prompt Inputs: RFP Document: [RPF Document] |
Test the prompt. The prompt output should look like this. Save and close the prompt designer.
Display The Prompt Output To The User
The final step is to display the text output by the prompt to the User. Add a message node to the topic with the promptOutput variable in the message body.
Save the topic, publish the Agent, then test the file upload. The Agent will now ask for the user to upload a file and send a list of project deadlines in the response message.

Video: Copilot Studio Easiest Way To Upload Files To A Chat Window
You can watch this step-by-step tutorial to learn how to upload a file through the chat window in Copilot Studio. And I’ll even teach you a 2nd method to upload a file without any question node!
Did You Enjoy This Article? 😺
Subscribe to get new Copilot Studio articles sent to your inbox each week for FREE
Questions?
If you have any questions or feedback about Copilot Studio: Upload File To Chat Window In MS Teams please leave a message in the comments section below. You can post using your email address and are not required to create an account to join the discussion.


Hi Matthew I’m trying to trigger agent by passing the Attachment file directly by setting an input variable as string with the value JSON(System.Activity.ChannelData.OriginalAttachments,JSONFormat.IndentFour), my intent is not to use the Question Block because it results as an extra step, but the result is that the variable is always null, it seems that the channel linked to the Trigger block (System.Activity.ChannelData.OriginalAttachments) has no effect, it is disabled or missing, do you have any ideas to suggest to me? Thanks for your patience
Hey Massimo, it sounds like I’m running into the same issue as you. Here’s my problem: For the “Upload A File To The Copilot Studio Agent Chat Window” section, I’m running to an issue. I created this topic a few weeks ago and used the
JSON(
System.Activity.ChannelData.OriginalAttachments,
JSONFormat.IndentFour
) in the message node to output the attachments data in JSON format, and it worked fine, and I was able to finish setting the agent up. Then all of a sudden my topic is failing with that agent. I tried to recreate a new agent, and when I get to this step, the agent outputs “null” in the teams chat when I give it a file. Anyone else running into this issue?
Here’s how I’m going about making a workaround (pulled from current top comment in his youtube video): Hi Matthew, awesome video – perfect timing too!
I was actually experimenting with something similar a few weeks ago, but took a slightly different approach.
I used a question node to prompt the user to upload a PDF, and then I stored it as a “File” entity variable.
From there, I added a “New prompt” node (AI Builder tool just under New Flow action you used) and passed the file variable directly as an input.
I’ve been using this setup to get the AI Builder to extract data like contract details into JSON format, which I then parse into records – making it really easy to work with downstream in connectors and automation flows.
Yes, that appears to be an option now. I am in-progress of deprecating this article.
For the “Upload A File To The Copilot Studio Agent Chat Window” section, I’m running to an issue. I created this topic a few weeks ago and used the
JSON(
System.Activity.ChannelData.OriginalAttachments,
JSONFormat.IndentFour
) in the message node to output the attachments data in JSON format, and it worked fine, and I was able to finish setting the agent up. Then all of a sudden my topic is failing with that agent. I tried to recreate a new agent, and when I get to this step, the agent outputs “null” in the teams chat when I give it a file. Anyone else running into this issue?
Sadly, Microsoft removed the OriginalAttachments property and didn’t communicate this to developers. I am scrambling to update my article.
Hello Matthew,
Thanks for sharing this article, it has been really helpful. The steps work just fine for me, until the last ‘Message’ step, when I’m unable to select my promptoutput variable as the variable output. I checked the overall list of variables and it exists. Do you know why this might be happening?
Pragnya,
I assume this is a Copilot Studio bug. There’s no other reason it could be happening. Try to open the YAML editor and see if you can add it that way.
Hi Matthew, I followed the steps exactly but am getting an error as InvalidBindingInput
Vedant,
What node are you supplying this file to? If its a Power Automate flow, this method does not work for flows.
Are you supplying it to a Prompt Action like I showed in the tutorial. Or a OneDrive Create File action?
Nope, it is topic, I’m not being able to publish the topic. The error is in the prompt node. There is an error: ‘InvalidBindingInput’
I’m supplying it to the prompt action, but it doesn’t seem to like the input file.
Having the same issue. Even after refreshed, still having the same error.
Hi, Copilot Studio now supports passing files to prompts so you don’t need to use ChannelData.OriginalAttachments anymore. If a prompt has a file input, use something like First(System.Activity.Attachments).Content to obtain the file reference and pass it to the prompt.
Eric,
Thanks for the message. This article was updated with the new information prior to your post. I’m guessing maybe you read the email version 🙂
Hi Matthew, I also followed this as well, and I am getting the invalid binding error as well. I was wondering if you were able to find a solution to this error?
Hi Matthew I want to upload a file into the chat so the code interpreter can access the file. What is the smartest way to do so? Thanks for your time!
Hi Matthew, I am trying to work on CSV and Excel with the exact same steps you did.But it only accepts PDF and images,can you assist me on this, please?
Neyu,
The file upload still work for PDF and CSV but to read those files in a Copilot you must enable code interpreter.