Power Apps Barcode Scanner

With the Power Apps barcode scanner you can quickly make apps that turn any mobile device into an inventory management tool. Checking inventory-levels, adjusting product details and receiving items into inventory can be done without fancy expensive software. Instead, you can build your own custom inventory system for free. All you need is a phone with a camera! In this article I will show you how to use the Power Apps barcode scanner.
Table of Contents:
Introduction: The Inventory App
SharePoint List Setup
Inventory Details Screen
Scan A Barcode
Adjusting Inventory Quantities
Inventory List Screen
Scan A Barcode From The List Screen
Scanning Multiple Barcodes
Print Barcodes From A SharePoint List
Introduction: The Inventory App
Employees at a library use the Inventory app to manage their stock of books. When an employee scans a book’s barcode, the app loads the book’s details and allows the employee to adjust the quantity.

SharePoint List Setup
Create a new SharePoint list called Library Books with the following columns
- Title
- BookAuthor (single-line text)
- Barcode (single-line text)
- Quantity (number)
Populate the SharePoint list with books from around your home. Here’s a sample of my own list:
| Title | BookAuthor | Barcode | Quantity |
| Walt Disney: An Americal Original | Bob Thomas | 9780786860272 | 5 |
| American Gods | Niel Gaiman | 9780082472106 | 13 |
| Leviathan Wakes | James S.A. Corey | 9780316129084 | 23 |
| Chaos Monkeys | Antonio Garcia Martinez | 9780062458209 | 8 |
| A Game Of Thrones | George R. R. Martin | 9780553103540 | 40 |
| The Ascent Of Money | Niall Ferguson | 9780143116172 | 11 |
| Dune | Frank Herbert | 9780441172719 | 15 |
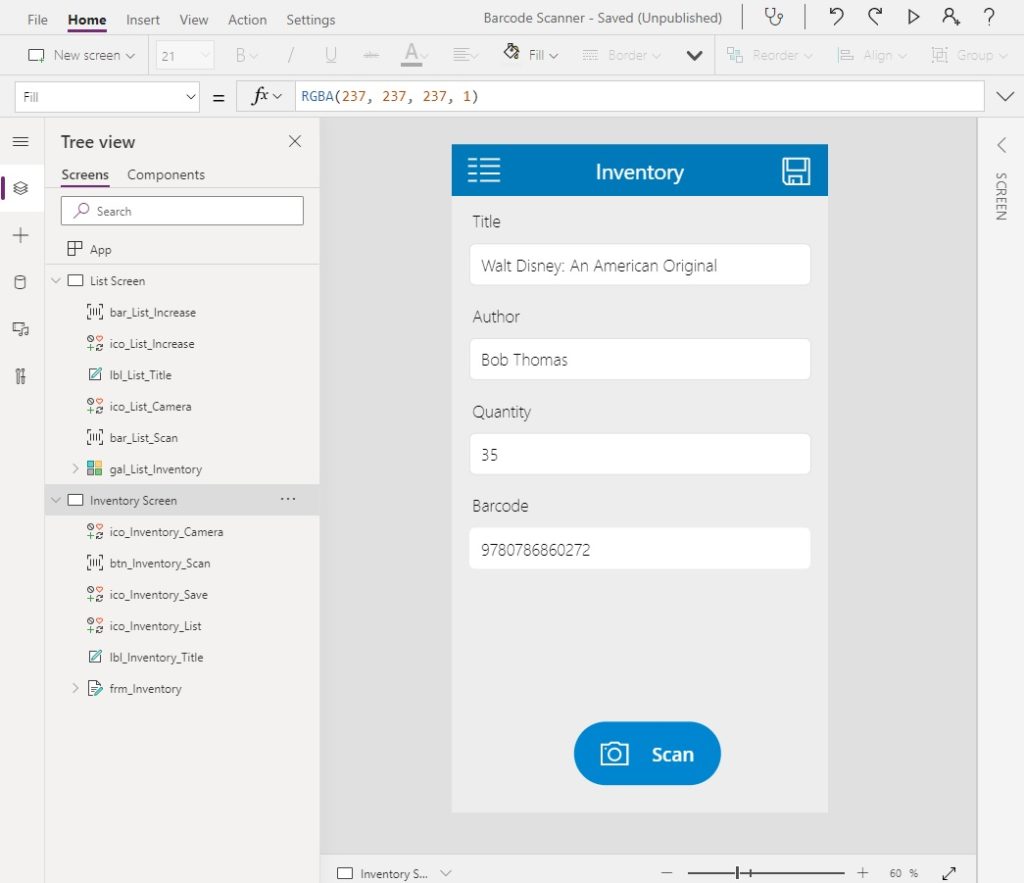
Inventory Details Screen
We will begin by creating the screen to show inventory details. Start a new canvas app from blank and select Phone.
Rename the blank screen Inventory Screen and add a label to the top with a title. Then insert an Edit Form onto the screen with the Library Books as the datasource.
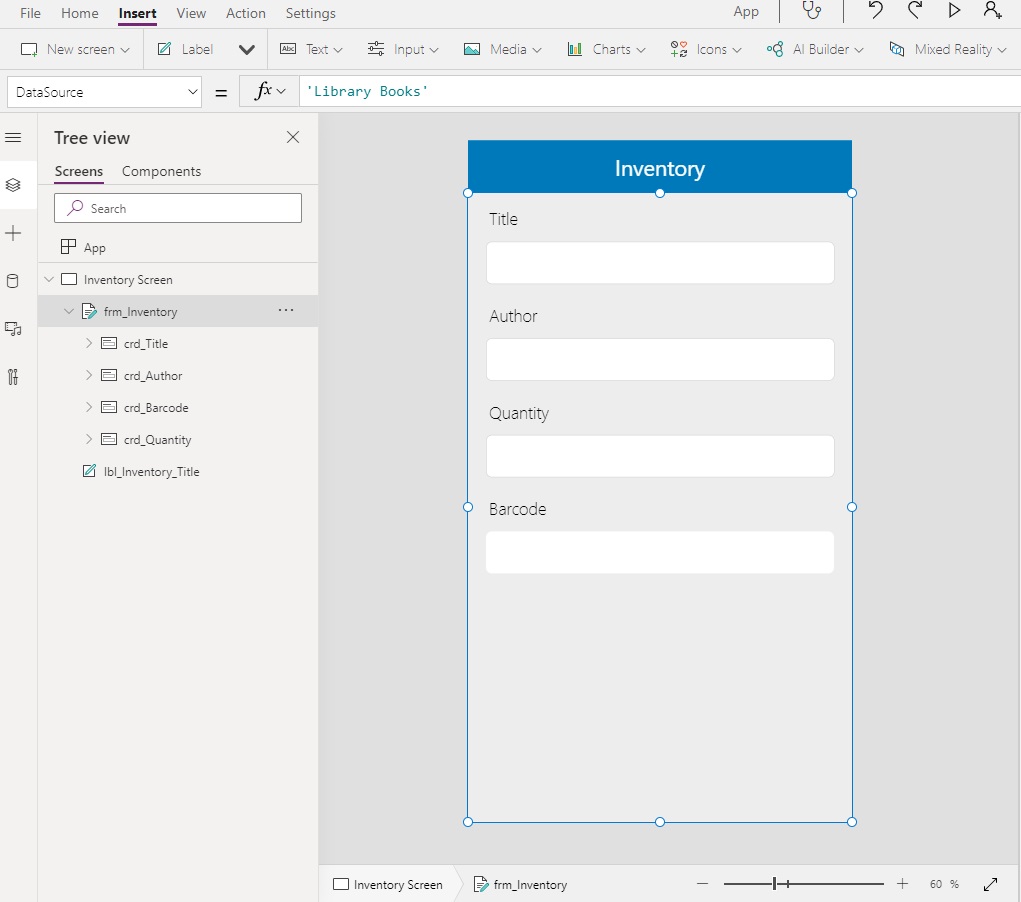
Write this variable name in the Item property of the form. It will hold information about the library book to populate the form. There will be an error message since we haven’t set the variable yet, but that’s OK, it will eventually disappear.
varCurrentRecord
Next, click the Media button on the ribbon and insert a barcode scanner. Then add a camera icon and place it on top of the barcode scanner button.
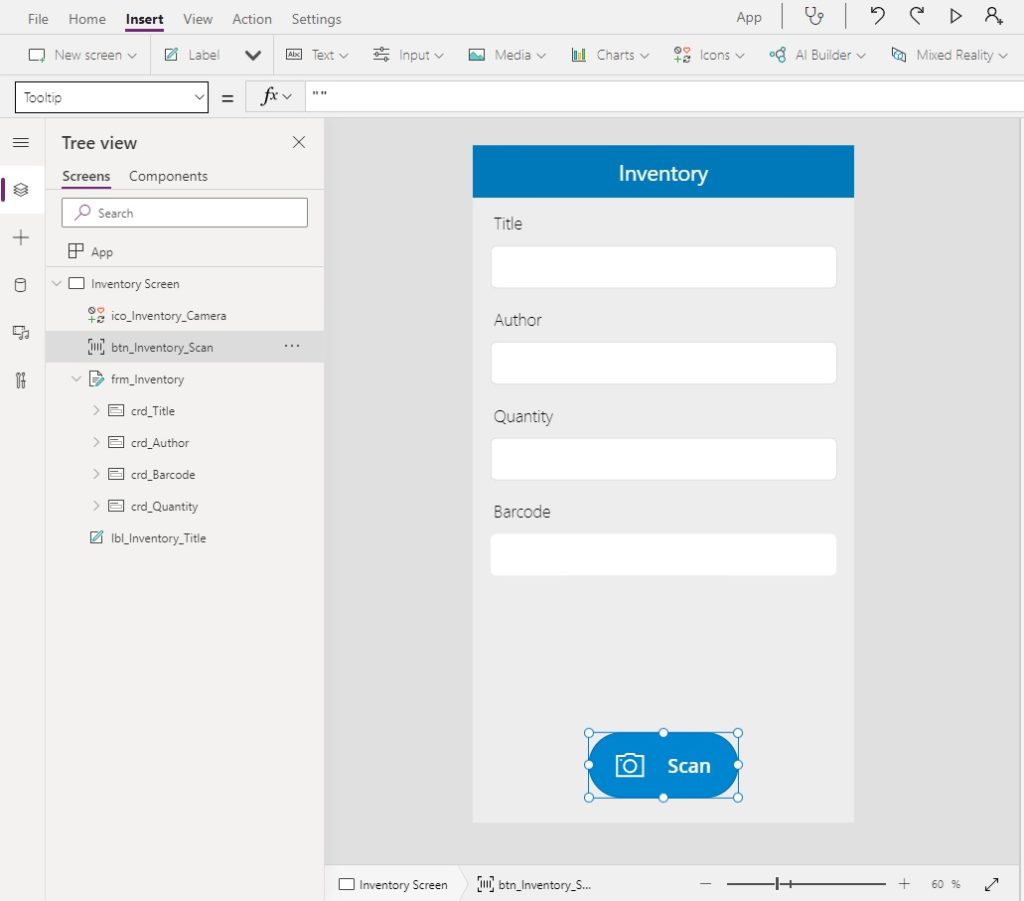
To make the barcode scanner look a little nicer input these values in the following properties.
Align: Right
BorderStyle: None
Color: White
Fill: RGBA(0, 134, 208, 1)
RadiusTopLeft: 180
RadiusTopRight: 180
RadiusBottomLeft: 180
RadiusBottomRight: 180
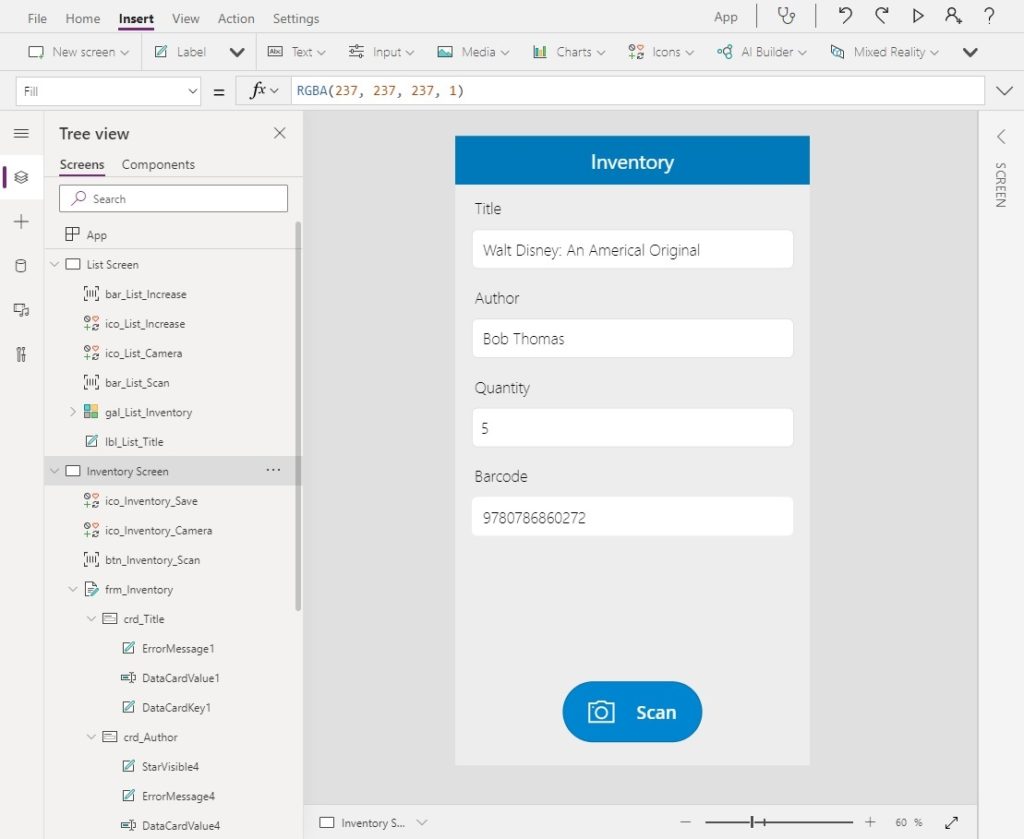
Scan A Barcode
When an employee scans a barcode the Inventory app shows the library book details. Write this code in the OnScan property of the barcode scanner. It performs a lookup for the library book in the SharePoint list and if a book is found it gets displayed in the form. Otherwise, a message will appear at the top of the screen saying “Item not found.”
// store the scanned item in a variable
 Set(
     varCurrentRecord,
     LookUp('Library Books', Barcode=btn_Inventory_Scan.Value)
 );
 // check if scanned item was found
 If(
     IsBlank(varCurrentRecord),
     Notify("Item not found", NotificationType.Error),
     ResetForm(frm_Inventory);
     EditForm(frm_Inventory)
 )
Put this code in the OnSelect property of the camera icon to trigger the barcode scanner it gets pressed.
Select(btn_Inventory_Scan)
Now test the app by scanning a book with the barcode scanner. The book details should show in the form.
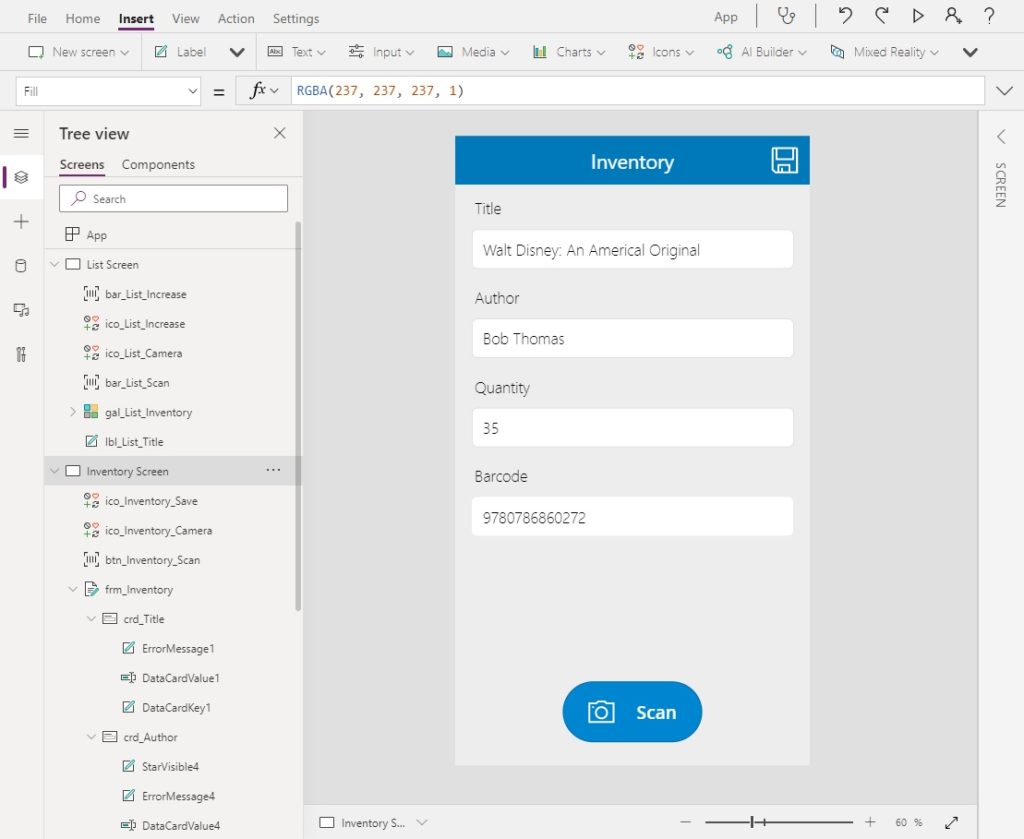
Adjusting Inventory Quantities
Employees can change the inventory stock level after scanning a barcode. To create this functionality, place a save button on the right-side of the titlebar
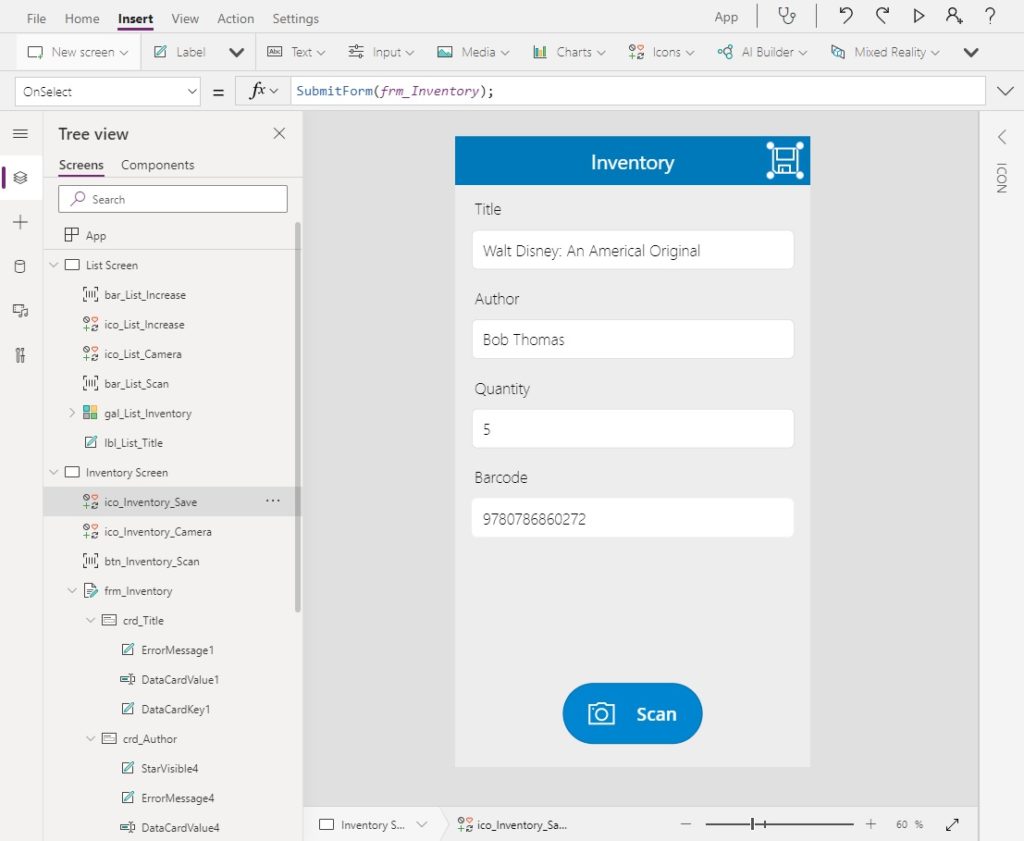
Write this code in the OnSelect property of the Save button to submit the form.
SubmitForm(frm_Inventory);
When the form gets submitted the varCurrentRecord variable must be updated with the new quantity and a notification should display saying the save was successful. Use this code on the OnSuccess property of the form.
Set(
    varCurrentRecord,
    frm_Inventory.LastSubmit
);
Notify(
    varCurrentRecord.Title&" was saved successfully",
    NotificationType.Success
);
Adjust the quantity of a book and press Save. The Library Books SharePoint list will be updated with the new quantity.
Inventory List Screen
Another screen in the app allows employees to see the complete list of inventory. Insert a blank screen called List Screen and a label to the top with the title Inventory List.
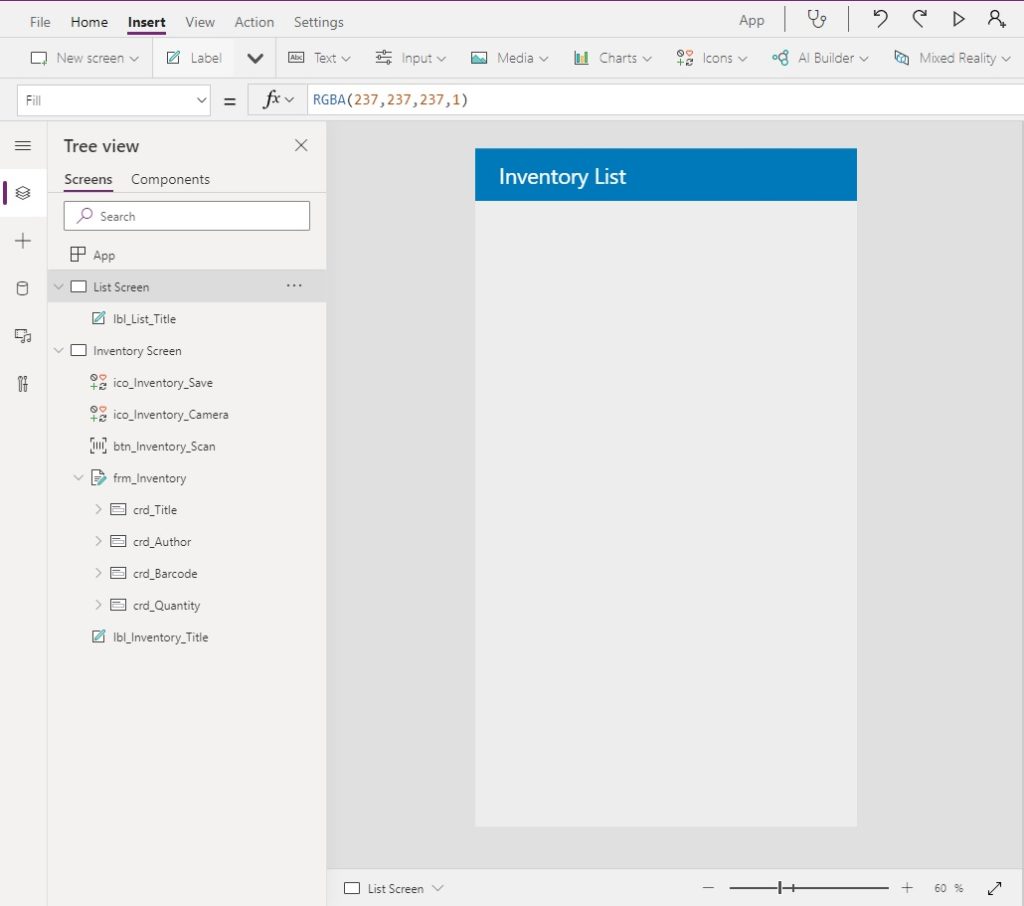
Add a gallery to the screen and connect it to the Library Books SharePoint list.
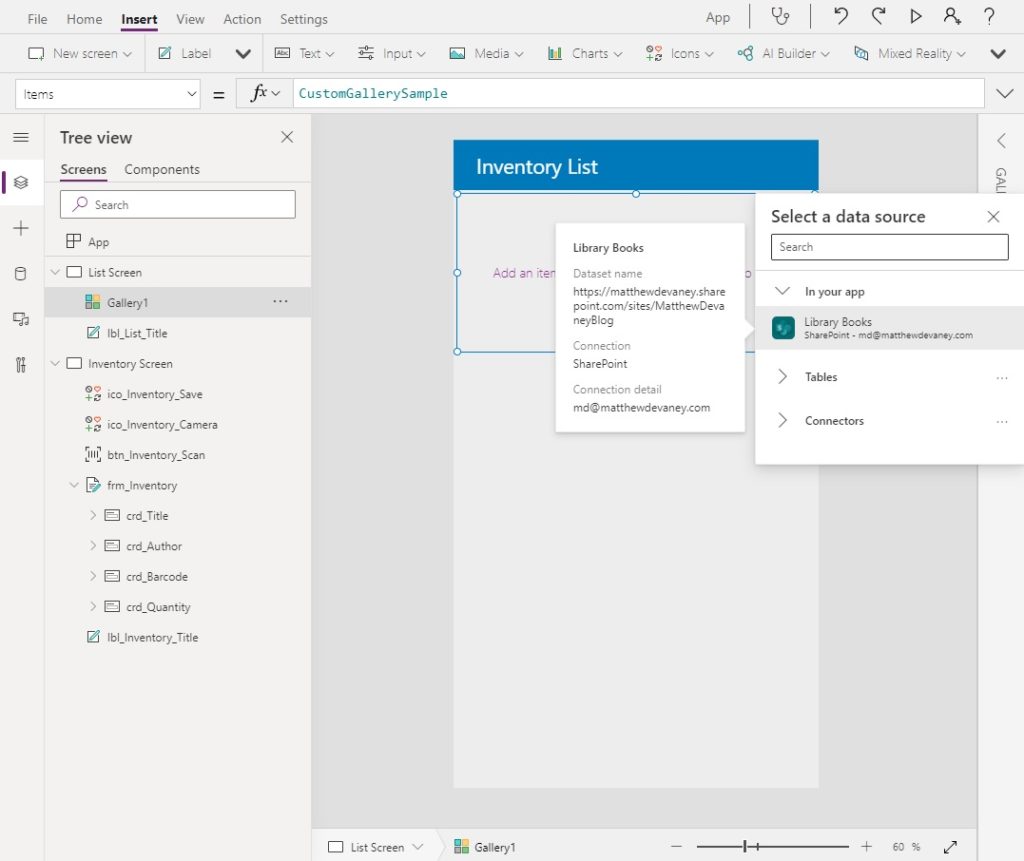
The gallery should show the book title, author barcode and inventory quantity.
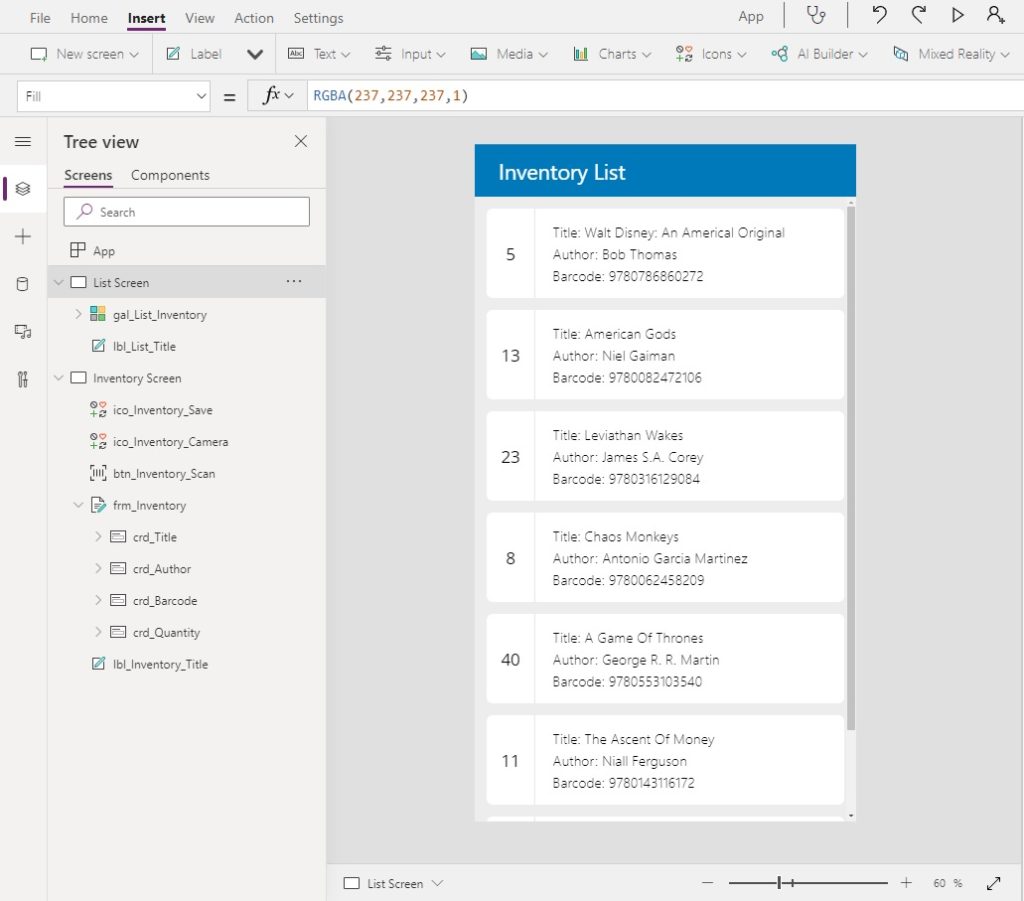
Place a label inside the gallery with this code to show title, author and barcode…
"Title: "&ThisItem.Title&"
 Author: "&ThisItem.BookAuthor&"
 Barcode: "&ThisItem.Barcode
…and another label to show the quantity.
ThisItem.Quantity
When an inventory item is selected the app navigate to the details screen. Use this code in the OnSelect property of the gallery…
Set(
     varCurrentRecord,
     LookUp(
         'Library Books',
         Barcode = ThisItem.Barcode
     )
 );
 EditForm(frm_Inventory);
 Navigate('Inventory Screen');
…and this code in the OnSelect property of the labels.
Select(Parent)
Once an employee scans an item they need a way to get back to the List Screen. Place an Options icon in the top left corner of the Inventory Screen…
…with the following code.
Navigate('List Screen')
Scan A Barcode From The List Screen
The list screen will be the 1st screen the employee sees when they open the app. We will need to add a barcode scanner button to allow them to trigger a scan from the home screen as shown in the image below. You can make the button into a circle shape by changing the border radius just we did on the inventory screen and then making the width equal to height.
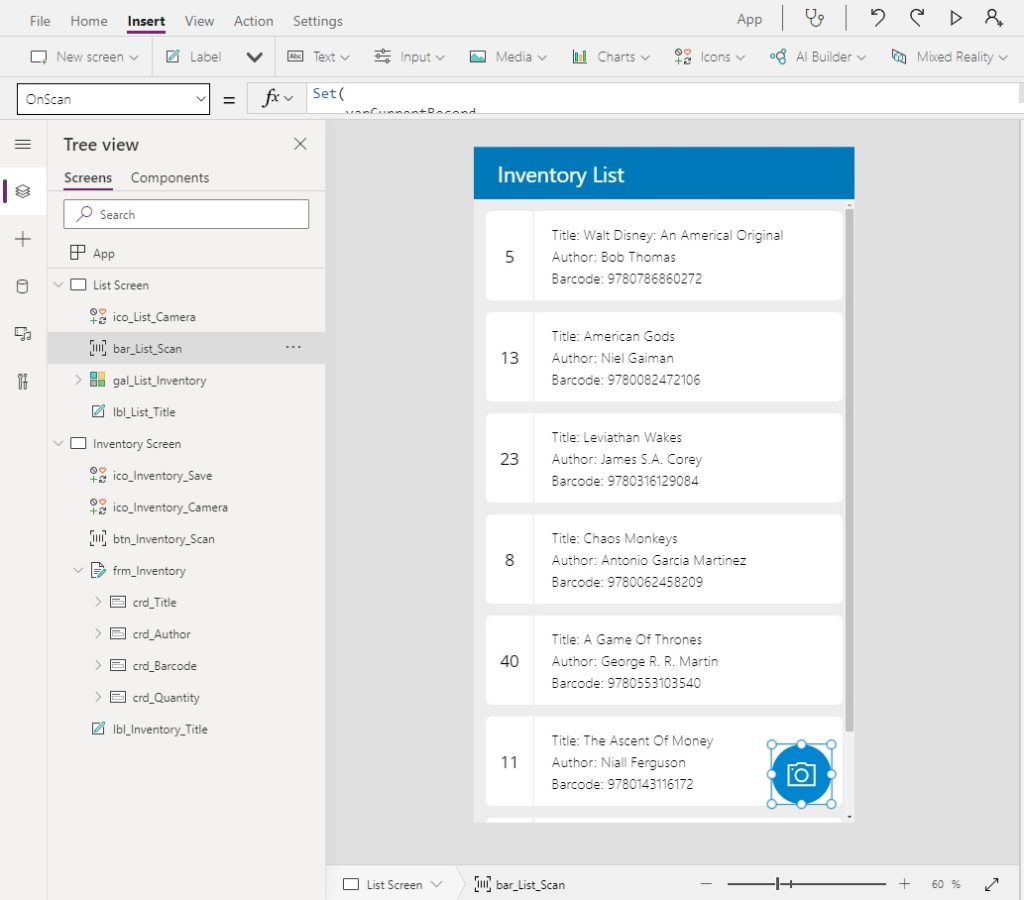
Use this code in the OnScan property of the barcode scanner. It is similar to the code found in the scan button on the Inventory Screen.
// store the scanned item in a variable
Set(
     varCurrentRecord,
     LookUp(
         'Library Books',
         Barcode = bar_List_Scan.Value
     )
 );
// check if scanned item was found
 If(
     IsBlank(varCurrentRecord),
     Notify(
         "Item not found",
         NotificationType.Error
     ),
     EditForm(frm_Inventory);
     Navigate('Inventory Screen');
 )
Then write this code in the OnSelect property of the camera icon. It will start the barcode scanner once pressed.
Select(bar_List_Scan)
Scanning Multiple Barcodes
Employees need the ability to scan several books at once as they are received into inventory and increase their quantity by one. Position an add icon on the top-right corner of the List Screen. Then insert another barcode scanner control and change its Visible property to false.
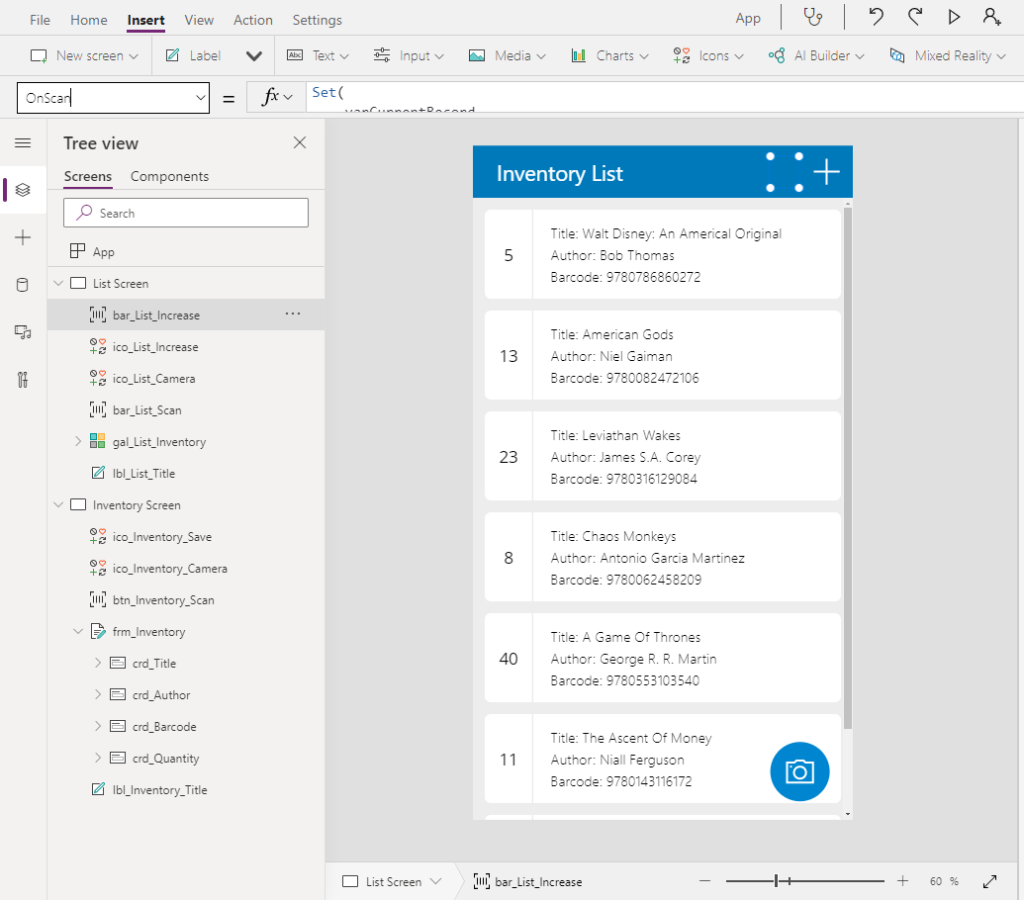
Use this code in the OnScan property of the barcode scanner called bar_List_Increase. When an item is scanned a notification will appear at the top of the screen with the new quantity. The scanner will remain open until the employee presses Cancel at the bottom of the barcode scanner screen.
Set(
    varCurrentRecord,
    LookUp('Library Books', Barcode=bar_List_Increase.Value)
);
If(
    IsBlank(varCurrentRecord),
    Notify("Item not found", NotificationType.Error),
    Set(
        varCurrentRecord,
        Patch(
            'Library Books',
            varCurrentRecord,
            {Quantity: varCurrentRecord.Quantity+1}
        )
     );
     Notify(
        "Increased quantity of "&varCurrentRecord.Title&" by 1.",
        NotificationType.Success
    )
);
Select(bar_List_Increase);
Print Barcodes From A SharePoint List
Would you like to know how to print a barcode from a SharePoint list onto a label? Check out this article called Print Barcodes From A SharePoint List and I’ll show you how to do it!
Did You Enjoy This Article? 😺
Subscribe to get new Power Apps articles sent to your inbox each week for FREE
Questions?
If you have any questions or feedback about Power Apps Barcode Scanner please leave a message in the comments section below. You can post using your email address and are not required to create an account to join the discussion.


Hello,
Is it possible to do the “Scan a Barcode” part not with a sharepoint list but with a Excel file ?
Victor,
Yes it is possible to scan a barcode found in an Excel table and retrieve the data. You can follow the exact same steps in this article and substitute Excel for SharePoint.
Hello,
Finally I use a Sharepoint list and I try to do what is in the “scan a barcode” paragraph but Powerapps displays “Getting your data”. In my SP list I have 5 EAN that I put in as “single line of text” but the application does not return the associated information
Do you have any idea why this does not work ?
Thank you for your help
Hello, thanks for sharing this article. I have a requirement to capture multiple barcodes in one go. I understand, with the help of gallery it is possible to scan multiple barcodes one by one and update the data source. But my requirement is like, when i open my phone camera, it could capture around 20 bar codes one under the other. Is there a way to capture all the barcodes at one time or to capture an image and extract barcodes from the images. Thanks
Lakshiman,
The ability to capture multiple barcodes in one screenshot is is not included in the barcode control. Sorry, I don’t have any advice to offer here. But if you do find some service that can do it try to connect it to Power Apps.
Hello, thank you for your sharing knowledge,
I got little bit issue, when I try to scan another barcode, I got same data with previously. Did I have miss code?
Ahamd,
Are you working on the tutorial in this article? If yes, what code are you using OnScan. Please share it here.
It looks like you’ve put a lot of work into this article. I commend you for your thorough work.
QR,
You’re welcome!
Does the app allow me to add a new book?
Paul,
No, the app is not designed to add a new book. Only to demonstrate scanning functionality. You can modify the app to add a new book if you wish.