7 Power Apps Gallery Conditional Formatting Examples

With conditional formatting, we can use colors and symbols to explain the meaning of values in a Power Apps gallery. For example, we can make positive values the color green to show success. And make negative values the color red to signal a failure. Any type of formatting is possible once you learn to use IF statements. In this article I will show you how to perform conditional formatting in a Power Apps gallery.
Table Of Contents:

Introduction: The Employee Training App
Setup The SharePoint List
Create A New App With A Gallery

Conditional Formatting With Text Criteria Examples
 • Formatting A Single Text Value
 • Formatting Multiple Text Values

Conditional Filtering With Number Criteria Examples
 • Formatting With A Single Number Criteria
 • Formatting With Two Number Criteria
 • Formatting With Many Number Criteria

Conditional Filtering With Gallery Row Colors

Conditional Filtering With Emojis
 • Formatting With Checks And Xs Emojis
 • Formatting With Happy And Sad Face Emojis
Introduction: The Employee Training App
Workers at a construction company use the Employee Training App to take online courses and view their progress. The app uses conditional formatting to make it easy to identify a passing score vs. a failing score.
Setup The SharePoint List
Create a SharePoint list named Employee Training with the following columns:
- Title – default column
- Employee – person type
- Score – number type
- Status – choices type (Not-Started, In-Progress, Passed, Failed)
Add these items to the SharePoint list:
| Title | Employee | Score | Status |
| Safety Training | Matthew Devaney | 70 | Passed |
| I/T Security Exam | Matthew Devaney | 95 | Passed |
| Ethics & Fraud Training | Matthew Devaney | 35 | Failed |
| Job Skills Assessment | Matthew Devaney | 80 | Passed |
| Diversity Training | Matthew Devaney | In-Progress | |
| Forklift Certification | Matthew Devaney | Not Started |
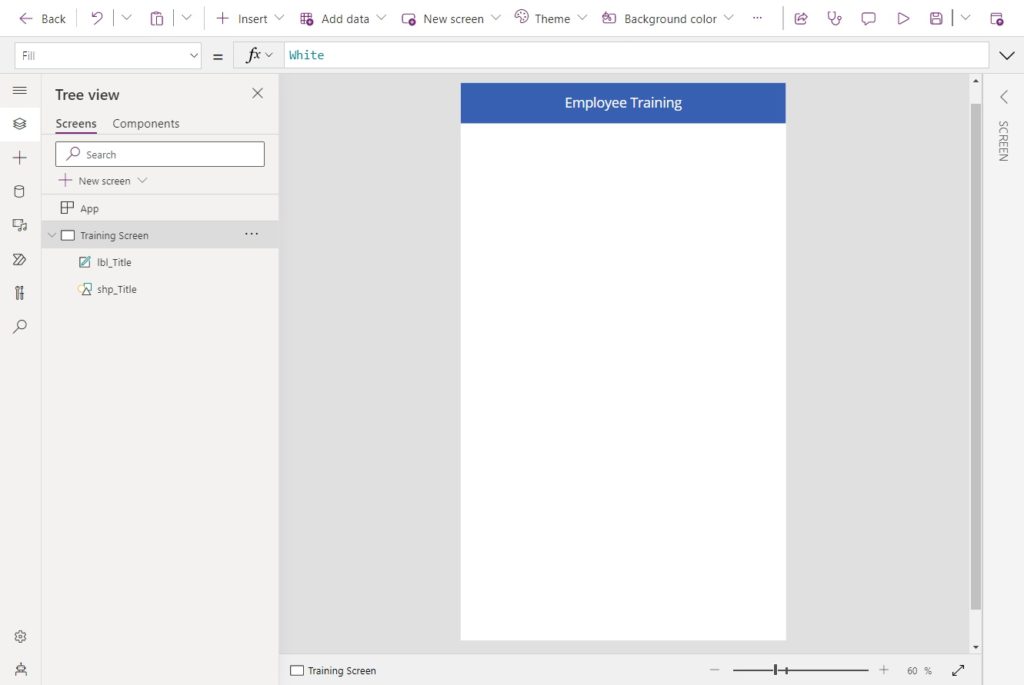
Create A New App With A Gallery
Open Power Apps Studio and create a new phone app from blank. Insert a blue rectangle shape at the top of the screen and place a label with the words “Employee Training” over top of it.
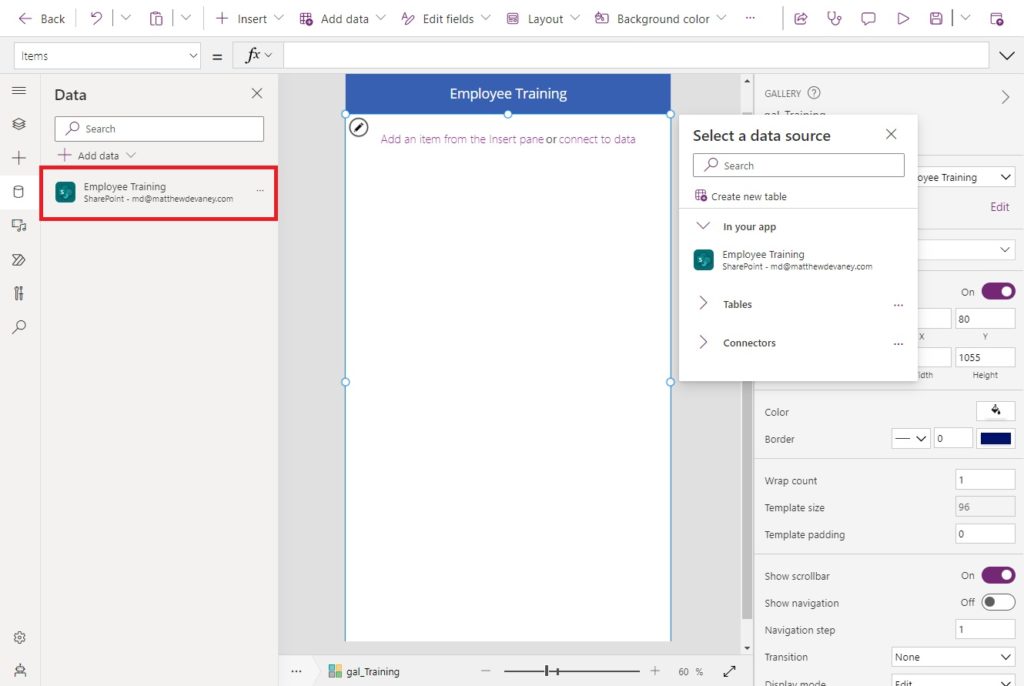
Add a connection to the Employee Training SharePoint list. Then insert a gallery and select the Employee Training SharePoint list as the datasource.
Place two new labels and a button into the gallery to show the Title, Score and the Status of each Employee Training record.

Use this code in the Text property of the controls
ThisItem.Title //lbl_TitleThisItem.Score // lbl_ScoreThisItem.Status.Value //lbl_Status
Conditional Formatting With Text Criteria Examples
The following examples show how to perform conditional formatting using text values in the criteria.
Formatting A Single Text Value
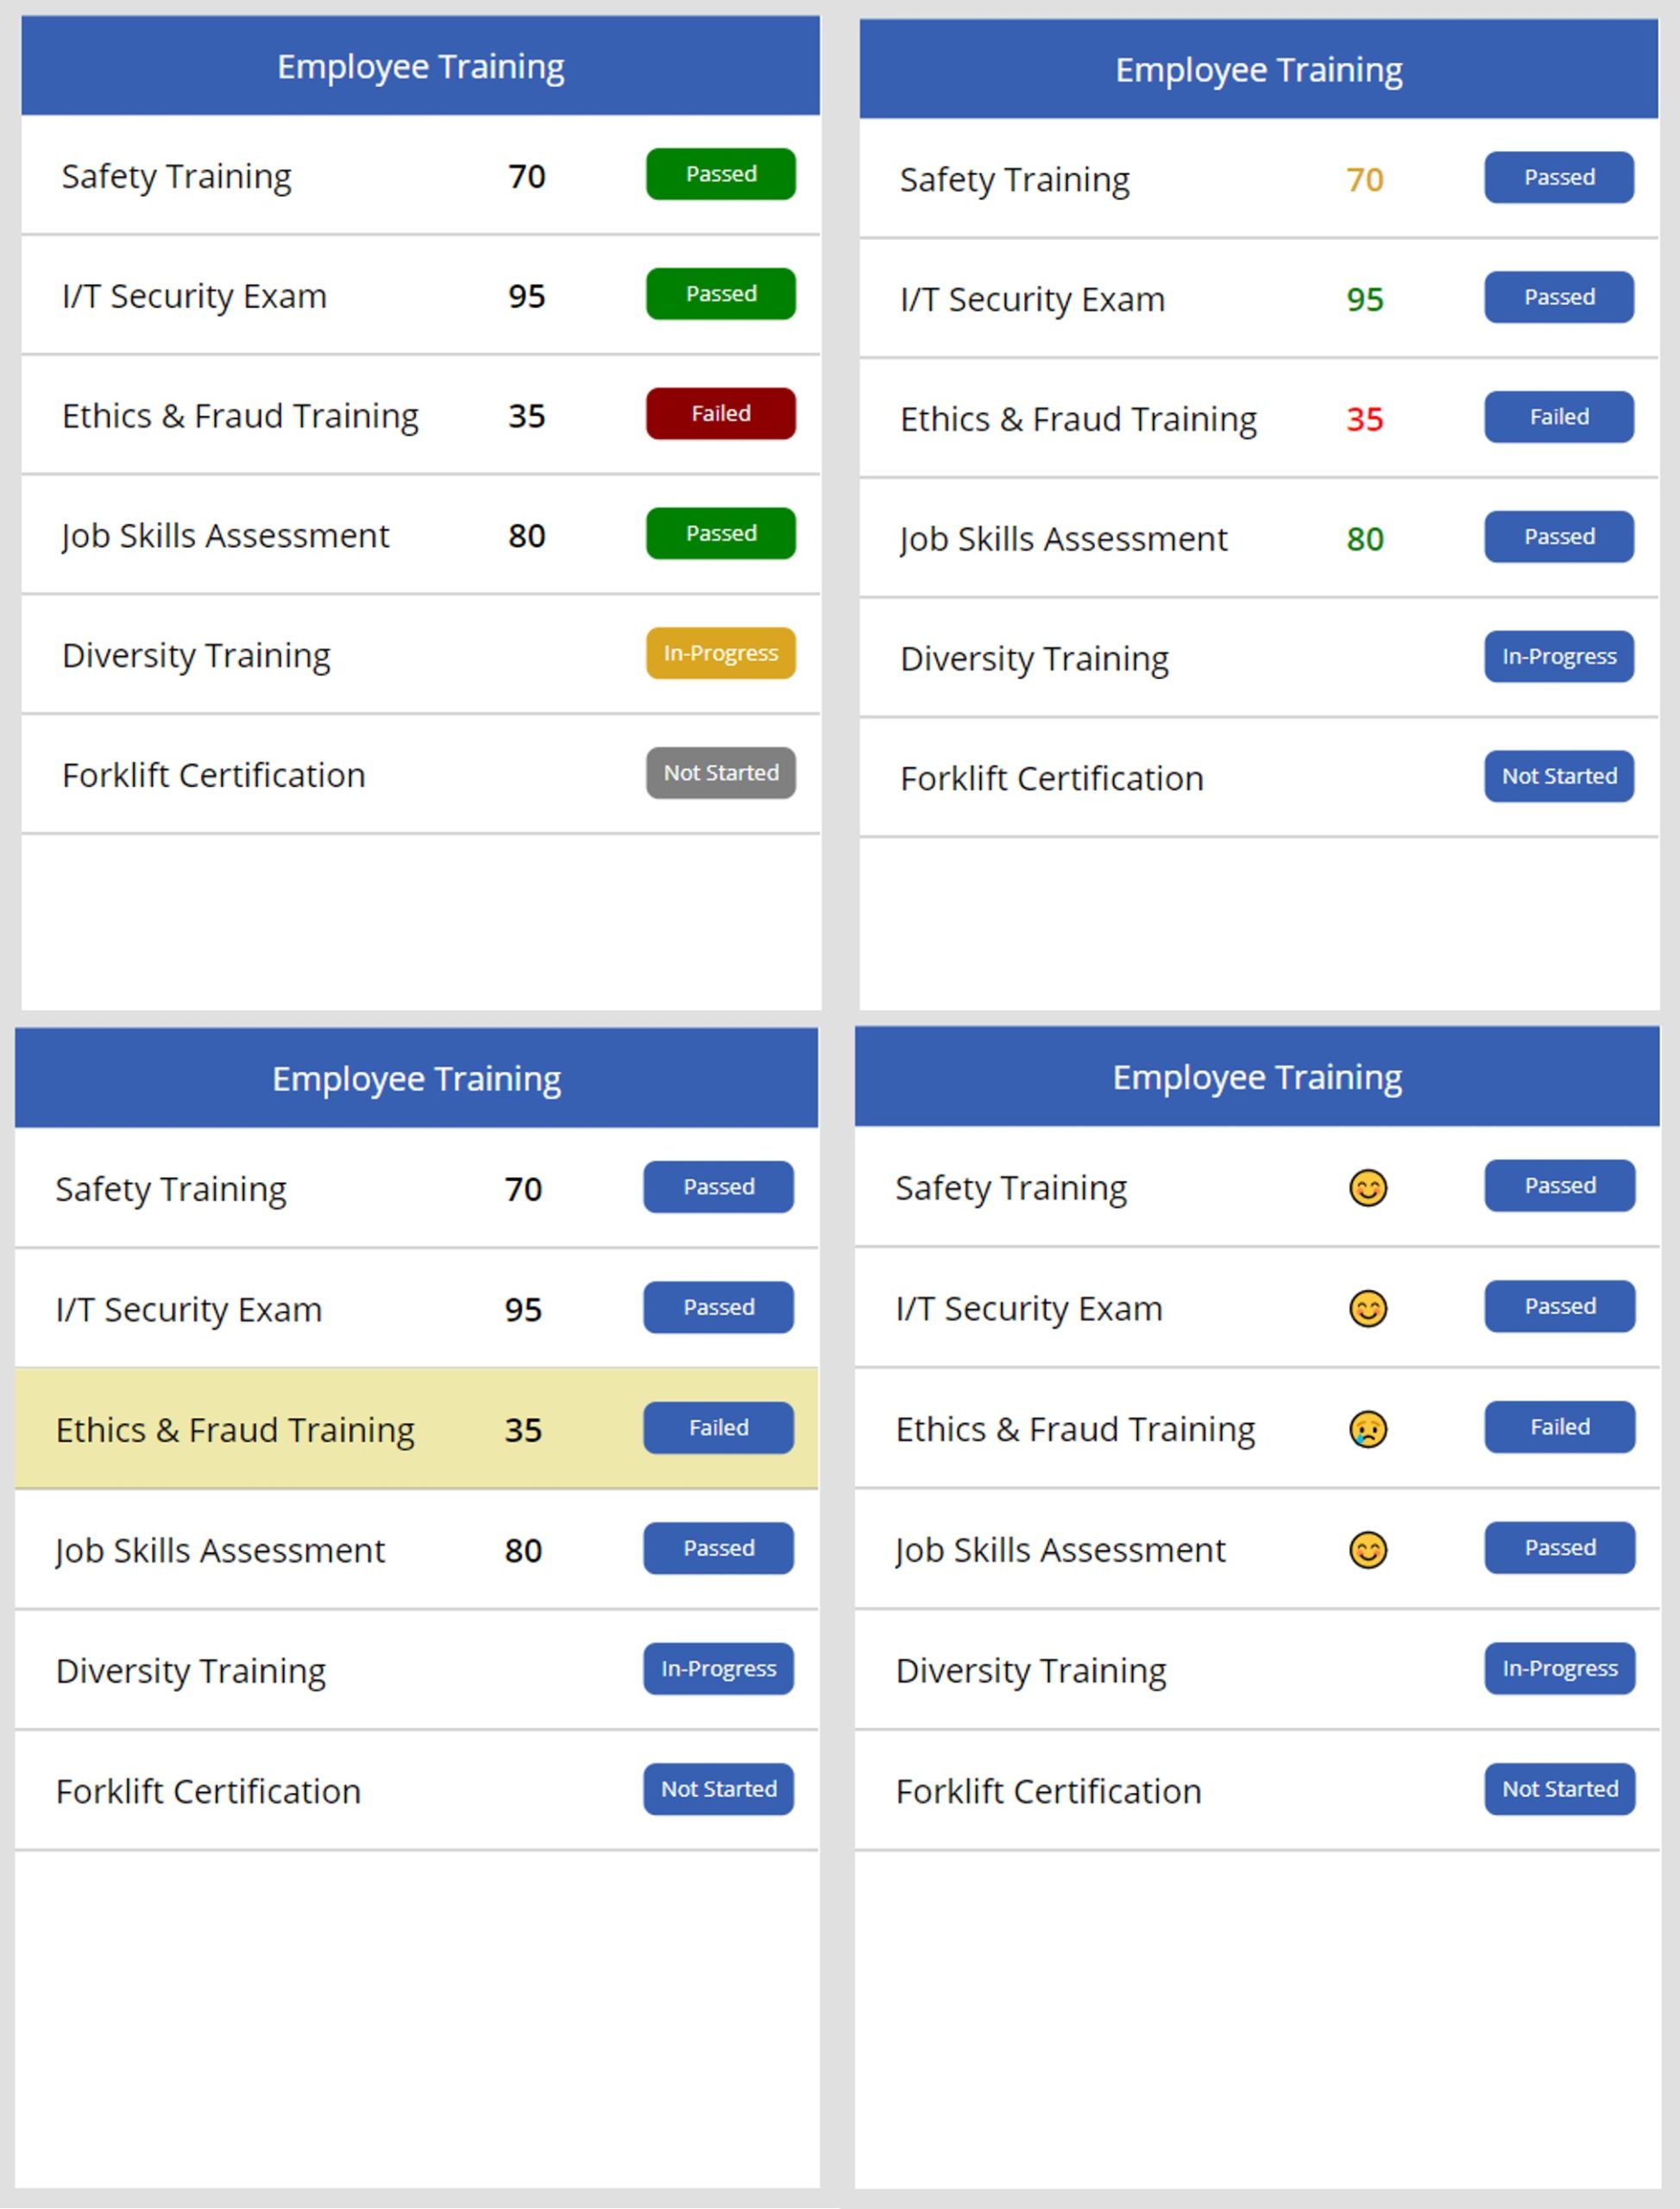
Give the status button a green fill when Status equals “Passed”

Use this code in the Fill property of the btn_Status.
If(ThisItem.Status.Value="Passed", Green, RGBA(56, 96, 178, 1))
Formatting Multiple Text Values
Make the status button green when Status equals Passed, red when Status equals Failed, yellow when Status equals In-Progress and gray when Status equals Not Started.

Use this code in the Fill property of the btn_Status.
If(
    ThisItem.Status.Value="Passed",
    Green,
    ThisItem.Status.Value="Failed",
    DarkRed,
    ThisItem.Status.Value="In-Progress",
    GoldenRod,
    ThisItem.Status.Value="Not Started",
    Gray
)
Conditional Filtering With Number Criteria Examples
The following examples show how to perform conditional formatting using number values as the criteria.
Formatting With A Single Number Criteria
Color any training scores less than 50 red.

Use this code in the Color property of lbl_Scores.
If(ThisItem.Score < 50, Red, Black)
Formatting With Two Number Criteria
Show any training scores greater than or equal to 50 as green and any numbers less than 50 red.

Use this code in the Color property of lbl_Score.
If(ThisItem.Score >= 50, Green, Red)
Formatting With Many Number Criteria
Make the score text green when Status is greater than or equal to 80, yellow when the Score is equal or greater than 50 or red when the Score is less than 50.

Use this code in the Color property of lbl_Score.
If(
    ThisItem.Score >= 80,
    Green, ThisItem.Score >= 50,
    GoldenRod, Red
)
Conditional Filtering With Gallery Row Colors
Highlight a gallery row with the color yellow when a Score is less than 50.

Use this code in the TemplateFill property of the Gallery.
If(ThisItem.Status.Value="Failed", PaleGoldenRod, Transparent)
Conditional Filtering With Emojis
The following examples show how to do conditional formatting using Emojis.
Formatting With Checks And Xs Emojis
When a Score is greater than or equal to 50 show a ✅ emoji and display a ❌ when a Score is less than 50.

Use this code in the Text property of lbl_Score. To access the emoji menu in Windows press the hotkey combination [Windows Key] [Period].
If(
    ThisItem.Status.Value = "Passed",
    "✅",
    ThisItem.Status.Value = "Failed",
    "❌"
)
Formatting With Happy And Sad Face Emojis
Display a 😊 emoji when a Score is greater than or equal to 50 and show a 😢 when a Score is less than 50.

Use this code in the Text property of lbl_Score. To access the emoji menu in Windows press the hotkey combination [Windows Key] [Period].
If(
    ThisItem.Status.Value = "Passed",
    "😊",
    ThisItem.Status.Value = "Failed",
    "😢"
)
Did You Enjoy This Article? 😺
Subscribe to get new Power Apps articles sent to your inbox each week for FREE
Questions?
If you have any questions about 7 Power Apps Gallery Conditional Formatting Examples please leave a message in the comments section below. You can post using your email address and are not required to create an account to join the discussion.


Hi Matthew – just wanted to say that I really enjoy your posts, please keep them coming! Also, I’m curious why you didn’t use the Switch function for Formatting Multiple Text Values section instead of your nested if/then statement, ie:
Switch(
ThisItem.Status.Value,
“Passed”, Green,
“Failed”, DarkRed,
“In-Progress”, GoldenRod,
“Not Started”, Gray
)
I know that the switch function is limited, but in this case, it seems perfect. Am I missing something?
Jonathan,
Your suggestion to use the SWITCH function is a perfect use-case for it. I was going to use SWITCH here but decided on IF instead. My goal is to introduce as few concepts as possible to make the core lesson easier to learn. That being said, I’d probably use SWITCH in my own code.
Good call out 🙂
Still waiting for the day powerapps adds a “template hover fill” value. There is only so much you can to with a button element for an overlay.
Cam,
I think you could do that already if you place a transparent label or button on top of the gallery row with a little bit of cover.
Hi Matthew, great post !!!
I just have a question. It is possible to filter the gallery with a comboBox “by color”, the green ones, the red ones, etc ???
I know that the obvious answer is, filter by “status column” but, it is possible filter by color of the button ??
Richard,
Yes you can filter on colors:
Filter(colData, Color=Color.Green)